These are my personal notes on installing, setting up, and using OpenBSD on two Thinkpads (an X220 and a T400). They’re applicable to OpenBSD-current as at 2020-09-05 (somewhere between OpenBSD versions 6.7 and 6.8) - please bear in mind that some things may have changed if you’re using a different version.
Important: You should always refer to the official OpenBSD FAQ, manual pages, or possibly a good book like Absolute OpenBSD rather than relying solely on information here or elsewhere on the web. I’m providing these notes in the hope that they can usefully supplement those resources, and I’ve tried to provide links back to those resources throughout.
Installation and full disk encryption
To install OpenBSD, you should follow the Installation Guide in the OpenBSD FAQ. Below are just some notes to complement that guide.
Pay attention to the section on verifying the downloaded image before you install. From an existing OpenBSD system, it should be something like this:
$ signify -Cx SHA256.sig install68.imgSignature Verified
install68.img: OK
If possible, perform the installation using a wired ethernet connection even if you plan to use wifi, since (depending on your interface) the installer may need to download firmware before it can use the wifi hardware.
When you reach the installer’s initial "Welcome" message, instead of proceeding with the install, choose 'S' for (S)hell, and then follow the Full Disk Encryption instructions to encrypt the entire disk with a passphrase you’ll need to enter to boot the system.
Wifi configuration
Run ifconfig(8) to identify the name of your wireless interface. We’ll assume it’s iwn0. To scan for available wifi networks:
# ifconfig iwn0 up
# ifconfig iwn0 scan
Create the file /etc/hostname.iwn0 (see hostname.if(5) for more details) as follows, to connect to the network automatically on boot:
nwid "Your SSID" wpakey "Your WPA key"
dhcp
The nwid can either be an ASCII string as above, or a hexadecimal number prefixed with 0x—this is useful if the SSID contains something non-ASCII (such as emoji 😎):
nwid 0xf09f988e636f6f6c wpakey "Emoji SSIDs are cool"
dhcp
If you would like your system to choose from a list of networks, you can build a "joinlist" in /etc/hostname.iwn0 instead (you can’t mix and match nwid and join in one file):
join "Your SSID" wpakey "Your WPA key"
join "Your other SSID" wpakey "The other WPA key"
join 0xf09f988e636f6f6c wpakey "Emoji SSIDs are cool"
dhcp
After setting up your hostname.iwn0, connect to the network:
# sh /etc/netstart
X11 configuration
When you log into an X session with xenodm(1) on a fresh install of OpenBSD, the file /etc/X11/xenodm/Xsession is responsible for setting up your session. Towards the end of that file, it runs $HOME/.xsession if that file exists and is non-empty; otherwise, it just runs xterm(1) and fvwm(1) - that’s what you see when you log into a fresh install.
To customise your X session, create the file .xsession in your home directory. It is normally a shell script, and your X session will end when it finishes running. So, to have multiple programs run at startup, make sure that all commands except the last one either complete quickly or are run 'asynchronously' (i.e. run with an "&" after the command). For example, here is how you’d recreate the default behaviour described above in your own .xsession:
xterm &
fvwm
The xterm stays running, but control immediately passes on to the next line. When fvwm quits, you will be logged out.
That’s a pretty minimal .xsession—what else might you add to it? Here are a couple of ideas from my .xsession:
Making the caps-lock key into something more useful
If you don’t use the caps-lock key, you can use setxkbmap(1) to remap it to a key you use more often, such as escape or control (I learned about this from Cullum Smith’s excellent OpenBSD on a laptop guide). To remap caps-lock as an extra control key:
setxkbmap -option ctrl:nocaps
Or to remap it as an extra escape key:
setxkbmap -option caps:escape
The full list of different ways you can remap keys can be found under /usr/X11R6/share/X11/xkb - see e.g. /usr/X11R6/share/X11/xkb/rules/base.
Setting a nice background
You can change the background/wallpaper (“root window”) to a solid colour, or a variety of simple two-colour patterns, using xsetroot(1). Colours can either be names like BlanchedAlmond or purple4 (see /usr/X11R6/share/X11/rgb.txt for the full list of names), or they can be hexadecimal colour references like "#2a1e2f". For example, to set a solid black background:
xsetroot -solid black
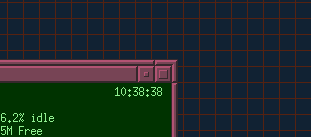
My favourite setting uses the -mod option to create a grid with two colours:
To customise what X looks like before you log in—on the login screen—you can modify the file /etc/X11/xenodm/Xsetup_0.
As I write this, the unmodified file contains an xsetroot(1) line to set a gentler version of the standard X "root weave" background. You can modify this line as described above—in fact, if you don’t set the background after logging in (e.g. in your .xsession), then the one set by xenodm(1) will persist. Personally, I set my xenodm(1) background to a slight colour-variation of my .xsession one above:
OpenBSD’s default window manager is fvwm(1), the Feline (or is it?) Virtual Window Manager. OpenBSD comes with fvwm version 2.2.5, while (at the time of writing) fvwm 2.6.5 is available as a package (named fvwm2). This newer version does have some nice features, but for the purpose of these notes we are sticking to the default install as much as possible, so what follows is specific to OpenBSD’s default fvwm 2.2.5.
On a fresh install, the file /usr/X11R6/lib/X11/fvwm/.fvwmrc controls fvwm’s configuration. If you wish to customise the configuration using that file as a starting point, you can place a copy of the file at $HOME/.fvwmrc - fvwm will then read your version instead.
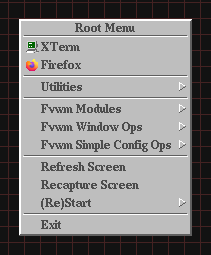
Adding launchers to the root (left click) menu
In your new $HOME/.fvwmrc, find the "Menus" section. Under the 'AddToMenu RootMenu...' line, you should see the current menu items. Let’s add a launcher for Firefox, right underneath the existing XTerm line:
Modify the label of the menu item we just made above to include the name of the new XPM file, enclosed in '%' signs:
+ "Firefox%firefox.xpm%" Exec exec firefox
Making windows sticky
I like to use GKrellM as a system monitor, and I want to have it present on every virtual desktop (i.e. I want it to be 'sticky' in window manager parlance). To do this in your .fvwmrc, go to the "Styles for various common programs" section and add a line like the following:
Style "gkrellm" Sticky
Stopping the pager (virtual desktop mini-view) from staying on top
The Fvwm pager (the miniature view of your virtual desktops) is configured by default with the StaysOnTop style option. This can be annoying if you frequently maximise windows (though note that you can temporarily lower any window, even a StaysOnTop one, by double-clicking on its window-frame). To set the pager to normal ('StaysPut') behaviour, find this line in your .fvwmrc and comment it out:
Classical X applications like xterm(1) can be configured by setting “resources” (see the “RESOURCES” chapter in X(7) for details). The usual place to write your personal X resources is in $HOME/.Xdefaults (see Loading the Resource Database in the X Toolkit Intrinsics documentation for more on where resources can be specified). This file is read on each application launch (no need to restart your X session).
Setting xterm colours
The foreground and background colours of the terminal can be set by putting the following resources in your $HOME/.Xdefaults:
Note that the colour names you can use are the same as I described above in "setting a nice background", including hex colour references.
Customising text selection behaviour
By default, double-clicking on text in xterm selects a whole word, and triple-clicking selects a whole line. You can customise this behaviour—you can even have xterm select text that matches an arbitrary regular expression!
I find that I often want to select contiguous strings like URIs or IP addresses, whereas xterm’s concept of a "word" doesn’t include the "." character. (I think the default text selection behaviour in a terminal emulator I used to use—maybe GNOME Terminal—must have been closer to what I’m expecting.) I use the following selection behaviour:
Clicks
Behaviour
2
select word
3
select URL-like or IP-address-like strings
4
select contiguous non-space characters
5
select line
This can be specified in your $HOME/.Xdefaults (see above) as follows:
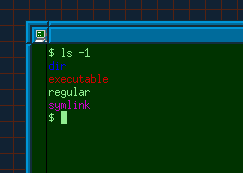
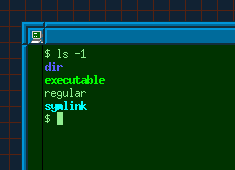
Getting (and customising) colour output from ls(1)
OpenBSD's ls(1) does not offer colour output for distinguishing different file types. However, a modified version with support for colour output is available as a package called colorls, which provides a separate colorls command.
To make colorls run when you type ls, you can make an alias. Aliases can be defined in ~/.kshrc:
alias ls=colorls
For that to take effect, ksh(1) must be configured to read ~/.kshrc—you can do this by adding a line to your ~/.profile defining the ENV parameter (I learned this from Cullum Smith's OpenBSD on a Laptop):
export ENV=$HOME/.kshrc
At this point, typing ls should run /usr/local/bin/colorls, but it will still behave like /bin/ls by default—i.e. it will not produce colour output! Instead, colorls supports a new -G flag, and checks whether CLICOLOR is defined in the environment—either of these enables colour output. To make colour output the default, you can define the CLICOLOR environment variable in ~/.profile:
export CLICOLOR=
Customising the colours
If you'd like to change the default ls colours, you can set the LSCOLORS environment variable to a string specifying which of the sixteen standard ANSI colours to use for each file type. The colorls man page explains how to construct this string (see the ENVIRONMENT section), but here is the version I use, based on the defaults but modified to be closer to the GNU ls defaults I'm used to (you can add this to ~/.profile):