Devlog
Disclaimer
I am not in any way an RE guru, I'm a software developer just like everybody else, but after learning about the "SNESticle" string on the Fight Night Round 2 ISO, I couldn't stop thinking about it and eventually decided that something had to be done about it.
The purpose of this page is to document what I have done (including some dead ends that didn't make it into the final release), for myself, and for others who might be interested in the more technical aspects of this hack and SNESticle itself. It's definitely not a tutorial on GC hacking, but if you happen to learn something, fine by me! And if you feel that I went about something in an exceptionally stupid way, please let me know because I would love to get better at this.
In this document I will be referring to Fight Night Round 2 as just Fight Night, and Super Punch-Out!! as just Super Punch-Out.
Tools
For disassembling (and decompiling) I used Ghidra, an open source RE tool by the NSA, and let me just put it out there right away: the NSA is not my favourite organisation in the world, but Ghidra is an impressive piece of software. I also think there's something inherently funny about RE-ing old video games using software provided by a morally corrupt government agency.
I only really used Ghidra to browse and comment the code a bit. For testing patches I used hexcurse. It's a perfectly reasonable hex editor with a really dull UI. Why aren't there any cool terminal-based hex editors?
Dolphin was of course invaluable for testing and debugging. It's really quite excellent.
VBinDiff came in handy for comparing binary files.
For writing PPC code I used disasm.pro, a rather awesome online tool that can assemble as well as disassemble PPC code with absolutely no context or boilerplate needed.
For real hardware testing I used Datel's SD Media Launcher and Swiss.
For SNES development I used the ca65 assembler (part of cc65) and NovaSquirrel's Mesen-SX fork of Mesen-S. Mesen-S(X) is a .NET application and it runs just as I expected on my Debian workstation: absolutely horribly. The GUI is sluggish and glitchy, and it crashes frequently, but the emulation itself is fine and the debugging tools are just so awesome it's still somehow worth it in the end.
First step towards wars
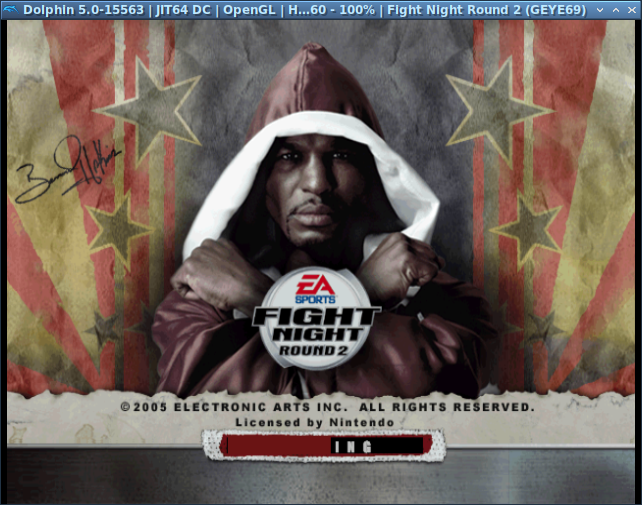
The first thing I wanted to do was to see if I could find the Super Punch-Out
ROM on the Fight Night ISO and then try to replace it with something else. My
main worry was that it might be encrypted, or there could be checksum checks in
place to prevent tampering. Thankfully there was nothing of the sorts and
Dolphin made this first step really simple. It is able to extract all of the DVD
contents into a directory, and can even run the game directly from the extracted
files, making for super quick patch+test cycles. Conveniently enough, Super
Punch-Out is located right in the root directory of the ISO in a file called
sns4q0.471. SNS was used in the model numbers for the SNES and its games, and
4Q is the game code for Super Punch Out specifically. It looks like a
bog-standard SFC file, and let's be real, they probably just downladed it from
the internet, because why not. (Some people have pointed out that it looks like
a file that would have come from Nintendo. I wouldn't put it past Nintendo to
have just downloaded it in the first place though.)
I replaced the file with a Zelda 3 ROM, booted up Fight Night, navigated to Super Punch-Out in the menus, took a deep breath...

...and rejoiced as the triforce polygons appeared on screen!
As exciting as this was, it also made me question the entire project. If it's this easy, why are there no records of other people doing this? Am I really the only one who still cares about SNESticle? (I mean, it's only been like, what, 24 years since we expected it to come out!) Still, since I couldn't find anything relevant online I decided to push on.
Playing Zelda 3 on SNESticle immediately revealed an interesting quirk with the joypad emulation. The lamp didn't work. Pressing Y on the Gamecube controller instead brought up the save menu, as Select would do on the SNES. And yet, in Super Punch-Out, the Y button seemed to work like you would expect. More on this in the joypad section further down.
Getting rid of Fight Night
Replacing the SNES ROM is cool and all, but playing it involves waiting for Fight Night to load, and then going through the menus and selecting Super Punch-Out. It's also a 1.5 GB ISO, not really an acceptable size for a SNES emulator and a single ROM. Clearly, Fight Night had to go.
Game code is typically located in a section of the DVD that is not part of the
file system but still referred to as main.dol. It is of course possible for
games to load executable code from other files, but in many cases, the code
itself is such a small part of a game that it all easily fits in main.dol. This
looks to be the case with Fight Night, and indeed, SNESticle itself is also
baked into main.dol.
The really cool thing to do would be to disassemble main.dol entirely, locate SNESticle and then build a new dol file containing just SNESticle. I decided, at least as a first milestone, I would go for a simpler hack, just patch main.dol to jump into SNESticle as soon as possible after the game is booted, and then remove as many Fight Night assets as possible from the ISO to bring the size down. Then main.dol would still contain all the Fight Night code, but it's only 5 MB in total which I think is quite acceptable.
Finding the SNESticle entry point
To be able to jump into SNESticle, the first thing we need to know is its entry point. This is relatively easy to figure out using Dolphin. Just launch Super Punch-Out and pause the emulator. Dolphin very helpfully displays the function call stack leading up to the current execution state.
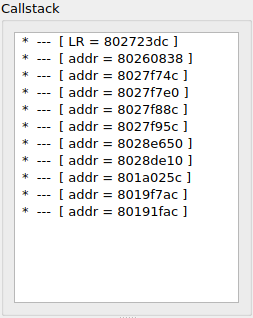
By placing breakpoints at the beginning of each of these functions and then resuming emulation we can see which functions get called again and which ones do not. The ones that do get called over and over are obviously used by SNESticle and though they could be of interest later on, they can't be used as entry points. The innermost function that does not get called again must be the one that contains the main SNESticle loop. That turns out to be the function containing 0x8028de10 (which begins at 0x8028dd3c), and this looked like a promising entry point. Poking around in it in Ghidra, I also noticed that one of the functions it calls before going into the emulation loop has a hard-coded reference to the string "sns4q0.471" (the name of the ROM file), so that would almost certainly have to be the function that loads the ROM file into memory.
Booting into SNESticle
Although knowing where SNESticle lives is a good start, it's still not obvious exactly how to go about shortcutting into it. There may be initialisation functions that need to run first, and the registers need to be in the correct state when the jump is made. Really this was mostly figured out through trial and error. My initial attempts, using Dolphin to just set the PC to what looked like reasonable entry points into SNESticle were not promising. I decided to try a different approach and patch the Fight Night menu system to automatically load SNESticle without user interaction. By debugging the functions that execute just prior to SNESticle I could see that writing a 4 to 0x804ccc38 would trigger SNESticle as soon as the game got past the loading screen.
if (DAT_804ccc38 == 4) {
  puVar1 = &DAT_804d0000;
  DAT_804ccc38 = 0;
  DAT_804ccc20 = 0;
  uVar13 = extraout_f1_03;
  puVar3 = FUN_80171a74(extraout_f1_03,param_2,param_3,param_4,param_5,param_6,param_7,param_8,
                        uVar9,uVar10,(int)param_11,param_12,param_13,param_14,&DAT_804d0000,
                        param_16);
  uVar13 = FUN_801735e8(uVar13,param_2,param_3,param_4,param_5,param_6,param_7,param_8,(int)puVar3
                        ,uVar10,(int)param_11,param_12,(byte *)param_13,param_14,puVar1,param_16);
  snesticle_FUN_8028dd3c
            (extraout_f1_04,param_2,param_3,param_4,param_5,param_6,param_7,param_8,
             (int)((ulonglong)uVar13 >> 0x20),(int)uVar13,(int)param_11,param_12,param_13,param_14
             ,puVar1,(int)param_16);
}
This was easy enough to patch, and that removed the hassle of having to go through the Fight Night menus to launch SNESticle, now I just needed to bypass the asset loading, and ideally hide the loading screen entirely. Sadly, this proved difficult.
I mapped out the tree of function calls (to an arbitrary but reasonable depth) from the main function all the way up to SNESticle, and patched out every function that seemed to affect the progress bar, the idea being that I wanted to cause minimal disruption to the intended control flow of Fight Night. It actually sort of worked. The loading screen showed up, and disappeared almost immediately, and then SNESticle started. But it seemed unpredictable, Dolphin would complain about null pointer references and occasionally just crash. Unsurprisingly, it did not work on a real Gamecube. I'm sure this method could have worked with some more care put into it, but it was also unsatisfactory in that the loading screen showed up at all (however briefly). I figured I could probably locate the image on the ISO and replace it with a custom SNESticle logo, but seeing as I also had the other problems, I went back to my original approach of jumping directly into SNESticle.
This time, choosing my SNESticle entry point a little more carefully (for the record, I finally went with 0x801a0254, which is located just a few instructions before the call to the main SNESticle function (jumping closer to (or directly into) SNESticle worked fine in Dolphin but not on real hardware)), and being slightly more systematic about searching for a point to jump from, I finally made some progress. I noticed that jumping into SNESticle during the loading screen was possible, but the result was that the loading continued in the background and SNESticle ran at about half speed. Clearly the jump would have to be made before loading even began. I already knew that the SNES ROM was loaded separately by SNESticle so at least that would not be affected by skipping the loading screen. After many dead ends I finally found a point (0x800ecadc), just before the loading screen where I could reliably jump into SNESticle. It caused a couple of null references, but they could be patched out seemingly without adverse effects.
Since the game has not even begun its asset loading at this point, it was now safe to remove every single file from the ISO file system, save for the SNES ROM and the banner file. Again, the fact that Dolphin can run the game from a directory rather than an ISO file is super-helpful when it comes to testing changes to the DVD filesystem.
Fixing the joypad
As already mentioned, the joypad emulation was strange. The Gamecube Y button seemed to double as Y and Select on the SNES, and Z on the Gamecube would normally exit SNESticle and go back into Fight Night, but now, with Fight Night mostly gone, it only really served to crash the game. Not cool!
Also, the mapping of buttons from Gamecube to SNES was very literal, with A, B, X and Y on the Gamecube corresponding to A, B, X and Y respectively on the SNES. That's fine for Super Punch-Out which has in-game button configuration, but it's terrible for most games. Just imagine playing Super Smash TV with the buttons rotated 90 degrees clockwise!
Finding the joypad code was not as straightforward as finding SNESticle itself. In part because I had no idea what the joypad data coming from the Gamecube hardware would look like. But I figured that whatever it looked like, the joypad state would probably be stored somewhere in memory, and if I could find that memory location I could use Ghidra or Dolphin to find code that references that location. So what I wanted to do was to find memory locations that react to joypad input, but executing just a single frame of emulation can cause huge amounts of memory to change so a slightly more sophisticated approach was needed. Eventually I came up with the following:
- Create a save state in Dolphin
- Execute one frame
- Dump the entire GC memory to a file
- Load the save state
- Hold down a button on the controller
- Execute one frame
- Dump the memory again
This will result in two very similar memory dumps, where all differences are more or less direct consequences of the button pressed. I then used memory breakpoints in Dolphin to find code that accessed these locations and eventually stumbled upon this interesting piece of code:
  uVar2 = 0;
  if (*(int *)(iVar4 + 4) == 2) {
    uVar2 = *(uint *)(iVar4 + 8);
    local_18[0] = 0;
    if ((uVar2 & 1) != 0) {
      local_18[0] = 0x200;
    }
    if ((uVar2 & 2) != 0) {
      local_18[0] = local_18[0] | 0x100;
    }
    if ((uVar2 & 8) != 0) {
      local_18[0] = local_18[0] | 0x800;
    }
    if ((uVar2 & 4) != 0) {
      local_18[0] = local_18[0] | 0x400;
    }
    bVar1 = (uVar2 & 0x800) != 0;
    if (bVar1) {
      local_18[0] = local_18[0] | 0x2000;
    }
    if ((uVar2 & 0x1000) != 0) {
      local_18[0] = local_18[0] | 0x1000;
    }
    if ((uVar2 & 0x200) != 0) {
      local_18[0] = local_18[0] | 0x8000;
    }
    if ((uVar2 & 0x100) != 0) {
      local_18[0] = local_18[0] | 0x80;
    }
    if ((uVar2 & 0x20) != 0) {
      local_18[0] = local_18[0] | 0x10;
    }
    if ((uVar2 & 0x40) != 0) {
      local_18[0] = local_18[0] | 0x20;
    }
    if ((uVar2 & 0x400) != 0) {
      local_18[0] = local_18[0] | 0x40;
    }
    if (bVar1) {
      local_18[0] = local_18[0] | 0x4000;
    }
    if ((local_18[0] & 0x200) != 0) {
      local_18[0] = local_18[0] & 0xfeff;
    }
    if ((local_18[0] & 0x400) != 0) {
      local_18[0] = local_18[0] & 0xf7ff;
    }
    uVar2 = *(uint *)(iVar4 + 8) >> 4 & 1;
  }
  if (param_9[10] == 0) {
    iVar4 = *(int *)(*param_9 + 8);
    (**(code **)(iVar4 + 0x2c))(*param_9 + (int)*(short *)(iVar4 + 0x28),local_18,0,param_9[6],1);
  }
  else {
    iVar4 = *(int *)(*param_9 + 8);
    (**(code **)(iVar4 + 0x2c))
              (*param_9 + (int)*(short *)(iVar4 + 0x28),local_18,param_9[3],param_9[6],1);
  }
  return uVar2;
And the corresponding disassembly:
        8028e560 39 20 00 00     li         r9,0x0
        8028e564 7c 0b 03 78     or         r11,r0,r0
        8028e568 70 0a 00 01     andi.      r10,r0,0x1
        8028e56c 41 82 00 08     beq        LAB_8028e574
        8028e570 39 20 02 00     li         r9,0x200
                             LAB_8028e574
        8028e574 71 60 00 02     andi.      r0,r11,0x2
        8028e578 41 82 00 08     beq        LAB_8028e580
        8028e57c 61 29 01 00     ori        r9,r9,0x100
                             LAB_8028e580
        8028e580 71 6a 00 08     andi.      r10,r11,0x8
        8028e584 41 82 00 08     beq        LAB_8028e58c
        8028e588 61 29 08 00     ori        r9,r9,0x800
                             LAB_8028e58c
        8028e58c 71 60 00 04     andi.      r0,r11,0x4
        8028e590 41 82 00 08     beq        LAB_8028e598
        8028e594 61 29 04 00     ori        r9,r9,0x400
                             LAB_8028e598
        8028e598 71 60 08 00     andi.      r0,r11,0x800
        8028e59c 4f 80 00 00     mcrf       cr7,cr0
        8028e5a0 41 9e 00 08     beq        cr7,LAB_8028e5a8
        8028e5a4 61 29 20 00     ori        r9,r9,0x2000
                             LAB_8028e5a8
        8028e5a8 71 6a 10 00     andi.      r10,r11,0x1000
        8028e5ac 41 82 00 08     beq        LAB_8028e5b4
        8028e5b0 61 29 10 00     ori        r9,r9,0x1000
                             LAB_8028e5b4
        8028e5b4 71 60 02 00     andi.      r0,r11,0x200
        8028e5b8 41 82 00 08     beq        LAB_8028e5c0
        8028e5bc 61 29 80 00     ori        r9,r9,0x8000
                             LAB_8028e5c0
        8028e5c0 71 6a 01 00     andi.      r10,r11,0x100
        8028e5c4 41 82 00 08     beq        LAB_8028e5cc
        8028e5c8 61 29 00 80     ori        r9,r9,0x80
                             LAB_8028e5cc
        8028e5cc 71 60 00 20     andi.      r0,r11,0x20
        8028e5d0 41 82 00 08     beq        LAB_8028e5d8
        8028e5d4 61 29 00 10     ori        r9,r9,0x10
                             LAB_8028e5d8
        8028e5d8 71 6a 00 40     andi.      r10,r11,0x40
        8028e5dc 41 82 00 08     beq        LAB_8028e5e4
        8028e5e0 61 29 00 20     ori        r9,r9,0x20
                             LAB_8028e5e4
        8028e5e4 71 60 04 00     andi.      r0,r11,0x400
        8028e5e8 41 82 00 08     beq        LAB_8028e5f0
        8028e5ec 61 29 00 40     ori        r9,r9,0x40
                             LAB_8028e5f0
        8028e5f0 41 9e 00 08     beq        cr7,LAB_8028e5f8
        8028e5f4 61 29 40 00     ori        r9,r9,0x4000
                             LAB_8028e5f8
        8028e5f8 71 2a 02 00     andi.      r10,r9,0x200
        8028e5fc 41 82 00 08     beq        LAB_8028e604
        8028e600 71 29 fe ff     andi.      r9,r9,0xfeff
                             LAB_8028e604
        8028e604 71 20 04 00     andi.      r0,r9,0x400
        8028e608 41 82 00 08     beq        LAB_8028e610
        8028e60c 71 29 f7 ff     andi.      r9,r9,0xf7ff
                             LAB_8028e610
        8028e610 b1 21 00 08     sth        r9,8(r1)
        8028e614 80 03 00 08     lwz        r0,0x8(r3)
        8028e618 54 1f e7 fe     rlwinm     r31,r0,0x1c,0x1f,0x1f
                             LAB_8028e61c
        8028e61c 80 1e 00 28     lwz        r0,0x28(r30)
        8028e620 2c 00 00 00     cmpwi      r0,0x0
        8028e624 41 82 00 34     beq        LAB_8028e658
        8028e628 80 7e 00 00     lwz        r3,0x0(r30)
        8028e62c 38 81 00 08     addi       r4,r1,0x8
        8028e630 80 de 00 18     lwz        r6,0x18(r30)
        8028e634 38 e0 00 01     li         r7,0x1
        8028e638 81 23 00 08     lwz        r9,0x8(r3)
        8028e63c 80 be 00 0c     lwz        r5,0xc(r30)
        8028e640 a8 09 00 28     lha        r0,0x28(r9)
        8028e644 81 29 00 2c     lwz        r9,0x2c(r9)
        8028e648 7c 63 02 14     add        r3,r3,r0
        8028e64c 7d 28 03 a6     mtspr      LR,r9
        8028e650 4e 80 00 21     blrl
        8028e654 48 00 00 30     b          LAB_8028e684
                             LAB_8028e658
        8028e658 80 7e 00 00     lwz        r3,0x0(r30)
        8028e65c 38 81 00 08     addi       r4,r1,0x8
        8028e660 80 de 00 18     lwz        r6,0x18(r30)
        8028e664 38 a0 00 00     li         r5,0x0
        8028e668 81 23 00 08     lwz        r9,0x8(r3)
        8028e66c 38 e0 00 01     li         r7,0x1
        8028e670 a8 09 00 28     lha        r0,0x28(r9)
        8028e674 81 29 00 2c     lwz        r9,0x2c(r9)
        8028e678 7c 63 02 14     add        r3,r3,r0
        8028e67c 7d 28 03 a6     mtspr      LR,r9
        8028e680 4e 80 00 21     blrl
                             LAB_8028e684
        8028e684 7f e3 fb 78     or         r3,r31,r31
        8028e688 80 01 00 24     lwz        r0,36(r1)
        8028e68c 7c 08 03 a6     mtspr      LR,r0
        8028e690 bb c1 00 18     lmw        r30,24(r1)
        8028e694 38 21 00 20     addi       r1,r1,0x20
        8028e698 4e 80 00 20     blr
Turns out the joypad state data on the Gamecube (at least the way it's presented to SNESticle) is pretty similar to its SNES counterpart. It's just a bit field where each bit corresponds to a single button. Not surprising really, as the two systems both have exactly 12 buttons (and the GC of course also has a bunch of analogue inputs but we don't care about those (except L and R, but their values have already been converted to single bits at this point)). The exact mapping between buttons and bits differs heavily between the two systems, though, so this function translates the Gamecube state into a SNES state, and it's really quite fortunate that it exists, or remapping the buttons would have required a lot more work.
These are the bitmask values corresponding to the buttons on the two systems:
| GC value | button | SNES value |
|---|---|---|
| 0x0001 | Left | 0x0200 |
| 0x0002 | Right | 0x0100 |
| 0x0004 | Down | 0x0400 |
| 0x0008 | Up | 0x0800 |
| 0x0010 | Z | |
| 0x0020 | R | 0x0010 |
| 0x0040 | L | 0x0020 |
| 0x0100 | A | 0x0080 |
| 0x0200 | B | 0x8000 |
| 0x0400 | X | 0x0040 |
| 0x0800 | Y | 0x4000 |
| 0x1000 | Start | 0x1000 |
| Select | 0x2000 |
This code also explains why Y doubles as Y and Select. At address 0x8028e59c, a flag in cr7 is set if bit 11 (0x800, Y) of the GC joypad state is set. This flag is then immediately tested and if it is set, bit 13 (0x2000, Select) of the SNES joypad state is set:
        8028e598 71 60 08 00     andi.      r0,r11,0x800
        8028e59c 4f 80 00 00     mcrf       cr7,cr0
        8028e5a0 41 9e 00 08     beq        cr7,LAB_8028e5a8
        8028e5a4 61 29 20 00     ori        r9,r9,0x2000
Further down, at address 0x8028e5f0, the flag is tested for again and if it is set, bit 14 (0x4000, Y) of the SNES joypad state is set:
        8028e5f0 41 9e 00 08     beq        cr7,LAB_8028e5f8
        8028e5f4 61 29 40 00     ori        r9,r9,0x4000
It's probably no surprise but I think it's worth pointing out that there is no
way this is hand-written assembly code. A human would just have written ori r9,
r9, 0x6000 to set both Select and Y at once in the SNES state, but the compiler
wasn't that clever. It did, however, notice that there were two checks for bit
11 (0x800) in the GC state and perform what I think can be classified as a
common subexpression elimination by caching the result of the check in the cr7
register rather than performing it twice. (The Ghidra decompiler can't undo this
optimisation and instead uses the variable bVar1 to cache the result.) The fact
that the compiler wasn't very good at optimising (or just wasn't running with
aggressive optimisation flags) turned out to be a blessing in disguise, though.
Remapping the buttons to un-rotate the face buttons is trivial, it's just a matter of replacing the constant operands in the ori instructions. Unmapping Select from Y is also quite simple, patching in a nop on line 0x8028e5a4 does the job.
At address 0x8028e618, r31 is set to 1 if Z (0x10) is pressed and this is what causes the emulator to exit.
8028e618 54 1f e7 fe rlwinm r31,r0,0x1c,0x1f,0x1f
This can also be prevented with a nop.
Then came the fun part! I still needed to map Select to something, and the Z button was really the only choice, but each button translation would seem to require three consecutive instructions. The code for Select should look something like this:
andi.  r0, r11, 0x10
beq    skip_next_instruction
ori    r9, r9, 0x2000
But there's no obvious place to put it. Some small optimisation is needed in order to make room for this new code. Luckily, the function is really poorly optimised to begin with and there are many ways to shorten it down. The first thing I thought of was that the L and R bits in the joypad state are adjacent in the Gamecube state as well as in the SNES state. That means we could process them together by adding up their bit masks and then rotating them into the position they have on the SNES, like this:
andi.   r0, r11, 0x60
beq     skip_next_two_instructions
rlwinm  r0, r0, 0x1f, 0x1a, 0x1b
or      r9, r9, r0
That would save two instructions, which should be enough since I could also overwrite some of the recently deactivated code. But actually, the andi and the beq are superfluous here. rlwinm is a stupidly powerful instruction that performs rotation and masking in one go and the whole thing could be shortened to:
rlwinm r0, r11, 0x1f, 0x1a, 0x1b
or r9, r9, r0
This would rotate the Gamecube joypad state 31 bits to the left (ie one bit to the right), and mask out everything but bits 4 and 5 (0x1a through 0x1b when counting from the MSB) and store the result in r0 (and then or that into r9). The same trick could be used all over the place to save one instruction on every button translation.
And then I found out there's an even more awesome instruction, rlwimi, that will even write the bits to r9:
rlwimi r9, r11, 0x1f, 0x1a, 0x1b
But none of this was needed because there's an even simpler way! The Start button sits at bit 12 (0x1000) in both representations, so instead of starting out by setting the SNES joypad state to 0, we could just set it to whatever the Start button state is on the GC by patching a single instruction, from:
8028e560 39 20 00 00 li r9,0x0
to:
8028e560 70 09 10 00 andi. r9, r0, 0x1000
This makes the Start button translation further down completely redundant and we can just modify that code to check for Z and map it to Select instead.
In the end, the button mapping looks like this:
| GC | SNES |
|---|---|
| A | B |
| B | Y |
| X | A |
| Y | X |
| Start | Start |
| Z | Select |
One final interesting thing to note about this joypad code is the following bit right at the end (comments added by me):
    if ((local_18[0] & 0x200) != 0) {      // If Left is pressed
      local_18[0] = local_18[0] & 0xfeff;  // Clear the Right bit
    }
    if ((local_18[0] & 0x400) != 0) {      // If Down is pressed
      local_18[0] = local_18[0] & 0xf7ff;  // Clear the Up bit
    }
Anyone who has programmed a game (or an emulator) for a computer will know what this is about. What happens if you press Left and Right at the same time? Sardu's solution is that Left always overrides Right, and Down overrides Up. What makes it interesting is that it's unnecessary on a Gamecube. The Gamecube controller will prevent this from happening in exactly the same way the SNES controller would. So from an emulator accuracy standpoint, it would arguably be best to just leave this code out. It's not much but it's a tiny little hint that this code was originally written with keyboard input in mind.
The banner
The banner is the 96x32 bitmap used to represent a game in the Gamecube OS, in custom loaders like Swiss, and in emulators. SNESticle obviously deserves a banner of its own. The Fight Night Round 2 banner is not just misleading now that we've more or less deleted Fight Night from the disc, it's also just a really ugly banner!

Seriously, what were they thinking?
I initially thought of modding some old NESticle logo, and though I doubt anyone at Bloodlust would really care, I decided against it for legal reasons. My next idea was this little banner, using the NESticle colour scheme and font:

But it turned out that some loaders display only the banner in their menus, and having all of your SNES games show up as just "SNESTICLE" is no good, so I took it a step further and the default behaviour is now to generate a banner using the provided game name (or the SNES ROM file name if no game name is provided). This is what it looks like for Super Punch-Out:

The script still has an option to create a banner from any image file, so of course nothing is stopping you from replacing it with something like Shitman or Buddy.
Since I couldn't find good utility for creating banners from png images I wrote
my own. It's in the git repo and
it's called a2bnr.py. It's used as a module by fn22snesticle.py but it's also
a standalone program. See the README.md file for usage.
The menu
Not included in the initial release of fn22snesticle.py, the ROM selection
screen is probably the most intricate part of the hack. In theory it would seem
like a simple thing to add: just print a list of ROMS, allow the user to select
one, and overwrite the hard-coded sns4q0.471 filename to get SNESticle to load
the correct file. There are a couple of problems with this idea though:
-
How do I write the code? The Gamecube is a relatively modern computer. Even something as simple as displaying a few lines of text and a cursor on the screen probably requires the sacrifice of at least a handful of larger mammals. Hacking it together with just my hex editor would require some serious low-level knowledge of the Gamecube hardware. The other option is to set up a full Gamecube dev environment on my computer.
-
Where do I put the code? Obviously there is a lot of dead Fight Night code all over the place that I am free to overwrite as I see fit, but without solving the halting problem it's difficult to know for sure which areas are truly safe to overwrite. It might be feasible to just grow the binary a bit, but it's not tempting.
These aren't showstopping problems, they just take the fun out of the project, so I hesitated. But then, right as the initial release was on its way out, the proper solution, the one that is fun as well as convenient (well, sort of anyway), occurred to me. I realised that I don't need to write Gamecube-native code to do this because I have a perfectly good virtual machine available to me: SNESticle!
Implementing the menu as a SNES program solves all of my problems. The code is contained within a SNES ROM which I can just store in a file on the ISO, so I no longer need to worry about patching stuff into the Gamecube binary. And the SNES is a nice, old, well-documented system. I didn't have any prior experience with it, but I have done quite a bit of NES programming and the SNES turned out to be quite similar, just immensely more powerful. The one thing the SNES environment is unable to do, though, is to launch other SNES games so that part still needs to be done from PPC code, but the SNES code can do all of the heavy lifting. On a high level, the plan is the following:
- Launch into the menu ROM.
- Let the user select a ROM, then exit SNESticle.
- In PPC code, figure out which ROM was selected by inspecting SNES memory and relaunch SNESticle with the correct ROM loaded.
Diversions
The menu ROM itself is trivial stuff. I added a starfield background to give it a bit of a cracktro air, and I figured I'd save myself some work by ripping the font from Super Punch-Out rather than drawing my own (and the NESticle font is variable width so using that here was not really an option). The Punch-Out font turned out to be compressed, making this a little bit more interesting than I had hoped. The compression scheme is simple, though. It goes like this:
- Read one byte, this is your new favourite byte.
- Read another byte, this is the magic control byte.
- For each bit (starting with the MSB) in the control byte: If it's a 1, read another byte and output that. If it's a 0, output your current favourite byte.
- Repeat from step 1 for as long as needed.
It's simple and also not very effective. It brings the font down to about 95% of its original size. I'll note though, that Super Punch-Out contains a second font, with larger characters, that probably benefits more from this type of compression. The font is ripped on the fly when an ISO is generated, and the code that does the decoding is in spof.py. The logo at the top (which does use the NESticle font) is also generated on the fly by fn22snesticle.py.
Filenames
The easiest way to load an alternate ROM file into SNESticle is to overwrite the in-memory "sns4q0.471" string with a different filename. One nice aspect of working with a disc-based system is that everything is running from RAM, meaning that even hard-coded strings like this one can be overwritten at runtime. Reusing the "sns4q0.471" string means that filenames on the ISO are limited to 10 characters, but that's more than enough. In fact, to keep my PPC code to a minimum, I wanted filenames that could fit in a single PPC register, ie at most four characters (including null-termination). In the end, filenames ended up being just two alphanumeric characters, allowing for a total of 36 * 36 = 1296 filenames (which is way more than the menu ROM can currently handle anyway). The original filenames are of course also written to the menu ROM, but only for display purposes, and they are truncated to 30 characters to fit on screen.
Any time the cursor is moved in the menu, the shortened ISO filename of the selected ROM is written to a specific memory location. Again, this is just to minimise complexity in the PPC code. These three bytes of emulated SNES memory constitute the entire interface between SNES code and PPC code.
Exiting SNESticle
You'll remember that the original script patched out the instruction that exits SNESticle when Z is pressed on the Gamecube controller. The whole menu trick relies on the user being able to exit SNESticle, so this feature can no longer be removed entirely, but Z is a crappy button to use for selecting a game so some patching is still in order. The original instruction looked like this:
rlwinm r31,r0,0x1c,0x1f,0x1f
This rotates r0 28 steps to the left (which is the same as rotating it four
steps to the right), and then ands the result with 1 and stores it in r31. In
simpler terms, r31 = (r0 & 0x10) >> 4. This is unnecessarily complex. r31 is
just a truth value and setting it to anything non-zero will cause SNESticle to
exit. ori r31, r0, 0x10 would have been fine. I believe the reason for the
rotation is that the C standard requires the result of a boolean expression to
always be 1 or 0. I am not a C compiler so I just changed it to
ori r31, r9, 0x9080 to exit on SNES buttons Start, A and B (though I later
changed it to just Start because I wanted the other buttons usable in the menu
itself). Of course, once we are in a real game we no longer want these buttons
to exit the emulator. I'll get to that in a bit.
Using my initial patches, SNESticle crashes horribly upon exiting. I haven't looked into why, but I think a reasonable assumption would be that it tries to free memory that was never allocated. While it certainly would be satisfying to get it to start and exit more cleanly, I again just patched out the offending code with NOPs and it seems to work flawlessly so I really have no practical incentive to fix it.
Reentering SNESticle
As it turns out, the function that calls SNESticle is rather long, and that is excellent news, because it just happens to be the one function in the whole binary that contains code that is almost guaranteed not to be needed. Everything after the call to SNESticle is ripe for overwriting, giving me about 60 instructions to play with that will be executed right as SNESticle exits, and that should be plenty.
SNES RAM is located at 0x8062aa8c in Gamecube memory. It's dynamically allocated so in theory its location could vary between executions (and in the unpatched Fight Night, it probably does), but since we are skipping over the loading and the menu, the execution is fully deterministic all the way up until SNESticle is running and memory allocations always end up in the same places. So after SNESticle exits, the filename of the selected game is going to be in 0x8062aa8c + 0x24 (because it's written to offset 0x24 (0x10 in later versions) in SNES memory).
I also needed to prevent any controller inputs from causing SNESticle to exit on the second run. I feared I would have to set a flag somewhere in memory before relaunching SNESticle, and then, inside the joypad code, skip the exit check if that flag was set. It's not rocket science but it's slightly annoying to implement, so I decided to first try what I think is a much cooler approach: using what is essentially self-modifying code to patch out the exit check at runtime. It's just one instruction that needs to be replaced with a NOP and to my great satisfaction that worked perfectly (once I realised I had to invalidate the instruction cache after patching the code). Apparently, code segments are not write protected on the Gamecube.
In the end, the PPC code needed to replace the ROM filename, patch out the exit check, and reenter SNESticle is completely trivial and consists of just 13 instructions, while the source code of the menu ROM weighs in at around 900 lines.
Additional controllers
Super Punch-Out, unfortunately, is firmly a one player game so it's not surprising that this version of SNESticle supports only one controller. But if SNESticle began its life on the PC only to be ported over to the Gamecube later, I figured it was probably safe to assume that it does emulate at least two SNES controllers, it just doesn't support more than one Gamecube controller for the time being.
This was easy to confirm. The function that converts Gamecube input to SNES input writes its result as a half-word to 0x805aa8f0. Dolphin reveals that this location is followed up by four additional halfwords that are always set to 0xffff, suggesting that there is room for input values from up to 5 SNES controllers, which just happens to be the number of controllers that are typically supported when a multitap is connected. And, indeed, it is possible to control the second player just by poking values into the second half-word.
While peeking around for the controller state earlier, one of the functions I stumbled into was this one:
void get_joypad_input_FUN_800e99ac(int *param_1)

{
  int iVar1;
  uint uVar2;
  ushort *puVar3;

  uVar2 = 0;
  FUN_803c4a3c();
  puVar3 = &DAT_8055f510;
  do {
    uVar2 = uVar2 + 1;
    if (*(char *)(puVar3 + 5) == -1) {
      param_1[1] = 1;
    }
    else {
      if (*(char *)(puVar3 + 5) == '\0') {
        param_1[1] = 2;
        param_1[2] = (uint)*puVar3;
        iVar1 = FUN_800e9930(0,(int)*(char *)(puVar3 + 1));
        param_1[0x1f] = iVar1;
        iVar1 = FUN_800e9930(0,(int)*(char *)((int)puVar3 + 3));
        param_1[0x20] = iVar1;
        iVar1 = FUN_800e9930(1,(int)*(char *)(puVar3 + 2));
        param_1[0x21] = iVar1;
        iVar1 = FUN_800e9930(1,(int)*(char *)((int)puVar3 + 5));
        param_1[0x22] = iVar1;
        if (0x20 < *(byte *)((int)puVar3 + 7)) {
                    /* R was pressed */
          param_1[2] = param_1[2] | 0x20;
        }
        if (0x20 < *(byte *)(puVar3 + 3)) {
                    /* L was pressed */
          param_1[2] = param_1[2] | 0x40;
        }
      }
      else {
        param_1[1] = 0;
      }
    }
    param_1 = param_1 + 0x23;
    puVar3 = puVar3 + 6;
  } while (uVar2 < 4);
  return;
}
This would seem to be the function that reads the Gamecube controller state and stores it in memory. It's not completely obvious exactly how it works but param_1[2] seems to be where the controller state ends up. And you'll note that the whole thing is wrapped in a do-while loop that runs exactly four times, once for each controller. (As a side note, the Ghidra decompiler does generate for loops sometimes, but for some reason it seems to favour this do-while construct most of the time.) The param_1 pointer is incremented by 0x23 on each iteration, and indeed, a quick check with Dolphin reveals that all four controller states can be found exactly 0x23 * 4 = 0x8c bytes apart. This function is shared with the actual Fight Night game, which explains why it checks all four controllers even though SNESticle only uses one of them.
So the only missing piece is the code that translates the three additional Gamecube inputs to SNES inputs. I already presented the code that does this for controller one way up in the joypad chapter. The cleanest way to go about this would perhaps be to add a for loop to that function, to run the same code for all four controllers, or to generalise the function a bit and call it four times with the different memory locations as arguments. The drawback to doing this is that the controller code would require four times as much cpu time as before. Of course, it probably only runs once per frame so the impact should be negligible, but since I already had some ideas on how to optimise that particular piece of code I figured I'd just try to cram all four controller mappings into that one function, without any looping.
To recap, the original mapping code consisted of a sequence of checks and branches. As an example, the following code maps Gamecube button Right (0x2) to SNES button right (0x100).
        8028e574 71 60 00 02     andi.      r0,r11,0x2
        8028e578 41 82 00 08     beq        LAB_8028e580
        8028e57c 61 29 01 00     ori        r9,r9,0x100
                             LAB_8028e580
But this can all be done with a single instruction:
rlwimi r9, r0, 7, 23, 23
It shortens the code to a third of the original size, and depending on how branches are implemented on this particular PPC the gains in terms of speed could be even greater. Getting the code down to a third the size, while good, is obviously not enough to be able to squeeze in four controllers. But as I also already mentioned, some buttons can be handled together because they are located the same number of bits apart in the SNES bitfield as in the GC one. It's quite a fun puzzle actually. If we order the bits from right to left and look at their corresponding buttons on the Gamecube as well as the SNES it's easy find groups that can be shifted together:
| Value | GC button | SNES button |
|---|---|---|
| 0x0001 | Left | |
| 0x0002 | Right | |
| 0x0004 | Down | |
| 0x0008 | Up | |
| 0x0010 | Z | R |
| 0x0020 | R | L |
| 0x0040 | L | X |
| 0x0080 | A | |
| 0x0100 | A | Right |
| 0x0200 | B | Left |
| 0x0400 | X | Down |
| 0x0800 | Y | Up |
| 0x1000 | Start | Start |
| 0x2000 | Select | |
| 0x4000 | Y | |
| 0x8000 | B |
R and L is the obvious one. They are adjacent and just need to be shifted one bit to the right to go from Gamecube encoding to SNES encoding. But buttons don't necessarily need to be adjacent to be shifted together. Button A also just needs one shift to the right so R, L, and A can all be shifted together. Though, since rlwimi works with contiguous ranges of bits, this means that bit 7 (0x80) will end up as the SNES X button, but that's fine, it will be overwritten with the real X value later.
Another obvious group is Down and Up. They are also adjacent, but they need to be shifted 8 bits to the left.
Then finally there is Left and Z/Select. They are four bits apart and will bring along incorrect values for Down, Up and Start, but again that's fine, I just made sure to do this group first.
The rest of the buttons need to be done individually, but with these optimisations in place, all twelve buttons can be mapped from GC encoding to SNES encoding with just eight instructions. I should add that these particular optimisations only apply to the original button mapping (the one I've dubbed "literal" in the menu), but the code for the improved ("sensible") mapping also adds up to eight instructions in the end.
I also previously mentioned the code that prevents the button combinations Up + Down or Left + Right from registering, and how it probably isn't needed. I did some quick research on it and what I could gather was that although the SNES controller innards and the controller interface does allow for any combination of buttons to be active at the same time, the physical design of the D-pad prevents Up and Down or Left and Right from being pressed simultaneously. The Gamecube D-pad does the same so I just removed that code to save a couple of extra bytes.
With all optimisations in place, the code that previously handled one controller now does all four of them, with seven instructions to spare.
The settings menu
One thing that bugged me after implementing the original ROM menu was that the button mapping had to be chosen once and for all when the ISO was built. With multiple ROMS on the ISO this no longer made sense, as your preferred button mapping might depend on the game you are playing. So I added four bytes to the interface between SNESticle and my PPC code, one for each controller, and the PPC code now patches the controller code based on your choices in the menu. This is all rather trivial and not really interesting to talk about, but if you are wondering why the settings menu is called "Preferences" and not "Settings" like in NESticle, there is a perfectly good explanation. The header is rendered using the NESticle font on two rows of tiles near the top of the screen. Unfortunately, the word "Settings" contains the letter "g", which would reach down into a third row of tiles and that's just not supported by the current code. It would be easy to fix of course, but it was even easier to just rename the menu.