About me: My name is Solène Rapenne, pronouns she/her. I like learning and
sharing knowledge. Hobbies: '(Qubes OS BSD OpenBSD Lisp cmdline gaming security QubesOS internet-stuff). I
love percent and lambda characters. Qubes OS core team member, former OpenBSD developer solene@. No AI is involved in this blog.
Contact me: solene at dataswamp dot org or
@solene@bsd.network (mastodon).
This blog post is a guide explaining how to setup a full-featured email server on OpenBSD 7.5. It was commissioned by a customer of my consultancy who wanted it to be published on my blog.
Setting up a modern email stack that does not appear as a spam platform to the world can be a daunting task, the guide will cover what you need for a secure, functional and low maintenance email system.
The features list can be found below:
email access through IMAP, POP or Webmail
secure SMTP server (mandatory server to server encryption, personal information hiding)
state-of-the-art setup to be considered as legitimate as possible
firewall filtering (bot blocking, all ports closes but the required ones)
anti-spam
In the example, I will set up a temporary server for the domain puffy.cafe with a server using the subdomain mail.puffy.cafe. From there, you can adapt with your own domain.
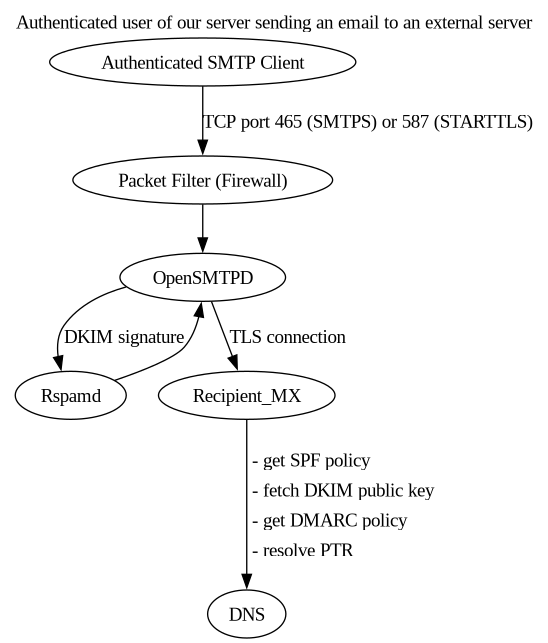
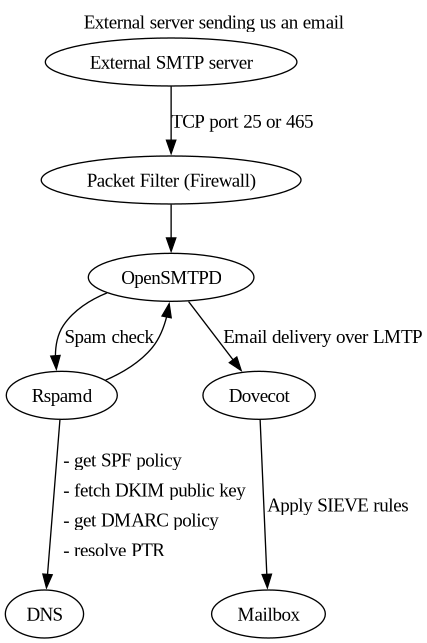
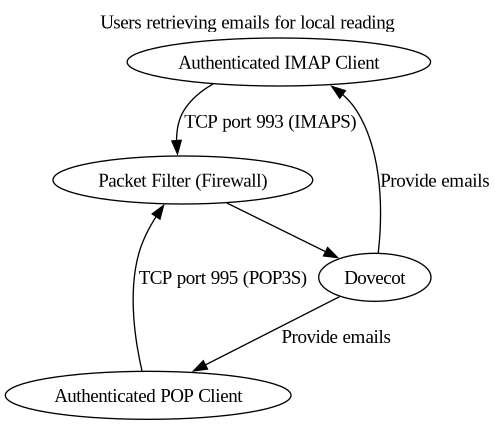
I prepared a few diagrams explaining how all the components are used together, in three cases: when sending an email, when the SMTP servers receives an email from the outside and when you retrieve your emails locally.
Packet Filter is OpenBSD's firewall. In our setup, we want all ports to be blocked except the few ones required for the email stack.
The following ports will be required:
opensmtpd 25/tcp (smtp): used for email delivery from other servers, supports STARTTLS
opensmtpd 465/tcp (smtps): used to establish a TLS connection to the SMTP server to receive or send emails
opensmtpd 587/tcp (submission): used to send emails to external servers, supports STARTTLS
httpd 80/tcp (http): used to generate TLS certificates using ACME
dovecot 993/tcp (imaps): used to connect to the IMAPS server to read emails
dovecot 995/tcp (pop3s): used to connect to the POP3S server to download emails
dovecot 4190/tcp (sieve): used to allow remote management of an user SIEVE rules
Depending on what services you will use, only the opensmtpd ports are mandatory. In addition, we will open the port 22/tcp for SSH.
set block-policy drop
set loginterface egress
set skip on lo0

# normalisation des paquets
match in all scrub (no-df random-id max-mss 1440)
antispoof quick for { egress }

tcp_ports = "{ smtps smtp submission imaps pop3s sieve ssh http }"

block all
pass out inet
pass out inet6

# allow ICMP (ping)
pass in proto icmp

# allow IPv6 to work
pass in on egress inet6 proto icmp6 all icmp6-type { routeradv neighbrsol neighbradv }
pass in on egress inet6 proto udp from fe80::/10 port dhcpv6-server to fe80::/10 port dhcpv6-client no state

# allow our services
pass in on egress proto tcp from any to any port $tcp_ports

# default OpenBSD rules
# By default, do not permit remote connections to X11
block return in on ! lo0 proto tcp to port 6000:6010

# Port build user does not need network
block return out log proto {tcp udp} user _pbuild
The MX records list the servers that should be used by outside SMTP servers to send us emails, this is the public list of our servers accepting emails for a given domain. They have a weight associated to each of them, the server with the lowest weight should be used first and if it does not respond, the next server used will be the one with a slightly higher weight. This is a simple mechanism that allow setting up a hierarchy.
I highly recommend setting up at least two servers, so if your main server fails is unreachable (host outage, hardware failure, upgrade ongoing) the emails will be sent to the backup server. Dovecot bundles a program to synchronize mailboxes between servers, one way or two-way, one shot or continuously.
If you have no MX records in your domain name, it is not possible to send you emails. It is like asking someone to send you a post card without giving them any clue about your real address.
Your server hostname can be different from the domain apex (raw domain name without a subdomain), a simple example would be to use mail.domain.example for the server name, this will not prevent it from receiving/sending emails using @domain.example in email addresses.
In my example, the domain puffy.cafe mail server will be mail.puffy.cafe, giving this MX record in my DNS zone:
The SPF record is certainly the most important piece of the email puzzle to detect spam. With the SPF, the domain name owner can define which servers are allowed to send emails from that domain. A properly configured spam filter will give a high spam score to incoming emails that are not in the sender domain SPF.
To ease the configuration, that record can automatically include all MX defined for a domain, but also A/AAAA records, so if you only use your MX servers for sending, a simple configuration allowing MX servers to send is enough.
In my example, only mail.puffy.cafe should be legitimate for sending emails, any future MX server should also be allowed to send emails, so we configure the SPF to allow all MX defined servers to be senders.
When used, the DKIM is a system allowing a receiver to authenticate a sender, based on an asymmetric cryptographic keys. The sender publishes its public key on a TXT DNS record before signing all outgoing emails using the private key. By doing so, receivers can validate the email integrity and make sure it was sent from a server of the domain claimed in the From header.
DKIM is mandatory to not be classified as a spamming server.
The following set of commands will create a 2048 bits RSA key in /etc/mail/dkim/private/puffy.cafe.key with its public key in /etc/mail/dkim/puffy.cafe.pub, the umask 077 command will make sure any file created during the process will only be readable by root. Finally, you need to make the private key readable to the group _rspamd.
You need to install the rspamd package to have the user _rspamd for these instructions. If you want to use a different DKIM program, you will need to adapt the configuration.
pkg_add rspamd-- opensmtpd-filter-rspamd
Note: the umask command will persist in your shell session, if you do not want to create files/directory only readable by root after this, either spawn a new shell, or run the set of commands in a new shell and then exit from it once you are done.
In this example, we will name the DKIM selector dkim to keep it simple. The selector is the name of the key, this allows having multiple DKIM keys for a single domain.
Add the DNS record like the following, the value in p is the public key in the file /etc/mail/dkim/puffy.cafe.pub, you can get it as a single line with the command awk '/PUBLIC/ { $0="" } { printf ("%s",$0) } END { print }' /etc/mail/dkim/puffy.cafe.pub:
Your registrar may offer to add the entry using a DKIM specific form. There is nothing wrong doing so, just make sure the produced entry looks like the entry below.
dkim._domainkey IN TXT "v=DKIM1;k=rsa;p=MIIBIjANBgkqhkiG9w0BAQEFAAOCAQ8AMIIBCgKCAQEAo3tIFelMk74wm+cJe20qAUVejD0/X+IdU+A2GhAnLDpgiA5zMGiPfYfmawlLy07tJdLfMLObl8aZDt5Ij4ojGN5SE1SsbGC2MTQGq9L2sLw2DXq+D8YKfFAe0KdYGczd9IAQ9mkYooRfhF8yMc2sMoM75bLxGjRM1Fs1OZLmyPYzy83UhFYq4gqzwaXuTvxvOKKyOwpWzrXzP6oVM7vTFCdbr8E0nWPXWKPJhcd10CF33ydtVVwDFp9nDdgek3yY+UYRuo/iJvdcn2adFoDxlE6eXmhGnyG4+nWLNZrxIgokhom5t5E84O2N31YJLmqdTF+nH5hTON7//5Kf/l/ubwIDAQAB"
The DMARC record is an extra mechanism that comes on top of SPF/DKIM, while it does not do much by itself, it is important to configure it.
DMARC could be seen as a public notice explaining to servers receiving emails whose sender looks like your domain name (legit or not) what they should do if SPF/DKIM does not validate.
As of 2024, DMARC offers three actions for receivers:
do nothing but make a report to the domain owner
"quarantine" mode: tell the receiver to be suspicious without rejecting it, the result will depend on the receiver (most of the time it will be flagged as spam) and make a report
"reject" mode: tell the receiver to not accept the email and make a report
In my example, I want invalid SPF/DKIM emails to be rejected. It is quite arbitrary, but I prefer all invalid emails from my domain to be discarded rather than ending up in a spam directory, so p and sp are set to reject. In addition, if my own server is misconfigured I will be notified about delivery issues sooner than if emails were silently put into quarantine.
An email address should be provided to receive DMARC reports, they are barely readable and I never made use of them, but the email address should exist so this is what the rua field is for.
The field aspf is set to r (relax), basically this allows any servers with a hostname being a subdomain of .puffy.cafe to send emails for @puffy.cafe, while if this field is set to s (strict), the domain of the sender should match the domain of the email server (mail.puffy.cafe would only be allowed to send for @mail.puffy.cafe).
An older mechanism used to prevent spam was to block, or consider as spam, any SMTP server whose advertised hostname did not match the result of the reverse lookup of its IP.
Let's say "mail.foobar.example" (IP: A.B.C.D) is sending an email to my server, if the result of the DNS request to resolve the PTR of A.B.C.D is not "mail.foobar.example", the email would be considered as spam or rejected. While this is superseded by SPF/DKIM and annoying as it is not always possible to define a PTR for a public IP, the reverse DNS setup is still a strong requirement to not be considered as a spamming platform.
Make sure the PTR matches the system hostname and not the domain name itself, in the example above the PTR should be mail.foobar.example and not foobar.example.
The first step is to obtain a valid TLS certificate, this requires configuring acme-client, httpd and start httpd daemon.
Copy the acme-client example cp /etc/examples/acme-client.conf /etc/
Modify /etc/acme-client.conf and edit only the last entry to configure your own domain, mine looks like this:
#
# $OpenBSD: acme-client.conf,v 1.5 2023/05/10 07:34:57 tb Exp $
#
authority letsencrypt {
	api url "https://acme-v02.api.letsencrypt.org/directory"
	account key "/etc/acme/letsencrypt-privkey.pem"
}

authority letsencrypt-staging {
	api url "https://acme-staging-v02.api.letsencrypt.org/directory"
	account key "/etc/acme/letsencrypt-staging-privkey.pem"
}

authority buypass {
	api url "https://api.buypass.com/acme/directory"
	account key "/etc/acme/buypass-privkey.pem"
	contact "mailto:me@example.com"
}

authority buypass-test {
	api url "https://api.test4.buypass.no/acme/directory"
	account key "/etc/acme/buypass-test-privkey.pem"
	contact "mailto:me@example.com"
}

domain mail.puffy.cafe {
    # you can remove the line "alternative names" if you do not need extra subdomains
    # associated to this certificate
    # imap.puffy.cafe is purely an example, I do not need it
	alternative names { imap.puffy.cafe pop.puffy.cafe }
	domain key "/etc/ssl/private/mail.puffy.cafe.key"
	domain full chain certificate "/etc/ssl/mail.puffy.cafe.fullchain.pem"
	sign with letsencrypt
}
Now, configure httpd, starting from the OpenBSD example: cp /etc/examples/httpd.conf /etc/
Edit /etc/httpd.conf, we want the first block to match all domains but not "example.com", and we do not need the second block listen on 443/tcp (except if you want to run a https server with some content, but you are on your own then). The resulting file should look like the following:
Enable and start httpd with rcctl enable httpd && rcctl start httpd.
Run acme-client -v mail.puffy.cafe to generate the certificate with some verbose output (if something goes wrong, you will have a clue).
If everything went fine, you should have the full chain certificate in /etc/ssl/mail.puffy.cafe.fullchain.pem and the private key in /etc/ssl/private/mail.puffy.cafe.key.
You will use rspamd to filter spam and sign outgoing emails for DKIM.
Install rspamd and the filter to plug it to opensmtpd:
pkg_add rspamd-- opensmtpd-filter-rspamd
You need to configure rspamd to sign outgoing emails with your DKIM private key, to proceed, create the file /etc/rspamd/local.d/dkim_signing.conf (the filename is important):
# our usernames does not contain the domain part
# so we need to enable this option
allow_username_mismatch = true;

# this configures the domain puffy.cafe to use the selector "dkim"
# and where to find the private key
domain {
    puffy.cafe {
        path = "/etc/mail/dkim/private/puffy.cafe.key";
        selector = "dkim";
    }
}
For better performance, you need to use redis as a cache backend for rspamd:
rcctl enable redis
rcctl start redis
Now you can start rspamd:
rcctl enable rspamd
rcctl start rspamd
For extra information about rspamd (like statistics or its web UI), I wrote about it in 2021:
If you do not want to use rspamd, it is possible to replace the DKIM signing part using opendkim, dkimproxy or opensmtpd-filter-dkimsign. The spam filter could be either replaced by the featureful spamassassin available as a package, or partially with the base system program spamd (it does not analyze emails).
This guide only focus on rspamd, but it is important to know alternatives exist.
OpenSMTPD configuration file on OpenBSD is /etc/mail/smtpd.conf, here is a working configuration with a lot of comments:
## this defines the paths for the X509 certificate
pki puffy.cafe cert "/etc/ssl/mail.puffy.cafe.fullchain.pem"
pki puffy.cafe key "/etc/ssl/private/mail.puffy.cafe.key"
pki puffy.cafe dhe auto

## this defines how the local part of email addresses can be split
# defaults to '+', so solene+foobar@domain matches user
# solene@domain. Due to the '+' character being a regular source of issues
# with many online forms, I recommend using a character such as '_',
# '.' or '-'. This feature is very handy to generate infinite unique emails
# addresses without pre-defining aliases.
# Using '_', solene_openbsd@domain and solene_buystuff@domain lead to the
# same address
smtp sub-addr-delim '_'

## this defines an external filter
# rspamd does dkim signing and spam filter
filter rspamd proc-exec "filter-rspamd"

## this defines which file will contain aliases
# this can be used to define groups or redirect emails to users
table aliases file:/etc/mail/aliases

## this defines all the ports to use
# mask-src hides system hostname, username and public IP when sending an email
listen on all port 25  tls         pki "puffy.cafe" filter "rspamd"
listen on all port 465 smtps       pki "puffy.cafe" auth mask-src filter "rspamd"
listen on all port 587 tls-require pki "puffy.cafe" auth mask-src filter "rspamd"

## this defines actions
# either deliver to lmtp or to an external server
action "local" lmtp "/var/dovecot/lmtp" alias <aliases>
action "outbound" relay

## this defines what should be done depending on some conditions
# receive emails (local or from external server for "puffy.cafe")
match from any for domain "puffy.cafe" action "local"
match from local for local action "local"

# send email (from local or authenticated user)
match from any auth for any action "outbound"
match from local for any action "outbound"
In addition, you can configure the advertised hostname by editing the file /etc/mail/mailname: for instance my machine's hostname is ryzen so I need this file to advertise it as mail.puffy.cafe.
For ports using STARTTLS (25 and 587), there are different options with regard to TLS encryption.
do not allow STARTTLS
offer STARTTLS but allow not using it (option tls)
require STARTTLS: drop connection when the remote peer does ask for STARTTLS (option tls-require)
require STARTTLS: drop connection when no STARTTLS, and verify the remote certificate (option tls-require verify)
It is recommended to enforce STARTTLS on port 587 as it is used by authenticated users to send emails, preventing them to send emails without network encryption.
On port 25, used by external servers to reach yours, it is important to allow STARTTLS because most server will deliver emails over an encrypted TLS session, however it is your choice to enforce it or not.
Enforcing STARTTLS might break email delivery from some external servers that are outdated or misconfigured (or bad actors).
By default, OpenSMTPD is configured to deliver email to valid users in the system. In my example, if user solene exists, then email address solene@puffy.cafe will deliver emails to solene user mailbox.
Of course, as you do not want the system daemons to receive emails, a file contains aliases to redirect emails from a user to another, or simply discard it.
In /etc/mail/aliases, you can redirect emails to your username by adding a new line, in the example below I will redirect root emails to my user.
root: solene
It is possible to redirect to multiple users using a comma to separate them, this is handful if you want to create a local group delivering emails to multiple users.
Instead of a user, it is possible to append the incoming emails to a file, pipe them to a command or return an SMTP code. The aliases(5) man pages contains all you need to know.
If you need to handle emails for multiple domains, this is rather simple:
Add this line to the file /etc/mail/smtpd.conf by changing puffy.cafe to the other domain name: match from any for domain "puffy.cafe" action "local"
Configure the other domain DNS MX/SPF/DKIM/DMARC
Configure /etc/rspamd/local.d/dkim_signing.conf to add a new block with the other domain, the dkim selector and the dkim key path
The PTR does not need to be modified as it should match the machine hostname advertised over SMTP, and it is an unique value anyway
If you want to use a different aliases table for the other domain, you need to create a new aliases file and configure /etc/mail/smtpd.conf accordingly where the following lines should be added:
table lambda file:/etc/mail/aliases-lambda

action "local_mail_lambda" lmtp "/var/dovecot/lmtp" alias <lambda>

match from any for domain "lambda-puffy.eu" action "local_mail_lambda"
Note that the users will be the same for all the domains configured on the server. If you want to have separate users per domains, or that "user a" on domain A and "user a" on domain B could be different persons / logins, you would need to setup virtual users instead of using system users. Such setup is beyond the scope of this guide.
It is possible to not use Dovecot. Such setup can suit users who would like to download the maildir directory using rsync on their local computer, this is a one-way process and does not allow sharing a mailbox across multiple devices. This reduces maintenance and attack surface at the cost of convenience.
This may work as a two-way access (untested) when using a software such as unison to keep both the local and remote directories synchronized, but be prepared to manage file conflicts!
If you want this setup, replace the following line in smtpd.conf
action "local" lmtp "/var/dovecot/lmtp" alias <aliases>
by this line: if you want to store the emails into a maildir format (a directory per email folder, a file per email), emails will be stored in the directory "Maildir" in user's homes.
action "local" maildir "~/Maildir/" junk alias <aliases>
or this line if you want to keep the mbox format (a single file with emails appended to it, not practical), the emails will be stored in /var/mail/$user.
Dovecot is an important piece of software for the domain end users, it provides protocols like IMAP or POP3 to read emails from a client. It is the most popular open source IMAP/POP server available (the other being Cyrus IMAP).
Install dovecot with the following command line:
pkg_add dovecot-- dovecot-pigeonhole--
Dovecot has a lot of configuration files in /etc/dovecot/conf.d/ although most of them are commented and ready to be modified, you will have to edit a few of them. This guide provides the content of files with empty lines / comments stripped so you can quickly check if your file is ok, you can use the command awk '$1 !~ /^#/ && $1 ~ /./' on a file to display its "useful" content only (awk will not modify the file).
Modify /etc/dovecot/conf.d/10-ssl.conf and search the lines ssl_cert and ssl_key, change their values to your certificate full chain and private key.
Generate a Diffie-Hellman file for perfect forward secrecy, this will make each TLS negociation unique, so if the private key ever leak, every past TLS communication will remain safe.
Modify /etc/dovecot/conf.d/10-mail.conf, search for a commented line mail_location, uncomment it and set the value to maildir:~/Maildir, this will tell Dovecot where users mailboxes are stored and in which format, we want to use the maildir format.
Modify the file /etc/dovecot/conf.d/20-lmtp.conf, LMTP is the protocol used by opensmtpd to transmit incoming emails to dovecot. Search for the commented variable mail_plugins and uncomment it with the value mail_plugins = $mail_plugins sieve:
IMAP is an efficient protocol that returns headers of emails per directory, so you do not have to download all your emails to view the directory list, emails are downloaded upon read (by default in most email clients). It allows some cool features like server side search, incoming email sorting with sieve filters or multi devices access.
Edit /etc/dovecot/conf.d/20-imap.conf and configure the last lines accordingly to the result file:
The number of connections per user/IP should be high if you have an email client tracking many folders, in IMAP a connection is required for each folder, so the number of connections can quickly increase. On top of that, if you have multiple devices under the same public IP you could quickly reach the limit. I found 25 worked fine for me with 3 devices.
POP3 is a pretty old protocol that is rarely considered by users, I still consider it a viable alternative to IMAP depending on your needs.
A major incentive for using POP is that it downloads all emails locally before removing them from the server. As we have no tooling to encrypt emails stored on remote email servers, POP3 is a must if you want to not leave any email on the server. POP3 does not support remote folders, so you can not use Sieve filters on the server to sort your emails and then download them as-this. A POP3 client downloads the Inbox and then sorts the emails locally.
It can support multiple devices under some conditions: if you delete the emails after X days, your devices should synchronize before the emails are removed. In such case they will have all the emails stored locally, but they will not be synced together: if both computers A and B are up-to-date, when deleting an email on A, it will still be in B.
There are no changes required for POP3 in Dovecot as the defaults are good enough.
For information, a replacement for IMAP called JMAP is in development, it is meant to be better than IMAP in every way and also include calendars and address book management.
JMAP Implementations are young but exist, although support in email clients is almost non-existent. For instance, it seems Mozilla Thunderbird is not interested in it, an issue in their bug tracker about JMAP from December 2016 only have a couple of comments from people who would like to see it happening, nothing more.
Dovecot has a plugin to offer Sieve filters, they are rules applied to received emails going into your mailbox, whether you want to sort them into dedicated directories, mark them read or block some addresses. That plugin is called pigeonhole.
You will need Sieve to enable the spam filter learning system when moving emails from/to the Junk folder as it is triggered by a Sieve rule. This improves rspamd Bayes (a method using tokens to understand information, the story of the person behind it is interesting) filter ability to detect spam accurately.
Edit /etc/dovecot/conf.d/90-plugin.conf with the following content:
This piece of configuration was taken from the official Dovecot documentation: https://doc.dovecot.org/configuration_manual/howto/antispam_with_sieve/ . It will trigger shell scripts calling rspamd to make it learn what does a spam look like, and what is legit (ham). One script will run when an email is moved out of the spam directory (ham), another one when an email is moved to the spam directory (spam).
Modify /etc/dovecot/conf.d/15-mailboxes.conf to add the following snippet inside the block namespace inbox { ... }, it will associate the Junk directory as the folder containing spam and automatically create it if it does not exist:
  mailbox Spam {
    auto = create
    special_use = \Junk
  }
To make this work completely, you need to write the two extra sieve filters that will run trigger the scripts:
By default, Sieves rules are a file located on the user home directory, however there is a standard protocol named "managesieve" to manage Sieve filters remotely from an email client.
It is enabled out of the box in Dovecot configuration, although you need to make sure you open the port 4190/tcp in the firewall if you want to allow users to use it.
A webmail will allow your users to read / send emails from a web interface instead of having to configure a local email client. While they can be convenient, they enable a larger attack surface and are often affected by vulnerability issues, you may prefer to avoid webmail on your server.
The two most popular open source webmail are Roundcube mail and Snappymail (a fork of the abandoned rainloop) and Roundcube, they both have pros and cons.
Roundcube is packaged in OpenBSD, it will pull in all required dependencies and occasionally receive backported security updates.
Install the package:
pkg_add roundcubemail
When installing the package, you will be prompted for a database backend for PHP. If you have one or two users, I highly recommend choosing SQLite as it will work fine without requiring a running daemon, thus less maintenance and server resources locked. If you plan to have a lot of users, there are no wrong picks between MySQL or PostgreSQL, but if you already have one of them running it would be better to reuse it for Roundcube.
Specific instructions for installing Roundcube are provided by the package README in /usr/local/share/doc/pkg-readmes/roundcubemail.
We need to enable a few PHP modules to make Roundcube mail working:
Note that more PHP modules may be required if you enable extra features and plugins in Roundcube.
PHP is ready to be started:
rcctl enable php82_fpm
rcctl start php82_fpm
Add the following blocks to /etc/httpd.conf, make sure you opened the port 443/tcp in your pf.conf and that you reloaded it with pfctl -f /etc/pf.conf:
server "mail.puffy.cafe" {

    listen on egress tls

    tls key "/etc/ssl/private/mail.puffy.cafe.key"
    tls certificate "/etc/ssl/mail.puffy.cafe.fullchain.pem"

    root "/roundcubemail"

    directory index index.php

    location "*.php" {
        fastcgi socket "/run/php-fpm.sock"
    }
}

types {
    include "/usr/share/misc/mime.types"
}
Restart httpd with rcctl restart httpd.
You need to configure Roundcube to use a 24 bytes security key and configure the database: edit the file /var/www/roundcubemail/config/config.inc.php:
Search for the variable des_key, replace its value by the output of the command tr -dc [:print:] < /dev/urandom | fold -w 24 | head -n 1 which will generate a 24 byte random string. If the string contains a quote character, either escape this character by prefixing it with a \ or generate a new string.
For the database, you need to search the variable db_dsnw.
To make sure the files cert.pem and openssl.cnf stay in sync after upgrades, add the two commands to a file /etc/rc.local and make this file executable. This script always starts at boot and is the best place for this kind of file copy.
If your IMAP and SMTP hosts are not on the same server where Roundcube is installed, adapt the variables imap_host and smtp_host to the server name.
If Roundcube mail is running on the same server where OpenSMTPD is running, you need to disable certificate validation because localhost will not match the certificate and authentication will fail. Change smtp_host line to $config['smtp_host'] = 'tls://127.0.0.1:587'; and add this snippet to the configuration file:
It is always possible to improve the security of this stack, all the following settings are not mandatory, but they can be interesting depending on your needs.
7.1. Always allow the sender per email or domain §
It is possible to configure rspamd to force it to accept emails from a given email address or domain, bypassing the anti-spam.
To proceed, edit the file /etc/rspamd/local.d/multimap.conf to add this content:
local_wl_domain {
        type = "from";
        filter = "email:domain";
        map = "$CONFDIR/local.d/whitelist_domain.map";
        symbol = "LOCAL_WL_DOMAIN";
        score = -10.0;
        description = "domains that are always accepted";
}

local_wl_from {
        type = "from";
        map = "$CONFDIR/local.d/whitelist_email.map";
        symbol = "LOCAL_WL_FROM";
        score = -10.0;
        description = "email addresses that are always accepted";
}
Create the files /etc/rspamd/local.d/whitelist_domain.map and /etc/rspamd/local.d/whitelist_email.map using the command touch.
Restart the service rspamd with rcctl restart rspamd.
The created files use a simple syntax, add a line for each entry you want to allow:
a domain name in /etc/rspamd/local.d/whitelist_domain.map to allow the domain
an email address in /etc/rspamd/local.d/whitelist_email.map to allow this address
There is no need to restart or reload rspamd after changing the files.
Reusing the same technique can be done to block domains/addresses directly in rspamd by giving a high positive score.
If you want to improve your email setup security further, the best method is to split each part into dedicated systems.
As dovecot is responsible for storing and exposing emails to users, this component would be safer in a dedicated system, so if a component of the email stack (other than dovecot) is compromised, the mailboxes will not be exposed.
If this does not go against usability of the email server users, I strongly recommend limiting the publicly opened ports in the firewall to the minimum: 25, 80, 465, 587. This would prevent attackers to exploit any network related 0day or unpatched vulnerabilities of non-exposed services such as Dovecot.
A VPN should be deployed to allow users to reach Dovecot services (IMAP, POP) and other services if any.
SSH port could be removed from the public ports as well, however, it would be safer to make sure your hosting provider offers a serial access / VNC / remote access to the system because if the VPN stops working, you will not be able to log in into the system using SSH to debug it.
There is an online service providing you a random email address to send a test email to, then you can check the result on their website displaying if the SPF, DKIM, DMARC and PTR records are correctly configured.
The score you want to be displayed on their website is no least than 10/10. The service can report meaningless issues like "the email was poorly formatted" or "you did not include an unsubscribe link", they are not relevant for the current test.
While it used to be completely free last time I used it, I found it would ask you to pay after three free checks if you do not want to wait 24h. It uses your public IP address for the limit.
The following processes list should always be running: using a program like monit, zabbix or reed-alert to notify you when they stop working could be a good idea.
In addition, the TLS certificate should be renewed regularly as ACME generated certificates are valid for a few months. Edit root crontab with crontab -e as root to add this line:
This will try to renew the certificate for mail.puffy.cafe every Sunday at 04h10 and upon renewal restart the services using the certificate: dovecot, httpd and smtpd.
Finally, OpenSMTPD will stop delivering emails locally if the /var partition has less than 4% of free disk space, be sure to monitor the disk space of this partition otherwise you will not receive emails anymore for a while before noticing something is wrong.
Congratulations, you configured a whole email stack that will allow you to send emails to the world, using your own domain and hardware. Keeping your system up to date is important as you have network services exposed to the wild Internet.
Even with a properly configured setup featuring SPF/DKIM/DMARC/PTR, it is not guaranteed to not end in the spam directory of our recipients. The IP reputation of your SMTP server also account, and so is the domain name extension (I have a .pw domain which I learned too late that it was almost always considered as spam because it is not mainstream).