About me: My name is Solène Rapenne, pronouns she/her. I like learning and
sharing knowledge. Hobbies: '(Qubes OS BSD OpenBSD Lisp cmdline gaming security QubesOS internet-stuff). I
love percent and lambda characters. Qubes OS core team member, former OpenBSD developer solene@. No AI is involved in this blog.
Contact me: solene at dataswamp dot org or
@solene@bsd.network (mastodon).
I have a lot of photos that I have been carrying since a long time, this is certainly my oldest files that I was able to not lost over 20 years. It has been stored as a hierarchy since then, and it had very poor metadata information, and poor ability to be browsed. It was time to improve on this.
My goal was to fix metadata on my pictures, but also put geolocation metadata on them because I really enjoy see a map with thumbnails of memories (just make sure to trim this metadata before sharing). Then I found about "modern" features like face recognitions, which allowed me to easily sort pictures by people, which I found handy when I want to view photos of relatives who are no longer with us.
I tried multiple solutions, each with pros and cons, here is an overview of my findings.
First, they almost all support the following features, let's say it is the core set of features we want:
As of my experience, it was practical to edit a lot of pictures and reset incorrect metadata, or add geolocation on directories of pictures. But the overall experience was pretty bad, I gave up a few times, I had to dig a lot to figure how to achieve what I wanted correctly.
I did not really enjoy using Digikam at all, but to my surprise, it is the most viable and advanced photo library around. There are other software of course, but they all lacked a few features Digikam had.
Digikam can generate metadata from filename (date, time), this can be useful when you have a lot of old pictures that have timestamp in the filename, but not in the metadata.
Photoprism is an open source web app that you can self host. It is rather easy to host and use, although the user interface is not really great, it works well.
In addition to face recognition, it has scene / objects recognition. In practice, it gave funky results like a volcano scene for a dish photo.
One issue with photoprism is that an instance of it can only have a single set of pictures, you can make multiple users for access control, but they are all admin.
Some features have a weird user experience, most notably the face recognition interface.
This is the best software around for the task, by far, in my opinion. It works great, looks great, it has a great user interface and provides Android and iOS apps for uploading new pictures.
Face recognition works well, and I did not have to fight with it to associate names to faces, like it was on Photoprism.
One surprising feature I really enjoy is that it daily shows pictures taken the same day of previous years, this is an engaging way to revisit old pictures for me and I check it daily now.
Compared to Photoprism, you can have multiple users with their own libraries, and users can give access of some folders or their libraries to other users of the same instance.
It comes with a share feature that creates a link that can show a set of pictures and strip all metadata, with optional password and expiration time.
Scenes and objects recognition works well, I can search "flower" and get all pictures featuring flowers. This kind of feature adds some CPU use when new pictures are imported, but it is really light in terms of CPU/memory requirements.
For my use case, Immich is exactly what I wanted: an efficient and easy picture management software, that allows me to share some pictures with a URL, and even share my library with my husband. Face recognition is not something I expected on average software, but it works great.
Digikam had a steep learning curve, but allowed me to edit a few thousand pictures in a few hours, although Immich supports editing pictures it might not be as convenient.
I used Photoprism a bit after looking for an alternative to Digikam, but then I found about Immich and immediately gave up on Photoprism.
I really like containers, but they are something that is currently very bad from a security point of view: distribution
We download container images from container registries, whether it is docker.io, quay.io or ghcr.io, but the upstream project do not sign them, so we can not verify a CI pipeline or the container registry did not mess with the image. There are actually a few upstream actors signing their images: Fedora, Red Hat and universial-blue based distros (Bluefin, Aurora, Bazzite), so if you acquire their public key using for signing from a different channel, you can verify if you got the image originally built. Please do not hesitate to get in touch with me if you know about other major upstream that sign their container images.
Nevertheless, we can still create containers ourself from trustable artifacts signed by upstream. Let's take a look at how to proceed with Alpine Linux.
The GPG file is at the top of the list, it is better to get it from a different channel to make sure that if the website was hacked, the key was not changed accordingly with all the signed files, in which case you would just trust the key of an attacker and it would validate the artifacts. A simple method is to check the page from webarchive a few days / week before and verify that the GPG file is the same on webarchive and the official website.
The GPG key fingerprint I used is 0482 D840 22F5 2DF1 C4E7 CD43 293A CD09 07D9 495A as of the date of publication.
gpg: Signature made Wed Jan 28 00:25:36 2026 CET
gpg:                using RSA key 0482D84022F52DF1C4E7CD43293ACD0907D9495A
gpg: Good signature from "Natanael Copa <ncopa@alpinelinux.org>" [unknown]
gpg: WARNING: This key is not certified with a trusted signature!
gpg:          There is no indication that the signature belongs to the owner.
Primary key fingerprint: 0482 D840 22F5 2DF1 C4E7  CD43 293A CD09 07D9 495A
The line "Good signature...." tells you that the file integrity check matches the GPG key you imported. The rest of the message tells you that the key is not trustable. This is actually a GPG thing, you would need to edit your keyring and mark the key as "trustable" or have in your keyring a trusted key that signed this key (this is the web of trust GPG wanted to create), but this will only remove the warning. Of course, you can mark that key trustable if you plan to use it for a long time and you are absolutely sure it is the genuine one.
You do not need to verify the checksum using sha256, the GPG check did the same in addition to authenticate the person who produced the checksum.
Now you validated the minirootfs authenticity, you can create an Alpine container!
Without any kind of cryptographic signature mechanism available between upstream and the end user, it is not possible to ensure a container from a third party registry was not tampered with.
It is best for security to rebuild the container image, and then rebuild all the containers you need using your base image, rather than blindly trusting registries.
This process works for other Linux distributions of course. For instance, for Ubuntu you can download Ubuntu base image, the SHA256SUMS.gpg and SHA256SUMS files, and make sure to get a genuine GPG key to verify the signature.
Since I started using Tailscale (using my own headscale server), I've been enjoying it a lot. The file transfer feature is particularly useful with other devices.
This blog post explains my small setup to enhance the user experience.
Tailscale is a network service that allows to enroll devices into a mesh VPN based on WireGuard, this mean every peer connects to every peers, this is not really manageable without some lot of work. It also allows automatic DNS assignment, access control, SSH service and lot of features.
Tailscale refers to both the service and the client. The service is closed source, but not the client. There is a reimplementation of the server called Headscale that you can use with the tailscale client.
When you want to receive a file from Tailscale on your desktop system, you need to manually run tailscale file get --wait $DEST, this is rather not practical and annoying to me.
I wrote a systemd service that starts the tailscale command at boot, really it is nothing fancy but it is not something available out of the box.
In the directory ~/.config/systemd/user/ edit the file tailscale-receiver.service with this content:
When sending files, it is possible to use tailscale file cp $file $target: but it is much more convenient to have it directly from the GUI, especially when you do not know all the remotes names. This also makes it easier for family member who may not want to fire up a terminal to send a file.
Someone wrote a short python script to add this "Send to" feature to Nautilus
Create the directory ~/.local/share/nautilus-python/extensions/ and save the file nautilus-send-to-tailscale.py in it.
Make sure you have the package "nautilus-python" installed, on Fedora it is nautilus-python while on Ubuntu it is python3-nautilus, so your mileage may vary.
Make sure to restart nautilus, a killall nautilus should work but otherwise just logout the user and log back. In Nautilus, in the contextual menu (right click), you should see "Send to Tailscale" and a sub menu should show the hosts.
Tailscale is a fantastic technology, having a mesh VPN network allows to secure access to internal services without exposing anything to the Internet. And because it features direct access between peers, it also enables some interesting uses like fast file transfer or VOIP calls without a relay.
When using a not end-to-end encrypted cloud storage, you may want to store your file encrypted so if the cloud provider (that could be you if you self host a nextcloud or seafile) get hacked, your data will be available to the hacker, this is not great.
While there are some encryption software like age or gpg, they are not usable for working transparently with files. A specific class of encryption software exists, they create a logical volume with your files and they are transparently encrypted in the file system.
You will learn about cryptomator, gocryptfs, cryfs and rclone. They allow you to have a local directory that is synced with the cloud provider, containing only encrypted files, and a mount point where you access your files. Your files are sent encrypted to the cloud provider, but you can use it as usual (with some overhead).
This blog post is a bit "yet another comparison" because all these software also provide a comparison list of challengers.
The main software (running on Linux) is open source, they have a client for all major operating system around, including Android and iOS. The android apps is not free (as in beer), the iOS app is free for read-only, the windows / linux / Mac OS program is free. They have an offer for a company-wide system which can be convenient for some users.
Cryptomator features a graphical interface, making it easy to use.
Encryption suites are good, it uses AES-256-GCM and scrypt, featuring authentication of the encrypted data (which is important as it allows to detect if a file was altered). A salt is used.
Hierarchy obfuscation can be sufficient depending on your threat model. The whole structure information is flattened, you can guess the number of directories and their number of files files, and the file sizes, all the names are obfuscated. This is not a huge security flaw, but this is something to consider.
I first learned about cryfs when using KDE Plasma, there was a graphical widget named "vault" that can drive cryfs to create encrypted directories. This GUI also allow to use gocryptfs but defaults to cryfs.
CryFS is written in C++ but an official rewrite in Rust is ongoing. It works fine on Linux but there are binaries for Mac OS and Windows as well.
Encryption suites are good, it uses AES-256-GCM and scrypt, but you can use xchacha20-poly1305 if you do not want AES-GCM.
It encrypts files metadata and split all files into small blocks of fixed size, it is the only software in the list that will obfuscate all kind of data (filename, directory name, tree hierarchy, sizes, timestamp) and also protect against an old file replay.
It can be surprising to see rclone here, it is a file transfer software supporting many cloud provider, but it also features a few "fake" provider that can be combined with any other provider. Thoses fakes remotes can be used to encrypt files, but also aggregate multiple remotes or split files in chunks. We will focus on the "crypt" remote.
rclone is a Go software, it is available everywhere on desktop systems but not on mobile devices.
Encryption is done through libNaCl and uses XSalsa20 and Poly1305 which both support authentication, and also use scrypt for key derivation. A salt can be used but it is optional, make sure to enable it.
Hierarchy obfuscation is not great, the whole structure information is saved although the names are obfuscated.
LUKS and Veracrypt are not "cloud friendly" because although you can have a local big file encrypted with it and mount the volume locally, it will be synced as a huge blob on the remote service.
From sources directories with 4312 files, 480 directories for a total of 847 MB.
cryptomator ended up with 5280 files, 1345 directories for a total of 855 MB
gocryptfs ended up with 4794 files, 481 directories for a total of 855 MB
cryfs ended up with 57928 files, 4097 directories for a total of 922 MB
rclone ended up with 4311 files, 481 directories for a total of 847 MB
Although cryptomater has a bit more files and directories in its encrypted output compared to the original files, the obfuscation is really just all directories being in a single directory with filenames obfuscated. Some extra directories and files are created for cryptomator internal works, which explains the small overhead.
I used default settings for cryfs with a blocksize of 16 kB which is quite low and will be a huge overhead for a synchronization software like Nextcloud desktop. Increasing the blocksize is a setting worth considering depending on your file sizes distribution. All files are spread in a binary tree, allowing it to scale to a huge number of files without filesystem performance issue.
In my opinion, the best choice from a security point of view would be cryfs. It features full data obfuscation, good encryption, mechanisms that prevent replaying old files or swapping files. The documentation is clear and we can see the design choices are explained with ease and clearly.
But to be honest, I would recommend cryptomator to someone who want a nice graphical interface, easy to use software and whose threat model allows some metadata reveal. It is also available everywhere (although not always for free), which is something to consider.
Authentication is used by all these software, so you will know if a file was tampered with, although it does not protect against swapping files or replaying an old file, this is certainly not in everyone's threat model. Most people will just want to prevent a data leak to read their data, but the case of a cloud storage provider modifying your encrypted files is less likely.
Some self hostable cloud storage provider exists with end-to-end encryption (file are encrypted/decrypted locally and only stored as blob remotely):
The two major products I would recommend are Peergos and Seafile. I am a peergos user, it works well and features a Web UI where as seafile encryption is not great as using the web ui requires sharing the password, metadata protection is bad too.
In a recent change within fish shell, the shortcut to delete last words were replaced by "delete last big chunk" (I don't know exactly how it is called in this case) which is usually the default behavior on Mac OS "command" key vs "alt" key and I guess it is why it was changed like this on fish.
Unfortunately, this broke everyone's habit and a standard keyboard do not even offer the new keybinding that received the old behavior.
There is an open issue asking to revert this change.
I am using this snippet in ~/.config/fish/config.fish to restore the previous behavior (the same as in other all other shell, where M-d deletes last word). I build it from the GitHub issue comments, I had to add $argv for some reasons.
if status is-interactive
 # Commands to run in interactive sessions can go here

 # restore delete behavior
 bind $argv alt-backspace backward-kill-word
 bind $argv alt-delete kill-word
 bind $argv ctrl-alt-h backward-kill-word
 bind $argv ctrl-backspace backward-kill-token
 bind $argv ctrl-delete kill-token
end
When you have to deal with containers on Linux, there are often two things making you wonder how to deal with effectively: how to keep your containers up to date, and how to easily maintain the configuration of everything running.
It turns out podman is offering systemd unit templates to declaratively manage containers, this comes with the fact that podman can run in user mode. This combination gives the opportunity to create files, maintain them in git or deploy them with a configuration management tool like ansible, and keep things separated per user.
It is also very convenient when you want to run a program shipped as a container on your desktop.
You need to create files that will declare containers and/or networks, this can be done in various places depending on how you want to manage the files, the man page gives all the details, but basically you want to stick with the two following options:
Both will run rootless containers under the user UID, but one keep the files in /etc/ which may be more suitable for central management.
As systemd is used to run the containers, if you want to run a container for a user that is not one where you are logged, you need to always enable it so its related systemd processes / services are running, including the containers, this is done by enabling "linger".
useradd -m kanban
loginctl enable-linger kanban
This will immediately create a session for that user and pop all related services.
Now, create a file /etc/containers/systemd/users/1001/ (1001 being the uid of kanban user) with this content:
This can exactly map to a very long podman command line that would use the image docker.io/kanboard/kanboard:latest in network podman and declaring three different container volumes and associated mount points. This generator even allows you to add command line arguments in case an option is not available with systemd format.
Because the user already runs, the container will not start yet except if you use disable-linger and then enable-linger the kanban user, and that would not be ideal to be honest. There is a better way to proceed: systemctl --user --machine kanban@ daemon-reload which basically runs systemctl --user daemon-reload by the user kanban except we do it as root user which is more convenient for automation.
Running the container this way will trigger exactly the same processes as if you started it manually with podman run -v kanboard_data:/var/www/app/data/ [...] docker.io/kanboard/kanboard:latest.
Note that you can skip the [Install] section if you do not want to automatically start the container, and prefer to manually start/stop it with "systemctl", this is actually useful if you have the container under your regular user and do not always need it.
If you want to run a more complicated service that need a couple of containers to talk together like a web server, a backend runner and a database, you only need to configure them in the same network.
If you need them to start the containers of a group in a specific order, you can add use systemd dependency declaration in [Install] section.
Podman will run a local DNS resolver that translates the container name into a working hostname, this mean if you have a postgresql container called "db", then you can refer to the postgresql host as "db" from another container within the same network. This works the same way as docker-compose.
To have a working environment for journalctl or systemctl commands to work requires to use machinectl shell kanban@, otherwise the dbus environment variables will not be initialized. Note that it works too when connecting with ssh, but it is not always ideal if you use it locally.
From this shell, you can run commands like systemctl --user status kanboard.container for our example or journalctl --user -f -u kanboard.container, or run a shell in a container, inspect a volume etc...
This is the very first reason I went into using quadlets for local services using containers, I did not want to have to manually run some podman pull commands over a list then restart related containers that were running.
Podman gives you a systemd services doing all of this for you, this works for containers with the parameter AutoUpdate=registry within the section [Container].
Enable the timer of this service with: systemctl --user enable --now podman-auto-update.timer then you can follow the timer information with systemctl --user status podman-auto-update.timer or logs from the update service with journalctl --user -u podman-auto-update.service.
Make sure to pin your container image to a branch like "stable" or "lts" or "latest" if you want a development version, the update mechanism will obviously do nothing if you pin the image to a specific version or checksum.
Quadlets made me switch to podman as it allowed me to deploy and maintain containers with ansible super easily, and also enabled me to separate each services into different users.
Prior to this, handling containers on a simple server or desktop was an annoying task to figure what should be running, how to start them and retrieving command lines from the shell history or use a docker/podman compose file. This also comes with all the power from systemd like querying a service status or querying logs with journalctl.
There is a program named "podlet" that allow you to convert some file format into quadlets files, most notably it is useful when getting a docker-compose.yml file and transforming it into quadlet files.
In addition to my regular computer mouse, by the end of 2024 I bought a Logitech Lift, a wireless ergonomic vertical mouse. This was the first time I used such mouse, although I am regularly using a track ball, the experience is really different.
The mouse works with a single AA / LR6 battery that with a heavy daily use for nine months is still reported as 30% charged.
The lift connects using Bluetooth, but Logitech provides a small USB dongle for a perfect "out of the box" experience with any operating system. The dongle can be stored within the mouse when travelling, or when not using it. There is a small button on the bottom of the mouse and 3 LED, this allows the mouse to be switched to different computers: two in Bluetooth, one for the dongle. The first profile is always the dongle. This allows you to connect the mouse to two different computers with Bluetooth and be able to switch between them. This works very well in practice.
About the buttons, nothing fancy with the standard two buttons, there are extra "back / next" buttons easily available, one button to cycle the laser resolution / sensitivity. The wheel is excellent, it is precise and easy to use, but if you give it a good kick it will spin a lot without being in free wheel like some other wheels, which is super handy to scroll a huge chunk of text.
Due to the mouse design, it is not ambidextrous, but Logitech made a version for left-handed users and right-hander users.
The first week with the mouse was really weird, I was switching back and forth with my old Steel Series mouse because I was less accurate and not used to it.
After a week, I became used to holding it, moving it, and it was a real joy and source of fun to go on the computer to use this mouse :)
Then, without noticing, I started using it exclusively. A few months later, I realized I did not use the previous mouse for a long time and gave it a try. This was a terrible experience, I was surprised that it was fitting really poorly in my hand, then I disconnected it, and it has been stored in a box since then.
It is hard to describe the feeling of this ergonomic mouse, the hand position is really different, but it feels much more enjoyable that I do not consider using a non-ergonomic mouse ever again.
I was reluctant to use a wireless mouse at first, but not having to deal with the cable acting as a "spring" is really appreciable.
I can definitely play video games with this mouse, except nervous FPS (maybe with some training?).
The price tag could be a blocker for many, but at the same time it is an essential peripheral when using your computer. If you feel some pain in your hand when using your computer mouse, maybe give a try to ergonomic mice.
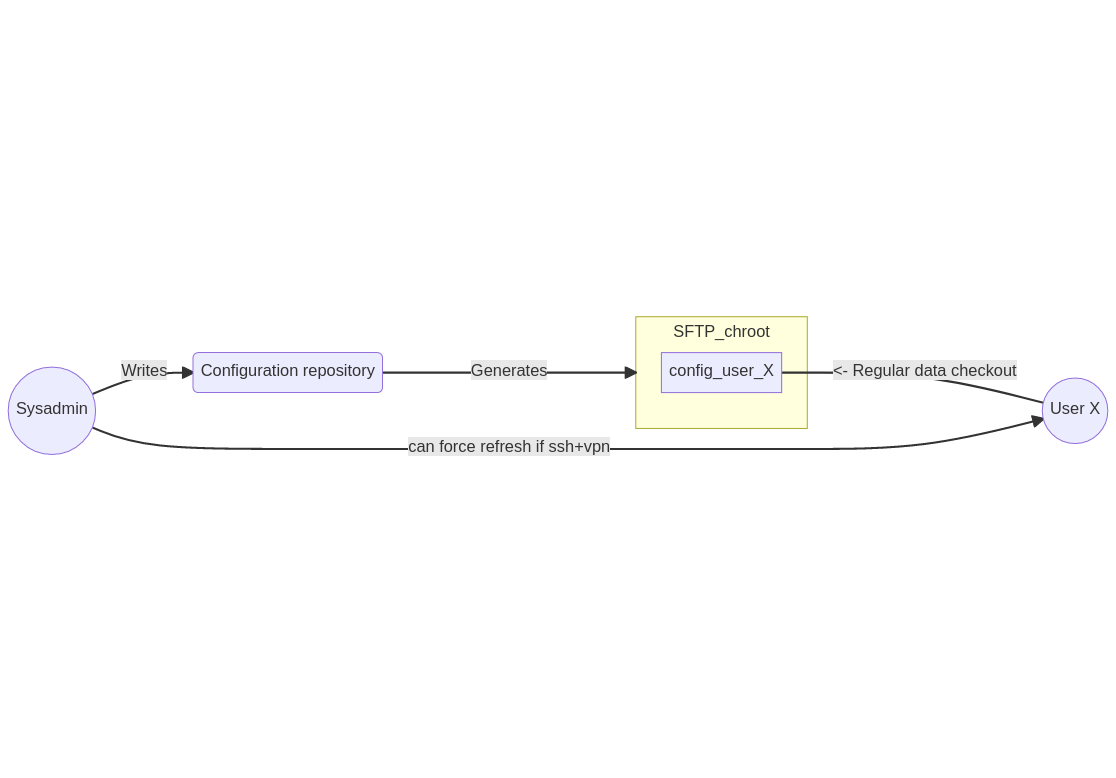
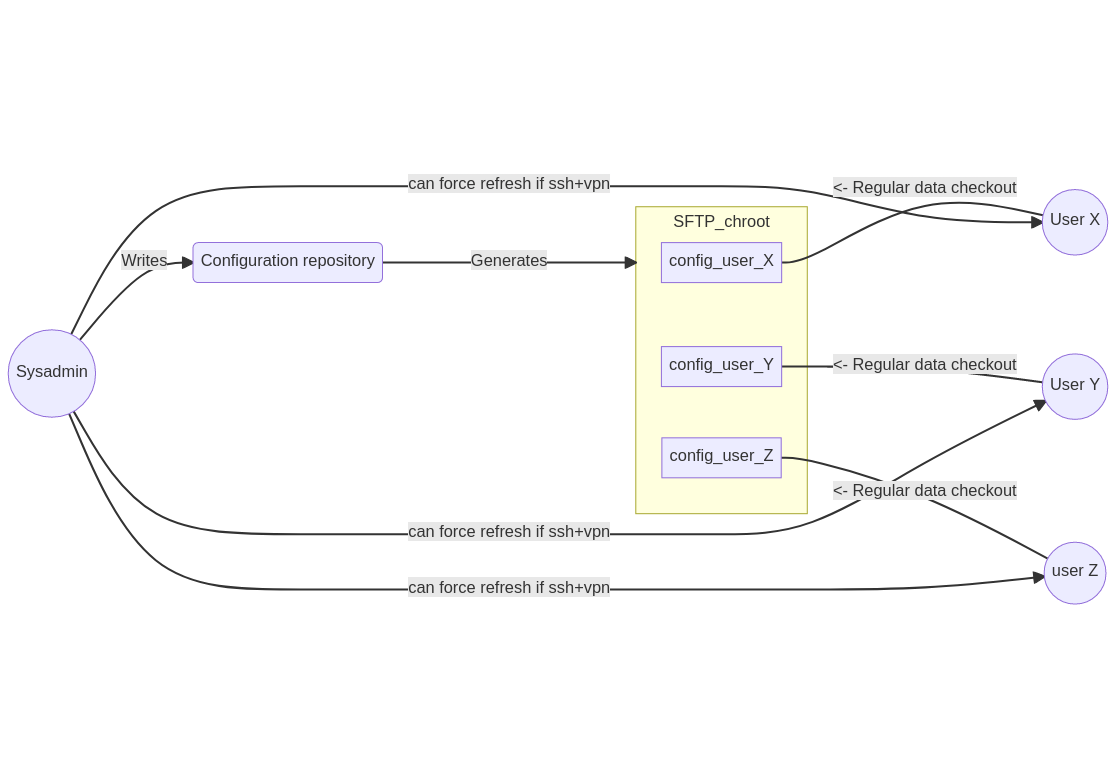
This guide is meant to users who want to allow a qube to reach some websites but not all the Internet, but facing the issue that using the firewall does not work well for DNS names using often changing IPs.
⚠️ This guide is for advanced users who understand what a HTTP(s) proxy is, and how to type commands or edit files in a terminal.
The setup will create a sys-proxy-out qube that will define a list of allowed domains, and use qvm-connect-tcp to allow client qubes to use it as a proxy. Those qubes could have no netvm, but still reach the filtered websites.
I based it on debian 12 xfce, so it's easy to set up and will be supported long term.
This step could be repeated multiple times, if you want to have multiple proxies with different lists of domains.
Create a new qube, let's call it sys-proxy-out, based on the template you configured above (debian-12-xfce-squid in the example)
Configure its firewall to allow the destination * and port TCP 443, and also * and port TCP 80 (this covers basic needs for doing http/https). This is an extra safety to be sure the proxy will not use another port.
Start the qube
Configure the domain list in /rw/config/domains.txt with this format:
# for a single domain
domain.example

# for all direct subdomains of qubes.org including qubes.org
# this work for doc.qubes-os.org for instance, but not foo.doc.qubes-os.org
.qubes-os.org
ℹ️ If you change the file, reload with sudo systemctl reload squid.
ℹ️ If you want to check squid started correctly, type systemctl status squid. You should read that it's active, and that there are no error in the log lines.
⚠️ If you have a line with a domain included by another line, squid will not start as it considers it an error! For instance .qubes.org includes doc.qubes-os.org.
⚠️ As far as I know, it is only possible to allow a hostname or a wildcard of this hostname, so you at least need to know the depth of the hostname. If you want to allow anything.anylevel.domain.com, you could use dstdom_regex instead of dstdomain, but it seems a regular source of configuration problems, and should not be useful for most users.
In dom0, using the "Qubes Policy Editor" GUI, create a new file named 50-squid (or edit the file /etc/qubes/policy.d/50-squid.policy) and append the configuration lines that you need to adapt from the following example:
In the proxy qube, you can check all requests done in /var/log/squid/access.log, you can filter with grep TCP_DENIED to see denied requests, this can be useful to adapt the domain list.
In the qube sys-proxy-out, inspect /var/spool/squid/, it should be empty. If not, please report here, this should not happen.
Some logs file exist in /var/log/squid/, if you don't want any hints about queried domains, configure squid accordingly. Privacy-specific tweaks are beyond the scope of this guide.
Qubes OS can appear as something weird and hard to figure for people that never used it. By this article, I would like to help other understanding what it is, and when it is useful.
Two years ago, I wrote something that was mostly a list of Qubes OS features, but this was not really helping readers to understand what is Qubes OS except it does XYZ stuff.
While Qubes OS is often tagged as a security operating system, it only offers a canvas to handling compartmentalized systems to work as a whole.
Qubes OS gives its user the ability to do cyber risk management the way they want, which is unique. A quick word about it if you are not familiar with risk management: for instance, when running software at different level, you should ask "can I trust this?", can you trust the packager? The signing key? The original developer? The transitive dependencies involved? It is not possible to entirely trust the whole chain, so you might want to take actions like handling sensitive data only when disconnected. Or you might want to ensure that if your web browser is compromised, the data leak and damage will be reduced to a minimum. This can go pretty far and is complementary to in-depth defense or security hardening of operating systems.
In the article, I will pass on some features that I do not think are interesting for introducing Qubes OS to people or that could be too confusing, so no need to tell me I forgot to talk about XYZ feature :-)
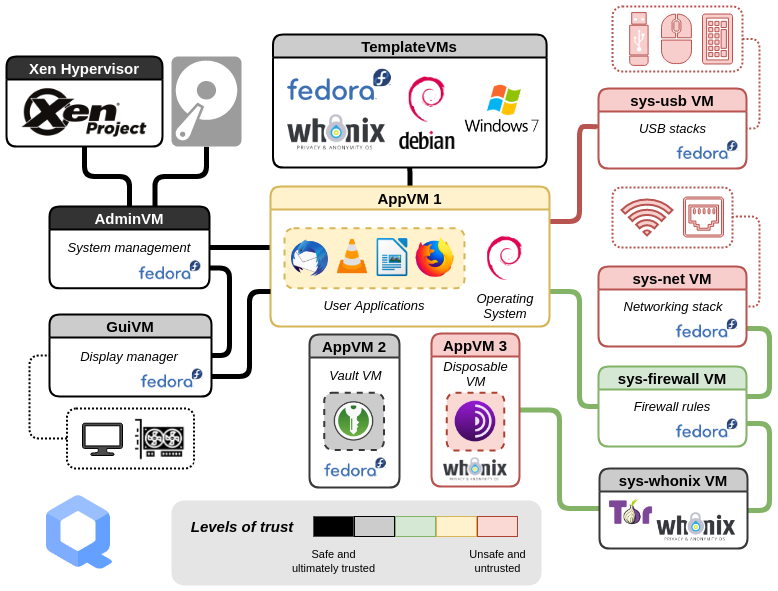
I like to call Qubes OS a meta operating system, because it is not a Linux / BSD / Windows based OS: its core is Xen (some kind of virtualization enabled kernel). Not only it's Xen based, but by design it is meant to run virtual machines, hence the name "meta operating system" which is an OS meant to run many OSes make sense to me.
Qubes OS comes with a few virtual machines templates that are managed by the development team:
debian
fedora
whonix (debian based distribution hardened for privacy)
There are also community templates for arch linux, gentoo, alpine, kali, kicksecure and certainly other you can find within the community.
Templates are not just templates, they are a ready to work, one-click/command install systems that integrate well within Qubes OS. It is time to explain how virtual machines interact together, as it is what makes Qubes OS great compared to any Linux system running KVM.
A virtual machine is named a "qube", it is a set of information and integration (template, firewall rules, resources, services, icons, ...).
The host system which has some kind of "admin" powers with regard to virtualization is named dom0 in Xen jargon. On Qubes OS, dom0 is a Fedora system (using a Xen kernel) with very few things installed, no networking and no USB access. Those two devices classes are assigned to two qubes, respectively named "sys-net" and "sys"usb". It is so to reduce the surface attack of dom0.
When running a graphical program within a qube, it will show a dedicated window in dom0 window manager, there are no big windows for each virtual machine, so running programs feels like a unified experience. The seamless windows feature works through a specific graphics driver within the qube, official templates support it and there is a Windows driver for it too.
Each qube has its own X11 server running, its own clipboard, kernel and memory. There are features to copy the clipboard of one qube, and transfer it to the clipboard of another qube. This can be configured to prevent clipboards to be used where you should not. This is rather practical if you store all your passwords in a qube, and you want to copy/paste them.
There are also file copy capabilities between qubes, which goes through Xen channels (some interconnection between Xen virtual machines allowing to transfer data), so no network is involved for data transfer. Data copy can also be configured, like one qube may be able to receive files from any, but never allow file to be transferred out.
In operations involving RPC features like file copy, a GUI in dom0 is shown to ask confirmation by the user (with a tiny delay to prevent hitting Enter before being able to understand what was going on).
As mentioned above, USB devices are assigned to a qube named "sys-usb", it provides a program to pass a device to a given qube (still through Xen channels), so it is easy to dispatch devices where you need them.
Qubes OS offer a tree like networking with sys-net (holding the hardware networking devices) at the root and a sys-firewall qube below, from there, you can attach qubes to sys-firewall to get network.
Firewall rules can be configured per qube, and will be applied on the qube providing network to the one configured, this prevents the qube from removing its own rules because it is done at a level higher in the tree.
A tree like networking system also allow running multiple VPN in parallel, and assign qubes to each VPNs as you need. In my case, when I work for multiple clients they all have their own VPN, so I dedicate them a qube connecting to their VPN, then I attach qubes I use to work for this client to the according VPN. With the firewall rule set on the VPN qube to prevent any connection except to the endpoint, I have the guarantee that all traffic of that client work will go through their VPN.
It is also possible to not use any network in a qube, so it is offline and unable to connect to network.
Qubes OS come out of the box (except if you uncheck the box) with a qube encapsulating all traffic network through Tor network (incompatible traffic like UDP is discarded).
I talked about templates earlier, in the sense of "ready to be installed and used", but a "Template VM" in Qubes OS has a special meaning. In order to make things manageable when you have a few dozen qubes, like handling updates or installing software, Qubes OS introduced Templates VMs.
A Template VM is a qube that you almost never use, except when you need to install a software or make a system change within it. Qubes OS updater will also make sure, from time to time, that installed packages are up-to-date.
So, what are them if there are not used? They are templates for a type of qubes named "AppVM". An AppVM is what you work the most with. It is an instance of the template it is configured to use, always reset from pristine state when starting, with a few directories persistent across reboot for this AppVM. The directories are all in /rw/ and symlinked where useful: /home and /usr/local/ by default. You can have a single Template VM of Debian 13 and a dozen AppVM with each their own data in it, if you want to install "vim", you do it in the template and then all AppVM using Debian 13 Template VM will have "vim" installed (after a reboot after the change). Note that is also work for emacs :)
With this mechanism, it is easy to switch an AppVM from a Linux distribution to another, just switch the qube template to use Fedora instead of Debian, reboot, done. This is also useful when switching to a new major release of the distribution in the template: Debian 13 is bugged? Let's switch back to Debian 12 until it is fixed and continue working (do not forget writing a bug report to Debian).
You learned about Templates VM and how a AppVM inherits all the template, reset in fresh state every time. What about an AppVM that could be run from its pristine state the same way? They did it, it is called a disposable qube.
Basically, a disposable qube is a temporary copy of an AppVM with all its storage discarded on shutdown. It is the default for the sys-usb qube handling USB, if it gets infected by a device, it will be reset from a fresh state next boot.
Disposables have many use case:
running a command on non-trusted file, to view or try to convert it to something more trustable (a PDF into BMP?)
running a known to work system for a specific task, and be sure it will work exactly the same every time, like when using a printer
as a playground to try stuff in an environment identical to another
qubes are using virtual storage that can stack multiple changes, from a base image with different layers of changes over time stacked on top of it. Once the number of revisions to keep is reached, the oldest layer above the base image is merged. This is a simple mechanism that allows to revert to any given checkpoint between the base image and the last checkpoint.
Did you delete important files, and restoring a backup is way too much effort? Revert the last volume. Did a package update break an important software in a template? Revert the last volume.
Obviously, it comes as an extra storage cost, deleted files are only freed from the storage once they do not exist in a checkpoint.
it is slower than running a vanilla system, because all virtualization involved as a cost, most notably all 3D rendering is done on CPU within qubes, which is terrible for eye candy effects or video decoding. It is possible, with a lot of efforts, to assign second GPU when you have one, to a single qube at a time, to use it, but as the sentence already long enough is telling out loud, it is not practical.
it requires effort to get into as it is different from your usual operating system, you will need to learn how to use it (this sounds rather logical when using a tool)
hardware compatibility is a bit limited due Xen kernel, there is compatibility list curated by the community
I tried to give a simple overview of major Qubes OS features. The goal was not to make you reader an expert or be aware of every single feature, but to allow you to understand what Qubes OS can offer.
When using a laptop connected to power most of the time, you may want it to power off once it gets disconnected, this can be really useful if you use it in a public area like a bar or a train. The idea is to protect the laptop if it gets stolen while in use and unlocked.
Here is how to proceed on Linux, using a trigger on an udev rule looking for a change in the power_supply subsystem.
For OpenBSD users, it is possible to use apmd as I explained in this article:
In the example, the script will just power off the machine, it is up to you to do whatever you want like destroy the LUKS master key or trigger the coffee machine :D
If you unplug your laptop power, it should power off, you should find an entry in the logs.
If nothing happens, looks at systemd logs to see if something is wrong in udev, like a syntax error in the file you created or an incorrect path for the script.
While BusKill is an effective / unusual product that is certainly useful for a niche, protecting a running laptop against thieves is an extra layer when being outside.
Obviously, this use case works only when the laptop is connected to power.
Today, I had to open a password protected PDF (medical report), unfortunately it is a few years old document and I did not remember the password format (usually something based on named and birthdate -_-).
I found a nice tool that can try a lot of combinations, and it is even better as if you know a bit the password format you can easily generate tested patterns.
The project page offers binaries for some operating systems, but you can compile it using cargo.
The documentation on the project's README is quite clear and easy to understand. It is possible to generate some simple patterns, try all combinations of random characters or use a dictionary (some tools exists to generate a dictionary).
Inside a virtual machine with 4 vCPU, I was able to achieve 36 000 checks per second, on baremetal I expect this to be a higher.
First, I decided to stop the Patreon page for multiple reasons. It was an interesting experimentation and helped me a lot in 2023 and a part of 2024 as I went freelance and did not earn much money. Now, the business is running fine and prefer my former patrons to support someone else more active / who need money.
The way I implemented Patreon support was like this: people supporting me financially had access to blog posts a 2 or 3 days earlier than the public release, the point was to give them a little something for their support without creating a paywall for some content. I think it worked quite well in that regard. A side effect of the "early access publishing" was that, almost every time, I used this extra delay to add more content / fix issues that I did not think about when writing. As a reminder, I usually just write then proofread quickly and publish.
Having people paying money to have early access to my blog posts created some kind of expectations from them in my mind, so I tried to raise the level higher in terms of content at the point that I came to procrastinate because "this blog post will not be interesting enough" or "this will just take too long to write, I'm bored". My writing cadence got delayed, I was able to sustain once a week at first then moved to twice a month. I have no idea if readers had "expectations", but I imagined it and acted like if it was a thing.
For each blog post I was publishing, this also created extra work for me:
publish in early access
write short news about it on Patreon
wait a few days and republish not in early access
It is not much more work, but this was still more work to think and schedule.
Cherry on the cake, Patreon was already bloated when I started using it, but it has been more and more aggressive in terms of marketing and selling features, which disgusted me at some point. I was not using all of this, but I felt bad to have people supporting me having to deal with it.
I used Patreon to publish a "I stop Patreon support but the blog continues" news, but it seems it is poorly handled on Patreon when you freeze a creator's page as subscribers are not able to see anything anymore once you put on freeze?! Sorry for the lack of news, I thought it was working fine :/
The blog started and has lived as the place where I shared my knowledge during my continuous learning journey. The thing is I learn less nowadays and more complicated knowledge that is hard to share, because it is super niche and certainly not fascinating to most, and because sharing it correctly may be hard.
Most of the blog is about OpenBSD, there were no community place to share it, so I self-hosted it. Then, I started to write about NixOS and got invited by the people I worked with at that time (at Tweag company) to contribute to NixOS documentation, this made sense after all to not write something only me can update and which can not be fixed by others. I did it a bit, but also continued my blog in parallel to share experience and ideas, not really "documentation".
Now I am using Qubes OS daily, for more than a year, I wrote a bit about it, but I started to contribute actively to community guides handled on the project's forum. As a result, this made less content to publish on the blog because it just makes sense to centralize all the documentation in one place that is manageable by a team instead of here.
I spent a lot of time contributing to Qubes OS community guides, mostly about networking/VPN, and early 2025 I officially joined Qubes OS core team as a documentation maintainer (concretely, this gives commit rights on some repositories that are website/documentation related). Qubes OS team is super nice, and the way the work is handled is cool, I will spend a lot of contribution time there (there is a huge backlog of changes to review first), still less time and incentive to write here.
As stated earlier, I finally found a work place that I enjoy and can keep me busy, my last two employers were not really able to figure how to use my weird skill set. I had a lot of time to kill during work in the previous years, so time to experiment and write, I just have a lot less time now because I am really busy at work doing cool things.
My family moved to a new place in 2024 as well, there is a lot of work and gardening to handle, so after this and job work, I just do not have many things to share about on the blog at the moment.
The blog is not dead, I think I will be able to resume activity soon now I turned the page on Patreon and identified why I was not writing here (I like writing here!).
I have a backlog of ideas, I also may write simpler blog posts when I would like to share an idea or a cool project without having to cover it entirely.
Thanks to my patrons support, last week I have been able to replace my 6.5 years old BQ Aquaris X which has been successfully running Lineage OS all that time, by a Google Pixel 8a now running GrapheneOS.
Introducing GrapheneOS is a daunting task, I will do my best to present you the basics information you need to understand if it might be useful for you, and let a link to the project FAQ which contains a lot of valuable technical explanations I do not want to repeat here.
GrapheneOS (written GOS from now on) is an Android based operating system that focuses security. It is only compatible with Google Pixel devices for multiple reasons: availability of hardware security components, long term support (series 8 and 9 are supported at least 7 years after release) and the hardware has a good quality / price ratio.
The goal of GOS is to provide users a lot more control about what their smartphone is doing. A main profile is used by default (the owner profile), but users are encouraged to do all their activities in a separate profile (or multiples profiles). This may remind you about Qubes OS workflow, although it does not translate entirely here. Profiles can not communicate between each others, encryption is done per profile, and some permissions can be assigned per profile (installing apps, running applications in background when a profile is not used, using the SIM...). This is really effective for privacy or security reasons (or both), you can have a different VPN per profile if you want, or use a different Google Play login, different applications sets, whatever! The best feature here in my opinion is the ability to completely stop a profile so you are sure it does not run anything in the background once you exit it.
When you make a new profile, it is important to understand it is like booting your phone again, the first log-in with the profile you will be asked questions like if you started the system for the first time. All settings have the defaults values, and any change is limited to the profile only, this includes ringtones, sound, default apps, themes… Switching between profile is a bit painful, you need to get the top to bottom dropdown menu at full size, then tap the bottom right corner icon and choose the profile you want to switch to, and tap the PIN of that profile. Only the owner profile can toggle important settings like 4G/5G network, or do SIM operations and other "lower level" settings.
GOS has a focus on privacy, but let the user in charge. Google Play and Google Play Services can be installed in one click from a dedicated GOS app store which is limited to GOS apps only, as you are supposed to install apps from Google Play, F-droid or Accrescent. Applications can be installed in a single profile, but can also be installed in the owner profile which lets you copy it to other profiles. This is actually how I do, I install all apps in the user profile, I always uncheck the "network permission" so they just can't do anything, and then I copy them to profiles where I will use it for real. There is no good or bad approach, this fits your need in terms of usability, privacy and security.
Just to make sure it is clear, it is possible to use GOS totally Google free, but if you want to use Google services, it is made super easy to do so. Google Play could be used in a dedicated profile if you ever need it once.
The installation was really simple as it can be done from the web page (from a Linux, Windows or macOS system), by just clicking buttons in the correct order from the installation page. The image integrity check can be done AFTER installation, thanks to the TPM features in the phone which guarantees the boot of valid software only, which will allow you to generate a proof of boot that is basically a post-install checksum. (More explanations in GOS website). The whole process took approximately 15 minutes between plugging the phone to my computer and using the phone.
It is possible to install from the command line, I did not test it.
Updates are 100% over-the-air (OTA), which mean the system is able to download updates over network. This is rather practical as you never need to do any adb command to push a new image, which have always been a stressful experience for me when using smartphones. GOS automatically download base system updates and offer you to reboot to install it, while GOS apps will just be downloaded and update in place. This is a huge difference from LineageOS which always required to manually download new builds, and applications updates were parts of the big image update.
A cool thing with GOS is the tight controls offered over applications. First, this is done by profile, so if you use the same app in two profiles, you can give different permissions, and secondly, GOS allows you to define a scope to some permissions. For example, if an application requires storage permission, you can list which paths are allowed, if it requires contacts access, you can give a list of contacts entries (or empty).
GOS Google Play installation (which is not installed by default) is sand-boxed to restrict what it can do, they also succeeded at sand-boxing Android Auto. (More details in the FAQ). I have a dedicated Android Auto profile, the setup was easy thanks to the FAQ has a lot of permissions must be manually given for it to work.
GOS does not allow you to become root on your phone though, it just gives you more control through permissions and profiles.
I did not try CPU/GPU intensive tasks for now, but there should be almost no visible performance penalty when using GOS. There are many extra security features enabled which may lead to a few percent of extra CPU usage, but there are no benchmark and the few reviews of people who played high demanding video games on their phone did not notice any performance change.
As an example, here is how I configured my device, this is not the only way to proceed, so I just share it to give the readers an idea of what it looks like for me:
my owner profile has Google Play installed used to install most apps. All apps are installed there with no network permission, then I copy them to the profile that will use the applications.
a profile that looks like what I was doing in my previous phone: allowed to phone/SMS, web browser, IM apps, TOTP app.
a profile for multimedia where I store music files, run audio players and use Android Auto. Profile is not allowed to run in background.
a profile for games (local and cloud). Profile is not allowed to run in background.
a "other" profile used to run crappy apps. Profile is not allowed to run in background.
a profile for each of my clients, so I can store any authentication app (TOTP, Microsoft authenticator, whatever), use any app required. Profile is not allowed to run in background.
a guest profile that can be used if I need to lend my phone to someone if they want to do something like look up something on the Internet. This profile always starts freshly reset.
After a long week of use, I came up with this. At first, I had a separate profile for TOTP, but having to switch back and forth to it a dozen time a day was creating too much friction.
I chose to buy a Google Pixel 8a 128 GB as it was the cheapest of the 8 and 9 series which have a 7 years support, but also got a huge CPU upgrade compared to the 7 series. The device could be bought at 300€ on second hand market and 400€ brand new.
The 120 Hz OLED screen is a blast! Colors are good, black is truly black (hence dark themes for OLED reduce battery usage and looks really great) and it is super smooth.
There is no SD card support, which is pretty sad especially since almost every Android smartphone support this, I guess they just want you to pay more for storage. I am fine with 128 GB though, I do not store much data on my smartphone, but being able to extend it would have been nice.
The camera is OK, I am not using it a lot and I have no comparison, from reviews I have read they were saying it is just average.
Wi-Fi 6 works really fine (latency, packet loss, range and bandwidth) although I have no way to verify its maximum bandwidth because it is faster than my gigabit wired network.
The battery lasts long, I use my smartphone a bit more now, the battery approximately drops by 20% for a day of usage. I did not test charge speed.
I am really happy with GrapheneOS, I finally feel in control of my smartphone and I never considered it a safe device before. I never really used an Android ROM from a manufacturer or iOS, I bet they can provide a better user experience, but they can not provide anything like GrapheneOS.
LineageOS was actually ok on my former BQ Aquaris X, but there were often regressions, and it did not provide anything special in terms of features, except it was still having updates for my old phone. GrapheneOS on the other hand provides a whole new experience, that may be what you are looking for.
This system is not for everyone! If you are happy with your current Android, do not bother buying a Google Pixel to try GOS.
The stock Android version supports profiles (this can be enabled in system -> users -> allow multiple users), but there is no way to restrict what profiles can do, it seems they are all administrators. I have been using this on our Android tablet at home, it is available on every Android phone as well. I am not sure if it can be used as a security feature as this.
This blog post is part of a series that will be about Systemd ecosystem, today's focus is on journaling.
Systemd got a regrettable reputation since its arrival mid 2010. I think this is due to Systemd being radically different than traditional tooling, and people got lost without a chance to be noticed beforehand they would have to deal with it. The transition was maybe rushed a bit with a half-baked product, in addition to the fact users had to learn new paradigms and tooling to operate their computer.
Nowadays, Systemd is working well, and there are serious non-Systemd alternatives, so everyone should be happy. :)
Journald is the logging system that was created as part of Systemd. It handles logs created by all Systemd units. A huge difference compared to the traditional logs is that there is a single journal file acting as a database to store all the data. If you want to read logs, you need to use journalctl command to extract data from the database as it is not plain text.
Most of the time journald logs data from units by reading their standard error and output, but it is possible to send data to journald directly.
On the command line, you can use systemd-cat to run a program or pipe data to it to send them to logs.
If you want to bypass journald and send all messages to syslog to handle your logs with it, you can edit the file /etc/systemd/journald.conf to add the line ForwardToSyslog=Yes.
This will make journald relay all incoming messages to syslog, so you can process your logs as you want.
Journalctl contains a lot more information than just the log line (raw content). Traditional syslog files contain the date and time, maybe the hostname, and the log message.
This is just for information, only system administrators will ever need to dig through this, it is important to know it exists in case you need it.
As the logs can be extracted in JSON format, it becomes easy to parse them properly using any programming language able to deserialize JSON data, this is far more robust than piping lines to AWK / grep, although it can work "most of the time" (until it does not due to a weird input).
On the command line, you can query/filter such logs using jq which is a bit the awk of JSON. For instance, if I output all the logs of "today" to filter lines generated by the binary /usr/sbin/sshd, I can use this:
This command line will report each line of logs where "_EXE" field is exactly "/usr/sbin/sshd" and all the metadata. This kind of data can be useful when you need to filter tightly for a problem or a security incident.
The example above was made easy as it is a bit silly in its form: filtering on SSH server can be done with journalctl -u sshd.service --since=today.
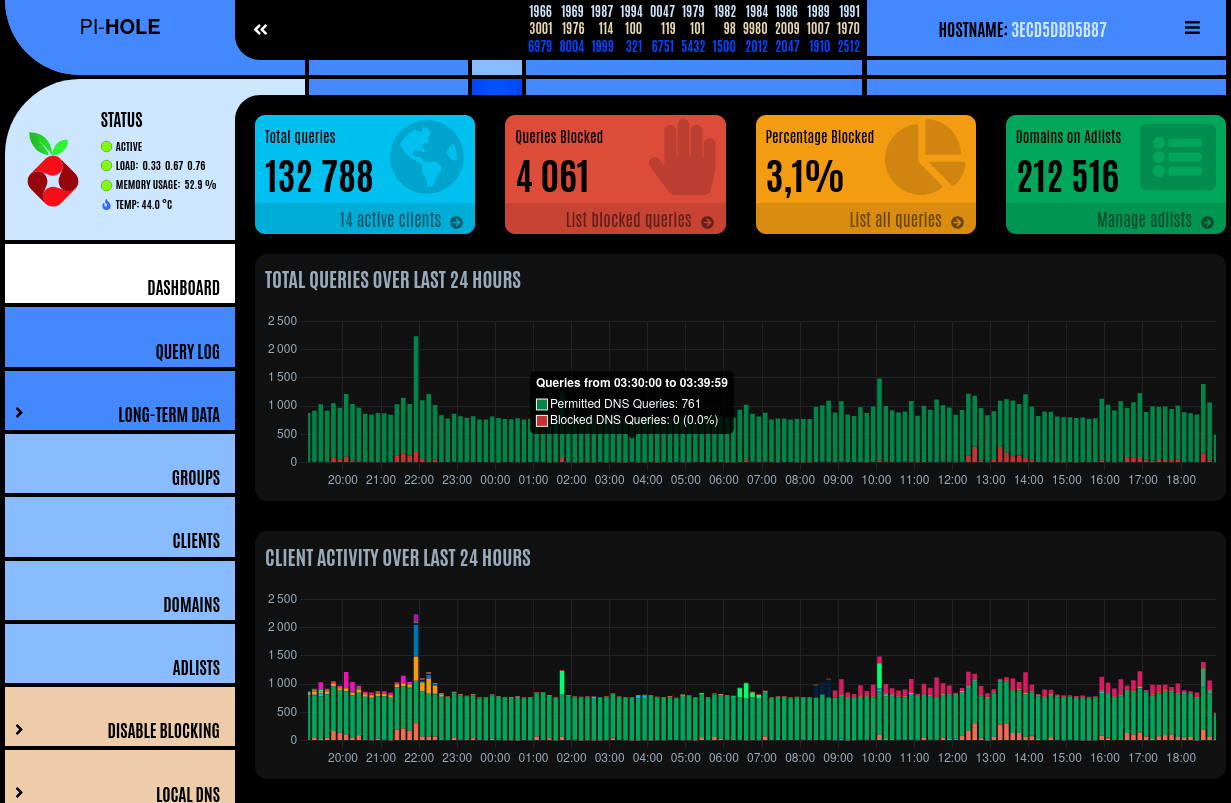
Pi-hole is Linux based, it is a collection of components and configuration that can be installed on Linux, or be used from a Raspberry PI image ready to write on a flash memory.
Most of Pi-hole configuration happens on a clear web interface (which is available with a star trek skin by the way), but there is also a command line utility and a telnet API if you need to automate some tasks.
The most basic feature of Pi-hole is filtering DNS requests. While it comes with a default block list from the Internet, you can add custom lists using their URLs, the import supports multiple formats as long as you tell Pi-hole which format to use for each source.
Filtering can be done for all queries, although you can create groups that will not be filtered and assign LAN hosts that will belong to this group, in some situation there are hosts you may not want to filter.
The resolving can be done using big upstream DNS servers (Cloudflare, Google, OpenDNS, Quad9 ...), but also custom servers. It is possible to configure a recursive resolver by installing unbound locally.
A nice dashboard allows you to see all queries with the following information:
date
client IP / host
domain in the query
result (allowed, blocked)
It can be useful to understand what is happening if a website is not working, but also see how much queries are blocked.
It is possible to choose the privacy level of logging, because you may only want to have statistics about numbers of queries allowed / blocked and not want to know who asked what (this may also be illegal to monitor this on your LAN).
In addition to lists, the audit log will display two columns with the 10 most allowed / blocked domains appearing in queries, that were not curated through the audit log.
Each line in the "allowed" column have a "blacklist" and "audit" buttons. The former will add the domain to the internal blacklist while the latter will just acknowledge this domain and remove it from the audit log. If you click on audit, it means "I agree with this domain being allowed".
The column with blocked queries will show a "Whitelist" and "Audit" buttons that can be used to definitely allow a domain or just acknowledge that it's blocked.
Once you added a domain to a list or clicked on audit, it got removed from the displayed list, and you can continue to manually review the new top 10 domains.
There is a feature to temporarily disable blocking for 10 seconds, 30 seconds, 5 minutes, indefinitely or a custom time. This can be useful if you have an important website that misbehave and want to be sure the DNS filtering is not involved.
It is possible to add custom hostnames that resolve to whatever IP you want, this makes easy to give nice names to your machines on your LAN. There is nothing really fancy, but the web ui makes it easy to handle this task.
Pi-hole can provide a DHCP server to your LAN, has self diagnosis, easy configuration backup / restore. Maybe more features I did not see or never used.
While Pi-hole requires more work than configuring unbound on your local LAN and feed it with a block list, it provides a lot more features, flexibility and insights about your DNS than unbound.
Pi-hole works perfectly fine on low end hardware, it uses very little resources despite all its features.
I am currently running Pi-hole as a container with podman, from an unpriviliged user. This setup is out of scope, but I may write about it later (or if people ask for it) as it required some quirks due to replying to UDP packets through the local NAT, and the use of the port 53 (which is restricted to root, usually).
This blog post is about designing firewall rules, not focusing on a specific operating system.
The idea came after I made a mistake on my test network where I exposed LAN services to the Internet after setting up a VPN with a static IPv4 on it due to too simplistic firewall rules. While discussing this topic on Mastodon, some mentioned they never know where to start when writing firewall rules.
Firewall rules are evaluated one by one, and the evaluation order matters.
Some firewall use a "first match" type, where the first rule matching a packet is the rule that is applied. Other firewalls are of type "last match", where the last matching rule is the one applied.
The first step when writing firewall rules is to block all incoming and outgoing traffic.
There is no other way to correctly configure a firewall, if you plan to block all services you want to restrict and let the default allow rule do its job, you are doing it wrong.
As all flows should be blocked by default, you have to list what should go through the firewall, inbound and outbound.
In most cases, you will want to allow outbound traffic, except if you have a specific environment on which you want to only allow outgoing traffic to a certain IP / port.
For inbound traffic, if you do not host any services, there are nothing to open. Otherwise, make a list of TCP, UDP, or any other ports that should be reachable, and who should be allowed to reach it.
When writing your rules, whether they are inbound or outbound, be explicit whenever possible about this:
restrict to a network interface
restrict the source addresses (maybe a peer, a LAN, or anyone?)
restrict to required ports only
Eventually, in some situations you may want to filter by source and destination port at the same time. This is usually useful when you have two servers communicating over a protocol enforcing both ports.
This is actually where I failed and exposed my LAN minecraft server to the wild. After setting up a VPN with a static IPv4 address, I only had a "allow tcp/25565" rule on my firewall as I was relying on my ISP router to not forward traffic. This rule was not effective once the traffic was received from the VPN, although it would have been filtrated when using a given network interface or a source network.
If you want to restrict the access of a critical service to a some user (1 or more), but that they do not have a static IP address, you should consider using a VPN for this service and restrict the access to the VPN interface only.
Firewall rules will evolve over time, you may want to write for your future you why you added this or that rule. Ideally, use a version control system on the firewall rules file, so you can easily revert changes or track history to understand a change.
When applying the firewall rules the first time, you may have made a mistake and if it is on remote equipment with no (or complicated) physical access, it is important to prepare an escape.
There are different methods, the most simple is to run a command in a second terminal that sleeps for 30 seconds before resetting the firewall to a known state, you have to run this command just before loading the new rules. So if you are locked out after applying, just wait 30 seconds to fix the rules.
If you want to monitor your firewall, consider adding counters to rules, it will tell you how many times it was evaluated/matched and how many packets and traffic went through. With nftables on Linux they are named "counters", whereas OpenBSD packet filter names this "label".
It is also possible to log packets matching a rule, this can be useful to debug an issue on the firewall, or if you want to receive alerts in your logs when a rule is triggered.
Last month, I decided to leave the OpenBSD team as I have not been using OpenBSD myself for a while. A lot of people asked me why I stopped using OpenBSD, although I have been advocating it for a while. Let me share my thoughts.
First, I like OpenBSD, it has values, and it is important that it exists. It just does not fit all needs, it does not fit mine anymore.
As part of staying relevant on the DevOps market, I need to experiment and learn with a lot of stuff, this includes OCI containers, but also machine learning and some weird technologies. Running virtual machines on OpenBSD is really limited, running programs headless with one core and poor performance is not a good incentive to work at staying sharp.
As part of my consultancy work, I occasionally need to run proprietary crap, this is not an issue when running it in a VM, but I can not do that on OpenBSD without a huge headache and very bad performance.
I have grievances against OpenBSD file system. Every time OpenBSD crash, and it happens very often for me when using it as a desktop, it ends with file corrupted or lost files. This is just not something I can accept.
Of course, it may be some hardware compatibility issue, I never have issues on an old ThinkPad T400, but I got various lock up, freeze or kernel panic on the following machines:
ThinkPad X395
ThinkPad t470
ThinkPad t480
ryzen 5600X + AMD GPU (desktop)
Would you like to keep using an operating system that daily eat your data? I don't. Maybe I am doing something weirds, I don't know, I have never been able to pinpoint why I got so many crashes although everyone else seem to have a stable experience with OpenBSD.
I moved from OpenBSD to Qubes OS for almost everything (except playing video games) on which I run Fedora virtual machines (approximately 20 VM simultaneously in average). This provides me better security than OpenBSD could provide me as I am able to separate every context into different spaces, this is absolutely hardcore for most users, but I just can't go back to a traditional system after this.
In addition, I have learned the following Linux features and became really happy of it:
namespaces: being able to reduce the scope of a process is incredibly powerful, this is something that exists in Linux since a very long time, this is also the foundation for running containers, it is way better than chroots.
cgroups: this is the name of the kernel subsystem that is responsible for resource accounting, with it, it is possible to get access to accurate and reliable monitoring. It is possible to know how much network, i/o, CPU or memory have been used by a process. From an operator point of view, it is really valuable to know exactly what is consuming resources when looking at the metrics. Where on OpenBSD you can notice a CPU spike at some timestamp, on Linux you would be able to know which user used the CPU.
systemd: journald, timers and scripting possibilities. I need to write a blog post about this, systemd is clearly disruptive, but it provides many good features. I understand it can make some people angry as they have to learn how to use it. The man pages are good though.
swap compression: this feature allows me to push my hardware to its limit, with lz4 compression algorithm, it is easy to get access to **extremely** fast swap paid with some memory. The compression ratio is usually 3:1 or 4:1 which is pretty good.
modern storage backend: between LVM, btrfs and ZFS, there are super nice things to achieve depending on the hardware, for maximum performance / reliability and scalability. I love transparent compression as I can just store more data on my hardware. (when it's compressible of course).
flatpak: I really like software distribution done with flatpak, packages are all running in their own namespace, they can't access all the file system, you can roll back to a previous version, and do some interesting stuff
auditd: this is a must-have for secure environments, it allows logging all accesses matching some rules (like when was accessed this arbitrary file, when that file is modified, etc...). This does not even exist in OpenBSD (maybe if you can run ktrace on pid 1 you could do something?). This kind of feature is a basic requirement for many qualified secure environments.
SELinux: although many people disable it immediately after the first time it gets on their way (without digging further), this is a very powerful security mechanism that mitigates entire classes of vulnerabilities.
When using a desktop for gaming, I found Fedora Silverblue to be a very solid system with reliable upgrades, good quality and a lot of software choice.
I got too many issues with OpenBSD, I wanted to come back to it twice this year, but I just have lost 2 days of my life due to all the crashes eating data. And when it was working fine, I was really frustrated by the performance and not being able to achieve the work I needed to do.
But as I said, I am glad people there are happy OpenBSD users who enjoy it and have a reliable system with it. From the various talks I had with users, the most common (by far) positive fact that make OpenBSD good is that users can understand what is going on. This is certainly a quality that can only be found in OpenBSD (maybe NetBSD too?).
I will continue to advocate OpenBSD for situations I think it is relevant, and I will continue to verify OpenBSD compatibility when contributing to open source software (last in date is Peergos). This is something that matters a lot for me, in case I go back to OpenBSD :-)
This blog post is about Floccus, a self-hosting web browser bookmarks and tabs syncing software.
What is cool with Floccus is that it works on major web browsers (Chromium, Google Chrome, Mozilla Firefox, Opera, Brave, Vivaldi and Microsoft Edge), allowing sharing bookmarks/tabs without depending on the web browser integrated feature, but it also supports multiple backends and also allow the sync file to be encrypted.
If you want to share a bookmark folder with other people (relatives, a team at work), do not forget to make a dedicated account on the backend as the credentials will be shared.
There is not much to setup, but the process looks like this:
install the web browser extension (it is published on Chrome, Mozilla and Edge stores)
click on the Floccus icon and click on "Add a profile"
choose the backend
type credentials for the backend
configure the sync options you want
enjoy!
After you are done, repeat the process on another web browser if you want to enable sync, otherwise Floccus will "only" serve as a bookmark backup solution.
It is the first bookmark sync solution I am happy with, it just works, supports end-to-end encryption, and does not force you to use the same web browser across all your devices.
Before this, I tried integrated web browser sync solutions, but self-hosting them was not always possible (or a terrible experience). I gave a try to "bookmark managers" (linkding, buku, shiori), but whether in command line or with a web UI, I did not really like it as I found it rather impractical for daily use. I just wanted to have my bookmarks stored in the browser, and be able to easily search/open them. Floccus does the job.
As I moved my infrastructure to a whole new architecture, I decided to only expose critical accesses to dedicated administration systems (I have just one). That workstation is dedicated to my infrastructure administration, it can only connect to my servers over a VPN and can not reach the Internet.
This blog post explains why I am doing this, and gives a high level overview of the setup. Implementation details are not fascinating as it only requires basics firewall, HTTP proxy and VPN configuration.
I wanted to have my regular computer not being able to handle any administration task, so I have a computer "like a regular person" without SSH keys, VPN and a password manager that does not mix personal credentials with administration credentials ... To prevent credentials leaks or malware risks, it makes sense to uncouple the admin role from the "everything else" role. So far, I have been using Qubes OS which helped me to do so at the software level, but I wanted to go further.
The admin workstation I use is an old laptop, it only needs a web browser (except if you have no internal web services), a SSH client, and being able to connect to a VPN. Almost any OS can do it, just pick the one you are the most conformable with, especially with regard to the firewall configuration.
The workstation has its own SSH key that is deployed on the servers. It also has its own VPN to the infrastructure core. And its own password manager.
Its firewall is configured to block all in and out traffic except the following:
UDP traffic to allow WireGuard
HTTP proxy address:port through WireGuard interface
SSH through WireGuard
The HTTP proxy exposed on the infrastructure has a whitelist to allow some fqdn. I actually want to use the admin workstation for some tasks, like managing my domains through my registrar web console. Keeping the list as small as possible is important, you do not want to start using this workstation for browsing the web or reading emails.
On this machine, make sure to configure the system to use the HTTP proxy for updates and installing packages. The difficulty of doing so will vary from an operating system to another. While Debian required a single file in /etc/apt/apt.conf.d/ to configure apt to use the HTTP proxy, OpenBSD needed both http_proxy and https_proxy environment variables, but some scripts needed to be patched as they do not use the variables, I had to check fw_update, pkg_add, sysupgrade and syspatch were all working.
Ideally, if you can afford it, configure a remote logging of this workstation logs to a central log server. When available, auditd monitoring important files access/changes in /etc could give precious information.
My SSH servers are only reachable through a VPN, I do not expose it publicly anymore. And I do IP filtering over the VPN, so only the VPN clients that have a use to connect over SSH will be allowed to connect.
When I have some web interfaces for services like Minio, Pi-Hole and the monitoring dashboard, all of that is restricted to the admin workstations only. Sometimes, you have the opportunity to separate the admin part by adding a HTTP filter on a /admin/ URI, or if the service uses a different port for the admin and the service (like Minio). When enabling a new service, you need to think about all the things you can restrict to the admin workstations only.
Depending on your infrastructure size and locations, you may want to use dedicated systems for SSH/VPN/HTTP proxy entry points, it is better if it is not shared with important services.
You will need to exchange data to the admin workstation (rarely the other way), I found nncp to be a good tool for that. You can imagine a lot of different setup, but I recommend picking one that:
does not require a daemon on the admin workstation: this does not increase the workstation attack surface
allows encryption at rest: so you can easily use any deposit system for the data exchange
is asynchronous: as a synchronous connection could be potentially dangerous because it establishes a link directly between the sender and the receiver
I learned about this method while reading ANSSI (French cybersecurity national agency) papers. While it may sound extreme, it is a good practice I endorse. This gives a use to old second hand hardware I own, and it improves my infrastructure security while giving me peace of mind.
In addition, if you want to allow some people to work on your infrastructure (maybe you want to set up some infra for an association?), you already have the framework to restrict their scope and trace what they do.
Of course, the amount of complexity and resources you can throw at this is up to you, you could totally have a single server and lock most of its services behind a VPN and call it a day, or have multiple servers worldwide and use dedicated servers to enter their software defined network.
Last thing, make sure that you can bootstrap into your infrastructure if the only admin workstation is lost/destroyed. Most of the time, you will have a physical/console access that is enough (make sure the password manager is reachable from the outside for this case).
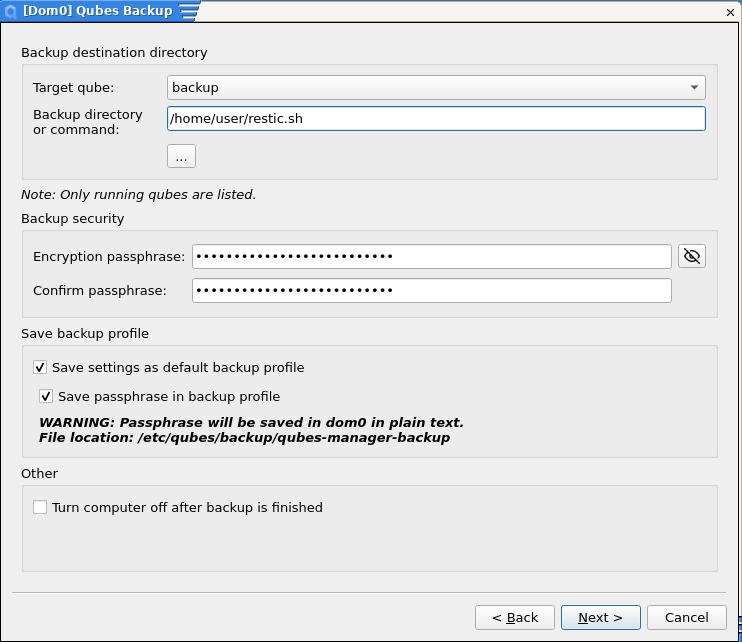
In this blog post, you will learn how to make secure backups using Restic and a S3 compatible object storage.
Backups are incredibly important, you may lose important files that only existed on your computer, you may lose access to some encrypted accounts or drives, when you need backups, you need them to be reliable and secure.
There are two methods to handle backups:
pull backups: a central server connects to the system and pulls data to store it locally, this is how rsnapshot, backuppc or bacula work
push backups: each system run the backup software locally to store it on the backup repository (either locally or remotely), this is how most backups tool work
Both workflows have pros and cons. The pull backups are not encrypted, and a single central server owns everything, this is rather bad from a security point of view. While push backups handle all encryption and accesses to the system where it runs, an attacker could destroy the backup using the backup tool.
I will explain how to leverage S3 features to protect your backups from an attacker.
S3 is the name of an AWS service used for Object Storage. Basically, it is a huge key-value store in which you can put data and retrieve it, there are very little metadata associated with an object. Objects are all stored in a "bucket", they have a path, and you can organize the bucket with directories and subdirectories.
Buckets can be encrypted, which is an important feature if you do not want your S3 provider to be able to access your data, however most backup tools already encrypt their repository, so it is not really useful to add encryption to the bucket. I will not explain how to use encryption in the bucket in this guide, although you can enable it if you want. Using encryption requires more secrets to store outside of the backup system if you want to restore, and it does not provide real benefits because the repository is already encrypted.
S3 was designed to be highly efficient for retrieving / storage data, but it is not a competitor to POSIX file systems. A bucket can be public or private, you can host your website in a public bucket (and it is rather common!). A bucket has permissions associated to it, you certainly do not want to allow random people to put files in your public bucket (or list the files), but you need to be able to do so.
The protocol designed around S3 was reused for what we call "S3-compatible" services on which you can directly plug any "S3-compatible" client, so you are not stuck with AWS.
This blog post exists because I wanted to share a cool S3 feature (not really S3 specific, but almost everyone implemented this feature) that goes well with backups: a bucket can be versioned. So, every change happening on a bucket can be reverted. Now, think about an attacker escalating to root privileges, they can access the backup repository and delete all the files there, then destroy the server. With a backup on a versioned S3 storage, you could revert your bucket just before the deletion happened and recover your backup. In order to prevent this, the attacker should also get access to the S3 storage credentials, which is different from the credentials required to use the bucket.
Finally, restic supports S3 as a backend, and this is what we want.
2.1. Open source S3-compatible storage implementations §
There is a list of open source and free S3-compatible storage, I played with them all, and they have different goals and purposes, they all worked well enough for me:
I consider seaweedfs to be the Swiss army knife of storage, you can mix multiple storage backends and expose them over different protocols (like S3, HTTP, WebDAV), it can also replicate data over remote instances. You can do tiering (based on last access time or speed) as well.
Garage is a relatively new project, it is quite bare bone in terms of features, but it works fine and support high availability with multiple instances, it only offers S3.
Minio is the big player, it has a paid version (which is extremely expensive) although the free version should be good enough for most users.
You need to pick a S3 provider, you can self-host it or use a paid service, it is up to you. I like backblaze as it is super cheap, with $6/TB/month, but I also have a local minio instance for some needs.
Create a bucket, enable the versioning on it and define the data retention, for the current scenario I think a few days is enough.
Create an application key for your restic client with the following permissions: "GetObject", "PutObject", "DeleteObject", "GetBucketLocation", "ListBucket", the names can change, but it needs to be able to put/delete/list data in the bucket (and only this bucket!). After this process done, you will get a pair of values: an identifier and a secret key
Now, you will have to provide the following environment variables to restic when it runs:
AWS_DEFAULT_REGION which contains the region of the S3 storage, this information is given when you configure the bucket.
AWS_ACCESS_KEY which contains the access key generated when you created the application key.
AWS_SECRET_ACCESS_KEY which contains the secret key generated when you created the application key.
RESTIC_REPOSITORY which will look like s3:https://$ENDPOINT/$BUCKET with $ENDPOINT being the bucket endpoint address and $BUCKET the bucket name.
RESTIC_PASSWORD which contains your backup repository passphrase to encrypt it, make sure to write it down somewhere else because you need it to recover the backup.
If you want a simple script to backup some directories, and remove old data after a retention of 5 hourly, 2 daily, 2 weekly and 2 monthly backups:
I really like this backup system as it is cheap, very efficient and provides a fallback in case of a problem with the repository (mistakes happen, there is not always need for an attacker to lose data ^_^').
If you do not want to use S3 backends, you need to know Borg backup and Restic both support an "append-only" method, which prevents an attacker from doing damages or even read the backup, but I always found the use to be hard, and you need to have another system to do the prune/cleanup on a regular basis.
This approach could work on any backend supporting snapshots, like BTRFS or ZFS. If you can recover the backup repository to a previous point in time, you will be able to access to the working backup repository.
You could also do a backup of the backup repository, on the backend side, but you would waste a lot of disk space.
Snap package format is interesting, while it used to have a bad reputation, I wanted to make my opinion about it. After reading its design and usage documentation, I find it quite good, and I have a good experience using some programs installed with snap.
Snap programs can be either packaged as "strict" or "classic"; when it is strict there is some confinement at work which can be inspected on an installed snap using snap connections $appname, while a "classic" snap has no sandboxing at all. Snap programs are completely decorrelated from the host operating system where snap is running, so you can have old or new versions of a snap packaged program without having to handle shared library versions.
The following setup explains how to install snap programs in a template to run them from AppVMs, and not how to install snap programs in AppVMs as a user, if you need this, please us the Qubes OS guide linked below.
Qubes OS documentation explains how to setup snap in a template, but with a helper to allow AppVMs to install snap programs in the user directory.
Now, you have to configure snap to use the http proxy in the template, this command can take some time because snap will time out as it tries to use the network when invoked...
snap set system proxy.http="http://127.0.0.1:8082/"
snap set system proxy.https="http://127.0.0.1:8082/"
You need to prevent snap from searching for updates on its own as you will run updates when the template is updated:
snap refresh --hold
To automatically update snap programs when the template is updating (or doing any dnf operation), create the file /etc/qubes/post-install.d/05-snap-update.sh with the following content and make it executable:
#!/bin/sh

if [ "$(qubesdb-read /type)" = "TemplateVM" ]
then
    snap refresh
fi
To add the menu entry of each snap program in the qube settings when you install/remove snaps, create the file /usr/local/sbin/sync-snap.sh with the following content and make it executable:
#!/bin/sh

# when a desktop file is created/removed
# - links snap .desktop in /usr/share/applications
# - remove outdated entries of programs that were removed
# - sync the menu with dom0

inotifywait -m -r \
-e create,delete,close_write \
/var/lib/snapd/desktop/applications/ |
while  IFS=':' read event
do
    find /var/lib/snapd/desktop/applications/ -type l -name "*.desktop" | while read line
    do
        ln -s "$line" /usr/share/applications/
    done
    find /usr/share/applications/ -xtype l -delete
    /etc/qubes/post-install.d/10-qubes-core-agent-appmenus.sh
done
Install the package inotify-tools to make the script above working, and add this to /rw/config/rc.local to run it at boot:
/usr/local/bin/sync-snap.sh &
You can run the script now with /usr/local/bin/sync-snap.sh & if you plan to install snap programs.
If you want to browse and install snap programs using a nice interface, you can install the snap store.
snap install snap-store
You can run the store with snap run snap-store or configure your template settings to add the snap store into the applications list, and run it from your Qubes OS menu.
More options to install programs is always good, especially when it comes with features like quota or sandboxing. Qubes OS gives you the flexibility to use multiple templates in parallel, a new source of packages can be useful for some users.
nncp (node to node copy) is a software to securely exchange data between peers. Is it command line only, it is written in Go and compiles on Linux and BSD systems (although it is only packaged for FreeBSD in BSDs).
The website will do a better job than me to talk about the numerous features, but I will do my best to explain what you can do with it and how to use it.
nncp is a suite of tools to asynchronously exchange data between peers, using zero knowledge encryption. Once peers have exchanged their public keys, they are able to encrypt data to send to this peer, this is nothing really new to be honest, but there is a twist.
a peer can directly connect to another using TCP, you can even configure different addresses like a tor onion or I2P host and use the one you want
a peer can connect to another using ssh
a peer can generate plain files that will be carried over USB, network storage, synchronization software, whatever, to be consumed by a peer. Files can be split in chunks of arbitrary size in order to prevent anyone snooping from figuring how many files are exchanged or their name (hence zero knowledge).
a peer can generate data to burn on a CD or tape (it is working as a stream of data instead of plain files)
a peer can be reachable through another relay peer
when a peer receives files, nncp generates ACK files (acknowledgement) that will tell you they correctly received it
a peer can request files and/or trigger pre-configured commands you expose to this peer
a peer can send emails with nncp (requires a specific setup on the email server)
data transfer can be interrupted and resumed
What is cool with nncp is that files you receive are unpacked in a given directory and their integrity is verified. This is sometimes more practical than a network share in which you are never sure when you can move / rename / modify / delete the file that was transferred to you.
I identified a few "realistic" use cases with nncp:
exchange files between air gap environments (I tried to exchange files over sound or QR codes, I found no reliable open source solution)
secure file exchange over physical medium with delivery notification (the medium needs to do a round-trip for the notification)
start a torrent download remotely, prepare the file to send back once downloaded, retrieve the file at your own pace
reliable data transfer over poor connections (although I am not sure if it beats kermit at this task :D )
"simple" file exchange between computers / people over network
This let a lot of room for other imaginative use cases.
My preferred workflow with nncp that I am currently using is a group of three syncthing servers.
Each syncthing server is running on a different computer, the location does not really matter. There is a single share between these syncthing instances.
The servers where syncthing are running have incoming and outgoing directories exposed over a NFS / SMB share, with a directory named after each peer in both directories. Deposing a file in the "outgoing" directory of a peer will make nncp to prepare the file for this peer, put it into the syncthing share and let it share, the file is consumed in the process.
In the same vein, in the incoming directory, new files are unpacked in the incoming directory of emitting peer on the receiver server running syncthing.
Why is it cool? You can just drop a file in the peer you want to send to, it disappears locally and magically appears on the remote side. If something wrong happens, due to ACK, you can verify if the file was delivered and unpacked. With three shares, you can almost have two connected at the same time.
It is a pretty good file deposit that requires no knowledge to use.
This could be implemented with pure syncthing, however you would have to:
for each peer, configure a one-way directory share in syncthing for each other peer to upload data to
for each peer, configure a one-way directory share in syncthing for each other peer to receive data from
for each peer, configure an encrypted share to relay all one way share from other peers
This does not scale well.
Side note, I am using syncthing because it is fun and requires no infrastructure. But actually, a webdav filesystem, a Nextcloud drive or anything to share data over the network would work just fine.
On each peer, you have to generate a configuration file with its private keys. The default path for the configuration file is /etc/nncp.hjson but nothing prevents you from storing this file anywhere, you will have to use the parameter -cfg /path/to/config file in that case.
Generate the file like this:
nncp-cfgnew > /etc/nncp.hjson
The file contains comments, this is helpful if you want to see how the file is structured and existing options. Never share the private keys of this file!
I recommend checking the spool and log paths, and decide which user should use nncp. For instance, you can use /var/spool/nncp to store nncp data (waiting to be delivered or unpacked) and the log file, and make your user the owner of this directory.
Now, generate the public keys (they are just derived from the private keys generated earlier) to share with your peers, there is a command for this that will read the private keys and output the public keys in a format ready to put in the nncp.hjson file of recipients.
nncp-cfgmin > my-peer-name.pub
You can share the generated file with anyone, this will allow them to send you files. The peer name of your system is "self", you can rename it, it is just an identifier.
When import public keys, you just need to add the content generated by the command nncp-cfgmin of a peer in your nncp configuration file.
Just copy / paste the content in the neigh structure within the configuration file, just make sure to rename "self" by the identifier you want to give to this peer.
If you want to receive data from this peer, make sure to add an attribute line incoming: "/path/to/incoming/data" for that peer, otherwise you will not be able to unpack received file.
Now you have peers who exchanged keys, they are able to send data to each other. nncp is a collection of tools, let's see the most common and what they do:
nncp-file: add a file in the spool to deliver to a peer
nncp-toss: unpack incoming data (files, commands, file request, emails) and generate ack
nncp-reass: reassemble files that were split in smaller parts
nncp-exec: trigger a pre-configured command on the remote peer, stdin data will be passed as the command parameters. Let's say a peer offers a "wget" service, you can use echo "https://some-domain/uri/" | nncp-exec peername wget to trigger a remote wget.
If you use the client / server model over TCP, you will also use:
nncp-daemon: the daemon waiting for connections
nncp-caller: a daemon occasionally triggering client connections (it works like a crontab)
nncp-call: trigger a client connection to a peer
If you use asynchronous file transfers, you will use:
nncp-xfer: generates to / consumes files from a directory for async transfer
For sending files, just use nncp-file file-path peername:, the file name will be used when unpacked, but you can also give the filename you want to give once unpacked.
A directory could be used as a parameter instead of a file, it will be stored automatically in a .tar file for delivery.
Finally, you can send a stream of data using nncp-file stdin, but you have to give a name to the resulting file.
This was not really clear from the documentation, so here it is how to best use nncp when exchanging files using plain files, the destination is /mnt/nncp in my examples (it can be an external drive, a syncthing share, a NFS mount...):
When you want to sync, always use this scheme:
nncp-xfer -rx /mnt/nncp
nncp-toss -gen-ack
nncp-xfer -keep -tx -mkdir /mnt/nncp
nncp-rm -all -ack
This receives files using nncp-xfer -rx, the files are stored in nncp spool directory. Then, with nncp-toss -gen-ack, the files are unpacked to the "incoming" directory of each peer who sent files, and ACK are generated (older versions of nncp-toss does not handle ack, you need to generate ack befores and remove them after tx, with nncp-ack -all 4>acks and nncp-rm -all -pkt < acks).
nncp-xfer -tx will put in the directory the data you want to send to peers, and also the ack files generated by the rx which happened before. The -keep flag is crucial here if you want to make use of ACK, with -keep, the sent data are kept in the pool until you receive the ACK for them, otherwise the data are removed from the spool and will not be retransmited if the files were not received. Finally, nncp-rm will delete all ACK files so you will not transmit them again.
From my experience and documentation reading, there are three cases with the spool and ACK:
the shared drive is missing the files you sent (that are still in pool), and you received no ACK, the next time you run nncp-xfer, the files will be transmitted again
when you receive ACK files for files in spool, they are deleted from the spool
when you do not use -keep when sending files with nncp-xfer, the files will not be stored in the spool so you will not be able to know what to retransmit if ACK are missing
ACKs do not clean up themselves, you need to use nncp-rm. It took me a while to figure this, my nodes were sending ACKs to each other repeatedly.
I really like nncp as it allows me to securely transfer files between my computers without having to care if they are online. Rsync is not always possible because both the sender and receiver need to be up at the same time (and reachable correctly).
The way files are delivered is also practical for me, as I already shared above, files are unpacked in a defined directory by peer, instead of remembering I moved something in a shared drive. This removes the doubt about files being in a shared drive: why is it there? Why did I put it there? What was its destination??
I played with various S3 storage to exchange nncp data, but this is for another blog post :-)
There are more features in nncp, I did not play with all of them.
You can define "areas" in parallel of using peers, you can use emails notifications when a remote receives data from you to have a confirmation, requesting remote files etc... It is all in the documentation.
I have the idea to use nncp on a SMTP server to store encrypted incoming emails until I retrieve them (I am still working at improving the security of email storage), stay tuned :)
I recently took a very hard decision: I moved my emails to Proton Mail.
This is certainly a shock for people following this blog for a long time, this was a shock for me as well! This was actually pretty difficult to think this topic objectively, I would like to explain how I came up to this decision.
I have been self-hosting my own email server since I bought my first domain name, back in 2009. The server have been migrated multiple times, from hosting companies to another and regularly changing the underlying operating system for fun. It has been running on: Slackware, NetBSD, FreeBSD, NixOS and Guix.
First, I need to explain my previous self-hosted setup, and what I do with my emails.
I have two accounts:
one for my regular emails, mailing lists, friends, family
one for my company to reach client, send quotes and invoices
Ideally, having all the emails retrieved locally and not stored on my server would be ideal. But I am using a lot of devices (most are disposable), and having everything on a single computer will not work for me.
Due to my emails being stored remotely and containing a lot of private information, I have never been really happy with how emails work at all. My dovecot server has access to all my emails, unencrypted and a single password is enough to connect to the server. Adding a VPN helps to protect dovecot if it is not exposed publicly, but the server could still be compromised by other means. OpenBSD smtpd server got critical vulnerabilities patched a few years ago, basically allowing to get root access, since then I have never been really comfortable with my email setup.
I have been looking for ways to secure my emails, this is how I came to the setup encrypting incoming emails with GPG. This is far from being ideal, and I stopped using it quickly. This breaks searches, the server requires a lot of CPU and does not even encrypt all information.
Someone shown me a dovecot plugin to encrypt emails completely, however my understanding of the encryption of this plugin is that the IMAP client must authenticate the user using a plain text password that is used by dovecot to unlock an asymmetric encryption key. The security model is questionable: if the dovecot server is compromised, users passwords are available to the attacker and they can decrypt all the emails. It would still be better than nothing though, except if the attacker has root access.
One thing I need from my emails is to arrive to the recipients. My emails were almost always considered as spam by big email providers (GMail, Microsoft), this has been an issue for me for years, but recently it became a real issue for my business. My email servers were always perfectly configured with everything required to be considered as legit as possible, but it never fully worked.
Why did I choose Proton Mail over another email provider? There are a few reasons for it, I evaluated a few providers before deciding.
Proton Mail is a paid service, actually this is an argument in itself, I would not trust a good service to work for free, this would be too good to be true, so it would be a scam (or making money on my data, who knows).
They offer zero-knowledge encryption and MFA, which is exactly what I wanted. Only me should be able to read my email, even if the provider is compromised, adding MFA on top is just perfect because it requires two secrets to access the data. Their zero-knowledge security could be criticized for a few things, ultimately there is no guarantee they do it as advertised.
Long story short, when making your account, Proton Mail generates an encryption key on their server that is password protected with your account password. When you use the service and log-in, the encrypted key is sent to you so all crypto operations happens locally, but there is no way to verify if they kept your private key unencrypted at the beginning, or if they modified their web apps to key log the password typed. Applications are less vulnerable to the second problem as it would impact many users and this would leave evidences. I do trust them for doing the things right, although I have no proof.
I did not choose Proton Mail for end-to-end encryption, I only use GPG occasionally and I could use it before.
IMAP is possible with Proton Mail when you have a paid account, but you need to use a "connect bridge", it is a client that connects to Proton with your credentials and download all encrypted emails locally, then it exposes an IMAP and SMTP server on localhost with dedicated credentials. All emails are saved locally and it syncs continuously, it works great, but it is not lightweight. There is a custom implementation named hydroxide, but it did not work for me. The bridge does not support caldav and cardav, which is not great but not really an issue for me anyway.
Before migrating, I verified that reversibility was possible, aka being able to migrate my emails away from Proton Mail. In case they stop providing their export tool, I would still have a local copy of all my IMAP emails, which is exactly what I would need to move it somewhere else.
There are certainly better alternatives than Proton with regard to privacy, but Proton is not _that_ bad on this topic, it is acceptable enough for me.
I did not know I would appreciate scheduling emails sending, but it's a thing and I do not need to keep the computer on.
It is possible to generate aliases (10 or unlimited depending on the subscription), what's great with it is that it takes a couple seconds to generate a unique alias, and replying to an email received on an alias automatically uses this alias as the From address (webmail feature). On my server, I have been using a lot of different addresses using a "+" local prefix, it was rarely recognized, so I switched to a dot, but these are not real aliases. So I started managing smtpd aliases through ansible, and it was really painful to add a new alias every time I needed one. Did I mention I like this alias feature? :D
If I want to send an end-to-end encrypted email without GPG, there is an option to use a password to protect the content, the email would actually send a link to the recipient, leading to a Proton Mail interface asking for the password to decrypt the content, and allow that person to reply. I have no idea if I will ever use it, but at least it is a more user-friendly end-to-end encryption method. Tuta is offering the same feature, but it is there only e2e method.
Proton offer logs of login attempts on my account, this was surprising.
There is an onion access to their web services in case you prefer to connect using tor.
The web interface is open source, one should be able to build it locally to connect to Proton servers, I guess it should work?
Proton Mail cannot be used as an SMTP relay by my servers, except through the open source bridge hydroxide.
The calendar only works on the website and the smartphone app. The calendar it does not integrate with the phone calendar, although in practice I did not find it to be an issue, everything works fine. Contact support is less good on Android, they are restrained in the Mail app and I still have my cardav server.
The web app is first class citizen, but at least it is good.
Nothing prevents Proton Mail from catching your incoming and outgoing emails, you need to use end-to-end encryption if you REALLY need to protect your emails from that.
I was using two accounts, this would require a "duo" subscription on Proton Mail which is more expensive. I solved this by creating two identities, label and filter rules to separate my two "accounts" (personal and professional) emails. I actually do not really like that, although it is not really an issue at the moment as one of them is relatively low traffic.
The price is certainly high, the "Mail plus" plan is 4€ / month (48€ / year) if you subscribe for 12 months, but is limited to 1 domain, 10 aliases and 15 GB of storage. The "Proton Unlimited" plan is 10€ / month (120€ / year) but comes with the kitchen sink: infinite aliases, 3 domains, 500 GB storage, and access to all Proton services (that you may not need...) like VPN, Drive and Pass. In comparison, hosting your email service on a cheap server should not cost you more than 70€ / year, and you can self-host a nextcloud / seafile (equivalent to Drive, although it is stored encrypted there), a VPN and a vaultwarden instance (equivalent to Pass) in addition to the emails.
Emails are limited to 25MB, which is low given I always configured my own server to allow 100 MB attachments, but it created delivery issues on most recipient servers, so it is not a _real_ issue, but I prefer when I can decide of this kind of limitation.
If I was to self-host again (which may be soon! Who knows), I would do it differently to improve the security:
one front server with the SMTP server, cheap and disposable
one server for IMAP
one server to receive and analyze the logs
Only the SMTP server would be publicly available, all ports would be closed on all servers, servers would communicate between each other through a VPN, and exports their logs to a server that would only be used for forensics and detecting security breaches.
Such setup would be an improvement if I was self-hosting again my emails, but the cost and time to operate is non-negligible. It is also an ecological nonsense to need 3 servers for a single person emails.
I started this blog post with the fact that the decision was hard, so hard that I was not able to decide up to a day before renewing my email server for one year. I wanted to give Proton a chance for a month to evaluate it completely, and I have to admit I like the service much more than I expected...
My Unix hacker heart hurts terribly on this one. I would like to go back to self-hosting, but I know I cannot reach the level of security I was looking for, simply because email sucks in the first place. A solution would be to get rid of this huge archive burden I am carrying, but I regularly search information into this archive and I have not found any usable "mail archive system" that could digest everything and serve it locally.
I wrote this blog post two days ago, and I cannot stop thinking about this topic since the migration.
The real problem certainly lies in my use case, not having my emails on the remote server would solve my problems. I need to figure how to handle it. Stay tuned :-)
A domain name must expose some information through WHOIS queries, basically who is the registrar responsible for it, and who could be contacted for technical or administration matters.
Almost every registrar will offer you feature to hide your personal information, you certainly not want to have your full name, full address and phone number exposed on a single WHOIS request.
You can perform a WHOIS request on the link below, directly managed by ICANN.
If you use TLS certificates for your services, and ACME (Let's Encrypt or alternatives), all the domains for which a certificate was emitted can easily be queried.
You can visit the following website, type a domain name, and you will immediately have a list of existing domain names.
If you use a custom domain in your email, it is highly likely that you have some IT knowledge and that you are the only user of your email server.
Using this statement (IT person + only domain user), someone having access to your email address can quickly search for anything related to your domain and figure it is related to you.
Anywhere you connect, your public IP is known of the remote servers.
Some bored sysadmin could take a look at the IPs in their logs, and check if some public service is running on it, polling for secure services (HTTPS, IMAPS, SMTPS) will immediately give associated domain name on that IP, then they could search even further.
There are not many solutions to prevent this, unfortunately.
The public IP situation could be mitigated by either continuing hosting at home by renting a cheap server with a public IP and establish a VPN between the two and use the public IP of the server for your services, or to move your services to such remote server. This is an extract cost of course. When possible, you could expose the service over Tor hidden service or I2P if it works for your use case, you would not need to rent a server for this.
The TLS certificates names being public could be easily solved by generating self-signed certificates locally, and deal with it. Depending on your services, it may be just fine, but if you have strangers using the services, the fact to accept to trust the certificate on first use (TOFU) may appear dangerous. Some software fail to connect to self-signed certificates and do not offer a bypass...
Self-hosting at home can be practical for various reasons: reusing old hardware, better local throughput, high performance for cheap... but you need to be aware of potential privacy issues that could come with it.
If you use Proton VPN with the paid plan, you have access to their port forwarding feature. It allows you to expose a TCP and/or UDP port of your machine on the public IP of your current VPN connection.
This can be useful for multiple use cases, let's see how to use it on Linux and OpenBSD.
If you do not have a privacy need with regard to the service you need to expose to the Internet, renting a cheap VPS is a better solution: cheaper price, stable public IP, no weird script for port forwarding, use of standard ports allowed, reverse DNS, etc...
Proton VPN port forwarding feature is not really practical, at least not as practical as doing a port forwarding with your local router. The NAT is done using NAT-PMP protocol (an alternative to UPnP), you will be given a random port number for 60 seconds. The random port number is the same for TCP and UDP.
There is a NAT PMPC client named natpmpc (available almost everywhere as a package) that need to run in an infinite loop to renew the port lease before it expires.
This is rather not practical for multiple reasons:
you get a random port assigned, so you must configure your daemon every time
the lease renewal script must run continuously
if something wrong happens (script failing, short network failure) that prevent renewing the lease, you will get a new random port
Although it has shortcomings, it is a useful feature that was dropped by other VPN providers because of abuses.
Install the package natpmpd to get the NAT-PMP client.
Create a script with the following content, and make it executable:
#!/bin/sh

PORT=$(natpmpc -a 1 0 udp 60 -g 10.2.0.1 | awk '/Mapped public/ { print $4 }')

# check if the current port is correct
grep "$PORT" /var/i2p/router.config || /etc/rc.d/i2p stop

# update the port in I2P config
sed -i -E "s,(^i2np.udp.port).*,\1=$PORT, ; s,(^i2np.udp.internalPort).*,\1=$PORT," /var/i2p/router.config

# make sure i2p is started (in case it was stopped just before)
/etc/rc.d/i2p start

while true
do
    date # use for debug only
    natpmpc -a 1 0 udp 60 -g 10.2.0.1 && natpmpc -a 1 0 tcp 60 -g 10.2.0.1 || { echo "error Failure natpmpc $(date)"; break ; }
    sleep 45
done
The script will search for the port number in I2P configuration, stop the service if the port is not found. Then the port line is modified with sed (in all cases, it does not matter much). Finally, i2p is started, this will only do something in case i2p was stopped before, otherwise nothing happens.
Then, in an infinite loop with a 45 seconds frequency, there is a renewal of the TCP and UDP port forwarding happening. If something wrong happens, the script exits.
If you want to use supervisord to start the script at boot and maintain it running, install the package supervisor and create the file /etc/supervisord.d/nat.ini with the following content:
[program:natvpn]
command=/etc/supervisord.d/continue_nat.sh ; choose the path of your script
autorestart=unexpected ; when to restart if exited after running (def: unexpected)
Enable supervisord at boot, start it and verify it started (a configuration error prevents it from starting):
The setup is exactly the same as for OpenBSD, just make sure the package providing natpmpc is installed.
Depending on your distribution, if you want to automate the script running / restart, you can run it from a systemd service with auto restart on failure, or use supervisord as explained above.
If you use a different network namespace, just make sure to prefix the commands using the VPN with ip netns exec vpn.
Here is the same example as above but using a network namespace named "vpn" to start i2p service and do the NAT query.
#!/bin/sh

PORT=$(ip netns exec vpn natpmpc -a 1 0 udp 60 -g 10.2.0.1 | awk '/Mapped public/ { print $4 }')

FILE=/var/i2p/.i2p/router.config

grep "$PORT" $FILE || sudo -u i2p /var/i2p/i2prouter stop
sed -i -E "s,(^i2np.udp.port).*,\1=$PORT, ; s,(^i2np.udp.internalPort).*,\1=$PORT," $FILE

ip netns exec vpn sudo -u i2p /var/i2p/i2prouter start

while true
do
    date
    ip netns exec vpn natpmpc -a 1 0 udp 60 -g 10.2.0.1 && ip netns exec vpn natpmpc -a 1 0 tcp 60 -g 10.2.0.1 || { echo "error Failure natpmpc $(date)"; break ; }
    sleep 45
done
Proton VPN port forwarding feature is useful when need to expose a local network service on a public IP. Automating it is required to make it work efficiently due to the unusual implementation.
In this blog post, you will learn how to configure your email server to encrypt all incoming emails using user's GPG public keys (when it exists). This will prevent anyone from reading the emails, except if you own the according GPG private key. This is known as "encryption at rest".
This setup, while effective, has limitations. Headers will not be encrypted, search in emails will break as the content is encrypted, and you obviously need to have the GPG private key available when you want to read your emails (if you read emails on your smartphone, you need to decide if you really want your GPG private key there).
Encryption is CPU consuming (and memory too for emails of a considerable size), I tried it on an openbsd.amsterdam virtual machine, and it was working fine until someone sent me emails with 20MB attachments. On a bare-metal server, there is absolutely no issue. Maybe GPG makes use of hardware acceleration cryptography, and it is not available in virtual machines hosted under the OpenBSD hypervisor vmm.
This is not an original idea, Etienne Perot wrote about a similar setup in 2012 and enhanced the gpgit script we will use in the setup. While his blog post is obsolete by now because of all the changes that happened in Dovecot, the core idea remains the same. Thank you very much Etienne for your job!
This setup is useful to protect your emails stored on the IMAP server. If the server or your IMAP account are compromised, the content of your emails will be encrypted and unusable.
You must be aware that emails headers are not encrypted: recipients / senders / date / subject will remain in clear text even after encryption. If you already use end-to-end encryption with your recipients, there are no benefits using this setup.
An alternative is to not let any emails on the IMAP server, although they could be recovered as they are written in the disk until you retrieve them.
Personally, I keep many emails of my server, and I am afraid that a 0day vulnerability could be exploited on my email server, allowing an attacker to retrieve the content of all my emails. OpenSMTPD had critical vulnerabilities a few years ago, including a remote code execution, so it is a realistic threat.
I wrote a privacy guide (for a client) explaining all the information shared through emails, with possible mitigations and their limitations.
This setup makes use of the program gpgit which is a Perl script encrypt emails received over the standard input using GPG, it is a complicated task because the email structure can be very complicated. I have not been able to find any alternative to this script. In gpgit repository there is a script to encrypt an existing mailbox (maildir format), that script must be run on the server, I did not test it yet.
You will configure a specific sieve rule which is "global" (not user-defined) that will process all emails before any other sieve filter. This sieve script will trigger a filter (a program allowed to modify the email) and pass the email on the standard input of the shell script encrypt.sh, which in turn will run gpgit with the according username after verifying a gnupg directory existed for them. If there is no gnupg directory, the email is not encrypted, this allows multiple users on the email server without enforcing encryption for everyone.
If a user has multiple addresses, this is the system account name that is used in the local part of the GPG key address.
All the following paths will be relative to the directory /usr/local/lib/dovecot/sieve/, you can cd into it now.
Create the file encrypt.sh with this content, replace the variable DOMAIN with the domain configured in the GPG key:
#!/bin/sh

DOMAIN="puffy.cafe"

NOW=$(date +%s)
DATA="$(cat)"

if test -d ~/.gnupg
then
    echo "$DATA" | /usr/local/bin/gpgit "${USER}@${DOMAIN}"
    NOW2=$(date +%s)
    echo "Email encryption for user ${USER}: $(( NOW2 - NOW )) seconds" | logger -p mail.info
else
    echo "$DATA"
    echo "Email encryption for user for ${USER} none" | logger -p mail.info
fi
Make the script executable with chmod +x encrypt.sh. This script will create a new log line in your email logs every time an email is processed, including the username and the time required for encryption (in case of encryption). You could extend the script to discard the Subject header from the email if you want to hide it, I do not provide the implementation as I expect this task to be trickier than it looks like if you want to handle all corner cases.
You may have sieve_global_extensions already set, in that case update its value.
The variable sieve_filter_exec_timeout allows the script encrypt.sh to run for 200 seconds before being stopped, you should adapt the value to your system. I came up with 200 seconds to be able to encrypt email with 20MB attachments on an openbsd.amsterdam virtual machine. On a bare metal server with a Ryzen 5 CPU, it takes less than one second for the same email.
The full file should look like the following (in case you followed my previous email guide):
##
## Plugin settings
##
# All wanted plugins must be listed in mail_plugins setting before any of the
# settings take effect. See <doc/wiki/Plugins.txt> for list of plugins and
# their configuration. Note that %variable expansion is done for all values.
plugin {
sieve_plugins = sieve_imapsieve sieve_extprograms
# From elsewhere to Spam folder
imapsieve_mailbox1_name = Spam
imapsieve_mailbox1_causes = COPY
imapsieve_mailbox1_before = file:/usr/local/lib/dovecot/sieve/report-spam.siev
# From Spam folder to elsewhere
imapsieve_mailbox2_name = *
imapsieve_mailbox2_from = Spam
imapsieve_mailbox2_causes = COPY
imapsieve_mailbox2_before = file:/usr/local/lib/dovecot/sieve/report-ham.sieve
sieve_pipe_bin_dir = /usr/local/lib/dovecot/sieve
# for GPG encryption
  sieve_filter_bin_dir = /usr/local/lib/dovecot/sieve
  sieve_global_extensions = +vnd.dovecot.pipe +vnd.dovecot.environment +vnd.dovecot.filter
  sieve_before = /usr/local/lib/dovecot/sieve/global.sieve
  sieve_filter_exec_timeout = 200s
}
Open the file /etc/dovecot/conf.d/10-master.conf and uncomment the variable default_vsz_limit and set its value to 1024M. This is required as GPG uses a lot of memory and without this, the process will be killed and the email lost. I found 1024M to works with attachments up to 45 MB, however you should raise this value higher value if you plan to receive bigger attachments.
Restart dovecot to take account of the changes: rcctl restart dovecot.
You need to create a GPG keyring for each users you want use encryption, the simplest method is to setup a passwordless keyring and import your public key:
If you use a spam filter such as rspamd or spamassassin relying on bayes filter, it will only work if it process the emails before arriving at dovecot, for instance in my email setup this is the case as rspamd is a filter of opensmtpd and pass the email before being delivered to Dovecot.
Such service can have privacy issues, especially if you use encryption. Bayes filter works by splitting an email content into tokens (not really words but almost) and looking for patterns using these tokens, basically each emails is split and stored in the anti-spam local database in small parts. I am not sure one could recreate the emails based on tokens, but if someone like an attacker is able to access the token list, they may have some insights about your email content. If this is part of your threat model, disable your anti-spam Bayes filter.
This setup is quite helpful if you want to protect all your emails on their storage. Full disk encryption on the server does not prevent anyone able to connect over SSH (as root or the email user) from reading the emails, even file recovery is possible when the volume is unlocked (not on the real disk, but the software encrypted volume), this is where encryption at rest is beneficial.
I know from experience it is complicated to use end-to-end encryption with tech-savvy users, and that it is even unthinkable with regular users. This is a first step if you need this kind of security (see the threat model section), but you need to remember a copy of all your emails certainly exist on the servers used by the persons you exchange emails with.
Firefox has an interesting features for developers, its ability to connect a Firefox developers tools to a remote Firefox instance. This can really interesting in the case of a remote kiosk display for instance.
The remote debugging does not provide a display of the remote, but it gives you access to the developer tools for tabs opened on the remote.
The remote firefox you want to connect to must be started using the command line parameter --start-debugger-server. This will make it listen on the TCP port 6000 on 127.0.0.1. Be careful, there is another option named remote-debugging-port which is not what you want here, but the names can be confusing (trust me, I wasted too much time because of this).
Before starting Firefox, a few knobs must be modified in its configuration. Either search for the options in about:config or create a user.js file in the Firefox profile directory with the following content:
This enables the remote management and removes a prompt upon each connection, while this is a good safety measure, it is not practical for remote debugging.
When you start Firefox, the URL input bar should have a red background.
Now, you need to make a SSH tunnel to that remote host where Firefox is running in order to connect to the port. Depending on your use case, a local NAT could be done to expose the port to a network interface or VPN interface, but pay attention to security as this would allow anyone on the network to control the Firefox instance.
The SSH tunnel is quite standard: ssh -L 6001:127.0.0.1:6000, the remote port 6000 is exposed locally as 6001, this is important because your own Firefox may be using the port 6000 for some reasons.
In your own local Firefox instance, visit the page about:debugging, add the remote instance localhost:6001 and then click on Connect on its name on the left panel. Congratulations, you have access to the remote instance for debugging or profiling websites.
This blog post is a guide explaining how to setup a full-featured email server on OpenBSD 7.5. It was commissioned by a customer of my consultancy who wanted it to be published on my blog.
Setting up a modern email stack that does not appear as a spam platform to the world can be a daunting task, the guide will cover what you need for a secure, functional and low maintenance email system.
The features list can be found below:
email access through IMAP, POP or Webmail
secure SMTP server (mandatory server to server encryption, personal information hiding)
state-of-the-art setup to be considered as legitimate as possible
firewall filtering (bot blocking, all ports closes but the required ones)
anti-spam
In the example, I will set up a temporary server for the domain puffy.cafe with a server using the subdomain mail.puffy.cafe. From there, you can adapt with your own domain.
I prepared a few diagrams explaining how all the components are used together, in three cases: when sending an email, when the SMTP servers receives an email from the outside and when you retrieve your emails locally.
Packet Filter is OpenBSD's firewall. In our setup, we want all ports to be blocked except the few ones required for the email stack.
The following ports will be required:
opensmtpd 25/tcp (smtp): used for email delivery from other servers, supports STARTTLS
opensmtpd 465/tcp (smtps): used to establish a TLS connection to the SMTP server to receive or send emails
opensmtpd 587/tcp (submission): used to send emails to external servers, supports STARTTLS
httpd 80/tcp (http): used to generate TLS certificates using ACME
dovecot 993/tcp (imaps): used to connect to the IMAPS server to read emails
dovecot 995/tcp (pop3s): used to connect to the POP3S server to download emails
dovecot 4190/tcp (sieve): used to allow remote management of an user SIEVE rules
Depending on what services you will use, only the opensmtpd ports are mandatory. In addition, we will open the port 22/tcp for SSH.
set block-policy drop
set loginterface egress
set skip on lo0

# normalisation des paquets
match in all scrub (no-df random-id max-mss 1440)
antispoof quick for { egress }

tcp_ports = "{ smtps smtp submission imaps pop3s sieve ssh http }"

block all
pass out inet
pass out inet6

# allow ICMP (ping)
pass in proto icmp

# allow IPv6 to work
pass in on egress inet6 proto icmp6 all icmp6-type { routeradv neighbrsol neighbradv }
pass in on egress inet6 proto udp from fe80::/10 port dhcpv6-server to fe80::/10 port dhcpv6-client no state

# allow our services
pass in on egress proto tcp from any to any port $tcp_ports

# default OpenBSD rules
# By default, do not permit remote connections to X11
block return in on ! lo0 proto tcp to port 6000:6010

# Port build user does not need network
block return out log proto {tcp udp} user _pbuild
The MX records list the servers that should be used by outside SMTP servers to send us emails, this is the public list of our servers accepting emails for a given domain. They have a weight associated to each of them, the server with the lowest weight should be used first and if it does not respond, the next server used will be the one with a slightly higher weight. This is a simple mechanism that allow setting up a hierarchy.
I highly recommend setting up at least two servers, so if your main server fails is unreachable (host outage, hardware failure, upgrade ongoing) the emails will be sent to the backup server. Dovecot bundles a program to synchronize mailboxes between servers, one way or two-way, one shot or continuously.
If you have no MX records in your domain name, it is not possible to send you emails. It is like asking someone to send you a post card without giving them any clue about your real address.
Your server hostname can be different from the domain apex (raw domain name without a subdomain), a simple example would be to use mail.domain.example for the server name, this will not prevent it from receiving/sending emails using @domain.example in email addresses.
In my example, the domain puffy.cafe mail server will be mail.puffy.cafe, giving this MX record in my DNS zone:
The SPF record is certainly the most important piece of the email puzzle to detect spam. With the SPF, the domain name owner can define which servers are allowed to send emails from that domain. A properly configured spam filter will give a high spam score to incoming emails that are not in the sender domain SPF.
To ease the configuration, that record can automatically include all MX defined for a domain, but also A/AAAA records, so if you only use your MX servers for sending, a simple configuration allowing MX servers to send is enough.
In my example, only mail.puffy.cafe should be legitimate for sending emails, any future MX server should also be allowed to send emails, so we configure the SPF to allow all MX defined servers to be senders.
When used, the DKIM is a system allowing a receiver to authenticate a sender, based on an asymmetric cryptographic keys. The sender publishes its public key on a TXT DNS record before signing all outgoing emails using the private key. By doing so, receivers can validate the email integrity and make sure it was sent from a server of the domain claimed in the From header.
DKIM is mandatory to not be classified as a spamming server.
The following set of commands will create a 2048 bits RSA key in /etc/mail/dkim/private/puffy.cafe.key with its public key in /etc/mail/dkim/puffy.cafe.pub, the umask 077 command will make sure any file created during the process will only be readable by root. Finally, you need to make the private key readable to the group _rspamd.
You need to install the rspamd package to have the user _rspamd for these instructions. If you want to use a different DKIM program, you will need to adapt the configuration.
pkg_add rspamd-- opensmtpd-filter-rspamd
Note: the umask command will persist in your shell session, if you do not want to create files/directory only readable by root after this, either spawn a new shell, or run the set of commands in a new shell and then exit from it once you are done.
In this example, we will name the DKIM selector dkim to keep it simple. The selector is the name of the key, this allows having multiple DKIM keys for a single domain.
Add the DNS record like the following, the value in p is the public key in the file /etc/mail/dkim/puffy.cafe.pub, you can get it as a single line with the command awk '/PUBLIC/ { $0="" } { printf ("%s",$0) } END { print }' /etc/mail/dkim/puffy.cafe.pub:
Your registrar may offer to add the entry using a DKIM specific form. There is nothing wrong doing so, just make sure the produced entry looks like the entry below.
dkim._domainkey IN TXT "v=DKIM1;k=rsa;p=MIIBIjANBgkqhkiG9w0BAQEFAAOCAQ8AMIIBCgKCAQEAo3tIFelMk74wm+cJe20qAUVejD0/X+IdU+A2GhAnLDpgiA5zMGiPfYfmawlLy07tJdLfMLObl8aZDt5Ij4ojGN5SE1SsbGC2MTQGq9L2sLw2DXq+D8YKfFAe0KdYGczd9IAQ9mkYooRfhF8yMc2sMoM75bLxGjRM1Fs1OZLmyPYzy83UhFYq4gqzwaXuTvxvOKKyOwpWzrXzP6oVM7vTFCdbr8E0nWPXWKPJhcd10CF33ydtVVwDFp9nDdgek3yY+UYRuo/iJvdcn2adFoDxlE6eXmhGnyG4+nWLNZrxIgokhom5t5E84O2N31YJLmqdTF+nH5hTON7//5Kf/l/ubwIDAQAB"
The DMARC record is an extra mechanism that comes on top of SPF/DKIM, while it does not do much by itself, it is important to configure it.
DMARC could be seen as a public notice explaining to servers receiving emails whose sender looks like your domain name (legit or not) what they should do if SPF/DKIM does not validate.
As of 2024, DMARC offers three actions for receivers:
do nothing but make a report to the domain owner
"quarantine" mode: tell the receiver to be suspicious without rejecting it, the result will depend on the receiver (most of the time it will be flagged as spam) and make a report
"reject" mode: tell the receiver to not accept the email and make a report
In my example, I want invalid SPF/DKIM emails to be rejected. It is quite arbitrary, but I prefer all invalid emails from my domain to be discarded rather than ending up in a spam directory, so p and sp are set to reject. In addition, if my own server is misconfigured I will be notified about delivery issues sooner than if emails were silently put into quarantine.
An email address should be provided to receive DMARC reports, they are barely readable and I never made use of them, but the email address should exist so this is what the rua field is for.
The field aspf is set to r (relax), basically this allows any servers with a hostname being a subdomain of .puffy.cafe to send emails for @puffy.cafe, while if this field is set to s (strict), the domain of the sender should match the domain of the email server (mail.puffy.cafe would only be allowed to send for @mail.puffy.cafe).
An older mechanism used to prevent spam was to block, or consider as spam, any SMTP server whose advertised hostname did not match the result of the reverse lookup of its IP.
Let's say "mail.foobar.example" (IP: A.B.C.D) is sending an email to my server, if the result of the DNS request to resolve the PTR of A.B.C.D is not "mail.foobar.example", the email would be considered as spam or rejected. While this is superseded by SPF/DKIM and annoying as it is not always possible to define a PTR for a public IP, the reverse DNS setup is still a strong requirement to not be considered as a spamming platform.
Make sure the PTR matches the system hostname and not the domain name itself, in the example above the PTR should be mail.foobar.example and not foobar.example.
The first step is to obtain a valid TLS certificate, this requires configuring acme-client, httpd and start httpd daemon.
Copy the acme-client example cp /etc/examples/acme-client.conf /etc/
Modify /etc/acme-client.conf and edit only the last entry to configure your own domain, mine looks like this:
#
# $OpenBSD: acme-client.conf,v 1.5 2023/05/10 07:34:57 tb Exp $
#
authority letsencrypt {
	api url "https://acme-v02.api.letsencrypt.org/directory"
	account key "/etc/acme/letsencrypt-privkey.pem"
}

authority letsencrypt-staging {
	api url "https://acme-staging-v02.api.letsencrypt.org/directory"
	account key "/etc/acme/letsencrypt-staging-privkey.pem"
}

authority buypass {
	api url "https://api.buypass.com/acme/directory"
	account key "/etc/acme/buypass-privkey.pem"
	contact "mailto:me@example.com"
}

authority buypass-test {
	api url "https://api.test4.buypass.no/acme/directory"
	account key "/etc/acme/buypass-test-privkey.pem"
	contact "mailto:me@example.com"
}

domain mail.puffy.cafe {
    # you can remove the line "alternative names" if you do not need extra subdomains
    # associated to this certificate
    # imap.puffy.cafe is purely an example, I do not need it
	alternative names { imap.puffy.cafe pop.puffy.cafe }
	domain key "/etc/ssl/private/mail.puffy.cafe.key"
	domain full chain certificate "/etc/ssl/mail.puffy.cafe.fullchain.pem"
	sign with letsencrypt
}
Now, configure httpd, starting from the OpenBSD example: cp /etc/examples/httpd.conf /etc/
Edit /etc/httpd.conf, we want the first block to match all domains but not "example.com", and we do not need the second block listen on 443/tcp (except if you want to run a https server with some content, but you are on your own then). The resulting file should look like the following:
Enable and start httpd with rcctl enable httpd && rcctl start httpd.
Run acme-client -v mail.puffy.cafe to generate the certificate with some verbose output (if something goes wrong, you will have a clue).
If everything went fine, you should have the full chain certificate in /etc/ssl/mail.puffy.cafe.fullchain.pem and the private key in /etc/ssl/private/mail.puffy.cafe.key.
You will use rspamd to filter spam and sign outgoing emails for DKIM.
Install rspamd and the filter to plug it to opensmtpd:
pkg_add rspamd-- opensmtpd-filter-rspamd
You need to configure rspamd to sign outgoing emails with your DKIM private key, to proceed, create the file /etc/rspamd/local.d/dkim_signing.conf (the filename is important):
# our usernames does not contain the domain part
# so we need to enable this option
allow_username_mismatch = true;

# this configures the domain puffy.cafe to use the selector "dkim"
# and where to find the private key
domain {
    puffy.cafe {
        path = "/etc/mail/dkim/private/puffy.cafe.key";
        selector = "dkim";
    }
}
For better performance, you need to use redis as a cache backend for rspamd:
rcctl enable redis
rcctl start redis
Now you can start rspamd:
rcctl enable rspamd
rcctl start rspamd
For extra information about rspamd (like statistics or its web UI), I wrote about it in 2021:
If you do not want to use rspamd, it is possible to replace the DKIM signing part using opendkim, dkimproxy or opensmtpd-filter-dkimsign. The spam filter could be either replaced by the featureful spamassassin available as a package, or partially with the base system program spamd (it does not analyze emails).
This guide only focus on rspamd, but it is important to know alternatives exist.
OpenSMTPD configuration file on OpenBSD is /etc/mail/smtpd.conf, here is a working configuration with a lot of comments:
## this defines the paths for the X509 certificate
pki puffy.cafe cert "/etc/ssl/mail.puffy.cafe.fullchain.pem"
pki puffy.cafe key "/etc/ssl/private/mail.puffy.cafe.key"
pki puffy.cafe dhe auto

## this defines how the local part of email addresses can be split
# defaults to '+', so solene+foobar@domain matches user
# solene@domain. Due to the '+' character being a regular source of issues
# with many online forms, I recommend using a character such as '_',
# '.' or '-'. This feature is very handy to generate infinite unique emails
# addresses without pre-defining aliases.
# Using '_', solene_openbsd@domain and solene_buystuff@domain lead to the
# same address
smtp sub-addr-delim '_'

## this defines an external filter
# rspamd does dkim signing and spam filter
filter rspamd proc-exec "filter-rspamd"

## this defines which file will contain aliases
# this can be used to define groups or redirect emails to users
table aliases file:/etc/mail/aliases

## this defines all the ports to use
# mask-src hides system hostname, username and public IP when sending an email
listen on all port 25  tls         pki "puffy.cafe" filter "rspamd"
listen on all port 465 smtps       pki "puffy.cafe" auth mask-src filter "rspamd"
listen on all port 587 tls-require pki "puffy.cafe" auth mask-src filter "rspamd"

## this defines actions
# either deliver to lmtp or to an external server
action "local" lmtp "/var/dovecot/lmtp" alias <aliases>
action "outbound" relay

## this defines what should be done depending on some conditions
# receive emails (local or from external server for "puffy.cafe")
match from any for domain "puffy.cafe" action "local"
match from local for local action "local"

# send email (from local or authenticated user)
match from any auth for any action "outbound"
match from local for any action "outbound"
In addition, you can configure the advertised hostname by editing the file /etc/mail/mailname: for instance my machine's hostname is ryzen so I need this file to advertise it as mail.puffy.cafe.
For ports using STARTTLS (25 and 587), there are different options with regard to TLS encryption.
do not allow STARTTLS
offer STARTTLS but allow not using it (option tls)
require STARTTLS: drop connection when the remote peer does ask for STARTTLS (option tls-require)
require STARTTLS: drop connection when no STARTTLS, and verify the remote certificate (option tls-require verify)
It is recommended to enforce STARTTLS on port 587 as it is used by authenticated users to send emails, preventing them to send emails without network encryption.
On port 25, used by external servers to reach yours, it is important to allow STARTTLS because most server will deliver emails over an encrypted TLS session, however it is your choice to enforce it or not.
Enforcing STARTTLS might break email delivery from some external servers that are outdated or misconfigured (or bad actors).
By default, OpenSMTPD is configured to deliver email to valid users in the system. In my example, if user solene exists, then email address solene@puffy.cafe will deliver emails to solene user mailbox.
Of course, as you do not want the system daemons to receive emails, a file contains aliases to redirect emails from a user to another, or simply discard it.
In /etc/mail/aliases, you can redirect emails to your username by adding a new line, in the example below I will redirect root emails to my user.
root: solene
It is possible to redirect to multiple users using a comma to separate them, this is handful if you want to create a local group delivering emails to multiple users.
Instead of a user, it is possible to append the incoming emails to a file, pipe them to a command or return an SMTP code. The aliases(5) man pages contains all you need to know.
If you need to handle emails for multiple domains, this is rather simple:
Add this line to the file /etc/mail/smtpd.conf by changing puffy.cafe to the other domain name: match from any for domain "puffy.cafe" action "local"
Configure the other domain DNS MX/SPF/DKIM/DMARC
Configure /etc/rspamd/local.d/dkim_signing.conf to add a new block with the other domain, the dkim selector and the dkim key path
The PTR does not need to be modified as it should match the machine hostname advertised over SMTP, and it is an unique value anyway
If you want to use a different aliases table for the other domain, you need to create a new aliases file and configure /etc/mail/smtpd.conf accordingly where the following lines should be added:
table lambda file:/etc/mail/aliases-lambda

action "local_mail_lambda" lmtp "/var/dovecot/lmtp" alias <lambda>

match from any for domain "lambda-puffy.eu" action "local_mail_lambda"
Note that the users will be the same for all the domains configured on the server. If you want to have separate users per domains, or that "user a" on domain A and "user a" on domain B could be different persons / logins, you would need to setup virtual users instead of using system users. Such setup is beyond the scope of this guide.
It is possible to not use Dovecot. Such setup can suit users who would like to download the maildir directory using rsync on their local computer, this is a one-way process and does not allow sharing a mailbox across multiple devices. This reduces maintenance and attack surface at the cost of convenience.
This may work as a two-way access (untested) when using a software such as unison to keep both the local and remote directories synchronized, but be prepared to manage file conflicts!
If you want this setup, replace the following line in smtpd.conf
action "local" lmtp "/var/dovecot/lmtp" alias <aliases>
by this line: if you want to store the emails into a maildir format (a directory per email folder, a file per email), emails will be stored in the directory "Maildir" in user's homes.
action "local" maildir "~/Maildir/" junk alias <aliases>
or this line if you want to keep the mbox format (a single file with emails appended to it, not practical), the emails will be stored in /var/mail/$user.
Dovecot is an important piece of software for the domain end users, it provides protocols like IMAP or POP3 to read emails from a client. It is the most popular open source IMAP/POP server available (the other being Cyrus IMAP).
Install dovecot with the following command line:
pkg_add dovecot-- dovecot-pigeonhole--
Dovecot has a lot of configuration files in /etc/dovecot/conf.d/ although most of them are commented and ready to be modified, you will have to edit a few of them. This guide provides the content of files with empty lines / comments stripped so you can quickly check if your file is ok, you can use the command awk '$1 !~ /^#/ && $1 ~ /./' on a file to display its "useful" content only (awk will not modify the file).
Modify /etc/dovecot/conf.d/10-ssl.conf and search the lines ssl_cert and ssl_key, change their values to your certificate full chain and private key.
Generate a Diffie-Hellman file for perfect forward secrecy, this will make each TLS negociation unique, so if the private key ever leak, every past TLS communication will remain safe.
Modify /etc/dovecot/conf.d/10-mail.conf, search for a commented line mail_location, uncomment it and set the value to maildir:~/Maildir, this will tell Dovecot where users mailboxes are stored and in which format, we want to use the maildir format.
Modify the file /etc/dovecot/conf.d/20-lmtp.conf, LMTP is the protocol used by opensmtpd to transmit incoming emails to dovecot. Search for the commented variable mail_plugins and uncomment it with the value mail_plugins = $mail_plugins sieve:
IMAP is an efficient protocol that returns headers of emails per directory, so you do not have to download all your emails to view the directory list, emails are downloaded upon read (by default in most email clients). It allows some cool features like server side search, incoming email sorting with sieve filters or multi devices access.
Edit /etc/dovecot/conf.d/20-imap.conf and configure the last lines accordingly to the result file:
The number of connections per user/IP should be high if you have an email client tracking many folders, in IMAP a connection is required for each folder, so the number of connections can quickly increase. On top of that, if you have multiple devices under the same public IP you could quickly reach the limit. I found 25 worked fine for me with 3 devices.
POP3 is a pretty old protocol that is rarely considered by users, I still consider it a viable alternative to IMAP depending on your needs.
A major incentive for using POP is that it downloads all emails locally before removing them from the server. As we have no tooling to encrypt emails stored on remote email servers, POP3 is a must if you want to not leave any email on the server. POP3 does not support remote folders, so you can not use Sieve filters on the server to sort your emails and then download them as-this. A POP3 client downloads the Inbox and then sorts the emails locally.
It can support multiple devices under some conditions: if you delete the emails after X days, your devices should synchronize before the emails are removed. In such case they will have all the emails stored locally, but they will not be synced together: if both computers A and B are up-to-date, when deleting an email on A, it will still be in B.
There are no changes required for POP3 in Dovecot as the defaults are good enough.
For information, a replacement for IMAP called JMAP is in development, it is meant to be better than IMAP in every way and also include calendars and address book management.
JMAP Implementations are young but exist, although support in email clients is almost non-existent. For instance, it seems Mozilla Thunderbird is not interested in it, an issue in their bug tracker about JMAP from December 2016 only have a couple of comments from people who would like to see it happening, nothing more.
Dovecot has a plugin to offer Sieve filters, they are rules applied to received emails going into your mailbox, whether you want to sort them into dedicated directories, mark them read or block some addresses. That plugin is called pigeonhole.
You will need Sieve to enable the spam filter learning system when moving emails from/to the Junk folder as it is triggered by a Sieve rule. This improves rspamd Bayes (a method using tokens to understand information, the story of the person behind it is interesting) filter ability to detect spam accurately.
Edit /etc/dovecot/conf.d/90-plugin.conf with the following content:
This piece of configuration was taken from the official Dovecot documentation: https://doc.dovecot.org/configuration_manual/howto/antispam_with_sieve/ . It will trigger shell scripts calling rspamd to make it learn what does a spam look like, and what is legit (ham). One script will run when an email is moved out of the spam directory (ham), another one when an email is moved to the spam directory (spam).
Modify /etc/dovecot/conf.d/15-mailboxes.conf to add the following snippet inside the block namespace inbox { ... }, it will associate the Junk directory as the folder containing spam and automatically create it if it does not exist:
  mailbox Spam {
    auto = create
    special_use = \Junk
  }
To make this work completely, you need to write the two extra sieve filters that will run trigger the scripts:
By default, Sieves rules are a file located on the user home directory, however there is a standard protocol named "managesieve" to manage Sieve filters remotely from an email client.
It is enabled out of the box in Dovecot configuration, although you need to make sure you open the port 4190/tcp in the firewall if you want to allow users to use it.
A webmail will allow your users to read / send emails from a web interface instead of having to configure a local email client. While they can be convenient, they enable a larger attack surface and are often affected by vulnerability issues, you may prefer to avoid webmail on your server.
The two most popular open source webmail are Roundcube mail and Snappymail (a fork of the abandoned rainloop) and Roundcube, they both have pros and cons.
Roundcube is packaged in OpenBSD, it will pull in all required dependencies and occasionally receive backported security updates.
Install the package:
pkg_add roundcubemail
When installing the package, you will be prompted for a database backend for PHP. If you have one or two users, I highly recommend choosing SQLite as it will work fine without requiring a running daemon, thus less maintenance and server resources locked. If you plan to have a lot of users, there are no wrong picks between MySQL or PostgreSQL, but if you already have one of them running it would be better to reuse it for Roundcube.
Specific instructions for installing Roundcube are provided by the package README in /usr/local/share/doc/pkg-readmes/roundcubemail.
We need to enable a few PHP modules to make Roundcube mail working:
Note that more PHP modules may be required if you enable extra features and plugins in Roundcube.
PHP is ready to be started:
rcctl enable php82_fpm
rcctl start php82_fpm
Add the following blocks to /etc/httpd.conf, make sure you opened the port 443/tcp in your pf.conf and that you reloaded it with pfctl -f /etc/pf.conf:
server "mail.puffy.cafe" {

    listen on egress tls

    tls key "/etc/ssl/private/mail.puffy.cafe.key"
    tls certificate "/etc/ssl/mail.puffy.cafe.fullchain.pem"

    root "/roundcubemail"

    directory index index.php

    location "*.php" {
        fastcgi socket "/run/php-fpm.sock"
    }
}

types {
    include "/usr/share/misc/mime.types"
}
Restart httpd with rcctl restart httpd.
You need to configure Roundcube to use a 24 bytes security key and configure the database: edit the file /var/www/roundcubemail/config/config.inc.php:
Search for the variable des_key, replace its value by the output of the command tr -dc [:print:] < /dev/urandom | fold -w 24 | head -n 1 which will generate a 24 byte random string. If the string contains a quote character, either escape this character by prefixing it with a \ or generate a new string.
For the database, you need to search the variable db_dsnw.
To make sure the files cert.pem and openssl.cnf stay in sync after upgrades, add the two commands to a file /etc/rc.local and make this file executable. This script always starts at boot and is the best place for this kind of file copy.
If your IMAP and SMTP hosts are not on the same server where Roundcube is installed, adapt the variables imap_host and smtp_host to the server name.
If Roundcube mail is running on the same server where OpenSMTPD is running, you need to disable certificate validation because localhost will not match the certificate and authentication will fail. Change smtp_host line to $config['smtp_host'] = 'tls://127.0.0.1:587'; and add this snippet to the configuration file:
It is always possible to improve the security of this stack, all the following settings are not mandatory, but they can be interesting depending on your needs.
7.1. Always allow the sender per email or domain §
It is possible to configure rspamd to force it to accept emails from a given email address or domain, bypassing the anti-spam.
To proceed, edit the file /etc/rspamd/local.d/multimap.conf to add this content:
local_wl_domain {
        type = "from";
        filter = "email:domain";
        map = "$CONFDIR/local.d/whitelist_domain.map";
        symbol = "LOCAL_WL_DOMAIN";
        score = -10.0;
        description = "domains that are always accepted";
}

local_wl_from {
        type = "from";
        map = "$CONFDIR/local.d/whitelist_email.map";
        symbol = "LOCAL_WL_FROM";
        score = -10.0;
        description = "email addresses that are always accepted";
}
Create the files /etc/rspamd/local.d/whitelist_domain.map and /etc/rspamd/local.d/whitelist_email.map using the command touch.
Restart the service rspamd with rcctl restart rspamd.
The created files use a simple syntax, add a line for each entry you want to allow:
a domain name in /etc/rspamd/local.d/whitelist_domain.map to allow the domain
an email address in /etc/rspamd/local.d/whitelist_email.map to allow this address
There is no need to restart or reload rspamd after changing the files.
Reusing the same technique can be done to block domains/addresses directly in rspamd by giving a high positive score.
If you want to improve your email setup security further, the best method is to split each part into dedicated systems.
As dovecot is responsible for storing and exposing emails to users, this component would be safer in a dedicated system, so if a component of the email stack (other than dovecot) is compromised, the mailboxes will not be exposed.
If this does not go against usability of the email server users, I strongly recommend limiting the publicly opened ports in the firewall to the minimum: 25, 80, 465, 587. This would prevent attackers to exploit any network related 0day or unpatched vulnerabilities of non-exposed services such as Dovecot.
A VPN should be deployed to allow users to reach Dovecot services (IMAP, POP) and other services if any.
SSH port could be removed from the public ports as well, however, it would be safer to make sure your hosting provider offers a serial access / VNC / remote access to the system because if the VPN stops working, you will not be able to log in into the system using SSH to debug it.
There is an online service providing you a random email address to send a test email to, then you can check the result on their website displaying if the SPF, DKIM, DMARC and PTR records are correctly configured.
The score you want to be displayed on their website is no least than 10/10. The service can report meaningless issues like "the email was poorly formatted" or "you did not include an unsubscribe link", they are not relevant for the current test.
While it used to be completely free last time I used it, I found it would ask you to pay after three free checks if you do not want to wait 24h. It uses your public IP address for the limit.
The following processes list should always be running: using a program like monit, zabbix or reed-alert to notify you when they stop working could be a good idea.
In addition, the TLS certificate should be renewed regularly as ACME generated certificates are valid for a few months. Edit root crontab with crontab -e as root to add this line:
This will try to renew the certificate for mail.puffy.cafe every Sunday at 04h10 and upon renewal restart the services using the certificate: dovecot, httpd and smtpd.
Finally, OpenSMTPD will stop delivering emails locally if the /var partition has less than 4% of free disk space, be sure to monitor the disk space of this partition otherwise you will not receive emails anymore for a while before noticing something is wrong.
Congratulations, you configured a whole email stack that will allow you to send emails to the world, using your own domain and hardware. Keeping your system up to date is important as you have network services exposed to the wild Internet.
Even with a properly configured setup featuring SPF/DKIM/DMARC/PTR, it is not guaranteed to not end in the spam directory of our recipients. The IP reputation of your SMTP server also account, and so is the domain name extension (I have a .pw domain which I learned too late that it was almost always considered as spam because it is not mainstream).
The Xbox Ultimate subscription bundles a game library for Xbox and Windows games with high price titles, this makes the price itself quite cheap compared to the price of available games as a high-priced game is more expensive than four months of subscription. However, I have mixed feelings about the associated streaming service: on one hand it works perfectly fine (no queue, input lag is ok) but the video quality is not fantastic on a 1080p screen. The service seems perfectly fitted to be played on smartphones, every touchscreen compatible games have a specific layout customized for that game, making the touchscreen a lot more usable than displaying a full controller over the layout when you only need a few buttons, in addition to the low bandwidth usage it makes a good service for handheld devices. On desktop, you may want to use the streaming to try a game before installing it, but not much more.
There is no client for Android TV, so you can not use these devices except if you can run a web browser in it.
Really, with a better bitrate, the service would be a blast (not for 4k and/or 120 fps users though), but at the moment it is only ok as a game library, or as a streaming service to play on small or low resolution screens.
The service could be good with a better bitrate, the input lag is ok and I did not experience any waiting time. The hardware specs seem good except the loading times, it feels like the data are stored on a network storage with poor access time or bandwidth. The bitrate is so bad that I can not recommend playing anything in first person view or moving too fast as it would look like a pixel mess. However, playing slow paced games is perfectly fine.
There have a killer feature that is unique to their service, you can invite a friend to play a game in streaming with you by just sending them a link, they will join your game, and you can start playing together in a minute. While it is absolutely cool, the service lacks fun games to play in couch coop...
As you can use Luna if you have Amazon Prime, I think it is a good fit for casual players who do not want to pay for games but would enjoy a session from time to time on any hardware.
I mentioned the subscription cancelling process twice, here are the facts: on your account you click on unsubscribe, then it asks if you are really sure because you will lose access to your service, you have to agree, then it will remind you that you are about to cancel, and maybe it is a mistake, so you need to agree again, then there is a trick. The web page says that your account will be cancelled and that you can still use your account up to cancel date, it looks fine here, but it is not, there is a huge paragraph of blah blah below and a button to confirm the cancel! Then you are done. But first time I cancelled I did not pass the third step as I thought it was fine, when double-checking my account status before the renewal, I saw I missed something.
I wrote a review of their services a few months ago. Since then, I renewed my account with 6 months of priority tier. I mostly use it to play resource intensive games when it is hot at home (so my computer does not heat at all), at night when I want to play a bit in silence without fan noise, finally I enjoy it a lot with slow paced games like walking simulators on my TV.
On one hand, Luna seems to target casual users: people who may not notice the bad quality or input lag and who will just play what is available.
On the other hand, Xbox service is a game library first, with a streaming feature. It is quite perfect for people playing Xbox library games on PC / Xbox who wants to play on a smartphone / tablet occasionally, but not for customers looking only for playing streaming games.
Both services would not need much to be _good_ streaming services, the minimum upgrade should be a higher bitrate. Better specs would be appreciated too: improved loading times for Luna, and Xbox games running on a better platform than Xbox Series S.
This guide explains how to setup a WireGuard tunnel on Linux using a dedicated network namespace so you can choose to run a program on the VPN or over clearnet.
I have been able to figure the setup thanks to the following blog post, I enhanced it a bit using scripts and sudo rules.
By default, if you connect WireGuard tunnel, its "allowedIps" field will be used as a route with a higher priority than your current default route. It is not always ideal to have everything routed through a VPN, so you will create a dedicated network namespace that uses the VPN as a default route, without affecting all other software.
Unfortunately, compared to OpenBSD rdomain (which provide the same features in this situation), network namespaces are much more complicated to deal with and requires root to run a program under a namespace.
You will create a SAFE sudo rule to allow your user to run commands under the new namespace, making it more practical for daily use.
You need a wg-quick compatible WireGuard configuration file, but do not make it automatically used at boot.
Create a script (for root use only) with the following content, then make it executable:
#!/bin/sh

# your VPN configuration file
CONFIG=/etc/wireguard/my-vpn.conf

# this directory is used to have a per netns resolver file
mkdir -p /etc/netns/vpn/

# cleanup any previous VPN in case you want to restart it
ip netns exec vpn ip l del tun0
ip netns del vpn

# information to reuse later
DNS=$(awk '/^DNS/ { print $3 }' $CONFIG)
IP=$(awk '/^Address/ { print $3 }' $CONFIG)

# the namespace will use the DNS defined in the VPN configuration file
echo "nameserver $DNS" > /etc/netns/vpn/resolv.conf

# now, it creates the namespace and configure it
ip netns add vpn
ip -n vpn link set lo up
ip link add tun0 type wireguard
ip link set tun0 netns vpn
ip netns exec vpn wg setconf tun0 <(wg-quick strip "$CONFIG")
ip -n vpn a add "$IP" dev tun0
ip -n vpn link set tun0 up
ip -n vpn route add default dev tun0
ip -n vpn add

# extra check if you want to verify the DNS used and the public IP assigned
#ip netns exec vpn dig ifconfig.me
#ip netns exec vpn curl https://ifconfig.me
This script autoconfigure the network namespace and the VPN interface + the DNS server to use. There are extra checks at the end of the script that you can uncomment if you want to take a look at the public IP and DNS resolver used just after connection.
Running this script will make the netns "vpn" available for use.
The command to run a program under the namespace is ip netns exec vpn your command, it can only be run as root.
When using this command line, you MUST use full paths exactly as in the sudo configuration file, this is important otherwise it would allow you to create a script called ip with whatever commands and run it as root, while /usr/sbin/ip can not be spoofed by a local script in $PATH.
If I want a shell session with the VPN, I can run the following command:
It is not a real limitation, but you may be caught by it, if you make a program listening on localhost in the netns vpn, you can only connect to it from another program in the same namespace. There are methods to connect two namespaces, but I do not plan to cover it, if you need to search about this setup, it can be done using socat (this is explained in the blog post linked earlier) or a local bridge interface.
Network namespaces are a cool feature on Linux, but it is overly complicated in my opinion, unfortunately I have to deal with it, but at least it is working fine in practice.
The Old Computer Challenge 4th edition will begin 13th July to 20th July 2024. It will be the prequel to Olympics, I was not able to get the challenge accepted there so we will do it our way.
While the three previous editions had different rules, I came to agree with the community for this year. Choose your rules!
When I did the challenge for the first time, I did not expect it to become a yearly event nor that it would gather aficionados during the trip. The original point of the challenge was just to see if I could use my oldest laptop as my main computer for a week, there were no incentive, it was not a contest and I did not have any written rules.
Previous editions rules were about using an old laptop, use a computer with limited hardware (and tips to slow down a modern machine) or limit Internet access to a single hour per day. I always insist on the fact it should not hinder your job, so people participating do not have to "play" during work. Smartphones became complicated to handle, especially with the limited Internet access, all I can recommend to people is to define some rules you want to stick to, and apply to it the best you can. If you realllyyyy need once to use a device that would break the rules, so be it if it is really important, nobody will yell at you.
People doing the OCC enjoy it for multiple reasons, find yours! Some find the opportunity to disconnect a bit, change their habit, do some technoarcheology to run rare hardware, play with low-tech, demonstrate obsolescence is not a fatality etc...
Some ideas if you do not know what to do for the challenge:
use your oldest device
do not use graphical interface
do not use your smartphone (and pick a slow computer :P)
limit your Internet access time
slow down your Internet access
forbid big software (I indented to do this for 4th OCC but it was hard to prepare, the idea was to setup an OpenBSD mirror where software with more than some arbitrary line of codes in their sources would be banned, resulting in a very small set of packages due to missing transitive dependencies)
You can join the community and share your experience.
There are many ways! It's the opportunity to learn how to use Gopher or Gemini to publish content, or to join the mailing list and participate with the other or simply come to the IRC channel to chat a bit.
Well, as nobody enforces you to do the OCC, you can just do it when you want, even in December if it suits your calendar better than mid July, nobody will complain at you.
There is a single rule, do it for fun! Do not impede yourself for weird reasons, it is here for fun, and doing the whole week is as good as failing and writing about the why you failed. It is not a contest, just try and see how it goes, and tell us your story :)
If you ever happen to mount a .iso file on OpenBSD, you may wonder how to proceed as the command mount_cd9660 requires a device name.
While the solution is entirely documented into man pages and in the official FAQ, it may not be easy to find it at first glance, especially since most operating system allow to mount an iso file in a single step where as OpenBSD requires an extra step.
On OpenBSD you need to use the command vnconfig to map a file to a device node, allowing interesting actions such as using a file as a storage disk (which you can encrypt) or mounting a .iso file.
This command must be used as root as it manipulates files in /dev.
If you are done with the file, you have to umount it with umount /mnt and destroy the vnd device using vnconfig -u vnd0.
5. Going further: Using a file as an encrypted disk §
If you want to use a single file as a file system, you have to provision the file with disk space using the command dd, you can fill it with zeroes but if you plan to use encryption on top of it, it's better to use random data. In the following example, you will create a file my-disk.img of a size of 10 GB (1000 x 10 MB):
Now you can use vnconfig to expose it as a device:
vnconfig vnd0 my-disk.img
Finally, the command bioctl can be used to configure encryption on the disk, disklabel to partition it and newfs to format the partitions. You can follow OpenBSD FAQ guides, make sure use the the device name /dev/vnd0 instead of wd0 or sd0 from the examples.
This blog post explains how to configure an OpenBSD workstation with extreme privacy in mind.
This is an attempt to turn OpenBSD into a Whonix or Tails alternative, although if you really need that level of privacy, use a system from this list and not the present guide. It is easy to spot OpenBSD using network fingerprinting, this can not be defeated, you can not hide the fact you use OpenBSD to network operators.
I did this guide as a challenge for fun, but I also know some users have a use for this level of privacy.
Note: this guide explains steps related to increase privacy of OpenBSD and its base system, it will not explain how to configure a web browser or how to choose a VPN.
OpenBSD does not have much network activity with a default installation, but the following programs generate traffic:
the installer connects to 199.185.178.80 to associate chosen timezone with your public IP to reuse the answer for a future installation
ntpd (for time sync) uses pool.ntp.org, 9.9.9.9, 2620:fe::fe, www.google.com and time.cloudflare.com
fw_update connects to firmware.openbsd.org (resolves as openbsd.map.fastlydns.net), fw_update is used at the end of the installer, and at the end of each sysupgrade
sysupgrade, syspatch and pkg_* tools use the address defined in /etc/installurl (defaults to cdn.openbsd.org)
During the installation, do not configure the network at all. You want to avoid syspatch and fw_update to run at the end of the installer, and also ntpd to ping many servers upon boot.
Once OpenBSD booted after the installation, you need to take a decision for ntpd (time synchronization daemon).
you can disable ntpd entirely with rcctl disable ntpd, but it is not really recommended as it can create issues with some network software if the time is desynchronized
you can edit the file /etc/ntpd.conf which contains the list of servers used to keep the time synchronized, and choose which server to connect to (if any)
you can configure ntpd to use a sensor providing time (like a GPS receiver) and disable everything else
Whonix (maybe Tails too?) uses a custom tailored program named swdate to update the system clock over Tor (because Tor only supports TCP while NTP uses UDP), it is unfortunately not easily portable on OpenBSD.
Next step is to edit the file /etc/hosts to disable the firmware server whose hostname is hard-coded in the program fw_update, add this line to the file:
The firmware installation and OpenBSD mirror configuration using Tor and I2P are covered in my previous article, it explains how to use tor or i2p to download firmware, packages and system sets to upgrade.
There is a chicken / egg issue with this though, on a fresh install you have neither tor nor i2p, so you can not download tor or i2p packages through it. You could download the packages and their dependencies from another system and install them locally using USB.
Wi-Fi and some other devices requiring a firmware may not work until you run fw_update, you may have to download the files from another system and pass the network interface firmware over a USB memory stick to get network. A smartphone with USB tethering is also a practical approach for downloading firmware, but you will have to download it over clearnet.
DNS is a huge topic for privacy-oriented users, I can not really recommend a given public DNS servers because they all have pros and cons, I will use 1.1.1.1 and 9.9.9.9 for the example, but use your favorite DNS.
Enable the daemon unwind, it is a local DNS resolver with some cache, and supports DoT, DoH and many cool features. Edit the file /etc/unwind.conf with this configuration:
forwarder { 1.1.1.1 9.9.9.9 }
As I said, DoT and DoH is supported, you can configure it directly in the forwarder block, the man page explains the syntax:
A program named resolvd is running by default, when it finds that unwind is running, resolvd modifies /etc/resolv.conf to switch DNS resolution to 127.0.0.1, so you do not have anything to do.
A sane firewall configuration for workstations is to block all incoming connections. This can be achieved with the following /etc/pf.conf: (reminder, last rule matches)
set block-policy drop
set skip on lo

match in all scrub (no-df random-id max-mss 1440)
antispoof quick for egress

# block all traffic (in/out)
block

# allow reaching the outside (IPv4 + IPv6)
pass out quick inet
pass out quick inet6

# allow ICMP (ping) for MTU discovery
pass in proto icmp

# uncomment if you use SLAAC or ICMP6 (IPv6)
#pass in on egress inet6 proto icmp6
#pass in on egress inet6 proto udp from fe80::/10 port dhcpv6-server to fe80::/10 port dhcpv6-client no state
When you upgrade your OpenBSD system from a release to another or to a newer snapshot using sysupgrade, the command fw_update will automatically be run at the very end of the installer.
It will bypass any /etc/hosts changes as it runs from a mini root filesystem, if you do not want fw_update to be used over clearnet at this step, the only method is to disable network at this step, which can be done by using sysupgrade -n to prepare the upgrade without rebooting, and then:
disconnect your computer Ethernet cable if any, if you use Wi-Fi and you have a physical killswitch this will be enough to disable Wi-Fi
if you do not have such a killswitch and Wi-Fi is configured, rename its configuration file in /etc/hostname.if to another invalid name, you will have to rename it back after sysupgrade.
You could use this script to automate the process:
It will move all your network configuration in /root/, run sysupgrade, and configure the next boot to restore the hostname files back to place and start the network.
By default, OpenBSD "filters" webcam and microphone use, if you try to use them, you get a video stream with a black background and no audio on the microphone. This is handled directly by the kernel and only root can change this behavior.
To toggle microphone recording, change the sysctl kern.audio.record to 1 or 0 (default).
To toggle webcam recording, change the sysctl kern.video.record to 1 or 0 (default).
What is cool with this mechanism is it makes software happy when they make webcam/microphone a requirement, they exist but just record nothing.
Congratulations, you achieved a high privacy level with your OpenBSD installation! If you have money and enough trust in some commercial services, you could use a VPN instead (or as a base) of Tor/I2P, but it is not in the scope of this guide.
I did this guide after installing OpenBSD on a laptop connected to another laptop doing NAT and running Wireshark to see exactly what was leaking over the network. It was a fun experience.
For an upcoming privacy related article about OpenBSD I needed to setup an access to an OpenBSD mirror both from a Tor hidden service and I2P.
The server does not contain any data, it only act as a proxy fetch files from a random existing OpenBSD mirror, so it does not waste bandwidth mirroring everything, the server does not have the storage required anyway. There is a little cache to keep most requested files locally.
It is only useful if you can not reach OpenBSD mirrors, or if you really need to hide your network activity. Tor or I2P will be much slower than connecting to a mirror using HTTP(s).
However, as they exist now, let me explain how to start using them.
If you want to install or update your packages from tor, you can use the onion address in /etc/installurl. However, it will not work for sysupgrade and syspatch, and you need to export the variable FETCH_CMD="/usr/local/bin/curl -L -s -q -N -x socks5h://127.0.0.1:9050" in your environment to make pkg_* programs able to use the mirror.
To make sysupgrade or syspatch able to use the onion address, you need to have the program torsocks installed, and patch the script to use torsocks:
sed -i 's,ftp -N,/usr/local/bin/torsocks &,' /usr/sbin/sysupgrade for sysupgrade
sed -i 's,ftp -N,/usr/local/bin/torsocks &,' /usr/sbin/syspatch for syspatch
These patches will have to be reapplied after each sysupgrade run.
If you want to install or update your packages from i2p, install i2pd with pkg_add i2pd, edit the file /etc/i2pd/i2pd.conf to set notransit = true except if you want to act as an i2p relay (high cpu/bandwidth consumption).
Replace the file /etc/i2pd/tunnels.conf by the following content (or adapt your current tunnels.conf if you configured it earlier):
[MIRROR]
type = client
address = 127.0.0.1
port = 8080
destination = 2st32tfsqjnvnmnmy3e5o5y5hphtgt4b2letuebyv75ohn2w5umq.b32.i2p
destinationport = 8081
keys = mirror.dat
Now, enable and start i2pd with rcctl enable i2pd && rcctl start i2pd.
After a few minutes to let i2pd establish tunnels, you should be able to browse the mirror over i2p using the address http://127.0.0.1:8080/. You can configure the port 8080 to another you prefer by modifying the file tunnels.conf.
You can use the address http://127.0.0.1:8080/pub/OpenBSD/ in /etc/installurl to automatically use the I2P mirror for installing/updating packages, or keeping your system up to date with syspatch/sysupgrade.
Note: from experience the I2P mirror works fine to install packages, but did not play well with fw_update, syspatch and sysupgrade, maybe because they use ftp command that seems to easily drop the connection. Downloading the files locally using a proper HTTP client supporting transfer resume would be better. On the other hand, this issue may be related to the current attack the I2P network is facing as of the time of writing (May 2024).
OpenBSD pulls firmware from a different server than the regular mirrors, the address is http://firmware.openbsd.org/firmware/, the files on this server are signed packages, they can be installed using fw_update $file.
Both i2p and tor hidden service hostname can be reused, you only have to change /pub/OpenBSD/ by /firmware/ to browse the files.
The proxy server does not cache any firmware, it directly proxy to the genuine firmware web server. They are on a separate server for legal matter, it seems to be a grey area.
For maximum privacy, you need to neutralize firmware.openbsd.org DNS lookup using a hosts entry. This is important because fw_update is automatically used after a system upgrade (as of 2024).
In /etc/hosts add the line:
127.0.0.9 firmware.openbsd.org
The IP in the snippet above is not a mistake, it will avoid fw_update to try to connect to a local web server if any.
If you are using SSH quite often, it is likely you use an SSH agent which stores your private key in memory so you do not have to type your password every time.
This method is convenient, but it comes at the expense of your SSH key use security, anyone able to use your session while the agent holds the key unlocked can use your SSH key. This scenario is most likely to happen when using a compromised build script.
However, it is possible to harden this process at a small expense of convenience, make your SSH agent ask for confirmation every time the key has to be used.
The tooling provided with OpenSSH comes with a simple SSH agent named ssh-agent. On OpenBSD, the agent is automatically started and ask to unlock your key upon graphical login if it finds a SSH key in the default path (like ~/.ssh/id_rsa).
Usually, the method to run the ssh-agent is the following. In a shell script defining your environment at an early stage, either your interactive shell configuration file or the script running your X session, you use eval $(ssh-agent -s). This command runs ssh-agent and also enable the environment variables to make it work.
Once your ssh-agent is correctly configured, it is required to add a key into it, now, here are two methods to proceed.
If you want to have a GUI confirmation upon each SSH key use, just add the flag -c to this command line: ssh-add -c /path/to/key.
In OpenBSD, if you have your key at a standard location, you can modify the script /etc/X11/xenodm/Xsession to change the first occurrence of ssh-add by ssh-add -c. You will still be greeting for your key password upon login, but you will be asked for each of its use.
It turns out the password manager KeepassXC can hold SSH keys, it works great for having used for a while. KeepassXC can either store the private key within its database or load a private key from the filesystem using a path and unlock it using a stored password, the choice is up to you.
You need to have the ssh-agent variables in your environment to have the feature work, as KeepassXC will replace ssh-add only, not the agent.
KeepassXC documentation has a "SSH Agent integration" section explaining how it works and how to configure it.
I would recommend to automatically delete the key from the agent after some time, this is especially useful if you do not actively use your SSH key.
In ssh-add, this can be achieved using -t time flag (it's tea time, if you want to remember about it), where time is a number of seconds or a time format specified in sshd_config, like 5s for 5 seconds, 10m for 10 minutes, 16h for 16 hours or 2d for 2 days.
In KeepassXC, it's in the key settings, within the SSH agent tab, you can configure the delay before the key is removed from the agent.
The ssh-agent is a practical software that ease the use of SSH keys without much compromise with regards to security, but some extra security could be useful in certain scenarios, especially for developers running untrusted code as their user holding the SSH key.
While the extra confirmation could still be manipulated by a rogue script, it would come with a greater complexity at the cost of being spotted more easily. If you really want to protect your SSH keys, you should use them from a hardware token requiring a physical action to unlock it. While I find those tokens not practical and expensive, they have their use and they can not be beaten by a pure software solution.
This program is particularly useful when you have repeated tasks to achieve in a terminal, or if you want to automate your tmux session to save your fingers from always typing the same commands.
tmuxinator is packaged in most distributions and requires tmux to work.
tmuxinator requires a configuration file for each "session" you want to manage with it. It provides a command line parameter to generate a file from a template:
$ tmuxinator new name_here
By default, it will create the yaml file for this project in $HOME/.config/tmuxinator/name_here.yml, if you want the project file to be in a directory (to make it part of a versioned project repository?), you can add the parameter --local.
Here is a tmuxinator configuration file I use to automatically do the following tasks, the commands include a lot of monitoring as I love watching progress and statistics:
update my ports tree using git before any other task
run a script named dpb.sh
open a shell and cd into a directory
run an infinite loop displaying ccache statistics
run an infinite loop displaying a MFS mount point disk usage
display top
display top for user _pbuild
I can start all of this using tmuxinator start dpb, or stop only these "parts" of tmux with tmuxinator stop dpb which is practical when using tmux a lot.
Here is my file dpb.yml:
name: dpb
root: ~/

# Runs on project start, always
on_project_start: cd /usr/ports && doas -u solene git pull -r

windows:
  - dpb:
      layout: tiled
      panes:
        - dpb:
          - cd /root/packages/packages
          - ./dpb.sh -P list.txt -R
        - watcher:
          - cd /root/logs
          - ls -altrh locks
          - date
        - while true ; do clear && env CCACHE_DIR=/build/tmp/pobj/.ccache/ ccache -s ; sleep 5 ; done
        - while true ; do df -h /build/tmp/pobj_mfs/ | grep % ; sleep 10 ; done
        - top
        - top -U _pbuild
Tmuxinator could be used to ssh into remote servers, connect to IRC, open your email client, clean stuff, there are no limits.
This is particularly easy to configure as it does not try to run commands, but only send the keys to each tmux panes, which mean it will send keystrokes like if you typed them. In the example above, you can see how the pane "dpb" can cd into a directory and then run a command, or how the pane "watcher" can run multiple commands and leave the shell as is.
I knew about tmuxinator for a while, but I never gave it a try before this week. I really regret not doing it earlier. Not only it allows me to "script" my console usage, but I can also embed some development configuration into my repositories. While you can use it as an automation method, I would not rely too much on it though, it only types blindly on the keyboard.
If you use commercial VPN, you may have noticed they all provide WireGuard configurations in the wg-quick format, this is not suitable for an easy use in OpenBSD.
As I currently work a lot for a VPN provider, I often have to play with configurations and I really needed a script to ease my work.
I made a shell script that turns a wg-quick configuration into a hostname.if compatible file, for a full integration into OpenBSD. This is practical if you always want to connect to a given VPN server, not for temporary connections.
It is really easy to use, download the script and mark it executable, then run it with your wg-quick configuration as a parameter, it will output the hostname.if file to the standard output.
wg-quick-to-hostname-if fr-wg-001.conf | doas tee /etc/hostname.wg0
In the generated file, it uses a trick to dynamically figure the current default route which is required to keep a non-vpn route to the VPN gateway.
If you need your WireGuard VPN to be leakproof (= no network traffic should leave the network interface outside the VPN if it's not toward the VPN gateway), you should absolutely do the following:
your WireGuard VPN should be on rdomain 0
WireGuard VPN should be established on another rdomain
use PF to block traffic on the other rdomain that is not toward the VPN gateway
use the VPN provider DNS or a no-log public DNS provider
OpenBSD's ability to configure WireGuard VPNs with ifconfig has always been an incredible feature, but it was not always fun to convert from wg-quick files. But now, using a commercial VPN got a lot easier thanks to a few piece of shell.
I always had an interest for practical security on computers, being workstations or servers. Many kinds of threats exist for users and system administrators, it's up to them to define a threat model to know what is acceptable or not. Nowadays, we have choice in the operating system land to pick what works best for that threat model: OpenBSD with its continuous security mechanisms, Linux with hardened flags (too bad grsec isn't free anymore), Qubes OS to keep everything separated, immutable operating system like Silverblue or MicroOS (in my opinion they don't bring much to the security table though) etc...
My threat model always had been the following: some exploit on my workstation remaining unnoticed almost forever, stealing data and capturing keyboard continuously. This one would be particularly bad because I have access to many servers through SSH, like OpenBSD servers. Protecting against that is particularly complicated, the best mitigations I found so far is to use Qubes OS with disposable VMs or restricting outbound network, but it's not practical.
My biggest grip with computers always have been "states". What is a state? It is something that distinguish a computer from another: installed software, configuration, data at rest (pictures, documents etc…). We use states because we don't want to lose work, and we want our computers to hold our preferences.
But what if I could go stateless? The best defense against data stealer is to own nothing, so let's go stateless!
My idea is to be able to use any computer around, and be able to use it for productive work, but it should always start fresh: stateless.
A stateless productive workstation obviously has challenges: How would it help with regard to security? How would I manage passwords? How would I work on a file over time? How to achieve this?
I have been able to address each of these questions. I am now using a stateless system.
States? Where we are going, we don't need states! (certainly Doc Brown in a different timeline)
It is obvious that we need to keep files for most tasks. This setup requires a way to store files on a remote server.
Here are different methods to store files:
Nextcloud
Seafile
NFS / CIFS over VPN
iSCSI over VPN
sshfs / webdav mount
Whatever works for you
Encryption could be done locally with tools like cryfs or gocryptfs, so only encrypted files would be stored on the remote server.
Nextcloud end-to-end encryption should not be used as of April 2024, it is known to be unreliable.
Seafile, a less known alternative to Nextcloud but focused only on file storage, supports end-to-end encryption and is reliable. I chose this one as I had a good experience with it 10 years ago.
Having access to the data storage in a stateless environment comes with an issue: getting the credentials to access the files. Passwords should be handled differently.
The main driving force for this project is to increase my workstation security, I had to think hard about this part.
Going stateless requires a few changes compared to a regular workstation:
data should be stored on a remote server
passwords should be stored on a remote server
a bootable live operating system
programs to install
This is mostly a paradigm change with pros and cons compared to a regular workstation.
Data and passwords stored in the cloud? This is not really an issue when using end-to-end encryption, this is true as long as the software is trustable and its code is correct.
A bootable live operating system is quite simply to acquire. There is a ton of choice of Linux distributions able to boot from a CD or from USB, and also non Linux live system exist. A bootable USB device could be compromised while a CD is an immutable media, but there are USB devices such as the Kanguru FlashBlu30 with a physical switch to make the device read-only. A USB device could be removed immediately after the boot, making it safe. As for physically protecting the USB device in case you would not trust it anymore, just buy a new USB memory stick and resilver it.
As for installed programs, it is fine as long as they are packaged and signed by the distribution, the risks are the same as for a regular workstation.
The system should be more secure than a typical workstation because:
the system never have access to all data at once, user is supposed to only pick what they will need for a given task
any malware that would succeed to reach the system would not persist to the next boot
The system would be less secure than a typical workstation because:
remote servers could be exploited (or offline, not a security issue but…), this is why end-to-end encryption is a must
To circumvent this, I only have the password manager service reachable from the Internet, which then allows me to create a VPN to reach all my other services.
I think it is a dimension that deserves to be analyzed for such setup. A stateless system requires remote servers to run, and use bandwidth to reinstall programs at each boot. It is less ecological than a regular workstation, but at the same time it may also enforce some kind of rationalization of computer usage because it is a bit less practical.
Here is a list of setup that already exist which could provide a stateless experience, with support for either a custom configuration or a mechanism to store files (like SSH or GPG keys, but an USB smart card would be better for those):
NixOS with impermanence, this is an installed OS, but almost everything on disk is volatile
NixOS live-cd generated from a custom config
Tails, comes with a mechanism to locally store encrypted files, privacy-oriented, not really what I need
Alpine with LBU, comes with a mechanism to locally store encrypted files and cache applications
FuguITA, comes with a mechanism to locally store encrypted files (OpenBSD based)
Guix live-cd generated from a custom config
Arch Linux generated live-cd
Ubuntu live-cd, comes with a mechanism to retrieve files from a partition named "casper-rw"
Otherwise, any live system could just work.
Special bonus to NixOS and Guix generated live-cd as you can choose which software will be in there, in latest version. Similar bonus with Alpine and LBU, packages are always installed from a local cache which mean you can update them.
A live-cd generated a few months ago is certainly not really up to date.
I decided to go with Alpine with its LBU mechanism, it is not 100% stateless but hit the perfect spot between "I have to bootstrap everything from scratch" and "I can reduce the burden to a minimum".
one with Alpine installer, upgrading to a newer Alpine version only requires me to write the new version on that stick
a second to store the packages cache and some settings such as the package list and specific changes in /etc (user name, password, services)
While it is not 100% stateless, the files on the second memory stick are just a way to have a working customized Alpine.
This is a pretty cool setup, it boots really fast as all the packages are already in cache on the second memory stick (packages are signed, so it is safe). I made a Firefox profile with settings and extensions, so it is always fresh and ready when I boot.
I decided to go with the following stack, entirely self-hosted:
Vaultwarden for passwords
Seafile for data (behind VPN)
Nextcloud for calendar and contacts (behind VPN)
Kanboard for task management (behind VPN)
Linkding for bookmarks (behind VPN)
WireGuard for VPN
This setup offered me freedom. Now, I can bootstrap into my files and passwords from any computer (a trustable USB memory stick is advisable though!).
I can also boot using any kind of operating system on any on my computer, it became so easy it's refreshing.
I do not make use of dotfiles or stored configurations because I use vanilla settings for most programs, a git repository could be used to fetch all settings quickly though.
A tricky part with this setup is to proceed with serious backups. The method will depend on the setup you chose.
With my self-hosted stack, restic makes a daily backup to two remote locations, but I should be able to reach the backup if my services are not available due to a server failure.
If you use proprietary services, it is likely they should handle backups, but it is better not to trust them blindly and checkout all your data on a regular schedule to make a proper backup.
This is an interesting approach to workstations management, I needed to try. I really like how it freed me from worrying about each workstation, they are now all disposable.
I made a mind map for this project, you can view it below, it may be useful to better understand how things articulate.
Yesterday Red Hat announced that xz library was compromised badly, and could be use as a remote execution code vector. It's still not clear exactly what's going on, but you can learn about this on the following GitHub discussion that also links to original posts:
As far as we currently know, xz-5.6.0 and xz-5.6.1 contains some really obfsucated code that would trigger only in sshd, this only happen in the case of:
the system is running systemd
openssh is compiled with a patch to add a feature related to systemd
the system is using glibc (this is mandatory for systemd systems afaik anyway)
xz package was built using release tarballs published on GitHub and not auto-generated tarballs, the malicious code is missing in the git repository
So far, it seems openSUSE Tumbleweed, Fedora 40 and 41 and Debian sid were affected and vulnerable. Nobody knows what the vulnerability is doing exactly yet, when security researchers get their hands on it, we will know more.
OpenBSD, FreeBSD, NixOS and Qubes OS (dom0 + official templates) are unaffected. I didn't check for other but Alpine and Guix shouldn't be vulnerable either.
This is really unfortunate that a piece of software as important and harmless in appareance got compromised. This made me think about how could we protect the most against this kind of issues, I came to the conclusion:
packages should be built from source code repository instead of tarballs whenever possible (sometimes tarballs contain vendoring code which would be cumbersome to pull otherwise), at least we would know what to expect
public network services that should be only used by known users (like openssh, imap server in small companies etc..) should be run behind a VPN
OpenBSD style to have a base system developed as a whole by a single team is great, such kind of vulnerability is barely possible to happen (on base system only, ports aren't audited)
whenever possible, separate each network service within their own operating system instance (using hardware machines, virtual machines or even containers)
avoid daemons running as root as possible
use opensnitch on workstations (linux only)
control outgoing traffic whenever you can afford to
I don't have much opinion about what could be done to protect supply chain. As a packager, it's not possible to audit code of each software we update. My take on this is we have to deal with it, xz may certainly not be the only one vulnerable library running in production.
However, the risks could be reduced by:
using less programs
using less complex programs
compiling programs with less options to pull in less dependencies (FreeBSD and Gentoo both provide this feature and it's great)
I actually have two systems that were running the vulnerable libs on openSUSE MicroOS which updates very aggressively (daily update + daily reboot). There are no magic balance between "update as soon as possible" and "wait for some people to take the risks first".
I'm going to rework my infrastructure and expose the bare minimum to the Internet, and use a VPN for all my services that are for known users. The peace of mind will obtained be far greater than the burden of setting up WireGuard VPNs.
While testing the cloud gaming service GeForce Now, I've learned that PlayStation also had an offer.
Basically, if you use a PlayStation 4 or 5, you can subscribe to the first two tiers to benefit some services and games library, but the last tier (premium) adds more content AND allows you to play video games on a computer with their client, no PlayStation required. I already had the second tier subscription, so I paid the small extra to switch to premium in order to experiment with the service.
Compared to GeForce Now, while you are subscribed you have a huge game library at hand. This makes the service a lot cheaper if you are happy with the content. The service costs 160$€ / year if you take for 12 months, this is roughly the price of 2 AAA games nowadays...
The service is only available using the PlayStation Plus Windows program. It's possible to install it on Linux, but it will use more CPU because hardware decoding doesn't seem to work on Wine (even wine-staging with vaapi compatibility checked).
There are no clients for Android, and you can't use it in a web browser. The Xbox Game Pass streaming and GeForce now services have all of that.
Sadness will start here. The service is super promising, but the application is currently a joke.
If you don't plug a PS4 controller (named a dualshock 4), you can't use the "touchpad" button, which is mandatory to start a game in Tales of Arise, or very important in many games. If you have a different controller, on Windows you can use the program "DualShock 4 emulator" to emulate it, on Linux it's impossible to use, even with a genuine controller.
A PS5 controller (dualsense) is NOT compatible with the program, the touchpad won't work.
There are absolutely no settings in the application, you can run a game just by clicking on it, did I mention there are no way to search for a game?
I guess games are started in 720p, but I'm not sure, putting the application full screen didn't degrade the quality, so maybe it's 1080p but doesn't go full screen when you run it...
Frame rate... this sucks. Games seem to run on a PS4 fat, not a PS4 pro that would allow 60 fps. On most games you are stuck with 30 fps and an insane input lag. I've not been able to cope with AAA games like God of War or Watch Dogs Legion as it was horrible.
Independent games like Alex Kidd remaster, Monster Boy or Rain World did feel very smooth though (60fps!), so it's really an issue with the hardware used to run the games.
Don't expect any PS5 games in streaming from Windows, there are none.
The service allows PlayStation users to play all games from the library (including PS5 games) in streaming up to 2160p@120fps, but not the application users. This feature is only useful if you want to try a game before installing it, or if your PlayStation storage is full.
This is fun here too. There are game saves in the PlayStation Plus program cloud, but if you also play on a PlayStation, their saves are sent to a different storage than the PlayStation cloud saves.
There is a horrible menu to copy saves from one pool to the other.
This is not an issue if you only use the stream application or the PlayStation, but it gets very hard to figure where is your save if you play on both.
I have been highly disappointed by the streaming service (outside PlayStation use). The Windows programs required to sign in twice before working (I tried on 5 devices!), most interesting games run poorly due to a PS4 hardware, there is no way to enable the performance mode that was added to many games to support the PS4 Pro. This is pretty curious as the streaming from a PlayStation device is a stellar experience, it's super smooth, high quality, no input lag, no waiting, crystal clear picture.
No Android application? Curious... No support for a genuine PS5 controller, WTF?
The service is still young, I really hope they will work at improving the streaming ecosystem.
At least, it works reliably and pretty well for simpler games.
It could be a fantastic service if the following requirements were met:
proper hardware to run games at 60fps
greater controller support
allow playing in a web browser, or at least allow people to run it on smartphones with a native application
I'm finally done with ADSL now as I got access to optical fiber last week! It was time for me to try cloud gaming again and see how it improved since my last use in 2016.
If you are not familiar with cloud gaming, please do not run away, here is a brief description. Cloud gaming refers to a service allowing one to play locally a game running on a remote machine (either locally or over the Internet).
There are a few commercial services available, mainly: GeForce Now, PlayStation Plus Premium (other tiers don't have streaming), Xbox game pass Ultimate and Amazon Luna. Two major services died in the long run: Google Stadia and Shadow (which is back now with a different formula).
A note on Shadow, they are now offering access to an entire computer running Windows, and you do what you want with it, which is a bit different from other "gaming" services listed above. It's expensive, but not more than renting an AWS system with equivalent specs (I know some people doing that for gaming).
This article is about the service Nvidia GeForce Now (not sponsored, just to be clear).
I tried the free tier, premium tier and ultimate tier (thanks to people supporting me on Patreon, I could afford the price for this review).
This is the first service I tried in 2016 when I received an Nvidia Shield HTPC, the experience was quite solid back in the days. But is it good in 2024?
The answer is clear, yes, it's good, but it has limitations you need to be aware of. The free tier allows playing for a maximum of 1 hour in a single session, and with a waiting queue that can be fast (< 1 minute) or long (> 15 minutes), but the average waiting time I had was like 9 minutes. The waiting queue also displays ads now.
The premium tier at 11€$/month removes the queue system by giving you priority over free users, always assigns an RTX card and allows playing up to 6 hours in a single session (you just need to start a new session if you want to continue).
Finally, the ultimate tier costs 22€$/month and allows you to play in 4K@120fps on a RTX 4080, up to 8h.
The tiers are quite good in my opinion, you can try and use the service for free to check if it works for you, then the premium tier is affordable to be used regularly. The ultimate tier will only be useful to advanced gamers who need 4K, or higher frame rates.
Nvidia just released a new offer early March 2024, a premium daily pass for $3.99 or ultimate daily pass for 8€. This is useful if you want to evaluate a tier before deciding if you pay for 6 months. You will understand later why this daily pass can be useful compared to buying a full month.
I tried the service using a Steam Deck, a Linux computer over Wi-Fi and Ethernet, a Windows computer over Ethernet and in a VM on Qubes OS. The latency and quality were very different.
If you play in a web browser (Chrome based, Edge, Safari), make sure it supports hardware acceleration video decoding, this is the default for Windows but a huge struggle on Linux, Chrome/Chromium support is recent and can be enabled using chromium --enable-features=VaapiVideoDecodeLinuxGL --use-gl=angle. There is a Linux Electron App, but it does nothing more than bundling the web page in chromium, without acceleration.
On a web browser, the codec used is limited to h264 which does not work great with dark areas, it is less effective than advanced codecs like av1 or hevc (commonly known as h265). If you web browser can't handle the stream, it will lose packets and then Geforce service will instantly reduce the quality until you do not lose packets, which will make things very ugly until it recover, until it drops again. Using hardware acceleration solves the problem almost entirely!
Web browser clients are also limited to 60 fps (so ultimate tier is useless), and Windows web browsers can support 1440p but no more.
On Windows and Android you can install a native Geforce Now application, and it has a LOT more features than in-browser. You can enable Nvidia reflex to remove any input lag, HDR for compatible screens, 4K resolution, 120 fps frame rate etc... There is also a feature to add color filters for whatever reason... The native program used AV1 (I only tried with the ultimate tier), games were smooth with stellar quality and not using more bandwidth than in h264 at 60 fps.
I took a screenshot while playing Baldur's Gate 3 on different systems, you can compare the quality:
In my opinion, the best looking one is surprisingly the Geforce Now on Windows, then the native run on Steam and finally on Linux where it's still acceptable. You can see a huge difference in terms of quality in the icons in the bottom bar.
When I upgraded from free to premium tier, I paid for 1 month and was instantly able to use the service as a premium user.
Premium gives you priority in the queues, I saw the queue display a few times for a few seconds, so there is virtually no queue, and you can play for 6 hours in a row.
When I upgraded from premium to ultimate tier, I was expecting to pay the price difference between my current subscription and the new one, but it was totally different. I had to pay for a whole month of ultimate tier, and my current remaining tier was converted as an ultimate tier, but as ultimate costs a bit more than twice premium, a pro rata was applied to the premium time, resulting in something like 12 extra days of ultimate for the premium month.
Ultimate tier allows reaching a 4K resolution and 120 fps refresh rate, allow saving video settings in games, so you don't have to tweak them every time you play, and provide an Nvidia 4080 for every session, so you can always set the graphics settings to maximum. You can also play up to 8 hours in a row. Additionaly, you can record gaming sessions or the past n minutes, there is a dedicated panel using Ctrl+G. It's possible to achieve 240 fps for compatible monitors, but only for 1080p resolution.
Due to the tier upgrade method, the ultimate pass can be interesting, if you had 6 months of premium, you certainly don't want to convert it into 2 months of ultimate + paying 1 month of ultimate just to try.
As a gamer, I'm highly sensitive to latency, and local streaming has always felt poor with regard to latency, and I've been very surprised to see I can play an FPS game with a mouse on cloud gaming. I had a ping of 8-75 ms with the streaming servers, which was really OK. Games featuring "Nvidia reflex" have no sensitive input lag, this is almost magic.
When using a proper client (native Windows client or a web browser with hardware acceleration), the quality was good, input lag barely noticeable (none in the app), it made me very happy :-)
Using the free tier, I always had a rig good enough to put the graphics quality on High or Ultra, which surprised me for a free service. On premium and later, I had an Nvidia 2080 minimum which is still relevant nowadays.
The service can handle multiple controllers! You can use any kind of controller, and even mix Xbox / PlayStation / Nintendo controllers, no specific hardware required here. This is pretty cool as I can visit my siblings, bring controllers and play together on their computer <3.
Another interesting benefit is that you can switch your gaming session from a device to another by connecting with the other device while already playing, Geforce Now will switch to the new connecting device without interruption.
This is where GeForce now is pretty cool, you don't need to buy games to them. You can import your own libraries like Steam, Ubisoft, Epic store, GOG (only CD Projekt Red games) or Xbox Game Pass games. Not all games from your libraries will be playable though! And for some reasons, some games are only available when run from Windows (native app or web browser), like Genshin Impact which won't appear in the games list if connected from non-Windows client?!
If you already own games (don't forget to claim weekly free Epic store games), you can play most of them on GeForce Now, and thanks to cloud saves, you can sync progression between sessions or with a local computer.
There are a bunch of free-to-play games that are good (like Warframe, Genshin Impact, some MMOs), so you could enjoy playing video games without having to buy one (until you get bored?).
If you don't currently own a modern gaming computer, and you subscribe to the premium tier (9.17 $€/month when signing for 6 months), this costs you 110 $€ / year.
Given an equivalent GPU costs at least 400€$ and could cope with games in High quality for 3 years (I'm optimistic), the GPU alone costs more than subscribing to the service. Of course, a local GPU can be used for data processing nowadays, or could be sold second hand, or be used for many years on old games.
If you add the whole computer around the GPU, renewed every 5 or 6 years (we are targeting to play modern games in high quality here!), you can add 1200 $€ / 5 years (or 240 $€ / year).
When using the ultimate tier, you instantly get access to the best GPU available (currently a Geforce 4080, retail value of 1300€$). Cost wise, this is impossible to beat with owned hardware.
I did some math to figure how much money you can save from electricity saving: the average gaming rig draws approximately 350 Watts when playing, a Geforce now thin client and a monitor would use 100 Watts in the worst case scenario (a laptop alone would be more around 35 Watts). So, you save 0.25 kWh per hour of gaming, if one plays 100 hours per month (that's 20 days playing 5h, or 3.33 hours / day) they would save 25 kWh. The official rate in France is 0.25 € / kWh, that would result in a 6.25€ saving in electricity. The monthly subscription is immediately less expensive when taking this into account. Obviously, if you are playing less, the savings are less important.
Most of the time, the streaming was using between 3 and 4 MB/s for a 1080p@60fps (full-hd resolution, 1920x1080, at 60 frames per second) in automatic quality mode. Playing at 30 fps or on smaller resolutions will use drastically less bandwidth. I've been able to play in 1080p@30 on my old ADSL line! (quality was degraded, but good enough). Playing at 120 fps slightly increased the bandwidth usage by 1 MB/s.
I remember a long tech article about ecology and cloud gaming which concluded cloud gaming is more "eco-friendly" than running locally if you play it less than a dozen hours. However, it always assumed you had a capable gaming computer locally that was already there, whether you use the cloud gaming or not, which is a huge bias in my opinion. It also didn't account that one may install a video games multiple times and that a single game now weights 100 GB (which is equivalent to 20h of cloud gaming bandwidth wise!). The biggest cons was the bandwidth requirements and the whole worldwide maintenance to keep high speed lines for everyone. I do think Cloud gaming is way more effective as it allows pooling gaming devices instead of having everyone with their own hardware.
As a comparison, 4K streaming at Netflix uses 25 Mbps of network (~ 3.1 MB/s).
Geforce Now allows you to play any compatible game on Android, is it worth? I tried it with a Bluetooth controller on my BQ Aquaris X running LineageOS (it's a 7 years old phone, average specs with a 720p screen).
I was able to play in Wi-Fi using the 5 GHz network, it felt perfect except that I had to put the smartphone screen in a comfortable way. This was drawing the battery at a rate of 0.7% / minute, but this is an old phone, I expect newer hardware to do better.
On 4G, the battery usage was less than Wi-Fi with 0.5% / minute. The service at 720p@60fps used an average of 1.2 MB/s of data for a gaming session of Monster Hunter world. At this rate, you can expect a data usage of 4.3 GB / hour of gameplay, which could be a lot or cheap depending on your usage and mobile subscription.
Globally, playing on Android was very good, but only if you have a controller. There are interesting folding controllers that sandwich the smartphone between two parts, turning it into something looking like a Nintendo Switch, this can be a very interesting device for players.
You can use "Ctrl+G" to change settings while in game or also display information about the streaming.
In GeForce Now settings (not in-game), you can choose the servers location if you want to try a different datacenter. I set to choose the nearest otherwise I could land on a remote one with a bad ping.
GeForce Now even works on OpenBSD or Qubes OS qubes (more on that later on Qubes OS forum!).
GeForce Now is a pretty neat service, the free tier is good enough for occasional gamers who would play once in a while for a short session, but also provide a cheaper alternative than having to keep a gaming rig up-to-date. I really like that they allow me to use my own library instead of having to buy games on their own store.
I'm preparing another blog post about local and self hosted cloud gaming, and I have to admit I haven't been able to do better than Geforce Now even on local network... Engineers at Geforce Now certainly know their stuff!
The experience was solid even on a 10 years old laptop, and enjoyable. A "cool" feature when playing is the surrounding silence, as no CPU/GPU are crunching for rendering! My GPU is still capable to handle modern games at an average quality at 60 FPS, I may consider using the premium tier in the future instead of replacing my GPU.
As a daily Qubes OS user, I often feel the need to expose a port of a given qube to my local network. However, the process is quite painful because it requires doing the NAT rules on each layer (usually net-vm => sys-firewall => qube), it's a lost of wasted time.
I wrote a simple script that should be used from dom0 that does all the job: opening the ports on the qube, and for each NetVM, open and redirect the ports.
It's quite simple to use, the hardest part will be to remember how to copy it to dom0 (download it in a qube and use qvm-run --pass-io from dom0 to retrieve it).
Make the script executable with chmod +x nat.sh, now if you want to redirect the port 443 of a qube, you can run ./nat.sh qube 443 tcp. That's all.
Be careful, the changes ARE NOT persistent. This is on purpose, if you want to always expose ports of a qube to your network, you should script its netvm accordingly.
The script is not altering the firewall rules handled by qvm-firewall, it only opens the ports and redirect them (this happens at a different level). This can be cumbersome for some users, but I decided to not touch rules that are hard-coded by users in order to not break any expectations.
Running the script should not break anything. It works for me, but it was only slightly tested though.
The avahi daemon uses the UDP port 5353. You need this port to discover devices on a network. This can be particularly useful to find network printers or scanners and use them in a dedicated qube.
It could be possible to use this script in qubes-rpc, this would allow any qube to ask for a port forwarding. I was going to write it this way at first, but then I thought it may be a bad idea to allow a qube to run a dom0 script as root that requires reading some untrusted inputs, but your mileage may vary.
The following list of features are not all OpenBSD specific as some can be found on other BSD systems. Most of the knowledge will not be useful to Linux users.
The secure level is a sysctl named kern.securelevel, it has 4 different values from level -1 to level 2, and it's only possible to increase the level. By default, the system enters the secure level 1 when in multi-user (the default when booting a regular installation).
It's then possible to escalate to the last secure level (2), which will enable the following extra security:
all raw disks are read-only, so it's not possible to try to make a change to the storage devices
the time is almost lock, it's only possible to modify the clock slowly by small steps (maybe 1 second max every so often)
the PF firewall rules can't be modified, flushed or altered
This feature is mostly useful for dedicated firewall with rules that rarely change. Preventing the time to change is really useful for remote logging as it allows being sure of "when" things happened, and you can be assured the past logs weren't modified.
The default security level 1 already enable some extra security like "immutable" and "append-only" file flags can't be removed, these overlooked flags (that can be applied with chflags) can lock down files to prevent anyone from modifying them. The append-only flag is really useful for logs because you can't modify the content, but this doesn't prevent adding new content, history can't be modified this way.
OpenBSD's memory allocator can be tweaked, system-wide or per command, to add extra checks. This could be either used for security reasons or to look for memory allocation related bugs in a program (this is VERY common...).
There are two methods to apply the changes:
system-wide by using the sysctl vm.malloc_conf, either immediately with the sysctl command, or at boot in /etc/sysctl.conf (make sure you quote its value there, some characters such as > will create troubles otherwise, been there...)
on the command line by prepending env MALLOC_OPTIONS="flags" program_to_run
The man page gives a list of flags to use as option, the easiest to use is S (for security checks). It is stated in the man page that a program misbehaving with any flag other than X is buggy, so it's not YOUR fault if you use malloc options and the program is crashing (except if you wrote the code ;-) ).
You are certainly used to files attributes like permissions or ownership, but on many file systems (including OpenBSD ffs), there are flags as well!
The file flags can be altered with the command chflags, there are a couple of flags available:
nodump: prevent the files from being saved by the command dump (except if you use a flag in dump to bypass this)
sappnd: the file can only be used in writing append mode, only root can set / remove this flag
schg: the file can not be change, it becomes immutable, only root can alter this flag
uappnd: same as sappnd mode but the user can alter the flag
uchg: same as schg mode but the user can alter the flag
As explained in the secure level section above, in the secure level 1 (default !), the flags sappnd and schg can't be removed, you would need to boot in single user mode to remove these flags.
Tip: remove the flags on a file with chflags 0 file [...]
You can check the flags on files using ls -ol, this would look like this:
OpenBSD crontab format received a few neat additions over the last years.
random number for time field: you can use ~ in a field instead of a number or * to generate a random value that will remain stable until the crontab is reloaded. Things like ~/5 work. You can force the random value within a range with 20~40 to get values between 20 and 40.
only send an email if the return code isn't 0 for the cron job: add -n between the time and the command, like in 0 * * * * -n /bin/something.
only run one instance of a job at a time: add -s between the time and the command, like in * * * * * -s /bin/something. This is incredibly useful for cron job that shouldn't be running twice in parallel, if the job duration is longer than usual, you are ensured it will never start a new instance until the previous one is done.
no logging: add -q between the time and the command, like in * * * * -q /bin/something, the effect will be that this cron job will not be logged in /var/cron/log.
It's possible to use a combination of flags like -ns. The random time is useful when you have multiple systems, and you don't want them to all run a command at the same time, like in a case they would trigger a huge I/O on a remote server. This was created to prevent the usual 0 * * * * sleep $(( $RANDOM % 3600 )) && something that would run a sleep command for a random time up to an hour before running a command.
One cool feature on OpenBSD is the ability to easily create an installation media with pre-configured answers. This is done by injecting a specific file in the bsd.rd install kernel.
There is a simple tool named upobsd that was created by semarie@ to easily modify such bsd.rd file to include the autoinstall file, I forked the project to continue its maintenance.
In addition to automatically installing OpenBSD with users, ssh configuration, sets to install etc... it's also possible to add a site.tgz archive along with the usual sets archives that includes files you want to add to the system, this can include a script to run at first boot to trigger some automation!
These features are a must-have if you run OpenBSD in production, and you have many of them to manage, enrolling a new device to the fleet should be automated as possible.
Apmd is certainly running on most OpenBSD laptop and desktop around, but it has features that aren't related to its command line flags, so you may have missed them.
There are different file names that can contain a script to be run upon some event such as suspend, resume, hibernate etc...
A classic usage is to run xlock in one's X session on suspend, so the system will require a password on resume.
A bit similar to what apmd by running a script upon events, hotplugd is a service that allow running a script when a device is added / removed.
A typical use is to automatically mount an USB memory stick when plugged in the system, or start cups daemon when powering on your USB printer.
The script receives two parameters that represents the device class and device name, so you can use them in your script to know what was connected. The example provided in the man page is a good starting point.
The scripts aren't really straightforward to write, you need to make a precise list of hardware you expect and what to run for each, and don't forget to skip unknown hardware. Don't forget to make the scripts executable, otherwise it won't work.
Finally, there is a feature that looks pretty cool. In the daily script, if an OpenBSD partition /altroot/ exists in /etc/fstab and the daily script environment has a variable ROOTBACKUP=1, the root partition will be duplicated to it. This permit keeping an extra root partition in sync with the main root partition. Obviously, it's more useful if the altroot partition is on another drive. The duplication is done with dd. You can look at the exact code by checking the script /etc/daily.
However, it's not clear how to boot from this partition if you didn't install a bootloader or created an EFI partition on the disk...
OpenBSD comes with a program named "talk", this creates a 1 to 1 chat with another user, either on the local system or a remote one (setup is more complicated). This is not asynchronous, the two users must be logged in the system to use talk.
This program isn't OpenBSD specific and can be used on Linux as well, but it's so fun, effective and easy to setup I wanted to write about it.
The communication happens on localhost on UDP ports 517 and 518, don't open them to the Internet! If you want to allow a remote system, use a VPN to encrypt the traffic and allow ports 517/518 only for the VPN.
The usage is simple, if you want alice and bob to talk to each other:
alice type talk bob, and bob must be logged in as well
bob receives a message in their terminal that alice wants to talk
bob type talk alice
a terminal UI appears for both users, what they write will appear on the top half of the UI, and the messages from recipient will appear on the half bottom
This is a bit archaic, but it works fine and comes with the base system. It does the job when you just want to speak to someone.
There are interesting features on OpenBSD that I wanted to highlight a bit, maybe you will find them useful. If you know cool features that could be added to this list, please reach me!
I've been doing a simple speed test using dd to measure the write speed compare to a tmpfs.
The vramfs mount point was able to achieve 971 MB/s, it was CPU bound by the FUSE program because FUSE isn't very efficient compared to a kernel module handling a file system.
t470 /mnt/vram # env LC_ALL=C dd if=/dev/zero of=here.disk bs=64k count=30000
30000+0 records in
30000+0 records out
1966080000 bytes (2.0 GB, 1.8 GiB) copied, 2.02388 s, 971 MB/s
Meanwhile, the good old tmpfs reached 3.2 GB/s without using much CPU, this is a clear winner.
t470 /mnt/tmpfs # env LC_ALL=C dd if=/dev/zero of=here.disk bs=64k count=30000
30000+0 records in
30000+0 records out
1966080000 bytes (2.0 GB, 1.8 GiB) copied, 0.611312 s, 3.2 GB/s
I tried to use the vram mount point as a temporary directory for portage (the Gentoo tool building packages), but it didn't work due to an error. After this error, I had to umount and recreate the mount point otherwise I was left with an irremovable directory. There are bugs in vramfs, no doubts here :-)
Arch Linux wiki has a guide explaining how to use vramfs to store a swap file, but it seems to be risky for the system stability.
It's pretty cool to know that on Linux you can do almost what you want, even store data in your GPU memory.
However, I'm still trying to figure a real use case for vramfs except that it's pretty cool and impressive. If you figure a useful situation, please let me know.
This guide explains how to install the PHP web service Shaarli on OpenBSD.
Shaarli is a bookmarking service and RSS feed reader, you can easily add new links and associate a text / tag and share it with other or keep each entry private if you prefer.
Extract the archive and move the directory Shaarli in /var/www/.
Change the owner of the following directories to the user www. It's required for Shaarli to work properly. For security’s sake, don't chown all the files to Shaarli, it's safer when a program can't modify itself.
By default, on OpenBSD the PHP modules aren't enabled, you can do it with:
for i in gd curl intl opcache; do ln -s "/etc/php-8.3.sample/${i}.ini" /etc/php-8.3/ ; done
Now, enable and start PHP service:
rcctl enable php83_fpm
rcctl start php83_fpm
If you want Shaarli to be able to do outgoing connections to fetch remote content, you need to make some changes in the chroot directory to make it work, everything is explained in the file /usr/local/share/doc/pkg-readmes/php-INSTALLED.VERSION.
Now you should have a working Shaarli upon opening http://YOUR_HOSTNAME_HERE/index.php/, all lights should be green, and you are now able to configure the instance as you wish.
Shaarli is a really handy piece of software, especially for active RSS readers who may have a huge stream of news to read. What's cool is the share service, and you may allow some people to subscribe to your own feed.
We need some kind of label "not AI powered" :D I'll add something like that on my template
There is one exception as I wrote one blog post about machine learning, and obviously the pictures in it were generated/colored by a program to demonstrate the tools.
I have no incentive adding an AI in the process of writing, I do mistakes, I may make poor sentences and I have my own style for the best of the worst. I think throwing an AI into this would just make the result bland.
For a pretty similar reason, I keep my custom website generator and template instead of using a program like Hugo with an awesome template because I need to have this "authentic" feeling for my blog.
This blog is my own space, it represents who I am.
It's hard to stay confident in your own skills when you feel you accomplished nothing in your life or career. I would recommend everyone to always keep a very detailed CV/Résumé up-to-date, with all the projects you worked on. When you feel in doubt about your own skills, just check this list, and you will certainly be surprised about what you achieve in the past.
If you are a developer, looking at your projects histories in git/mg/svn/whatever is also a nice way to review your own past work. There are dedicated git tools to write such nice reports, even across multiple repositories.
When I look back at my blog index, I realize how many things I learned. I forgot about most of the previous content and topics I wrote about! This is my own list, it's really helpful to me.
It seems IS exists because it's hard to differentiate "low value general knowledge" and what we know and should know as a technician, knowledge that makes us a professional in our job. In IT it's really hard to evaluate a work/product/service, compared to let's say, a sculpted piece of wood. I'm not saying sculpting wood is easy, but at least it doesn't require an audit by a dedicated team to know if it was nicely done in the state of the art.
My confidence got better when I started spending time with the new colleagues when joining a new company. Being able to know how the other worked helped me to evaluate my own work, it was also the opportunity to ask them to review my work and methods. Honest feedback from a competent person is invaluable.
By spending more time with my colleagues, I was finally able to establish some kind of reference to auto-evaluate my work more accurately.
Moving to a new job is also the opportunity to meet real slackers with poor skills, and in most cases you will notice they don't even care. After all, if they got a job and their boss is happy, your work will just be better, so there is no reason to not stay confident in yourself.
This seems boring and obvious, but you need to stay confident in yourself to start building some confidence. If you succeeded in a project in the past, there is no reason for you to fail in another project later.
Being able to overcome failures is an important part of the process. It's common for anyone to fail at something, but instead of lamenting about it, see it as the opportunity to improve yourself for the next time. There is a lot more to learn from failures than from successes.
When you see someone's work/article/video, you may be impressed by it and feel bad that you would never be able to achieve something similar because it's "too hard". But did you ever think that you only saw the tip of the iceberg, and that you dismissed all the hard work and researches done in order to succeed?
For instance, maybe that person spent hundreds of hours making a two minutes video: the result looks incredible to you, and it's only two minutes, so you immediately think "I would never be able to do this myself", but what if you had hundreds hours and the skills to do it? Could you?
If you ever feel bad listening to someone's story that makes you feel incompetent and useless, you could think: "do they know how to do [this], and [this]?". ([this] being someone you know)
Yes, they are a programming compiler expert, but do they know like me how to cook? Do they know how to change a car wheel? Do they know how to grow vegetables?
I'm not a psychologist, a personal coach or an imposter syndrome specialist. But I've been able to work around it, and I'm now gradually getting rid of it for good. It's really refreshing!
It's important to not feel over-confident in the process, there is a balance to keep, but don't think about it too early ;)
Have fun, you are awesome in your own way, like everyone else!
2023 was a special year for me, I've been terribly sick early January, and this motivated me to change a lot of things in my life. I stuck to this idea the whole year and I still continue to lurk for changing things in my life.
I left the company I was working for, and started to work as a freelance DevSecOps/DevOps. The word "Sysadmin" would be the best job title for me, but people like buzzwords and nobody talk about system administrators anymore.
Since the end of the year, I also work as a technical writer for a VPN provider (that I consider ethical), and it makes me think that in the future, I may have a career shift to being a technical writer "only".
Since 2023, I have a page on Patreon allowing my readers to support me financially, in exchange for a few days of early access for most blog posts. This is an advantage to reward my supporters without being a loss for all other readers. Patreon helps me a lot as it allows me to plan on a monthly income and spend more time on my blog or contributing to open source projects. I also added other payments option as some wanted to support me using more free (as in freedom) methods like liberapay, BTC or XMR.
The blog also received a few technical changes, mostly in the HTML rendering like captions on pictures or headers numbering. I'm quite pleased with the result right now, and the use of GemText (from Gemini) markup was a right choice a few years ago as it gives a simple structure enforcing clarity (of course it's bad if you need a complex layout).
The content finally got a proper license: CC-BY-4.0, I'm an open source person, but my own content was under no license, what a shame for all this time...
Last year, I started using Qubes OS as it's the best operating system for my needs (a blog post will cover this "soon") and I got involved into the community and in testing the 4.2 release that got out a few weeks ago by now.
I'm still contributing to OpenBSD, but not as much as I want, simply because of lack of hardware (and a bit of time), but this is now solved after my deal with NovaCustom. I still maintain the packages updates build cluster.
In 2023, I entirely dropped NixOS, but I preferred to not write a blog post about it to avoid a flame war, but maybe I'll write one. In a few words, I didn't like the governance issues of the project, it seems company driven to me and from my point of view it's harmful for the open source project. The technology is awesome, but the "core team" struggles to get somewhere. I'll investigate more Guix as I always enjoyed this project, and they proved they are a reliable and solid project able to maintain their pace over time.
It's my favorite pet project, even though it's a lot of work to publish a single issue.
Working with Prahou for the special Halloween issue was really fun as instead of writing the content, I had to give some direction to keep the issue on rails for being a Webzine issue, while being able to enjoy it like any other reader as I didn't make the content itself.
For no reasons, I decided to experiment vegetarian diet up to end of February (I still eat eggs, milk, butter, cheese or rarely fish). I'm bad at cooking, I don't enjoy it much but mostly because I have no idea what to cook. This forces me to learn about new food and recipes I was not aware of. Buying a recipes book is definitely a must for this :-). I never really enjoyed meat, and it's possible that I may keep the vegetarian diet for a longer time.
I'd like to thank all my readers. I regularly receive emails about your enjoyments, or typos reports, or suggestions to improve the content, this really drives me continuing writing.
Hello! Today, I present you a quite special blog post, resulting from a partnership with the PC Manufacturer NovaCustom. I offered them to write an honest review for their product and also share my feedback as a user, in exchange for a NV41 laptop. This is an exceptional situation, I insist that it's not a sponsorship, I actually needed a laptop for my freelance work, and it turns they agreed. In our agreements, I added that I would return the laptop in the case I wouldn't like it, I don't want to generate electronic wastes and company's money for nothing.
I have no plans to turn my blog into an advertisement platform and do this on a regular basis. Stars aligned well here, NovaCustom is making the only modern laptop Qubes OS certified, and the CEO is a very open source friendly person.
After more than a year using the laptop, I am convinced my next laptop will be from NovaCustom. I did not encounter issues, the battery charge threshold did save the battery will still shows 98% efficiency (and measured).
Over the year, I got my hand on multiple new laptops (work, family), and they all lacked the huge number of i/o ports I have on my NV41. Although it is docked most of the time, it works great on battery and its keyboard feels good, although I was not convinced at first. Thermal management is still a strong point for me, it does really little noise, and the laptop is still cool enough when used on the lap.
In my opinion, the biggest weakness of this laptop is its screen whose ghosting is annoying. I enjoy high refresh rate screens as I am really sensitive to latency, so experience may vary? The webcam quality could be better, although it is enough for most video calls (if ugly resolution is not a deal breaker).
In this blog post, I'll share my experience using a NV41 laptop from NovaCustom, I tried many operating systems on it for a while, run some benchmarks, and ultimately used Qubes OS on it for a month and half for my freelance work.
This is a 14-inch laptop, the best form factor in my opinion for being comfortable when used for a long time while being easy to carry.
It looks great with its metal look with blueish reflection and the engraved logo "NV" on the cover (logo can be customized).
The frame feels solid and high-end, I'm not afraid to carry it or manipulate it. Compared to my ThinkPad T470, that's a change, I always fear to press its plastic frame too much when carrying with a single hand.
The power button is on the right side, this is quite unusual, but it looks great, there are LED around the power plug near the power button that tells the state of the system (running, off, sleeping) and if the battery is running low or charging.
It's running the open-source Firmware Dasharo coreboot, and optionally the security oriented firmware Heads can be installed.
The laptop screen had a removable sleeve that can be reused, I appreciated this as it's smart because it's possible to put it back in case you don't use the laptop for a long time or want to sell it later.
The box contained the laptop, the power supply and the power plug, the full length of the power supply is 2 meters which is great, I hate laptops chargers that only have 1 meter of cable.
The default wireless card is an Intel AX-200/201 compatible with Wi-Fi 6 and Bluetooth 5.2, but I received the blob-free card which was convenient for most operating systems as it doesn't need a firmware (works out of the box on Guix for instance).
There are options to remove the webcam or add a slider to it, a screen privacy filter or secure screws+tape for the packaging to be sure the laptop hasn't been intercepted during transit.
You can also choose the keyboard layout from a large list, or even have your own layout.
Kudos to NovaCustom for guaranteeing the sell of replacement parts for at least 7 years after you buy them a laptop! They also provide a PDF will full details about the internals.
This is my very first Hybrid CPU, it has 4 Performance cores capable of hyperthreading, and 8 Efficient cores that should draw less power at the expense of being slower.
I made a benchmark, only on Qubes OS, to compare the different cores to a Ryzen 5 5600X and my T470 i5-7300U.
If your operating system doesn't know (Linux does) how to make use of E/P cores (like OpenBSD or FreeBSD), it will use them like if they were similar, so no worry here. However, the performance and battery saving aren't optimized because the system won't balance the load at the right place.
TL;DR: the P cores compete with my desktop Ryzen 5 5600X! And the E cores are faster than the i5-7300U! Linux and Xen (in Qubes OS) does a great job at balancing the workload at the right place, so you don't have to worry about pinning a specific task to a P or E core pool.
I think this deserves an entry because it's a plague on many modern computers. If you don't know about it, it's an electric noise that happens under certain conditions. On my T470, it's when charging the battery.
I've been able to get some coil whine noise, only if I forced the CPU frequency to the maximum in the operating system, instead of letting the computer scaling the frequency. This resulted in no performance improvement and some coil whine noise.
In my daily "normal" use with Linux or Qubes OS, I never heard a coil whine. But on OpenBSD for which the frequency management is still not good with these modern CPUs (intel p-state support isn't great) there is a constant noise. However, using obsdfreqd reduced the noise to almost nothing, but still appeared a bit on CPU load.
There is a specific topic where coil whine on this laptop was discussed, a fix was provided by NovaCustom using heat pads (sent for free for their customers) placed at a specific place. I don't think this should be required except if your operating system has a poor support for frequency scaling.
The screen coloring is excellent, which is expected as it covers 98% of sRGB palette, it's really bright, and I rarely turn the brightness more than 50%. I didn't try to use it outdoor, but the brightness at full level should allow reading the screen.
However, it has a noticeable ghosting which make it annoying for playing video games (that's not really the purpose of this model though), or if you are really sensitive to it. I'm used to a 144 Hz display on my desktop and I became really sensitive to refresh rate. However, I have to admit the ghosting isn't really annoying for productivity work, development or browsing the web. Watching a video is fine too.
One slightly annoying limitation is that it's not possible to open the screen more than a 140° angle, this sounds reasonable, but I got used to my T470 screen able to open at ~180°. This is not a real issue, but if you have a weird setup in which you store your laptop vertically against your desktop AND with the screen opened, you won't be able to use the screen.
I've been surprised by the speakers, the audio quality is good up to ~80% of the max volume, but then the quality drops when you set it too high.
I have no way to measure it, but the speakers appear to be quite loud compared to my other laptops when set to 100%, I don't recommend doing it though due to quality drop, but it can be handy sometimes.
The headphones port works fine, there are no noises, and it's able to drive my DT 770 Pro 80 ohm.
I’ve been able to figure an equalizer setting improving the audio to be pretty good (that's subjective). I’m absolutely not an audio expert, but it sounded a lot better for pop, rock, metal or piano.
31 Hz: 0 db
63 Hz: 0 db
125 Hz: 0 db
250 Hz: 0 db
500 Hz: -4 db
1 kHz: -5 db
2 kHz: -8 db
4 kHz: -3 db
8 kHz: -3 db
16 kHz: +2 db
The idea is to lower the trebles instead of pushing the bass which quickly saturate. Depending on what you listen to and your tastes, you could try +1 or +2 db for the four first settings, but it may produce saturated sounds.
Under a huge load, the fan can be heard, but it's still less loud than my idling silent desktop...
There is a special key combination (Fn+1) that triggers the turbo fan mode, forcing them to run at 100%, it is recommended if the laptop is used to run at full CPU 24/7 or for a very long period of time, however, this is as loud as a 1U rack server! For a more comprehensive comparison, let's say it is as annoying as a microwave device.
I was surprised that the laptop never burned my knees, although under heavy load for 30 minutes it felt a bit too hot to keep it on my bare skin without fabric between, that's a genuine lap-top laptop, compatible with short skirts :D.
The keyboard isn't bad, but not good either. Typing on it is pleasant, but it's no match against my mechanical keyboards. The touch is harder than on my Lenovo T470 laptop, I think it feels like most modern laptop keyboards.
Check the layout for the keys like "home", "end", "page up/down", on mine they are tiny keys near the arrows, this may not be to your taste.
The type is quite silent, and there are 5 levels of back-light, I don't really like this feature, so I turned it off, but it's there if you like it.
There are NO indicators for the status of caps lock or num lock (neither for scroll lock, but do people really use it?), this can be annoying for some users.
The touchpad may be a no-go for many, there are no extra physical buttons but you can physically click on the bottom area to make/hold a click. It also features no trackpoint (the little joystick in the middle of the keyboard).
However, it has a large surface and can make use of multitouch clicks. While I was annoyed at first because I was used to ThinkPad's extra physical buttons, over time I got used to multitouch click (click is different depending on the number of fingers used), or the "split-area" click, where a click in a bottom left does a left click, in the middle it does a middle click, and in the bottom right it does a right click.
It reacts well to movements and clicks and does the job, it's not the greatest touchpad I ever used, but it's good enough.
Unfortunately, it's not possible for NovaCustom to propose a variant touchpad featuring extra physical buttons.
Nothing special to say about it, it's like most laptop webcams, it has a narrow angle and the image quality is good enough to show your face during VoIP meetings.
I tested the battery using different operating systems (OpenBSD, Qubes OS, Fedora, Ubuntu) and different methods, there are more details later in the text, but long story short, you can expect the following:
battery life when idling: 6h00
battery life with normal usage: 3h00-5h00 for viewing videos, browsing the web, playing emulated games, code development and some compilation
battery life in continuous heavy use: 2h00 (I accidentally played a long video with no hardware-acceleration, it was using 500% CPU)
The rear of the laptop is fully used for the cooling system, and there are nothing on the front (Hopefully! I hate connecting headphones on the front side).
The laptop ships by Dasharo coreboot firmware (that's the correct name for nowadays devices when we speak of the BIOS), it's an open-source firmware that allows to manage your own secure boot keys, disable some Intel features like "ME"
I guess their website will be a better place to understand what it's doing compared to a proprietary firmware.
NovaCustom is building laptops based on Clevo (a manufacturer doing high-end laptop frames, but they rarely sell directly) while ensuring compatibility with Linux systems, especially Qubes OS for this specific model as it's certified (it guarantees the laptop and all its features will work correctly).
They contribute to dasharo development for their own laptops.
They ship their product worldwide, and as I heard from some users, the custom support is quite reactive.
Fedora Linux support (tested with Fedora 39) was excellent, GNOME worked fine. The Wi-Fi network worked immediately even during the installer, Bluetooth was working as well with my few devices. Changing the screen brightness from the GNOME panel was working. However, after a Dasharo update, the keyboard slider in GNOME stopped working, it's a known bug that also affects System76 laptops if I've read correctly, this may be an issue with the Linux driver itself.
The touchpad was working on multitouch out of the box, suspending and resuming the laptop never produced any issue.
Enabling Secure Boot worked out of the box with Fedora, which is quite enjoyable.
Ubuntu 23.10 support was excellent as well, it's absolutely identical to the Fedora report above.
Note: if you use VLC from the Snap store, it won't have hardware decoded acceleration and will use a lot of CPU (and draw battery, and waste watts for nothing), I guess it's an Ubuntu issue here. VLC from Flatpak worked fine, as always.
Alpine Linux support (tested with Alpine 3.18.4) was excellent, I installed GNOME and everything worked out of the box. The Atheros card worked without firmware (this is expected for a blob free device), CPU scheduling was correctly handled for Efficient/Performance cores as the provided kernel is quite recent.
The touchpad default behavior was to click left/right/middle depending on the number of fingers used to click, suspend and resume worked fine, playing video games was also easy thanks to flatpak and Steam.
It's possible to enable Secure Boot by generating your own keys.
Guix support is mixed. I've been able to install it with no issue, thanks to the blob-free atheros network interface, it worked without having to use guix-nonfree repository (that contains firmware).
However, I was surprised to notice that the graphical acceleration wasn't working, it seems that Intel Xe GPU aren't blob free. This only mean you can't plan video games or that any kind of GPU related encoding/decoding won't work, but this didn't prevent GNOME to work fine.
Suspend and resume was OK, and the touchpad worked out-of-the-box in multi-tap mode.
Secure Boot didn't work, and I have no idea how a Secure Boot setup with your own keys would look like on Guix, but it's certainly achievable with enough Grub-foo.
Trisquel is a 100% libre GNU/Linux distribution, this mean it doesn't provide proprietary software or drivers, and no device firmware.
I've been able to install Trisquel and use it, the Wi-Fi was working out of the box because of the blob-free Atheros card.
The main components of the system: CPU / Memory / Storage were correctly detected, the default kernel isn't too old, and it was able to make use of the Efficient/Performance core of the CPU.
When not using the laptop, I was able to suspend it to reduce the battery usage, and then resume instantly the session when I needed, this worked flawlessly.
The touchpad was working great using the "3 zones" mode in which you tap on the touchpad in the left/center/right bottom of it to make a left/middle/right click, this is actually as convenient as using 1, 2 or 3 fingers depending on the click you want to make, this is something that could be configured though.
Sound was working out of the box, the audio jack is also working fine when plugging in headphones.
There is one issue with the webcam, when trying to use it, X crashes instantly. This may be an issue in Trisquel software stack because it works fine on other OS.
A major issue right now is the lack of graphical hardware acceleration, I'm not sure if it's due to the i7-1260P integrated GPU needing a proprietary firmware or if the linux-libre kernel didn't catch up with this GPU yet.
Qubes OS support (tested with 4.1, 4.2-RC2 to RC5 and 4.2) is excellent, this is exactly what I expected for a Qubes OS certified laptop (the only modern and powerful certified laptop as of January 2024!).
Qubes OS is my main OS as I use it for writing this blog, for work (freelancer with different clients) and general use except gaming, so I needed a reliable system that would be fast, with a pretty good battery life.
So far, I never experienced issues except one related to the Atheros Wi-Fi card (this is not the stock Wi-Fi device): 1 time out of 10 when I suspend and resume, the card is missing, and I need to restart the qube sys-net to have it again. I didn't try with the latest Dasharo update though, it may be solved.
Watching 1080p videos x265 10 bits encoded is smooth and only draw ~40% of a CPU, without any kind of GPU accelerated decoding.
The battery life when using the system to write emails, browse the Internet and look at some videos was of 3 hours, if I only do stuff in LibreOffice offline it lasts 5h30.
I'm able to have smooth videoconferences with the integrated webcam and a USB headset, this kind of task may be the most CPU consuming popular job that Qubes OS need, and it worked well.
The 64 GB are very appreciated, I "only" have 32 GB on my desktop computer, but sometimes it lacks memory... 64 GB allows to not ever think about memory anymore.
The touchpad is working fine, by default on the split-area behavior (left/middle/right click depending on the touchpad area you click on).
There is a single USB controller that drives the webcam and card reader + the USB ports, including a USB-c docked that would be connected on either the thunderbolt or USB-c ports. The thunderbolt device is on a separate controller, but if you attach it to a qube (that is not sys-usb), you lose all USB connectivity from a dock connected to it (there is still the other plain USB-c port). The qube sys-usb isn't even required to run if you don't use any USB devices (this saves many headaches and annoying times).
Connecting a usb-c dock on the thunderbolt port allows to have USB passthrough with sys-usb, an additional ethernet port and external screen working with sound, it's also capable of charging the computer. Whereas the simple usb-c port can only carry USB devices or the integrated ethernet port of my dock, it should be able to support a screen but I guess it's not working on Qubes OS. I didn't try adding more than one screen on either ports, I guess it should work on the thunderbolt port.
I tried OpenBSD and FreeBSD with the laptop. I always have bad luck with NetBSD, so I preferred to not try it, and DragonFly BSD support should be pretty close to FreeBSD for which it didn't work well.
I tried OpenBSD 7.4 and -current, everything went really well except the Atheros WiFi card that isn't supported, but this was to be expected. If you want the NV41 with OpenBSD, you need to take the Intel AX-200/201 which is supported by the iwx driver.
Suspend and resume works fine, the touchpad is using the "3 zones" behavior by default where you need to tap left/center/right bottom to make a left/middle/right click. The webcam and sound card were working fine too.
The GPU is fully supported, you can use it for 3D rendering: I've been able to play a PSP game using PPSSPP emulator. OpenBSD doesn't support hardware accelerated video encoding/decoding at all, so I didn't test it.
I installed FreeBSD 14.0 RC4 with ZFS on root and full disk encryption, the process went fine, I had Wi-Fi at the installer step (thanks to the blob free Atheros card).
However, once I booted into the system, I didn't succeed to get X to run, the GPU isn't supported yet and using VESA display didn't work for me. Suspend and resume didn't work either.
I gave another try with GhostBSD 23.10.1 in hope I did something wrong on FreeBSD 14 RC4 like a misconfiguration as I never had any good experience with FreeBSD on desktop with regard to the setup. But GhostBSD failed to start X and was continuously displaying its logo on screen, only booting in safe mode allowed me to figure what was wrong.
I was really surprised that the hardware is still "too new" for FreeBSD while OpenBSD support is almost excellent.
I tried the freshly released OpenIndiana Hipster 2023.10 liveUSB.
After letting the bootloader display and start the boot process, the init process seemed stuck and was printing errors about CPU every minute. I haven't been able to get past this step.
I had fun measuring a lot of things like power usage at the outlet, battery duration with many workloads and gaming FPS (Frames per Second, 30 is okayish depending on people, 40 is acceptable, 60 is perfect as it's the refresh rate of the screen).
I measured the power usage in watts using a watt-o-meter in different situations:
power supply connected, but not to the laptop: 0 watt (some power supplies draw a few watts doing nothing... hello Nintendo Switch with its 2.1 watts!)
charging, sleeping: 30 watts
charging, idling: 37 watts
charging and heavy use: 79 watts
connected to AC (not charging), sleeping: 1 watt
connected to AC (not charging), idling, screen at full brightness: 17 watts
connected to AC (not charging), downloading a file over Wi-Fi, screen at full brightness: 22 watts
This is actually good in my opinion, to have a comparison point, a standard 24-inch screen usually draw around 40 watts alone.
The power consumption of the laptop itself is within the range of other laptop. I was happy to see it use no power when the AC is connected but not to the computer, and on idling it's only 1 watt, I have another laptop idling at 7 watts!
One method was to play a 2160p x265 10 bits encoded video using VLC, 1h39 long, with full brightness and no network.
With hardware accelerated decoding support: 33% of the battery was used, so the battery life would theoretically be almost 6 hours (299 minutes) while playing a video at full brightness
Without hardware acceleration: 90% of the battery was used (VLC was using 480% of the CPU, but I didn't notice it as the fans were too silent!), this would mean a battery life of 1h49 (110 minutes) using the computer under heavy load
The other method was to play the video game "Risk of Rain Returns" with a USB PS5 controller, and at full brightness, for a given duration (measured at 20 25 minutes).
Risk of Rain Returns: 15% of battery used in 20 minutes, this mean I should have been able to play 2h13 (133 minutes) before having to charge.
I did play a bit on the laptop on Linux using Steam on Flatpak. I tested it on Fedora 39, Ubuntu 23.10 and Alpine Linux 3.18.3, results were identical.
A big surprise while playing was that the fans remained almost silent, they were spinning faster than usual of course, but that didn't require me to increase the moderate volume I used in my gaming session.
Baldur's Gate 3: Playable at stable 30 FPS with all settings to low and FSR2.2 enabled in ultra performance mode
I'm glad I dared asking NovaCustom about this partnership about the NV41, this is exactly the laptop I needed. It's reliable, no weird features, it's almost full open source (at least for the software stack?), very powerful, and I can buy replacement parts for at least 7 years if I break something. It's also SILENT, I despise laptop having a high pitch fan noise.
I still have to play with Dasharo coreboot, I'm really new to this open-source firmware world, so I have to learn before trying weird and dangerous things (I would like to try Heads for its anti-evil maid features, it should be possible to install it on Dasharo systems "soon").
Writing this blog post was extremely hard, I had to stay mindful that this must be an HONEST and NEUTRAL review: writing about a product you are happy with leads to some excitement moments and one may forget to share some little annoyance because it's "not _that_ bad", but I did my best to stay neutral when writing. And this is the agreement I had with NovaCustom.
Honesty is an important value to me. You, dear readers, certainly trust me to some point, I don't want to lose your trust.
Feel free to pick any tweak you find useful for your use-case, many are certainly overkill for most people, but depending on the context, these changes could make sense for others.
In some cases, it may be desirable to have a multiple factor authentication, this mean that in order to log in your system, you would need a TOTP generator (phone app typically, or a password manager such as KeePassXC) in addition to your regular password.
This would protect against people nearby who may be able to guess your system password.
I already wrote a guide explaining how to add TOTP to an OpenBSD login.
By default, it's good practice to disable all incoming traffic except the responses to established sessions (so servers can reply to your requests). This protects against someone on your local network / VPN to access network services that would be listening on the network interfaces.
In /etc/pf.conf you would have to replace the default:
block return
pass
By the following:
block all
pass out inet
# allow ICMP because it's useful
pass in proto icmp
Then, reload with pfctl -f /etc/pf.conf, if you ever need to allow a port on the network, add the according rule in the file.
It may be useful and effective to block outbound traffic, but this only work effectively if you know exactly what you need because you will have to allow hosts and remote ports manually.
It would protect against a program trying to exfiltrate data using a non-allowed port/host.
Disabling network by default is an important mitigation in my opinion. This will protect against any program your run and try to act rogue, if they can't figure there is a proxy, they won't be able to connect to the Internet.
This could also save you from mistaken commands that would pull stuff from the network like pip, npm and co. I think it's always great to have a tight control on which program should do networking and which shouldn't. On Linux this is actually easy to do, but on OpenBSD we can't restrict a single program so a proxy is the only solution.
This can be done by creating a new user named _proxy (or whatever the name you prefer) using useradd -s /sbin/nologin -m _proxy and adding your SSH key to its authorized_keys file.
Add this rule at the end of your file /etc/pf.conf and then reload with pfctl -f /etc/pf.conf:
block return out proto {tcp udp} user solene
Now, if you want to allow a program to use the network, you need to:
toggle the proxy ON with the command: ssh -N -D 10000 _proxy@localhost which is only possible if your SSH private key is unlocked
Most programs will react to a proxy configured in a variable named http_proxy or https_proxy or all_proxy, however it's not a good idea to globally define these variables for your user as it would be a lot easier to a program to use the proxy automatically, which is against the essence of this proxy.
If you didn't configure GNOME proxy settings, Chromium / Ungoogled Chromium won't use a proxy, except if you add a command line parameter --proxy-server=socks5://localhost:10000.
I tried to manually modified the dconf database where the "GNOME" settings are to configure the proxy, but I didn't get it to work (it used to work for me, but I can't succeed anymore).
If you use syncthing, you need to proxy all its traffic through the SSH tunnel. This is done by setting the environment variable all_proxy=socks5://localhost:10000 in the program environment.
It's possible to have most of your home directory be a temporary file system living in memory, with a few directories with persistency.
This change would prevent anyone from using temporary files or cache left-over from previous session.
The most efficient method to achieve this is to use the program home-impermanence that I wrote for this use case, it handles a list of files/directories that should be persistent.
If you only want to start fresh using a template (that doesn't evolve on use), you can check the flag -P of mount_mfs which allows populating the fresh memory based file system using an existing directory.
Good news! I take the opportunity here to remember OpenBSD disables by default the video and audio recording of the various capable devices, instead, they will appear to work but record empty stream of data.
They can be manually enabled by changing the sysctls kern.audio.record or kern.video.record to 1 when you need to use them.
Some laptop manufacturer offer the option to have a physical switch to disable microphone and webcam, so you can be confident about their state (Framework). Some other manufacturer also allow to not put any webcam and microphone (NovaCustom, Nitropad). Finally, open source firmwares like Coreboot can offer a bios setting to disable these peripherals, it should be trustable in my opinion.
If you need to protect your system from malicious USB devices (usually in an office environment), you should disable them in the BIOS/Firmware if possible.
If it's not possible, then you could still disable the kernel drivers at boot time using this method.
Create the file /etc/bsd.re-config and add the content to it:
disable usb
disable xhci
This will disable the support for USB 3 and 2 controllers. On a desktop computer, you may want to use PS/2 peripherals in these conditions.
While this one may make you smile, if there is a chance it saves you once, I think it's still a valuable addition to any kind of hardening. A downloaded attachment from an email, or rogue JPG file could still harm your system.
OpenBSD ships a fully working clamav service, don't forget to enable freshclam, the viral database updater.
I already covered it in a previous article about anacron, but in my opinion, auto-updating the packages and base system daily on a computer is the minimum that should be done everywhere.
The OpenBSD malloc system allows you to enable some extra checks, like use after free, heap overflow or guard pages, they can be all enabled at once. This is really efficient for security as most security exploits relies on memory management issues, BUT it may break software that have memory management issues (there are many of them). Using this mode will also impact the performance negatively, as the system needs to do more checks for each piece of allocated memory.
In order to enable it, add this to /etc/sysctl.conf:
vm.malloc_conf=S
It can be immediately enabled with sysctl vm.malloc_conf=S, and disabled by setting no value sysctl vm.malloc_conf="".
The program ssh and sshd always run with this flag enabled, even if it's disabled system-wide.
It could be possible to have different proxy users, with each restriction to the remote ports allowed, we could imagine proxies like:
http / https / ftp
ssh only
imap / smtp
etc....
Of course, this is even more tedious than the multipurpose proxy, but at least, it's harder for a program to guess what proxy to use, especially if you don't connect them all at once.
I wrote a bit about this in the past, for command line programs, running them in dedicated local users over SSH make sense, as long as it's still practical.
But if you need to run graphical programs, this becomes tricky. Using ssh -Y gives the remote program a full access to your display server, which has access to everything else running, not great... You could still rely on ssh -X which enables X11 Security extensions, but you have to trust the implementation, and it comes with issues like no shared clipboard, poor performance and programs crashing when attempting to access a legit resource that is blocked by the security protocol...
In my opinion, the best way to achieve isolation for graphical programs would be to run a dedicated VNC server in the local user, and connect from your own user. This should be better than running on your own X locally.
In a setup where the computer is used by multiple person, the system encryption may be tedious because everyone have to remember the main passphrase, you have no guarantee one won't write it down on a post-it... In that case, it may be better to have a personal volume, encrypted, for each user.
I don't have an implementation yet, but I got a nice idea. Adding a volume for a user would look like the following:
take a dedicated USB memory stick for this user, this will be used as a "key" to unlock their data directory
overwrite the memory stick with random data
create an empty disk file on the system, it will contain the encrypted virtual disk, use a random part of the USB disk for the passphrase (you will have to write down the length + offset)
write a rc file that looks for the USB disk volume if present, if so, tries to unlock and mount the partition upon boot
This way, you only need to have your USB memory stick plugged in when the system is booting, and it should automatically unlock and mount your personal encrypted volume. Note that if you want to switch user, you would have to reboot to unlock their drive if you don't want to mess with the command line.
It's always possible to harden a system more and more, but the balance between real world security and actual usability should always be studied.
No one will use a too-much hardened system if they can't work on it efficiently, on the other hand, users expect their system to protect them against most common threats.
Depending on one's environment and threat model, it's important to configure their system accordingly.
With the recent release of Qubes OS 4.2, I took the opportunity to migrate to a newer laptop (from a Thinkpad T470 to a NovaCustom NV41) so I had to backup all the qubes from the T470 and restore them on the NV41.
The fastest way to proceed is to create the backups on the new laptop directly from the old one, which is quite complicated to achieve due to Qubes OS compartmentalization.
In this guide, I'll share how I created a qube with a network file server to allow one laptop to send the backups to the new laptop.
Of course, this whole process could be avoided by using a NAS or external storage, but they are in my opinion slower than directly transferring the files on the new machine, and you may not want to leave any trace of your backups.
As the new laptop has a very fast NVME disk, I thought it would be nice to use it for saving the backups as it will offload a bit of disk activity for the one doing backups, and it shouldn't be slowed down during the restore process even if it has to write and read the backups at the same time.
The setup consists in creating a dedicated qube on the new laptop offering an NFS v4 share, make the routing at the different levels, and mount this disk in a qube on the old laptop, so the backup could be saved there.
I used a direct Ethernet connection between the two computers as it allows to not think much about NFS security
On the new laptop, create a standalone qube with the name of your choice (I'll refer to it as nfs), the following commands have been tested with the fedora-38-xfce template. Make sure to give it enough storage space for the backup.
First we need to configure the NFS server, we need to install the related package first:
$ sudo dnf install nfs-utils
After this, edit the file /etc/exports to export the path /home/user/backup to other computers, using the following content:
/home/user/backup *(rw,sync)
Create the directory we want to export, and make user the owner of it:
install -d -o user /home/user/backup
Now, run the NFS server now and at boot time:
systemctl enable --now nfs-server
You can verify the service started successfully by using the command systemctl status nfs-server
You can check the different components of the NFS server are running correctly, if the two following commands have an output this mean it's working:
ss -lapteun | grep 2049
ss -lapteun | grep 111
Allow the NFS server at the firewall level, run the following commands AND add them at the end of /rw/config/rc.local:
Now the service is running within the qube, we need to allow the remote computer to reach it, by default the network should look like this:
We will make sys-net to nat the UDP port 111 and TCP port 2049 to sys-firewall, which will nat them to the nfs qube, which will already accept connections on those ports.
Write the following script inside the sys-net qube of the destination system, make sure to update the value of the variable DESTINATION with sys-firewall's IP address, it can be found by looking at the qube settings.
Write the following script inside the sys-firewall qube of the destination system, make sure to update the value of the variable DESTINATION with nfs's IP address, it can be found by looking at the qube settings.
On the source system, we need to have a running qube that will mount the remote NFS server, this can be a disposable qube, an AppVM qube with temporary changes, a standalone etc...
In this step, you need to configure the network with the direct Ethernet cable, so the two systems can speak to each other, please disconnect from any Wi-Fi connections as you didn't set any security for the file transfer (it's encrypted but still).
You can choose any address as long as the two hosts are in the same subnet, an easy pick could be 192.168.0.2 for the source system, and 192.168.0.3 for the new system.
Now, both systems should be able to ping each other, it's time to execute the scripts in sys-firewall and sys-net to enable the routing.
On the "mounting" qube, run the following command as root to mount the remote file system:
mount.nvfs4 192.168.0.3:/home/user/backup /mnt
You can verify it worked if the output of df shows a line starting by 192.168.0.3:/home/user/backup, and you can ensure your user can actually write in this remote directory by running touch /mnt/test with the regular user user.
Now, we can start the backup tool to send the backup to the remote storage.
In the source system dom0, run the Qubes OS backup tool, choose the qubes you want to transfer, uncheck "Compress backups" (except if you are tight on storage for the new system) and click on "Next".
In the field "Target qube", select the "mounting qube" and set the path to /mnt/, choose an encryption passphrase and run the backup.
If everything goes well, you should see a new file named qubes-backup-YYYY-MM-DDThhmmss in the directory /home/user/backups/ of the nfs qube.
In the destination system dom0, you can run the Restore backup tool to restore all the qubes, if the old sys-net and sys-firewall have any value, you may want to delete yours first otherwise the restored one will be renamed.
When you backup and restore dom0, only the directory /home/ is part of the backup, so it's only about the desktop settings themselves and not the Qubes OS system configuration. I actually use versioned files in the salt directories to have reproducible Qubes OS machines because the backups aren't enough.
When you restore dom0, it creates a directory /home/solene/home-restore-YYYY-MM-DDThhmmss on the new dom0 that contains the previous /home/ directory.
Restoring this directory verbatim requires some clever trick as you should not be logged in for the operation!
reboot qubes OS
don't log in, instead press ctrl+alt+F2 to run commands as the root user in a console (tty)
move the backup outside /home/solene with mv /home/solene/home-restore* /home/
delete your home directory /home/solene with rm -fr /home/solene
put the old backup at the right place with mv /home/home-restore*/dom0-home/solene /home/
press ctrl+alt+F1
log-in as user
Your desktop environment should be like you left if during the backup. If you used some specific packages or desktop environment, make sure you also installed the according packages in the new dom0
Moving my backup from the old system to the new one was pretty straightforward once the NFS server was established, I was able to quickly have a new working computer that looked identical to the previous one, ready to be used.
If you ever required continuous integration pipelines to do some actions in an OpenBSD environment, you certainly figured that most Git "forge" didn't provide OpenBSD as a host environment for the CI.
It turns out that sourcehut is offering many environments, and OpenBSD is one among them, but you can also find Guix, NixOS, NetBSD, FreeBSD or even 9front!
Note that the CI is only available to paid accounts, the minimal fee is "$2/month or $20/year". There are no tiers, so as long as you pay something you have a paid account. sourcehut is offering a clutter-free web interface, and developing an open source product that is also capable of running OpenBSD in a CI environment, I decided to support them (I really rarely subscribe to any kind of services).
Upon each CI trigger, a new VM is created, it's possible to define the operating system and version you want for the environment, and then what to do in it.
The CI works when you have a "manifest" file in your project with the path .build.yml at the root of your project, it contains all the information about what to do.
Here is a simple example of a manifest file I use to build a website using the static generator hugo, and then push the result on a remote server.
image: openbsd/latest
packages:
  - hugo--
  - rsync--
secrets:
  - f20c67ec-64c2-46a2-a308-6ad929c5d2e7
sources:
  - git@git.sr.ht:~solene/my-project
tasks:
  - init: |
      cd my-project
      git clone https://github.com/adityatelange/hugo-PaperMod themes/PaperMod --depth=1
  - build: |
      cd my-project
      echo 'web.perso.pw ssh-ed25519 AAAAC3NzaC1lZDI1NTE5AAAAIKRj0NK7ZPMQgkgqw8V4JUcoT4GP6CIS2kjutB6xdR1P' | tee -a ~/.ssh/known_hosts
      make
On the example above, we can notice different parts:
image: this tells the manifest which OS to use, openbsd/latest means latest release.
packages: this tells which packages to install, it's OS-agnostic. I use extra dashes because some alternate versions of these packages exists, I just want the simple flavour for each.
secrets: this tells which secret I want among the secrets stored in sourcehut. This is a dedicated private SSH key in this case.
sources: this tells which sources to clone in the CI. Be careful though, if a repository is private, the CI needs to have the SSH key to access the repository. I spent some time figuring this the hard way.
tasks: this defines which commands to run, they are grouped in jobs.
If you use SSH, don't forget to either use ssh-keyscan to generate the content for ~/.ssh/known_hosts, or add the known fingerprint like me that would require an update if the SSH host key changes.
A cool thing is when your CI job failed, the environment will continue to live for at least 10 minutes while offering an SSH access for debug purpose.
I finally found a Git forge that is ethic and supportive of niche operating system. Its interface may be rude with fewer features, but it loads faster and is cleaner to understand. The price ($20/year) is higher than the competition (GitHub or GitLab) which can be used freely (up to some point) but they don't offer the CI choice and the elegant workflow sourcehut has.
In earlier blog posts, I covered the program Syncthing and its features, then how to self-host a discovery server. I'll finish the series with the syncthing relay server.
The Syncthing relay is the component that receives file from a peer to transmit it to the other when two peers can't establish a direct connection, by default Syncthing uses its huge worldwide community pool of relays. However, while data are encrypted, this leaks some information and some relays may be malicious and store files until it could be possible to make use of the content (weakness in encryption algorithm, better computers etc…).
Running your own Syncthing relay server will allow you to secure the whole synchronization between peers.
A simple use case for a relay: you have Syncthing configured between a smartphone on its WAN network and a computer behind a NAT, it's unlikely they will be able to communicate to each other directly, they will need a relay to synchronize.
On OpenBSD, you will need the binary strelaysrv provided by the package syncthing.
# pkg_add syncthing
There is no rc file to start the relay as a service on OpenBSD 7.3, I added it to -current and will be available from OpenBSD 7.5, create an rc file /etc/rc.d/syncthing_relay with the following content:
The special flag -pools='' is there to NOT join the community pool. If you want to contribute to the pool, remove this flag.
There is nothing else to configure, except enabling the service at boot, and running it, at the exception the need to retrieve an information from its runtime output:
You need to open the port TCP/22067 for the relay to work, in addition, you can open the port 22070 which can be used to display a JSON with statistics.
To reach the status page, you need to visit the page http://$SERVER_IP:22070/status
On the client Web GUI, click on "Actions" and "Settings" to open the settings panel.
In the "Connections tab", you need to enter the relay URI in the first field "Sync Protocol Listen Addresses", you can add it after default by separating the two values with a comma, that would add your own relay in addition to the community pool. You could entirely replace the value with the relay URI, in such situation, all peers must use the same relay, if they need a relay.
Don't forget to check the option "Enable relaying", otherwise the relay won't be used.
Syncthing is greatly modular, it's pretty cool to be able to self-host all of its components separately. In addition, it's also easy to contribute to the community pool if one decides to.
My relay is set up within a VPN where all my networks are connected, so my data are never leaving the VPN.
It's possible to use a shared passphrase to authenticate with the remote relay, this can be useful in the situation where the relay is on a public IP, but you only want the nodes holding the shared secret to be able to use it.
You may already have encountered emails in raw text that contained weird characters sequences like =E3 or =09, especially if you work with patch files embedded as text in emails.
There is nothing wrong with the text itself, or the sender email client. In fact, this shows the email client is doing the right thing by applying the RFC 1521. Non-ASCII character should be escaped in some way in emails.
This is where qprint enters in action, it can be used to encode using the quoted-printable, or decode such content. The software can be installed on OpenBSD with the package named qprint.
If you search for an email from the OpenBSD mailing list, and display it in raw format, you may encounter this encoding. There isn't much you can do with the file, it's hard to read and can't be used with the program patch.
In a previous article, I covered the software Syncthing and mentioned a specific feature named "discovery server".
The discovery server is used to allow clients to connect each other through NATs to help connect each other, this is NOT a relay server (which is a different service) that serves as a proxy between clients.
A motivation to run your own discovery server(s) would be for security, privacy or performance reasons.
security: using global servers with the software synchronizing your data can be dangerous if a remote exploit is found in the protocol, running your own server will reduce the risks
privacy: the global servers know a lot about your client if you sync online: time of activity, IP address, number of remote nodes, the ID of everyone involved etc...
my specific use case where I have two Qubes OS computer with multiple syncthing inside, they can't see each other as they are in separate networks, and I don't want the data to go through my slow ADSL to sync locally...
Let's see how to install your own Syncthing discovery daemon on OpenBSD.
On OpenBSD, the binary we need is provided by syncthing package.
# pkg_add syncthing
The relay service is done by the binary stdiscosrv, you need to create a service file to enable it at boot. We can use the syncthing service file as a template for the new one. In OpenBSD-current and from OpenBSD 7.5 the rc file will be installed with the package.
You created a service named syncthing_discovery, it's time to enable and start it.
# rcctl enable syncthing_discovery
You need to retrieve the line "Server device IS is XXXX-XXXX......" from the output, keep the ID (which is the XXXX-XXXX-XXXX-XXXX part) because we will need to reuse it later. We will start the service in debug mode to display the binary output in the terminal.
# rcctl -d start syncthing_discovery
Make sure your firewall is correctly configured to let pass incoming connections on port TCP/8443 used by the discovery daemon.
On the client Web GUI, click on "Actions" and "Settings" to open the settings panel.
In the "Connections tab", you need to change the value of "Global Discovery servers" from "Default" to https://IP:8443/?id=ID where IP is the IP address where the discovery daemon is running, and ID is the value retrieved at the previous step when running the daemon.
Depending on your use case, you may want to have the global discovery server plus yours, it's possible to use multiple servers, in which case you would use the value default,https://IP:8443/?id=ID.
If you change the default discovery server by your own, make sure all the peers can reach it, otherwise your syncthing clients may not be able to connect to each other.
By default, the discovery daemon will generate self-signed certificate, you could use a Let's Encrypt certificate if you prefer.
There are some other options like prometheus export for getting metrics or changing the connection port, you will find all the extra options in the documentation / man page.
As stated earlier, Syncthing is a network daemon that synchronize files between computers/phones. Each Syncthing instance must know the other instance ID to trust them and find them over the network. The transfer are encrypted and efficient, the storage itself can be encrypted.
Some Syncthing vocabulary:
a folder: a local directory that is shared with a remote device,
a remote device: a remote computer running Syncthing, each of them have a unique ID and a user-defined name, you can choose which shared folders you want to synchronize with them
an item: this word appears when syncing two remotes, an item can be either a directory or a file that isn't synchronized yet
a discovery server: a server which helps remotes finding known remotes over the Internet, or in the worst case scenario, relays data from a remote to another if they can't communicate directly
When you need to add a new remote, you need to add the remote's ID on a Syncthing and trust that one on the remote one. The ID is a human representation of the Syncthing instance certificate fingerprint. When you exchange ID, you are basically asked to review each certificate and allow each instance to trust the other.
All network transfers occurring between two Syncthing are encrypted using TLS, as the remote certificate can be checked, the incoming data integrity can be verified and authenticated.
I guess this is Syncthing killer feature. Connecting two remotes is very easy and file transfer between them can bypass firewalls and NATs.
This works because the Syncthing offers a default discovery server which has two purposes:
if the two servers could potentially communicate to each other but are behind NATs, it does what we call "hole punching" to establish a connection between the two remotes and allow them to transfer directly from one to the other
if the two servers can't communicate to each other, the discovery server acts as a relay for the data
The file transfer is still encrypted, but having a third party server involved may rise privacy issues, and security risks if a vulnerability can be exploited.
My next blog post will show how to self-host your own Syncthing relay, for better privacy and even more complicated setups!
Note that the discovery server or the relaying can be disabled! You could also build a mesh VPN and run Syncthing on each node without using any relay or discovery server.
On a given Syncthing instance, you can enable per shared folder a retention policy, aka file versioning in the interface.
Basically, if a file is modified / removed in the share by a remote, the local instance can keep a hidden copy for a while.
There are different versioning modes, from a simple "trash bin" style keeping the files for n days, or more elaborated policies like you could have in backup tools.
For each share, it's possible to write an exclusion filter, this allows you to either discard sync changes for some pattern (like excluding vim swap files) or entire directories if you don't want to retrieve all the shared folder.
The filter works in both way, if you accept a remote, you could write a filter before starting the synchronization and remove some huge directories you may not want locally. But this could also allow preventing a directory to be sent to the remotes, like a temporary directory for instance.
This is a topic I covered with a very specific use case, only sync a single file in a directory.
A pretty cool feature I found recently was the support for encrypted shared folders per remote. I'm using syncthing to keep my KeepassXC databases synchronized between my computers.
As I don't always have at least two of my computers turned ON at the same time, they can't always synchronize directly with each other, so I use a remote dedicated server as a buffer to hold the files, Syncthing encryption is activated for this remote, both my computers can exchange data with it, but on the server itself you can't get my KeepassXC databases.
This is also pretty cool as it doesn't leave any readable data on the storage drive if you use 3rd party systems.
Taking the opportunity here, KeepassXC has a cool feature that allows you to add a binary file as a key in addition to a password / FIDO key. If this binary file isn't part of the synchronized directory, even someone who could access your KeepassXC database and steal your password shouldn't be able to use it.
When Syncthing scans a directory, it will hash all the file into chunks and synchronize all these chunks to other remotes, this is basically how BitTorrent work too.
This may sound boring, but basically, this allows Syncthing to move or rename files on a remote instead of transferring the data again when you rename / move files in a local shared directory. Indeed, only the changed paths list is sent, and the chunks used in the files, as the files already exist on the remote, the data chunks don't have to be retrieved.
Note that this doesn't work for encrypted remotes as the chunks contain some path information, once encrypted, the same file with different paths will look as two different encrypted chunks.
Syncthing GUI allows you to define inbound or outbound bandwidth limitation, either globally or per remote. If like me, you have a slow ADSL line with slow upload, you may want to limit the bandwidth used to send data to set the non-local remotes.
This may sound more niche, but it's important for some users: Syncthing can synchronize file permissions, ownership or even extended attributes. This is not enabled by default as Syncthing requires elevated privileges (typically running as root) to make it work.
Syncthing is a Go program, it's a small binary with no dependencies, it's quite portable and runs on Linux, all the BSD, Android, Windows, macOS etc... There is nothing worse than a synchronization utility that can't be installed on a specific computer...
I really love this software, especially since I figured the file versioning and the encrypted remotes, now I don't fear conflicts or lost files anymore when syncing my files between computers.
My computers also use a local discovery server that allows my Qubes OS to be kept in sync together over the LAN.
When you install Syncthing on your system, you can enable the service as your user, this will make Syncthing start properly when you log in with your user:
Syncthing has to listen for each file change, you will need to increase the maximum opened files limit for your user, and maybe the limit in the kernel using the according sysctl.
You can find more detailed information about using Syncthing on OpenBSD in the file /usr/local/share/doc/pkg-readmes/syncthing.
I often see a lot of confusion with regard to OpenBSD, either assimilate as a Linux distribution or mixed up with FreeBSD.
Let's be clear, OpenBSD is a stand alone operating system. It came as a fork of NetBSD in 1994, there isn't much things in common between the two nowadays.
While OpenBSD and the other BSDs are independant projects, they share some very old roots in their core, and regularly see source code changes in one being imported to another, but this is really a very small amount of the daily code changes though.
a complete operating system with X, network services, compilers, all out of the box
100% community driven
more than 11000 packages with stuff like GNOME, Xfce, LibreOffice, Chromium, Firefox, KDE applications, GHC etc... (and KDE Plasma SOON!)
a release every 6 months
sandboxed web browsers
stack smash memory protection
where OpenSSH is developped
accurate manual pages for everything
It's used with success on workstations, either for personal or professional use. It's also widely used as a server, being for network services or just routing/filtering network!
You can install OpenBSD on your system, or a spare computers you don't use anymore. You need at least 48 MB of memory for it to work, and many architectures are supported like arm64, amd64, i386, sparc64, powerpc, riscv...
You can rent an OpenBSD VM on OpenBSD Amsterdam, a company doing OpenBSD hosting on OpenBSD servers using the OpenBSD hypervisor! And they give money to the OpenBSD project for each VM they host!
We are in October 2023, let's celebrate the first OctOpenBSD event, the month where OpenBSD users show to the world our favorite operating system is still relevant.
The event will occur from 1st October up to 31st October. A surprise will be revealed on the OpenBSD Webzine for the last day!
Dear Firefox users, what if I told you it's possible to harden Firefox by changing a lot of settings? Something really boring to explain and hard to reproduce on every computer. Fortunately, someone did the job of automating all of that under the name Arkenfox.
Arkenfox design is simple, it's a Firefox configuration file (more precisely a user.js file), that you have to drop in your profile directory to override many Firefox defaults with a lot of curated settings to harden privacy and security. Cherry on cake, it features an updater and a way to override some of its values with a user defined file.
This makes Arkenfox easy to use on any system (including Windows), but also easy to tweak or distribute across multiple computers.
The official documentation contains more information, but basically the steps are the following:
find your Firefox profile directory: open about:support and search for an entry name profile directory
download latest Arkenfox user.js release archive
if the profile is not new, there is an extra step to clean it using scratchpad-scripts/arkenfox-cleanup.js which contains instructions at the top of the file
save the file user.js in the profile directory
add update.sh to the profile directory, so you can update user.js easily later
create user-overrides.js in the profile directory if you want to override some settings and keep them, the updater is required for the override
Basically, Arkenfox disables a lot of persistency such as cache storage, cookies, history. But it also enforces a canvas of fixed size to render the content, reset the preferred languages to English only (that defines which language is used to display a multilingual website) and many more changes.
You may want to override some settings because you don't like them. In the project's Wiki, you can find all Arkenfox overrides, with the explanation of its new value, and which value you may want to use in your own override.
By default, cookies aren't saved, so if you don't want to log in every time you restart Firefox, you have to specifically allow cookies for each website.
The easiest method I found is to press Ctrl+I, visit the Permissions tab, and uncheck the "Default permissions" relative to cookies. You could also do it by visiting Firefox settings, and search for an exception button in which you can enter a list of domains where cookies shouldn't be cleared on shutdown.
By default, entering text in the address bar won't trigger a search anymore, so instead of using Ctrl+L to type in the bar, you can use Ctrl+K to type for a search.
Arkenfox wiki recommends to use uBlock Origin and Skip redirect extensions only, with some details. I agree they both work well and do the job.
It's possible to harden uBlock Origin by disabling 3rd party scripts / frames by default, and giving you the opportunity to allow per domain / globally some sources, this is called the blocking mode. I found it to be way more usable than NoScript.js.
I found that Arkenfox was a bit hard to use at first because I didn't fully understand the scope of its changes, but it didn't break any website even if it disables a lot of Firefox features that aren't really needed.
This reduces Firefox attack surface, and it's always a welcome improvement.
Arkenfox user.js isn't the only set of Firefox settings around, there is also Betterfox (thanks prx!) which provides different profiles, even one for performance. I didn't try any of these profiles yet, Arkenfox and Betterfox are parallel projects and not forks, it's actually complicated to compare which one would be better.
I recently wanted to improve Qubes OS accessibility to new users a bit, yesterday I found why GNOME Software wasn't working in the offline templates.
Today, I'll explain how to install programs from Flatpak in a template to provide to other qubes. I really like flatpak as it provides extra security features and a lot of software choice, and all the data created by Flatpak packaged software are compartmentalized into their own tree in ~/.var/app/program.some.fqdn/.
All the commands in this guide are meant to be run in a Fedora or Debian template as root.
In order to add Flathub repository, you need to define the variable https_proxy in your shell session so flatpak can figure how to reach the repository through the proxy:
Now, if you want to use flatpak commands, you need to either set the all_proxy variable in your shell session, or prefix the flatpak command with env all_proxy=http://127.0.0.1:8082 flatpak ......
In order to circumvent a GNOME Software bug, if you want to use it to install packages (Flatpak or not), you need to add the following line to /rw/config/rc.local:
You can make the environment variable persistent for the user user if you want to allow GNOME Software to work with flatpak, but also for all flatpak commands as the user user, so you do not have to export the variable every time.
/!\ Note that this can lead to the template's programs to connect to the Internet as the proxy will be configured for the whole user user, so let's say you start Firefox or run something with telemetry and they support proxies, they will use the proxy.
If you install or remove flatpak programs, either from the command line or with the Software application, you certainly want them to be easily available to add in the qubes menus.
Here is a script to automatically keep the applications list in sync every time a change is made to the flatpak applications.
If you don't want to use the automated script, you will need to run /etc/qubes/post-install.d/10-qubes-core-agent-appmenus.sh, or click on "Sync applications" in the template qube settings after each flatpak program installation / deinstallation.
For the setup to work, you will have to install the package inotify-tools in the template, this will be used to monitor changes in a flatpak directory.
#!/bin/sh

# when a desktop file is created/removed
# - links flatpak .desktop in /usr/share/applications
# - remove outdated entries of programs that were removed
# - sync the menu with dom0

inotifywait -m -r \
-e create,delete,close_write \
/var/lib/flatpak/exports/share/applications/ |
while  IFS=':' read event
do
    find /var/lib/flatpak/exports/share/applications/ -type l -name "*.desktop" | while read line
    do
        ln -s "$line" /usr/share/applications/
    done
    find /usr/share/applications/ -xtype l -delete
    /etc/qubes/post-install.d/10-qubes-core-agent-appmenus.sh
done
You have to mark this file as executable with chmod +x /usr/local/sbin/sync-app.sh.
You can automatically run flatpak upgrade after a template update. After a dnf change, all the scripts in /etc/qubes/post-install.d/ are executed.
Create /etc/qubes/post-install.d/05-flatpak-update.sh with the following content, and make the script executable:
#!/bin/sh

# abort if not in a template
if [ "$(qubesdb-read /type)" = "TemplateVM" ]
then
    export all_proxy=http://127.0.0.1:8082/
    flatpak upgrade -y --noninteractive
fi
Every time you update your template, flatpak will upgrade after and the application menus will also be updated if required.
With this setup, you can finally install programs from flatpak in a template to provide it to other qubes, with bells and whistles to not have to worry about creating desktop files or keeping them up to date.
Please note that while well-made Flatpak programs like Firefox will add extra security, the repository flathub allows anyone to publish programs. You can browse flathub to see who is publishing which software, they may be the official project team (like Mozilla for Firefox) or some random people.
This article is meant to be a simple guide explaining how to make use of the OpenBSD specific feature pledge in order to restrict a software capabilities for more security.
While pledge falls in the sandboxing features, it's different than the traditional sandboxing we are used to see because it happens within the source code itself, and can be really tightened. Actually, many programs requires lot of privileges like reading files, doing DNS etc... when initializing, then those privileges could be removed, this is possible with pledge but not for traditional sandboxing wrappers.
In OpenBSD, most of the base userland have support for pledge, and more and more packaged software (including Chromium and Firefox) received some code to add pledge. If a program tries to use a system call that isn't in pledge promises list, it dies and the violation is reported in the system logs.
What makes pledge pretty cool is how it's easy to implement it in your software, it has a simple mechanism of system call families so you don't have to worry about listing every system calls, but only their categories (named promises), like reading a file, writing a file, executing binaries etc...
I found a small utility that I will use to illustrate how to add pledge to a program. The program is qprint, a C quoted printable encoder/decoder. This kind of converter is quite easy to pledge because most of the time, they only take an input, do some computation and make an output, they don't run forever and don't do network.
When extracting the sources, we can find a bunch of files, we will focus at reading the *.c files, the first thing we want to find is the function main().
It happens the main function is in the file qprint.c. It's important to call pledge as soon as possible in the program, most of the time after variable initialization.
Adding pledge to a program requires to understand how it works, because some feature that aren't often used may be broken by pledge, and some programs having live reloading or being able to change behavior during runtime are complicated to pledge.
Within the function main below variables declaration, We will add a call to pledge for stdio because the program can display the result on the output, rpath because it can read files and wpath as it can also write files.
It's ok, we imported the library providing pledge, and called it from within. But what if the pledge call fails for some reasons? We need to ensure it worked or abort the program. Let's add some checks.
This is a lot better now, if pledge call failed, the program will stop and we will be warned about it. I don't know exactly under which circumstance it could fail, but maybe if promise name changes or doesn't exist anymore in a program, that would be bad if pledge silently failed.
Now we made some changes to the program, we need to verify it's still working as expected.
Fortunately, qprint comes with a test suite which can be used with make wringer, if the test suite pass and the tests have a good coverage, this mean we may have not break anything. If the test suite fails, we should have an error in the output of dmesg telling us why it failed.
And, it failed!
qprint[98802]: pledge "cpath", syscall 5
This error (which killed the PID instantly) indicates that the pledge list is missing cpath, this makes sense because it has to create new files if you specify an output file.
Adding cpath to the list, and running the test suite again, all tests pass! Now, we exactly know that the software can't do anything except using the system calls we whitelisted.
We could tighten pledge more by dropping rpath if the file is read from stdin, and cpath wpath if the output is sent to stdout. I left this exercise to the reader :-)
It's actually possible to call pledge() in other programming languages, Perl has a library provided in OpenBSD base system that will work out of the box. For some other, such library may be packaged already (for python and Golang at least). If you use something less common, you can define an interface to call the library.
It's possible to find which running programs are currently using pledge() by using ps auxww | awk '$8 ~ "p" { print }', any PID with a state containing p indicates it's pledged.
If you want to add pledge to a packaged program on OpenBSD, make sure it still fully work.
Adding pledge to a program that contain most promises won't be doing much...
Now, if you want to practice, you can tighten the pledge calls to only allow qprint to use the pledge stdio only in the case it's used in a pipe for input and output like this: ./qprint < input.txt > output.txt.
Ideally, it should add the pledge cpath wpath only when it writes into a file, and rpath only when it has to read a file, so in the case of using stdin and stdout, only stdio would have been added at the beginning.
Good luck, Have fun! Thanks to Brynet@ for the suggestion!
The system call pledge() is a wonderful security feature that is reliable, and as it must be done in the source code, the program isn't run from within a sandboxed environment that may be possible to escape. I can't say pledge can't be escaped, but I think it's a lot less likely to be escaped than any other sandbox mechanism (especially since the program immediately dies if it tries to escape).
Next time, I'll present its companion system called unveil which is used to restrict access to the filesystem, except some developer defined files.
I wanted to share my favorite games list of all time. Making the list wasn't easy though, but I've set some rules to help deciding myself.
Here are the criteria:
if you show me the game, I'd be happy to play it again
if it's a multiplayer game, let's assume we could still play it
the nostalgia factor should be discarded
let's try to avoid selecting multiple similar games
I'd love being able to forget the story to play it again from a fresh point of view
Trivia, I'm not a huge gamer, I still play many games nowaday, but I only play each of them for a couple of hours to see what they have to offer in term of gameplay, mechanics, and see if they are innovative in some way. If a game is able to surprise me or give me something new, I may spend a bit more time on it.
Here is the list of my top 20 games I enjoyed, and with which I'd be fine to enjoy play them again anytime.
I tried to elect some games to be a bit better than the other, so there is my top 3, top 10, and the top 20. I haven't been able to rank them from 1 to 20, so I just made tiers.
I spent so many hours playing with my brother or friends, sharing the mouse each turn so everyone could play with a single computer.
And not only the social factor was nice, the game was cool, there are many different factions to play, the game is cool and there is strategy at play to win. A must have.
The Sega Saturn hasn't been very popular, but it had some good games, and one is Saturn Bomberman. From all the games from the Bomberman franchise, this looks really the best, it featured some dinosaurs with unique abilities, and they could grow up, some weird items, many maps.
And it had an excellent campaign that was long to play, and could be played in coop! The campaign was really really top notch for this kind of game, with unique items you couldn't find in multiplayer.
I guess this is a classic, I played a lot the Nintendo 64 version, and now we have the 1+2 games into one, with high refresh rate, HD textures and still the same good music.
This may sound like heresy, but I never played the campaign of this game. I just played skirmish or in multiplayer with friends, and with the huge factions choice with different gameplay, it's always cool even if the graphics aged a bit.
Being able to send dreadnought from space directly into the ork base, or send legions of necrons to that Tau player is always source of joy.
2.1.6. Street Fighter 2 Special Champion Edition §
A classic on the megadrive/genesis, it's smooth, music is good. So many characters and stages, incredible soundtracks. The combos were easy to remember, just enough to give each character their own identity and allow players to quickly onboard.
Maybe the super NES version is superior, but I always played it on megadrive.
Maybe the game which demonstrated we can do great deck based video games.
Playing a character with a set of skills as cards, gathering items while climbing a tower, it can get a bit repetitive over time though, but the game itself is good and doing a run occasionally is always tempting.
The community made a lot of mods, even adding new characters with very specific mechanics, I highly recommend it for anyone looking for a card based game.
My first Monster Hunter game, on 3DS. I absolutely loved it, insane fights against beloved monsters (we need to study them carefully, so we need to hunt a lot of them :P).
While Monster Hunter World shown better graphics and smoother gameplay, I still prefer the more rigid MH like MH4U or MH Generations Ultimate.
The 3D effect on the console was working quite well too!
A very good card game with multiple factions, but not like Slay the Spire.
There are lot of combos to create as cards are persistent within the train, and runs are not that much depending on RNG (random number generator), which make it a great game.
A classic among the RPG, I wanted to put an Elder Scrolls game into the list and I went with Oblivion. In my opinion, this was the coolest one compared to Morrowind or Skyrim. I have to say, I just hesitated with Morrowind, but because of all Morrowind flaws and issues, Oblivion built a better game. Skyrim was just bad for me, really boring and not interesting.
Oblivion gave the opportunity to discover many cities with day/night cycle, NPC that had homes and were at work during day, the game was incredible when it was released, and I think it's still really good.
Trivia, I never did the story of Morrowind or Oblivion, but yet I spent a lot of time playing them!
The greatest puzzle game I ever played. It's like chess, but actually fun. Moving some mechas on a small tiled board when it's your turn, you must think about everything that will happen and in which order.
The number of mechas and equipment you find in the game make it really replayable, and game sessions can be short so it's always tempting to start yet another run.
My first Yakuza / Like a dragon game, I didn't really know what to expect, and I was happy to discover it!
A Japanese RPG / turn based game featuring the most stupid skills or quests I've ever seen. The story was really engaging, unlocking new jobs / characters leads to more stupidity around.
A super NES classic, and it was possible to play in coop with a friend!
The game had so much content, lot of weapons, of magic, of monsters, the soundtrack is just incredible all along. And even more, at some point in the game you have the opportunity to move from your current location by riding a dragon in a 3D view over the planet!
At the moment, it's the best RPG I played, and it's turn based like how I like them.
I'd have added Neverwinter Night, but BG3 does better than it in every way, so I retained BG3 instead.
Every new game could be played a lot differently than the previous one, there are so many possibilities out there, it's quite the next level of RPG compared to what we had before.
After hesitating between Factorio and Dyson Sphere Program in the list, I chose to retain Factorio, because DSP is really good, but I can't see myself starting it again and again like Factorio. DSP has a very very slow beginning, while Factorio provides fun much faster.
Factorio invented a new genre of game: automation. I get crazy with automation, optimization. It's like doing computer stuff in a game, everything is clean, can be calculated, I could stare at conveyor belts transporting stuff like I could stare at Gentoo compilation logs for hours. The game is so deep, you can do crazy things, even more when you get into the logic circuits.
While I finished the game, I'm always up for a new world with some goals, and modding community added a lot of high quality content.
The only issue with this game is that it's hard to stop playing.
While I played Street of Rage 2 a lot more than the 4Th, I think this modern version is just better.
You can play with a friend almost immediately, fun is there, brawling bad guys is pretty cool. The music are good, the character roster is complete, it's just 100% fun to play it again and again.
That's one game I wish I could forget to play it again...
It gave me a truly unique experience as a gamer.
It's an adventure game featuring a time loop of 15 minutes, the only things you acquire in the game is knowledge in your own mind. With that knowledge, you can complete the game in different ways, but first, you need to find clues leading to other clues, leading to some pieces of the whole puzzle.
There are some games I really enjoyed, but for some reasons I haven't been able to put them in the list, could be replayability issues or the nostalgia factor that was too high maybe?
Let me show you a very practical feature of qcow2 virtual disk format, that is available in OpenBSD vmm, allowing you to easily create derived disks from an original image (also called delta disks).
A derived disk image is a new storage file that will inherit all the data from the original file, without modifying the original ever, it's like stacking a new fresh disk on top of the previous one, but all the changes are now written on the new one.
This allows interesting use cases such as using a golden image to provide a base template, like a fresh OpenBSD install, or create a temporary disks to try changes without harming to original file (and without having to backup a potentially huge file).
This is NOT OpenBSD specific, it's a feature of the qcow2 format, so while this guide is using OpenBSD as an example, this will work wherever qcow2 can be used.
First, you need to have a qcow2 file with something installed in it, let's say you already have a virtual machine with its storage file /var/lib/vmm/alpine.qcow2.
We will create a derived file /var/lib/vmm/derived.qcow2 using the vmctl command:
The derived disk will stop working if the original file is modified, so once you make derived disks from a base image, you shouldn't modify the base image.
However, it's possible to merge changes from a derived disk to the base image using the qemu-img command:
The derived images can be useful in some scenarios, if you have an image and want to make some experimentation without making a full backup, just use a derived disk. If you want to provide a golden image as a start like an installed OS, this will work too.
One use case I had was with OpenKuBSD, I had a single OpenBSD install as a base image, each VM had a derived disk as their root but removed and recreated at every boot, but they also had a dedicated disk for /home, this allows me to keep all the VMs clean, and I just have a single system to manage.
Merging multiple PDFs into a single PDF also uses the sub command cat. In the following example, you will concatenate the PDF first.pdf and second.pdf into a merged.pdf result:
pdftk first.pdf second.pdf cat output merged.pdf
Note that they are concatenated in their order in the command line.
Pdftk comes with a very powerful way to rotate PDFs pages. You can specify pages or ranges of pages to rotate, the whole document, or only odd/even pages etc...
If you want to rotate all the pages of a PDF clockwise (east), we need to specify a range 1-end, which means first to last page:
If you want to select even or odd pages, you can add the keyword even or odd between the range and the rotation direction: 1-10oddwest or 2-8eveneast are valid rotations.
If you want to reverse how pages are in your PDF, we can use the special range end-1 which will go through pages from the last to the first one, with the sub command cat this will only recreate a new PDF:
Pdftk have some other commands, most people will need to extract / merge / rotate pages, but take a look at the documentation to learn about all pdftk features.
PDF are usually a pain to work with, but pdftk make it very fast and easy to apply transformation on them. What a great tool :-)
As some may know, I'm an XMPP user, an instant messaging protocol which used to be known as Jabber. My server is running Prosody XMPP server on OpenBSD. Recently, I got more users on my server, and I wanted to improve performance a bit by switching from the internal storage to SQLite.
Actually, prosody comes with a tool to switch from a storage to another, but I found the documentation lacking and on OpenBSD the migration tool isn't packaged (yet?).
The switch to SQLite drastically reduced prosody CPU usage on my small server, and went pain free.
For the migration to be done, you will need a few prerequisites:
know your current storage, which is "internal" by default
know the future storage you want to use
know where prosody stores its files
the migration tool
On OpenBSD, the migration tool can be retrieved by downloading the sources of prosody. If you have the ports tree available, just run make extract in net/prosody and cd into the newly extracted directory. The directory path can be retrieved using make show=WRKSRC.
The migration tool can be found in the subdirectory tools/migration of the sources, the program gmake is required to build the program (it's only replacing a few variables in it, so no worry about a complex setup).
In the migration directory, run gmake, you will obtain the migration tool prosody-migrator.install which is the program you will run for the migration to happen.
In the migration directory, you will find a file migrator.cfg.lua.install, this is a configuration file describing your current prosody deployment and what you want with the migration, it defaults to a conversion from "internal" to "sqlite" which is what most users will want in my opinion.
Make sure the variable data_path in the file refers to /var/prosody which is the default directory on OpenBSD, and check the hosts in the "input" part which describe the current storage. By default, the new storage will be in /var/prosody/prosody.sqlite.
Prosody comes with a migration tool to switch from a storage backend to another, that's very handy when you didn't think about scaling the system correctly at first.
The migrator can also be used to migrate from the server ejabberd to prosody.
Thanks prx for your report about some missing steps!
This means there are 244 MB of memory currently in use, and 158 MB in the swap file.
The cache column displays how much file system data you have cached in memory, this is extremely useful because every time you open a program, this would avoid seeking it on the storage media if it's already in the memory cache, which is way faster. This memory is freed when needed if there are not enough free memory available.
The "free" column only tell you that this ram is completely unused.
The number 733M indicates the total real memory, which includes memory in use that could be freed if required, however if someone find a clearer explanation, I'd be happy to read it.
The command systat is OpenBSD specific, often overlooked but very powerful, it has many displays you can switch to using left/right arrows, each aspect of the system has its own display.
The default display has a "memory totals in (KB)" area about your real, free or virtual memory.
When one looks at OpenBSD memory usage, it's better to understand the various field before reporting a wrong amount, or that OpenBSD uses too much memory. But we have to admit the documentation explaining each field is quite lacking.
It's common knowledge that SSH connections are secure; however, they always had a flaw: when you connect to a remote host for the first time, how can you be sure it's the right one and not a tampered system?
SSH uses what we call TOFU (Trust On First Use), when you connect to a remote server for the first time, you have a key fingerprint displayed, and you are asked if you want to trust it or not. Without any other information, you can either blindly trust it or deny it and not connect. If you trust it, the key's fingerprint is stored locally in the file known_hosts, and if the remote server offers you a different key later, you will be warned and the connection will be forbidden because the server may have been replaced by a malicious one.
Let's try an analogy. It's a bit like if you only had a post-it with, supposedly, your bank phone number on it, but you had no way to verify if it was really your bank on that number. This would be pretty bad. However, using an up-to-date trustable public reverse lookup directory, you could check that the phone number is genuine before calling.
What we can do to improve the TOFU situation is to publish the server's SSH fingerprint over DNS, so when you connect, SSH will try to fetch the fingerprint if it exists and compare it with what the server is offering. This only works if the DNS server uses DNSSEC, which guarantees the DNS answer hasn't been tampered with in the process. It's unlikely that someone would be able to simultaneously hijack your SSH connection to a different server and also craft valid DNSSEC replies.
The setup is really simple, we need to gather the fingerprints of each key (they exist in multiple different crypto) on a server, securely, and publish them as SSHFP DNS entries.
If the server has new keys, you need to update its SSHFP entries.
We will use the tool ssh-keygen which contains a feature to automatically generate the DNS records for the server on which the command is running.
For example, on my server interbus.perso.pw, I will run ssh-keygen -r interbus.perso.pw. to get the records
$ ssh-keygen -r interbus.perso.pw.
interbus.perso.pw. IN SSHFP 1 1 d93504fdcb5a67f09d263d6cbf1fcf59b55c5a03
interbus.perso.pw. IN SSHFP 1 2 1d677b3094170511297579836f5ef8d750dae8c481f464a0d2fb0943ad9f0430
interbus.perso.pw. IN SSHFP 3 1 98350f8a3c4a6d94c8974df82144913fd478efd8
interbus.perso.pw. IN SSHFP 3 2 ec67c81dd11f24f51da9560c53d7e3f21bf37b5436c3fd396ee7611cedf263c0
interbus.perso.pw. IN SSHFP 4 1 cb5039e2d4ece538ebb7517cc4a9bba3c253ef3b
interbus.perso.pw. IN SSHFP 4 2 adbcdfea2aee40345d1f28bc851158ed5a4b009f165ee6aa31cf6b6f62255612
You certainly noted I used an extra dot, this is because they will be used as DNS records, so either:
Use the full domain name with an extra dot to indicate you are not giving a subdomain
Use only the subdomain part, this would be interbus in the example
If you use interbus.perso.pw without the dot, this would be for the domain interbus.perso.pw.perso.pw because it would be treated as a subdomain.
Note that -r arg isn't used for anything but the raw text in the output, this doesn't make ssh-keygen fetch the keys of a remote URL.
Now, just add each of the generated entries in your DNS.
By default, if you connect to my server, you should see this output:
> ssh interbus.perso.pw
The authenticity of host 'interbus.perso.pw (46.23.92.114)' can't be established.
ED25519 key fingerprint is SHA256:rbzf6iruQDRdHyi8hRFY7VpLAJ8WXuaqMc9rb2IlVhI.
This key is not known by any other names
Are you sure you want to continue connecting (yes/no/[fingerprint])?
It's telling you the server isn't known in known_hosts yet, and you have to trust it (or not, but you wouldn't connect).
However, with the option VerifyHostKeyDNS set to yes, the fingerprint will automatically be accepted if the one offered is found in an SSHFP entry.
As I explained earlier, this only works if the DNS answer is valid with regard to DNSSEC, otherwise, the setting "VerifyHostKeyDNS" automatically falls back to "ask", asking you to manually check the DNS SSHFP found and if you want to accept or not.
For example, without a working DNSSEC, the output would look like this:
$ ssh -o VerifyHostKeyDNS=yes interbus.perso.pw
The authenticity of host 'interbus.perso.pw (46.23.92.114)' can't be established.
ED25519 key fingerprint is SHA256:rbzf6iruQDRdHyi8hRFY7VpLAJ8WXuaqMc9rb2IlVhI.
Matching host key fingerprint found in DNS.
This key is not known by any other names
Are you sure you want to continue connecting (yes/no/[fingerprint])?
With a working DNSSEC, you should immediately connect without any TOFU prompt, and the host fingerprint won't be stored in known_hosts.
SSHFP is a simple mechanism to build a chain of trust using an external service to authenticate the server you are connecting to. Another method to authenticate a remote server would be to use an SSH certificate, but I'll keep that one for later.
We saw that VerifyHostKeyDNS is reliable, but doesn't save the fingerprint in the file ~/.ssh/known_hosts, which can be an issue if you need to connect later to the same server if you don't have a working DNSSEC resolver, you would have to trust blindly the server.
However, you could generate the required output from the server to be used by the known_hosts when you have DNSSEC working, so next time, you won't only rely on DNSSEC.
Note that if the server is replaced by another one and its SSHFP records updated accordingly, this will ask you what to do if you have the old keys in known_hosts.
To gather the fingerpints, connect on the remote server, which will be remote-server.local in the example and add the command output to your known_hosts file:
ssh-keyscan localhost 2>/dev/null | sed 's/^localhost/remote-server/'
We omit the .local in the remote-server.local hostname because it's a subdomain of the DNS zone. (thanks Francisco Gaitán for spotting it).
Basically, ssh-keyscan can remotely gather keys, but we want the local keys of the server, then we need to modify its output to replace localhost by the actual server name used to ssh into it.
This article explains a setup I made for our family vacation place, I wanted to turn an old laptop (a Dell Vostro 1500 from 2008) into a retrogaming station. That's actually easy to do, but I wanted to make it "childproof" so it will always work even if we let children alone with the laptop for a moment, that part was way harder.
This is not a tutorial explaining everything from A to Z, but mostly what worked / didn't work from my experimentation.
First step is to pick an operating system. I wanted to use Alpine, with the persistent mode I described last week, this would allow having nothing persistent except the ROMs files. Unfortunately, the packages for Retroarch on Alpine were missing the cores I wanted, so I dropped Alpine. A retroarch core is the library required to emulate a given platform/console.
Then, I wanted to give FreeBSD a try before switching to a more standard Linux system (Alpine uses the libc musl which makes it "non-standard" for my use case). The setup was complicated as FreeBSD barely do anything by itself at install time, but after I got a working desktop, Retroarch had an issue, I couldn't launch any game even though the cores were loaded. I can't explain why this wasn't working, everything seemed fine. On top of this issue, game pad support have been really random, so I gave up.
Finally, I installed Debian 12 using the netinstall ISO, and without installing any desktop and graphical server like X or Wayland, just a bare Debian.
To achieve a more children-proof environment, I decided to run Retroarch directly from a TTY, without a graphical server.
This removes a lot of issues:
no desktop you could lock
no desktop you could log out from
no icons / no menus to move / delete
nothing fancy, just retroarch in full screen
In addition to all the benefits listed above, this also reduces the emulation latency, and makes the system lighter by not having to render through X/Wayland. I had to install the retroarch package and some GL / vulkan / mesa / sdl2 related packages to have it working.
One major painful issue I had was to figure a way to start retroarch in tty1 at boot. Actually, this is really hard, especially since it must start under a dbus session to have all features enabled.
My solution is a hack, but good enough for the use case. I overrode the getty@tty1 service to automatically log in the user, and modified the user ~/.bashrc file to exec retroarch. If retroarch quits, the tty1 would be reset and retroarch started again, and you can't escape it.
I can't describe all the tweaks I did in retroarch, some were for pure enhancement, some for "hardening". Here is a list of things I changed:
pre-configure all the controllers you want to use with the system
disable all menus except the playlists, they automatically group games by support which is fine
set the default core for each playlist, this removes an extra weird step for non-technical users
set a special shortcut to access the quick menu from the controller, something like select+start should be good, this allows to drop/pause a game from the controller
In addition to all of that, there is a lovely kiosk mode. This basically just allow you to password protect all the settings in Retroarch, once you are done with the configuration, enable the kiosk mode, nothing can be changed (except putting a ROM in favorite).
Grub can be a major issue if a children boots up the laptop but press a key at grub time. Just set GRUB_TIMEOUT=0 to disable the menu prompt, it will directly start into Debian.
The computer doesn't need to connect to any network, so I disabled all the services related to network, this reduced the boot time by a few seconds, and will prevent anything weird from happening.
It may be wise to lock the bios, so in case you have children who know how to boot something on a computer, they wouldn't even be able to do that. This also prevent mistakes in the bios, better be careful. Don't lose that password.
If you want your gaming console to have this extra thing that will turn the boring and scary boot process text into something cool, you can use Plymouth.
I found a nice splash screen featuring Optimus head from Transformers while the system is booting, this looks pretty cool! And surely, this will give the system some charm and persona compared to systemd boot process. This delays the boot by a few seconds though.
Retroarch is a fantastic software for emulation, and you can even run it from a TTY for lower latency. Its controller mapping is really smart, you have to configure each controller against some kind of "reference" controller, and then each core will have a map from the reference controller to convert into the console controller you are emulating. This mean you don't have to map your controller for each console, just once.
Doing a children proof kiosk computer wasn't easy, I'm sure there is room for improvement, but I'm happy that I turned a 15 years old laptop into something useful that will bring joy for kids, and memories for adults, without them fearing that the system will be damaged by kids (except physical damage but hey, I won't put the thing in a box).
Now, I have to do some paint job for the laptop behind-the-screen part to look bright and shiny :)
Hi! I've not been very communicative about my week during the Old Computer Challenge v3, the reason is that I failed it. Time for a postmortem (analysis of what happened) to understand the failure!
For the context, the last time I was using a restricted hardware was for the first edition of the challenge two years ago. Last year challenge was about reducing Internet connectivity.
I have to admit, I didn't prepare anything. I thought I could simply limit the requirements on my laptop, either on OpenBSD or openSUSE and enjoy the challenge. It turned out it was more complicated than that.
OpenBSD memory limitation code wasn't working on my system for some reason (I should report this issue)
openSUSE refused to boot with 512 MB of memory under 30 minutes, even by adding swap, and I couldn't log in through GDM once there
I had to figure a backup plan, which turned to be using Alpine Linux installed on a USB memory stick, memory and core number restriction worked out of the box, figuring how to effectively reduce the frequency was hard, but I did it finally.
From this point, I had a non-encrypted Alpine Linux on a poor storage medium. What would I do with this? Nothing much.
It turns out that in 2 years, my requirements evolved a bit. 512 MB wasn't enough to use a web browser with JavaScript, and while I thought it wouldn't be such a big deal, it WAS.
I regularly need to go on some websites, doing it on my non-trusted smartphone is a no-go, so I need a computer, and Firefox on 512 MB just doesn't work. Chromium almost work, but it depends on the page, and WebKit browser often didn't work well enough.
Here is a sample of websites I needed to visit:
OVH web console
Patreon web page
Bank service
Some online store
Mastodon (I have such a huge flow that CLI tools doesn't work well for me)
Kanban tool
Deepl for translation
Replying to people on some open source project Discourse forums
Managing stuff in GitHub (gh tool isn't always on-par with the web interface)
For this reason, I often had to use my "work" computer to do the tasks, and ended up inadvertently continuing on this computer :(
In addition to web browsing, some programs like LanguageTool (a java GUI spellcheck program) required too much memory to be started, so I couldn't even spell check my blog posts (Aspell is not as complete as LanguageTool).
At first when I thought about the rules for the 3rd edition, the CPU frequency seemed to be the worst part. In practice, the system was almost swapping continuously but wasn't CPU bound. Hardware acceleration was fast enough to play videos smoothly.
If you can make good use of the 512 MB of memory, you certainly won't have CPU problems.
This is not related to the challenge itself, but I felt a bit stuck with my untrusted Alpine Linux, I have some ssh / GPG keys that are secured on two systems and my passwords, I almost can't do anything without them, and I didn't want to take the risk of compromising my security chain for the challenge.
In fact, since I started using Qubes OS, I started being reluctant to mix all my data on a single system, even the other one I'm used to being working with (which has all the credentials too), but Qubes OS is the anti-oldcomputerchallenge as you need to throw the more hardware you can to make it useful.
However, the challenge wasn't such a complete failure for me. While I can't say I played by the rules, it definitely helped me to realize the changes in my computer use over the last years. This was the point when I started the "offline laptop" project three years ago, which transformed into the old computer challenge the year after.
I tried to use less the computer as I wasn't able to fulfill the challenge requirements, and did some stuff IRL at home and outside, the week went SUPER FAST, I was astonished to realize it's already over. This also forced me to look for solutions, so I spent *a LOT* of time trying to make Firefox fit in 512 MB, TLDR it didn't work.
The LEAST memory I'd need nowadays is 1 GB of memory, it's still not much compared to what we have nowadays (my main system has 32 GB), but it's twice the first requirements I've set.
It seems everyone had a nice week with the challenge, I'm very happy to see the community enjoying this every year. I may not be the challenge paragon for this year, but it was useful to me, and since then I couldn't stop thinking about how to improve my computer usage.
In this guide, I'd like to share with you how to install Alpine Linux, so it runs entirely from RAM, but using its built-in tool to handle persistency. Perfect setup for a NAS or router, so you don't waste a disk for the system, and this can even be used for a workstation.
Basically, we want to get the Alpine installer on a writable disk formatted in FAT instead of a read only image like official installers, then we will use the command lbu to handle persistency, and we will see what need to be configured to have a working system.
This is only a list of steps, they will be detailed later:
boot from an Alpine Installer (if you are using Alpine, you don't need too)
format an usb memory drive with an ESP partition and make it bootable
run setup-bootloader to copy the bootloader from the installer to the freshly formatted drive
reboot on the usb drive
run setup-alpine
you are on your new Alpine system
run lbu commit to make changes persistent across reboot
For this step you have to download an Alpine Linux installer, take the one that suits your needs, if unsure, take the "Extended" one. Don't forget to verify the file checksum.
Once you have the ISO file, create the installation media:
In this step, we will need to boot on the Alpine installer to create a new Alpine installer, but writable.
You need another USB media for this step, the one that will keep your system and data.
On Alpine Linux, you can use setup-alpine to configure your network, key map and a few things for the current system. You only have to say "none" when you are asked what you want to install, where, and if you want to store the configuration somewhere.
Run the following commands on the destination USB drive (networking is required to install a package), this will format it and use all the space as a FAT32 partition. In the example below, the drive is /dev/sdc.
This creates a GPT table on /dev/sdc, then creates a first partition as FAT32 from the first megabyte up to the full disk size, and finally marks it bootable. This guide is only for UEFI compatible systems.
We actually have to format the drive as FAT32, otherwise it's just a partition type without a way to mount it as FAT32:
mkfs.vfat /dev/sdc1
modprobe vfat
Final step, we use an Alpine tool to copy the bootloader from the installer to our new disk. In the example below, your installer may be /media/usb and the destination /dev/sdc1, you could figure the first one using mount.
setup-bootable /media/usb /dev/sdc1
At this step, you made a USB disk in FAT32 containing the Alpine Linux installer you were using live. Reboot on the new one.
On your new installation media, run setup-alpine as if you were installing Alpine Linux, but answer "none" when you are asked which disk you want to use. When asked "Enter where to store configs", you should be prompted your new device by default, accept. Immediately, after, you will be prompted for an APK cache, accept.
At this point, we can say Alpine is installed! Don't reboot yet, you are already on your new system!
Just use it, and run lbu commit when you need to save changes done to packages or /etc/. lbu commit creates a new tarball in your USB disk containing a list of files configured in /etc/apk/protected_paths.d/, and this tarball is loaded at boot time, and will install your package list quickly from the local cache.
Please take extra care that if you include more files, everything you commit the changes, they have to be stored on your USB media. You could modify the fstab to add an extra disk/partition for persistent data on a performant drive.
The kernel can't be upgraded using apk, you have to use the script update-kernel that will create a "modloop" file in the boot partition which contains the boot image. You can't rollback this file.
You will need a few gigabytes in your in-memory filesystem, or use a temporary build directory by affecting TMPDIR variable to a persistent storage.
By default, tmpfs on root is set to 1 GB, this can be increased given you have enough memory using the command: mount -o remount,size=6G /.
The script should have the boot directory as a parameter, so it should look like update-kernel /media/usb/boot in a default setup, if you use an external partition, this would look like env TMPDIR=/mnt/something/ update-kernel /media/usb/boot.
By default, lbu will only keep the last version you save, by settingBACKUP_LIMIT to a number n, you will always have the last n versions of your system stored in the boot media, this is practical if you want to roll back a change.
This mean your system may have troubles if you use it on a different computer or that you plug another USB disk in it. Fix by using the UUID of your partition, you can find it using the program blkid from the eponym package, and fix the fstab like this:
If you added a user during setup-alpine, its home directory has been automatically added to /etc/apk/protected_paths.d/lbu.list, when you run lbu commit, its whole home is stored. This may not be desired.
If you don't want to save the whole home directory, but only a selection of files/directories, here is how to proceed:
edit /etc/apk/protected_paths.d/lbu.list to remove the line adding your user directory
you need to create the user directory at boot with the correct permissions: echo "install -d -o solene -g solene -m 700 /home/solene" | doas tee /etc/local.d/00-user.start
in case you have some persistency set at least one user sub directories, it's important to fix the permissions of all the user data after the boot: echo "chown -R solene:solene /home/solene | doas tee -a /etc/local.d/00-user.start
you need to mark this script as executable: doas chmod +x /etc/local.d/00-user.start
you need to run the local scripts at boot time: doas rc-update add local
save the changes: doas lbu commit
I'd recommend the use of a directory named Persist and adding it to the lbu list. Doing so, you have a place to store some important data without having to save all your home directory (including garbage such as cache). This is even nicer if you use ecryptfs as explained below.
Because Alpine Linux is packaged in a minimalistic manner, you may have to install a lot of extra packages to have all the fonts, icons, emojis, cursors etc... working correctly as you would expect for a standard Linux desktop.
Fortunately, there is a community guide explaining each section you may want to configure.
Alpine insists of you using a qwerty desktop for X until you log into your session, this can be complicated to type passwords.
You can create a file /etc/X11/xorg.conf.d/00-keyboard.conf like in the linked example and choose your default keyboard layout. You will have to create the directories /etc/X11/xorg.conf.d first.
You could use ecryptfs to either encrypt the home partition of your user, or just give it a Private directory that could be unlocked on demand AND made persistent without pulling all the user files at every configuration commit.
$ doas apk add ecryptfs-utils
$ doas modprobe ecryptfs
$ ecryptfs-setup-private
Enter your login passphrase [solene]:
Enter your mount passphrase [leave blank to generate one]:
[...]
$ doas lbu add $HOME/.Private
$ doas lbu add $HOME/.ecryptfs
$ echo "install -d -o solene -g solene -m 700 /home/solene/Private" | doas tee /etc/local.d/50-ecryptfs.start
$ doas chmod +x /etc/local.d/50-ecryptfs.start
$ doas rc-update add local
$ doas lbu commit
Now, when you need to access your private directory, run ecryptfs-mount-private and you have your $HOME/Private directory which is encrypted.
You could use ecryptfs to encrypt the whole user directory, this requires extra steps and changes into /etc/pam.d/base-auth, don't forget to add /home/.ecryptfs to the lbu include list.
Let's be clear, this setup isn't secure! The weak part is the boot media, which doesn't use secure boot, could easily be modified, and has nothing encrypted (except the local backups, but NOT BY DEFAULT).
However, once the system has booted, if you remove the boot media, nothing can be damaged as everything lives in memory, but you should still use passwords for your users.
Alpine is a very good platform for this kind of setup, and they provide all the tools out of the box! It's a very fun setup to play with.
Don't forget that by default everything runs from memory without persistency, so be careful if you generate data you don't want to lose (passwords, downloads, etc...).
The lbu configuration can be encrypted, this is recommended if you plan to carry your disk around, especially if it contains sensitive data.
You can use the fat32 partition only for the bootloader and the local backup files, but you could have an extra partition that could be mounted for /home or something, and why not a layer of LUKS for encryption.
You may want to use zram if you are tight on memory, this creates a compressed block device that could be used for swap, it's basically compressed RAM, it's very efficient but less useful if you have a slow CPU.
If you reach this page, you may be interested into this new category of Linux distributions labeled "immutable".
In this category, one can find by age (oldest → youngest) NixOS, Guix, Endless OS, Fedora Silverblue, OpenSUSE MicroOS, Vanilla OS and many new to come.
I will give examples of immutability implementation, then detail my thoughts about immutability, and why I think this naming can be misleading. I spent a few months running all of those distributions on my main computers (NAS, Gaming, laptop, workstation) to be able to write this text.
The word immutability itself refers to an object that can't change.
However, when it comes to an immutable operating system, the definition immediately become vague. What would be an operating system that can't change? What would you be supposed to do with it?
We could say that a Linux LIVE-CD is immutable, because every time you boot it, you get the exact same programs running, and you can't change anything as the disk media is read only. But while the LIVE-CD is running, you can make changes to it, you can create files and directories, install packages, it's not stuck in an immutable state.
Unfortunately, this example was nice but the immutability approach by those Linux distribution is totally different, so we need to think a bit further.
There are three common principles in these systems:
system upgrades aren't done on the live system
packages changes are applied on the next boot
you can roll back a change
Depending on the implementation, a system may offer more features. But this list is what a Linux distribution should have to be labelled "immutable" at the moment.
In this section, I'm mixing NixOS and Guix as they both rely on the same implementation. NixOS is based on Nix (first appearance in 2003), which has been forked into early 2010s into the Guix package manager to be 100% libre, which gave birth to an eponym operating system also 100% free.
These two systems are really different than a traditional Unix like system we are used to, and immutability is a main principle. To make it quick, they are based on their package manager (being Nix or Guix) that contains every package or built file into a special read-only directory (where only the package manager can write) where each package has its own unique entry, and the operating system itself is a byproduct of the package manager.
What does that imply? If the operating system is built, this is because it's made of source code, you literally describe what you want your system to be in a declarative way. You have to list users, their shells, installed packages, running services and their configurations, partitions to mount with which options etc... Fortunately, it's made a lot easier by the use of modules which provide sane defaults, so if you create a user, you don't have to specify its UID, GID, shell, home etc...
So, as the system is built and stored in the special read-only directory, all your system is derived from that (using symbolic links), so all the files handled by the package manager are read-only. A concrete example is that /etc/fstab or /bin/sh ARE read-only, if you want to make a change in those, you have to do it through the package manager.
I'm not going into details, because this store based package manager is really different than everything else but:
you can switch between two configurations on the fly as it's just a symlink dance to go from a configuration to another
you can select your configuration at boot time, so you can roll back to a previous version if something is wrong
you can't make change to a package file or system file as they are read only
the mount points except the special store directory are all mutable, so you can write changes in /home or /etc or /var etc... You can remove the system symlinks by a modified version, but you can't modify the symlink source itself.
This is the immutability as seen through the Nix lens.
I've spent a few years running NixOS systems, this is really a blast for me, and the best "immutable" implementation around, but unfortunately it's too different, so its adoption rate is very low, despite all the benefits.
While this one is not the oldest immutable OS around, it's the first one to be released for the average user, while NixOS and Guix are older but for a niche user category. The company behind Endless OS is trying to offer a solid and reliable system, free and open source, that can works without Internet, to be used in countries with a low Internet / powergrid coverage. They even provide a version with "offline internet included" containing Wikipedia dumps, class lessons and many things to make a computer useful while offline (I love their work).
Endless OS is based on Debian, but uses the OSTree tool to make it immutable. OSTree allows you to manage a core system image, and add layers on top of it, think of packages as layers. But it can also prepare a new system image for the next boot.
With OSTree, you can apply package changes in a new version of the system that will be available at next boot, and revert to a previous version at boot time.
The partitions are mounted writable, except for /usr, the land of packages handled by OSTree, which is mounted read-only. There are no rollbacks possible for /etc.
Programs meant to be for the user (not the packages to be used by the system like grub, X display or drivers) are installed from Flatpak (which also uses OSTree, but unrelated to the system), this avoids the need to reboot each time you install a new package.
My experience with Endless OS is mixed, it is an excellent and solid operating system, it's working well, never failed, but I'm just not the target audience. They provide a modified GNOME desktop that looks like a smartphone menu, because this is what most non-tech users are comfortable with (but I hate it). And installing DevOps tools isn't practical but not impossible, so I keep Endless OS for my multimedia netbook and I really enjoy it.
This linux distribution is the long descendant of Project Atomic, an old initiative to make Fedora / CentOS/ RHEL immutable. It's now part of the Fedora releases along with Fedora Workstation.
Fedora Silverblue is also using OSTree, but with a twist. It's using rpm-OSTree, a tool built on top of OSTree to let your RPM packages apply the changes through OSTree.
The system consists of a single core image for the release, let's say fedora-40, and for each package installed, a new layer is added on top of the core. At anytime, you can list all the layers to know what packages have been installed on top of the core, if you remove a package, the whole stack is generated again (which is terribly SLOW) without the package, there is absolutely no leftover after a package removal.
On boot, you can choose an older version of the system, in case something broke after an upgrade. If you install a package, you need to reboot to have it available as the change isn't applied on the current booted system, however rpm-OSTree received a nice upgrade, you can temporarily merge the changes of the next boot into the live system (using a tmpfs overlay) to use the changes.
The mountpount management is a bit different, everything is read-only except /etc/, /root and /var, but your home directory is by default in /var/home which sometimes breaks expectations. There are no rollbacks possible for /etc as it is not managed by rpm-ostree. A nice surprise was to discover that /usr/local/ was a symbolic link to a directory in /var/, allowing to easily inject custom changes without going through a rpm file.
As installing a new package is slow due to rpm-OSTree and requires a reboot to be fully usable (the live change back port store the extra changes in memory), they recommend to use Flatpak for programs, or toolbox, some kind of wrapper that create a rootless fedora container where you can install packages and use it in your terminal. toolbox is meant to provide development libraries or tool you wouldn't have in Flatpak, but that you wouldn't want to install in your base Fedora system.
My experience with Fedora Silverblue has been quite good, it's stable, the updates are smooth even if they are slow. toolbox was working fine, but using it is an habit to learn.
This spin of OpenSUSE Tumbleweed (rolling-release OpenSUSE) features immutability, but with its own implementation. The idea of MicroOS / Aeon is really simple, the whole system except a few directories like /home or /var lives on a btrfs snapshot, if you want to make a change to the system, the current snapshot is forked into a new snapshot, and the changes are applied there, ready for the next boot.
What's interesting here is that /etc IS part of the snapshots, and can be roll backed, which wasn't possible in the OSTree based systems. It's also possible to make changes to any file of the file system (in a new snapshot, not the live one) using a shell, which can be very practical for injecting files to solve a driver issue. The downside it's not guaranteed that your system is "pure" if you start making changes, because they won't be tracked, the snapshots are just numbered, and you don't know what changes were made in each of them.
Changes must be done through the command transactional-update which do all the snapshot work for you, and you could either manipulate package by adding/removing a package, or just start a shell in the new snapshot to make all the changes you want. I said /etc is part of the snapshots, it's true, but it's never read-only, so you could make a change live in /etc, then create a new snapshot, the change would be immediately inherited. This can create troubles if you roll back to a previous state after an upgrade if you also made changes to /etc just before.
The default approach of MicroOS is disturbing at first, a reboot is planned every day after a system update, this is because it's a rolling-release system and there are updates every day, and you won't benefit from them until you reboot. While you can disable this automatic reboot, it makes sense to use the newest packages anyway, so it's something to consider if you plan to use MicroOS.
There is currently no way to apply the changes into the live system (like Silverblue is offering), it's still experimental, but I'm confident this will be doable soon. As such, it's recommended to use distrobox to use rootless containers of various distributions to install your favorite tools for your users, instead of using the base system packages. I don't really like this because this adds maintenance, and I often had issues of distrobox refusing to start a container after a reboot, I had to destroy and recreate it entirely to solve.
My experience with OpenSUSE MicroOS has been wonderful, it's in dual-boot with OpenBSD on my main laptop, it's my Linux Gaming OS, and it's also my NAS operating system, so I don't have to care about updates. I like that the snapshots system doesn't restrict me, while OSTree systems just doesn't allow you to make changes without installing a package.
Finally, the really new (but mature enough to be usable) system in the immutable family is Vanilla OS based on Ubuntu (but soon on Debian), using ABroot for immutability. With Vanilla OS, we have another implementation that really differs from what we saw above.
ABroot named is well thought, the idea is to have a root partition A, another root partition B, and a partition for persistent data like /home or /var.
Here is the boot dance done by ABroot:
first boot is done on A, it's mounted in read-only
changes to the system like new packages or file changes in /etc are done on B (and can be applied live using a tmpfs overlay)
upon reboot, if previous boot was A, you boot on B, then if the boot is successful, ABroot scan for all the changes between A and B, and apply all the changes from B to A
when you are using your system, until you make a change, A and B are always identical
This implementation has downsides, you can only roll back a change until you boot on the new version, then the changes are also applied on the previous boot, and you can't roll back. This implementation mostly protects you from a failing upgrade, or if you made changes and tried them live, but you prefer to rollback.
Vanilla OS features the package manager apx, written by distrobox author. That's for sure an interesting piece of software, allowing your non-root user to install packages from many distributions (arch linux, fedora, ubuntu, nix, etc...) and integrates them into the system as if they were installed locally. I suppose it's some kind of layer on top of distrobox.
My experience wasn't very good, I didn't find ABroot to be really useful, and the version 22.10 I tried was using an old Ubuntu LTS release which didn't make my gaming computer really happy. The overall state of Vanilla OS, ABroot and apx is that they are young, I think it can become a great distribution, but it still has some rough edges.
I don't want to go much into details, but here is the short version: you can use Alpine Linux installer as a base system to boot from, and create tarballs of "saved configurations" that are automatically applied upon boot (it's just tarred directories and some automation to install packages). At every boot, everything is untarred again, and packages are installed again (you should use an apk cache directory), everything in live memory, fully writable.
What does this achieve? You always start from a clean state, changes are applied on top of it at every boot, you can roll back the changes and start fresh again. Immutability as we defined above here isn't achieved because changes are applied on the base system, but it's quite close to fulfill (my own) requirements.
I've been using it a few days only, not as my main system, and it requires a very good understanding of what you are doing because the system is fully in memory, and you need to take care about what you want to save/restore, which can create big archives.
Now I gave some details about all the major immutable systems (Linux based) around, I think it's time to list the real pros and cons I found from my experimentation.
configuration management tool (ansible, salt, puppet etc..) integrate VERY badly, they received updates to know how to apply package changes, but you will mostly hit walls if you want to manage those like regular systems.
having to reboot after a change is annoying (except for NixOS and Guix which don't require rebooting for each change).
OSTree based systems aren't flexible, my netbook requires some extra files in alsa directories to get sound (fortunately Endless OS have them!), you just can't add the files without making a package deploying them.
blind rollbacks, it's hard to figure what was done in each version of the system, so when you roll back it's hard to figure what you are doing exactly.
it can be hard to install programs like Nix/Guix which require a directory at the root of the file system, or install non-packaged software system-wide (this is often bad practice, but sometimes a necessary evil).
immutability is a lie, many parts of the systems are mutable, although I don't know how to describe this family with a different word (transactional something?).
immutable doesn't imply stateless.
NixOS / Guix are doing it right in my opinion, you can track your whole system through a reliable package manager, and you can use a version control system on the sources, it has the right philosophy from the ground up.
immutability is often associated with security benefits, I don't understand why. If someone obtains root access on your system, they can still manipulate the live system and have fun with the /boot partition, nothing prevent them to install a backdoor for the next boot.
immutability requires discipline and maintenance, because you have to care about the versioning, you have extra programs like apx / distrobox / devbox that must be updated in parallel of the system (while this is all integrated into NixOS/Guix).
Immutable operating systems are making the news in our small community of open source systems, but behind this word lies various implementations with different use cases. The word immutable certainly creates expectations from users, but it's really nothing more than transactional updates for your operating system, and I'm happy we can have this feature now.
But transactional updates aren't new, I think it started a while ago with Solaris and ZFS allowing you to select a system snapshot at boot time, then I'm quite sure FreeBSD implemented this a decade ago, and it turns out that on any linux distribution with regular btrfs snapshots you could select a snapshot at boot time.
In the end, what's REALLY new is the ability to apply a transactional change on a non-live environment, integrates this into the bootloader, and give the user the tooling to handle this easily.
For Qubes OS, the simplest way to proceed is to use the qube sys-net (which is UNTRUSTED) to proceed with the scanner operations. Scanning in it isn't less secure than having a dedicated qube as the network traffic isn't encrypted toward the scanner, this also ease a lot the network setup.
All the instructions below will be done in sys-net, with the root user.
Note that sys-net should be either an AppVM with persistent /home or a fully disposable system, so you will have to do all the commands every time you need your scanner. If you need it really often (I use mine once in a while), you may want to automate this in the template used by sys-net.
We need to install the program sane-airscan used to discover network scanners, and also all the backends/drivers for devices. On Fedora, this can be done using the following command, the package list may differ for other systems.
Make sure the service avahi-daemon is installed and running, the default Qubes OS templates have it, but not running. It is required for network devices discovery.
# systemctl start avahi-daemon
An extra step is required, avahi requires the port UDP/5353 to be opened on the system to receive discovery replies, if you don't do that, you won't find your network scanner (this is also required for printers).
You need to figure the network interface name of your network, open a console and type ip -4 -br a | grep UP, the first column is the interface name, the lines starting by vif can be discarded. Run the following command, and make sure to replace INTERFACE_NAME by the real name you just found.
You can run the command scanimage as a regular user to use your remote scanner, by default, it selects the first device available, so if you have a single scanner, you don't need to specify its long and complicated name/address.
You can scan and save as a PDF file using this command:
$ scanimage --format pdf > my_document.pdf
On Qubes OS, you can open a file manager in sys-net and right-click on the file to move it to the qube where you want to keep the document.
Using a network scanner is quite easy when it's supported by SANE, but you need direct access to the network because of the avahi discovery requirement, which is not practical when you have a firewall or use virtual machines in sub networks.
Hi! Today, I started the 3rd edition of the Old Computer Challenge. And it's not going well, I didn't prepare a computer before, because I wanted to see how easy it would be.
main computer (Ryzen 5 5600X with 32 GB of memory) running Qubes OS: well, Qubes OS may be the worse OS for that challenge because it needs so much memory as everything is done in virtual machines, just handling USB devices requires 400 MB of memory
main laptop (a t470) running OpenBSD 7.3: for some reasons, the memory limitation isn't working, maybe it's due to the hardware or the 7.3 kernel
main laptop running OpenSUSE MicroOS (in dual boot): reducing the memory to 512MB prevent the system to unlock the LUKS drive!
The thing is that I have some other laptops around, but I'd have to prepare them with full disk encryption and file synchronization to have my passwords, GPG and SSH keys around.
With this challenge, in its first hour, I realized my current workflows don't allow me to use computers with 512 MB of memory, this is quite sad. A solution would be to use the iBook G4 laptop that I've been using since the beginning of the challenges, or my T400 running OpenBSD -current, but they have really old hardware, and the challenge is allowing some more fancy systems.
I'd really like to try Alpine Linux for this challenge, let's wrap something around this idea.
Let me share an installation guide on OpenBSD for a product I like: kanboard. It's a Kanban board written in PHP, it's easy of use, light, effective, the kind of software I like.
While there is a docker image for easy deployment on Linux, there is no guide to install it on OpenBSD. I did it successfuly, including httpd for the web server.
Extract the archive, and move the extracted content into /var/www/htdocs/kanboard; the file /var/www/htdocs/kanboard/cli should exists if you did it correctly.
Now, you need to fix the permissions for a single directory inside the project to allow the web server to write persistent data.
For kanboard, we will need PHP and a few extensions. They can be installed and enabled using the following command: (for the future, 8.2 will be obsolete, adapt to the current PHP version)
pkg_add php-zip--%8.2 php-curl--%8.2 php-zip--%8.2 php-pdo_sqlite--%8.2
for mod in pdo_sqlite opcache gd zip curl
do
  ln -s /etc/php-8.2.sample/${mod}.ini /etc/php-8.2/
done
rcctl enable php82_fpm
rcctl start php82_fpm
Now you have the service php82_fpm (chrooted in /var/www/) ready to be used by httpd.
If you want to use one of the first two methods, you will have to add a few files to the chroot like /bin/sh; you can find accurate and up to date information about the specific changes in the file /usr/local/share/doc/pkg-readms/php-8.2.
Kanboard is a fine piece of software, I really like the kanban workflow to organize. I hope you'll enjoy it as well.
I'd also add that installing software without docker is still a thing, this requires you to know exactly what you need to make it run, and how to configure it, but I'd consider this a security bonus point. Think that it will also have all its dependencies updated along with your system upgrades over time.
When you need to regularly run a program on your workstation that isn't powered 24/7 or even not every day, you can't rely on cronjob for that task.
Fortunately, there is a good old tool for this job (first release June 2000), it's called anacron and it will track when was the last time each configured tasks have been running.
I'll use OpenBSD as an example for the setup, but it's easily adaptable to any other Unix-like system.
The first step is to install the package anacron, this will provide the program /usr/local/sbin/anacron we will use later. You can also read OpenBSD specific setup instructions in /usr/local/share/doc/pkg-readmes/anacron.
Configure root's crontab to run anacron at system boot, we will use the flag -d to not run anacron as a daemon, and -s to run each task in a sequence instead of in parallel.
The crontab entry would look like this:
@reboot /usr/local/sbin/anacron -ds
If your computer is occasionally on for a few days, anacron won't run at all after the boot, so it would make sense to run it daily too just in case:
# at each boot
@reboot /usr/local/sbin/anacron -ds

# at 01h00 if the system is up
0 1 * * * /usr/local/sbin/anacron -ds
Now, you will configure the tasks you want to run, and at which frequency. This is configured in the file /etc/anacrontab using a specific format, different from crontab.
There is a man page named anacrontab for official reference.
The format consists of the following ordered fields:
the frequency in days at which the task should be started
the delay in minutes after which the task should be started
a readable name (used as an internal identifier)
the command to run
I said it before but it's really important to understand, the purpose of anacron is to run daily/weekly/monthly scripts on a system that isn't always on, where cron wouldn't be reliable.
Usually, anacron is started at the system boot and run each task from its anacrontab file, this is why a delay field is useful, you may not want your backup to start immediately upon reboot, while the system is still waiting to have a working network connection.
Some variables can be used like in crontab, the most important are PATH and MAILTO.
Anacron keeps the last run date of each task in the directory /var/spool/anacron/ using the identifier field as a filename, it will contain the last run date in the format YYYYMMDD.
I really like the example provided in the OpenBSD package. By default, OpenBSD has some periodic tasks to run every day, week and month at night, we can use anacron to run those maintenance scripts on our workstations.
If you are an OpenBSD running an OpenSMTP email server, you may want to ban IPs used by bots trying to bruteforce logins. OpenBSD doesn't have fail2ban available in packages, and sshguard isn't extensible enough to support the multiline log format used by OpenSMTP.
Here is a short script that looks for authentication failures in /var/mail/maillog and will add the IPs into the PF table bot after too many failed login.
Write the following content in an executable file, this could be /usr/local/bin/ban_smtpd but this doesn't really matter.
#!/bin/sh

TRIES=10
EXPIRE_DAYS=5

awk -v tries="$TRIES" '
	/ smtp connected / {
    		ips[$6]=substr($9, 9)
	}

	/ smtp authentication / && /result=permfail/ {
    		seen[ips[$6]]++
	}

	END {
    		for(ip in seen) {
        		if(seen[ip] > tries) {
            			print ip
    			}
		}
	}' /var/log/maillog | xargs pfctl -T add -t bot

# if the file exists, remove IPs listed there
if [ -f /etc/mail/ignore.txt ]
then
    cat /etc/mail/ignore.txt | xargs pfctl -T delete -t bot
fi

# remove IPs from the table after $EXPIRE_DAYS days
pfctl -t bot -T expire "$(( 60 * 60 * 24 * $EXPIRE_DAYS ))"
This parses the maillog file, so by default it has a rotation every day, you could adapt the script to your log rotation policy to match what you want, users failing with permfail are banned after some tries, configurable with $TRIES.
I added support for an ignore list, to avoid blocking yourself out, just add IP addresses in /etc/mail/ignore.txt.
Finally, banned IPs are unbanned after 5 days, you can change it using the variable EXPIRE_DAYS.
Now, edit root's crontab, you want to run this script at least every hour, and get a log if it fails.
~ * * * * -sn /usr/local/bin/ban_smtpd
This cron job will run every hour at a random minute (defined each time crond restarts, so it stays consistent for a while). The periodicity may depend on the number of scan your email server receives and also the log size vs the CPU power.
This would be better to have an integrated banning system supporting multiple logfiles / daemons, such as fail2ban, but in the current state it's not possible. This script is simple, fast, extensible and does the job.
Qubes OS is like a meta system emphasizing on security and privacy. You start on an almost empty XFCE interface on a system called dom0 (Xen hypervisor) with no network access: this is your desktop from which you will start virtual machines integrating into dom0 display in order to do what you need to do with your computer.
Virtual Machines in Qubes OS are called qubes, most of the time, you want them to be using a template (Debian or Fedora for the official ones). If you install a program in the template, it will be available in a Qube using that template. When a Qube is set to only have a persistent /home directory, it's called an AppVM. In that case, any change done outside /home will be discarded upon reboot.
By default, the system network devices are assigned to a special Qube named sys-net which is special in that it gets the physical network devices attached to the VM. sys-net purpose is to be disposable and provide network access to the outside to the VM named sys-firewall which will be doing some filtering.
All your qubes using Internet will have to use sys-firewall as their network provider. A practical use case if you want to use a VPN but not globally is to create a sys-vpn Qube (pick the name you want), connect it to the Internet using sys-firewall, and now you can use sys-vpn as the network source for qubes that should use your VPN, it's really effective.
If you need to use an USB device like a microphone and webcam in a Qube, you have a systray app to handle USB pass-through, from the special Qube sys-usb managing the physical USB controllers, to attach the USB device into a Qube. This allows you to plug anything USB into the computer, and if you need to analyze it, you can start a disposable VM and check what's in there.
Efficient VM management due to the use of templates.
Efficient resource usage due to Xen (memory ballooning, para-virtualization).
Built for being secure.
Disposables VMs.
Builtin integration with Tor (using whonix).
Secure copy/paste between VMs.
Security (network is handled by a VM which gets the physical devices attached, hypervisor is not connected).
Practical approach: if you need to run a program you can't trust because you have too (this happens sometimes), you can do that in a disposable VM and not worry.
Easy update management + rollback ability in VMs.
Easy USB pass-through to VMs.
Easy file transfer between VMs.
Incredible VM windows integration into the host.
Qubes-rpc to setup things like split-ssh where the ssh key is stored in an offline VM, with user approval for each use.
Modular networking, I can make a VPN in a VPN and assign it to other VM but not all.
Easily extensible as all templates and VMs are managed by Salt Stack.
I tried Qubes OS early 2022, it felt very complicated and not efficient so I abandoned it only after a few hours. This year, I did want to try again for a longer time, reading documentation, trying to understand everything.
The more I used it, the more I got hooked by the idea, and how clean it was. I basically don't really want to use a different workflow anymore, that's why I'm currently implementing OpenKuBSD to have a similar experience on OpenBSD (even if I don't plan to have as many features as Qubes OS).
My workflow is the following, this doesn't mean it's the best one, but it fits my mindset and the way I want to separate things:
a Qube for web browsing with privacy plugins and Arkenfox user.js, this is what I use to browse websites in general
a Qube for communication: emails, XMPP and Matrix
a Qube for development which contains my projects source code
a Qube for each work client which contains their projects source code
an OpenBSD VM to do ports work (it's not as integrated as the other though)
a Qube without network for the KeePassXC databases (personal and per-client), SSH and GPG keys
a Qube using a VPN for some specific network tasks, it can be connected 24/7 without having all the programs going through the VPN (or without having to write complicated ip rules to use this route only in some case)
disposable VMs at hand to try things
I've configured my system to use split-SSH and split-GPG, so some qubes can request the use of my SSH key in the dom0 GUI, and I have to manually accept that one-time authorization on each use. It may appear annoying, but at least it gives me a visual indicator that the key is requested, from which VM, and it's not automatically approved (I only have to press Enter though).
I'm not afraid of mixing up client work with my personal projects due to different VM use. If I need to make experimentation, I can create a new Qube or use a disposable one, this won't affect my working systems. I always feel dirty and unsafe when I need to run a package manager like npm to build a program in a regular workstation...
Sometimes I want to experiment a new program, but I have no idea if it's safe when installing it manually or with "curl | sudo bash". In a dispoable, I just don't care, everything is destroyed when I close its terminal, and it doesn't contain any information.
What I really like is that when I say I'm using Qubes OS, for real I'm using Fedora, OpenBSD and NixOS in VMs, not "just" Qubes OS.
However, Qubes OS is super bad for multimedia in general. I have a dual boot with a regular Linux if I want to watch videos or use 3D programs (like Stellarium or Blender).
This is a question that seems to pop quite often on the project forum. It's hard to reply because Qubes OS has an important learning curve, it's picky with regard to hardware compatibility and requirements, and the pros/cons weight can differ greatly depending on your usage.
When you want important data to be kept almost physically separated from running programs, it's useful.
When you need to run programs you don't trust, it's useful.
When you prefer to separate contexts to avoid mixing up files / clipboard, like sharing some personal data in your workplace Slack, this can be useful.
When you want to use your computer without having to think about security and privacy, it's really not for you.
When you want to play video games, use 3D programs, benefit from GPU hardware acceleration (for machine learning, video encoding/decoding), this won't work, although with a second GPU you could attach it to a VM, but it requires some time and dedication to get it working fine.
Qubes OS security model relies on a virtualization software (currently XEN), however they are known to regularly have security issues. It can be debated whether virtualization is secure or not.
I think Qubes OS has an unique offer with its compartmentalization paradigm. However, the required mindset and discipline to use it efficiently makes me warn that it's not for everyone, but more for a niche user base.
The security achieved here is relatively higher than in other systems if used correctly, but it really hinders the system usability for many common tasks. What I like most is that Qubes OS gives you the tools to easily solve practical problems like having to run proprietary and untrusted software.
In a previous article, I explained how to use Fossil version control system to version the files you may write in dom0 and sync them against a remote repository.
I figured how to synchronize a git repository between an AppVM and dom0, then from the AppVM it can be synchronized remotely if you want. This can be done using the git feature named bundle, which bundle git artifacts into a single file.
In this setup, you will create a git repository (this could be a clone of a remote repository) in an AppVM called Dev, and you will clone it from there into dom0.
Then, you will learn how to send and receive changes between the AppVM repo and the one in dom0, using git bundle.
The first step is to have git installed in your AppVM and in dom0.
For the sake of simplicity for the guide, the path /tmp/repo/ refers to the git repository location in both dom0 and the AppVM, don't forget to adapt to your setup.
In the AppVM Dev, create a git repository using cd /tmp/ && git init repo. We need a first commit for the setup to work because we can't bundle commits if there is nothing. So, commit at least one file in that repo, if you have no idea, you can write a short README.md file explaining what this repository is for.
In dom0, use the following command:
qvm-run -u user --pass-io Dev "cd /tmp/repo/ && git bundle create - master" > /tmp/git.bundle
cd /tmp/ && git clone -b master /tmp/git.bundle repo
Congratulations, you cloned the repository into dom0 using the bundle file, the path /tmp/git.bundle is important because it's automatically set as URL for the remote named "origin". If you want to manage multiple git repositories this way, you should use a different name for this exchange file for each repo.
Back to the AppVM Dev, run the following command in the git repository, this will configure the bundle file to use for the remote dom0. Like previously, you can pick the name you prefer.
In the script push.sh, git bundle is used to send a bundle file over stdout containing artifacts from the remote AppVM last known commit up to the latest commit in the current repository, hence origin/master..master range. This data is piped into the file /tmp/dom0.bundle in the AppVm, and was configured earlier as a remote for the repository.
Then, the command git pull -r dom0 master is used to fetch the changes from the bundle, and rebase the current repository, exactly like you would do with a "real" remote over the network.
In the script pull.sh, we run the git bundle from within the AppVM Dev to generate on stdout the bundle from the last known state of dom0 up to the latest commit in the branch master, and pipe into the dom0 file /tmp/git.bundle, remember that this file is the remote origin in dom0's clone.
After the bundle creation, a regular git pull -r is used to fetch the changes, and rebase the repository.
I find this setup really elegant, the safe qvm-run is used to exchange static data between dom0 and the AppVM, no network is involved in the process. Now there is no reason to have dom0 configuration file not properly tracked within a version control system :)
Here is a summary of my progress for writing OpenKuBSD. So far, I've had a few blockers but I've been able to find solutions, more or less simple and nice, but overall I'm really excited about how the project is turning out.
As a quick introduction to OpenKuBSD in its current state, it's a program to install on top of OpenBSD, using mostly base system tools.
OpenBSD templates can be created and configured
Kubes (VMs) inherit an OpenBSD template for the disk, except for a dedicated persistent /home, any changes outside of /home will be reset on each boot
Kubes have a nice name like "www.kube" to connect to
NFS storage per Kube in /shared/ , this allows data to be shared with the host, which can then move files between Kubes via the shared directories
Xephyr based compartimentalization for GUI display. Each program run has its own Xephyr server.
Clipboard manipulation tool: a utility for copying the clipboard from one Xephyr to another one. This is a secure way to share the clipboard between Kubes without leakage.
On-demand start and polling for ssh connection, so you don't have to pre-start a Kube before running a program.
Executable /home/openkubsd/rc.local script at boot time to customize an environment at kube level rather than template level
Desktop entry integration: a script is available to create desktop entries to run program X on Kube Y, directly from the menu
The Xephyr trick was hard to figure and implement correctly. Originally, I used ssh -Y which worked fine, and integrated very well with the desktop however:
ssh -Y allows any window to access the X server, meaning any hacked VM could access all other running programs
ssh -X is secure, but super bad: slow, can't have a custom layout, crashes when trying to do access X in some cases. (fun fact, on Fedora, ForwardX11Trusted seems to be set to Yes by default, so ssh -X does ssh -Y!)
Xephyr worked, but running a program in it didn't use the full display, so a window manager was required. But all the tiling window managers I used (to automatically use all the screen) couldn't resize when Xephyr was resized.... except stumpwm!
Stumpwm custom configuration to quit when it has no more window displayed. If you exit your programs then stumpwm quits then Xephyr stops.
I'm really getting satisfied with the current result. It's still far from being ready to ship or feature complete, but I think the foundations are quite cool.
Next steps:
tighten the network access for each Kube using PF (only NAT + host access + prevent spoofing)
allow a Kube to not have NAT (communication would be restricted to the host only for ssh access), this is the most "no network" implementation I can achieve.
allow a Kube to have a NAT from another Kube (to handle a Kube VPN for a specific list of Kubes)
figure how to make a Tor VPN Kube
allow to make disposable Kubes using the Tor VPN Kube network
Mid term steps:
support Alpine Linux (with features matching what OpenBSD Kubes have)
Long term steps:
rewrite all OpenKuBSD shell implementation into a daemon/client model, easier to install, more robust
define a configuration file format to declare all the infrastructure
The project is still in its beginning, but I made important progress over the last two weeks, I may reduce the pace here a bit to get everything stabilized. I started using OpenKuBSD on my own computer, this helps a lot to refine the workflow and see what feature matter, and which design is wrong or correct.
I got an idea today (while taking a shower...) about _partially_ reusing Qubes OS design of using VMs to separate contexts and programs, but doing so on OpenBSD.
To make explanations CLEAR, I won't reimplement Qubes OS entirely on OpenBSD. Qubes OS is an interesting operating system with a very strong focus on security (from a very practical point of view ), but it's in my opinion overkill for most users, and hence not always practical or usable.
In the meantime, I think the core design could be reused and made it easy for users, like we are used to do in OpenBSD.
I like the way Qubes OS allows to separate things and to easily run a program using a VPN without affecting the rest of the system. Using it requires a different mindset, one has to think about data silos, what do I need for which context?
However, I don't really like that Qubes OS has so many opened issues, governance isn't clear, and Xen seems to be creating a lot of troubles with regard to hardware compatibility.
I'm sure I can provide a similar but lighter experience, at the cost of "less" security. My threat model is more preventing data leak in case of a compromised system/software, than protecting my computer from a government secret agency.
After spending two months using "immutables" distributions (openSUSE MicroOS, Vanilla OS, Silverblue), where they all want to you use root-less containers (with podman) through distrobox, I hate that idea, it integrates poorly with the host, it's a nightmare to maintain, can create issues due to different versions of programs altering your user data directory, and that just doesn't bring anything much to the table except allowing users to install software without being root (and without having to reboot on those systems).
Here is a list of features that I think good to implement.
vmd based OpenBSD and Alpine template (installation automated), with the help of qcow2 format for VMs, it's possible to create a disk based on another, a must for using templates
disposable VMs, they are started from the template but using a derived disk of the template, destroyed after use
AppVM, a VM created with a persistent /home, and the rest of the system is inherited from the template using a derived qcow2 from template
VPN VMs that could be used by other VMs as their network source (Tor VPN template should be provided)
Simple configuration file describing your templates, your VMS, packages installed (in templates), and which network source to use for which VM
Installing software in templates will create .desktop files in menus to easily start programs (over ssh -Y)
OpenBSD host should be USABLE (hardware acceleration, network handling, no perf issues)
OpenBSD host should be able to transfer files between VMs using ssh
Audio disabled by default on VMs, sndio could be allowed (by the user in a configuration file) to send the sound to the host
Should work with at least 4 GB of memory (I would like to make just 2 as a requirement if possible)
Some kind of quick diagram explaining relationship of various components. This doesn't show the whole picture because it wouldn't be easy to represent (and I didn't had time to try doing so yet):
HVM support and passthrough, this could be done one day if vmd supports passthrough, but this creates too much problems, and only help security for niche use case I don't want to focus on
USB passthrough, too complex to implement, too niche use case
VM RPC, except for the host being able to copy files from one vm to the other using ssh
An OpenBSD distribution, OpenKuBSD must be installable on top of OpenBSD with the least friction possible, not as a separate system
Hi! It's that time of the year when I announce a new Old Computer Challenge :)
If you don't know about it, it's a weird challenge I've did twice in the past 3 years that consists into limiting my computer performance using old hardware, or by limiting Internet access to 60 minutes a day.
I want this challenge to be accessible. The first one wasn't easy for many because it required to use an old machine, but many readers didn't have a spare old computer (weird right? :P). The second one with Internet time limitation was hard to setup.
This one is a bit back to the roots: let's use a SLOW computer for 7 days. This will be achieved by various means with any hardware:
Limit your computer's CPU to use only 1 core. This can be set in the BIOS most of the time, and on Linux you can use maxcores=1 in the boot command line, on OpenBSD you can use bsd.sp kernel for the duration of the challenge.
Limit your computer's memory to 512 MB of memory (no swap limit). This can be set on Linux using the boot command line mem=512MB. On OpenBSD, this can be achieved a bit similarly by using datasize-max=512M in login.conf for your user's login class.
Set your CPU frequency to the lowest minimum (which is pretty low on modern hardware!). On Linux, use the "powersave" frequency governor, in modern desktop environments the battery widget should offer an easy way to set the governor. On OpenBSD, run apm -L (while apmd service is running). On Windows, in the power settings, set the frequency to minimum.
I got the idea when I remembered a few people reporting these tricks to do the first challenge, like in this report:
Since I'm using Qubes OS, I always faced an issue; I need a proper tracking of the configuration files for my systemthis can be done using Salt as I explained in a previous blog post. But what I really want is a version control system allowing me to synchronize changes to a remote repository (it's absurd to backup dom0 for every change I make to a salt file). So far, git is too complicated to achieve that.
I gave a try with fossil, a tool I like (I wrote about this one too ;) ), and it was surprisingly easy to setup remote access leveraging Qubes'qvm-run.
In this blog post, you will learn how to setup a remote fossil repository, and how to use it from your dom0.
Now, we will clone this remote repository in our dom0, I'm personnally fine with storing such files in /root/ directory.
In the following example, the file my-repo.fossil was created on the machine 10.42.42.200 with the path /home/solene/devel/my-repo.fossil. I'm using the AppVM qubes-devel to connect to the remote host using SSH.
This command clone a remote fossil repository by piping the SSH command through qubes-devel AppVM, allowing fossil to reach the remote host.
Cool fact with fossil's clone command, it keeps the proxy settings, so no further changes are required.
With a Split SSH setup, I'm asked everytime fossil is synchronizing; by default fossil has "autosync" mode enabled, for every commit done the database is synced with the remote repository.
4. Open the repository (reminder about fossil usage) §
As I said, fossil works with repository files. Now you cloned the repository in /root/my-repo.fossil, you could for instance open it in /srv/ to manage all your custom changes to the dom0 salt.
This can be achieved with the following command:
[root@dom0 ~#] cd /srv/
[root@dom0 ~#] fossil open --force /root/my-repo.fossil
The --force flag is needed because we need to open the repository in a non-empty directory.
Finally, I figured a proper way to manage my dom0 files, and my whole host. I'm very happy of this easy and reliable setup, especially since I'm already a fossil user. I don't really enjoy git, so demonstrating alternatives working fine always feel great.
If you want to use Git, I have a hunch that something could be done using git bundle, but this requires some investigation.
Download an ISO file to install OpenBSD, do it from an AppVM. You can use the command cksum -a sha256 install73.iso in the AppVM to generate a checksum to compare with the file SHA256 to be found in the OpenBSD mirror.
In the XFCE menu > Qubes Tools > Create Qubes VM GUI, choose a name, use the type "StandaloneVM (fully persistent)", use "none" as a template and check "Launch settings after creation".
In the "Basic" tab, configure the "system storage max size", that's the storage size OpenBSD will see at installation time. OpenBSD storage management is pretty limited, if you add more space later it will be complicated to grow partitions, so pick something large enough for your task.
Still in the "Basic" tab, you have all the network information, keep them later (you can open the Qube settings after the VM booted) to configure your OpenBSD.
In "Firewall rules" tab, you can set ... firewall rules that happens at Qubes OS level (in the sys-firewall VM).
In the "Devices" tab, you can expose some internal devices to the VM (this is useful for networking VMs).
In the "Advanced" tab, choose the memory to use and the number of CPU. In the "Virtualization" square, choose the mode "HVM" (it should already be selected). Finally, click on "Boot qube from CD-ROM" and pick the downloaded file by choosing the AppVM where it is stored and its path. The VM will directly boot when you validate.
You should get into your working OpenBSD VM with functional network.
Be careful, it doesn't have any specific integration with Qubes OS like the clipboard, USB passthrough etc... However, it's a HVM system, so you could give it an USB controller or a dedicated GPU.
It's perfectly possible to run OpenBSD in Qube OS with very decent performance, the setup is straightforward when you know where to look for the network information (and that the netmask is /8 and not /32 like on Linux).
As a recent Qubes OS user, but also a NixOS user, I want to be able to reproduce my system configuration instead of fiddling with files everywhere by hand and being clueless about what I changed since the installation time.
Fortunately, Qubes OS is managed internally with Salt Stack (it's similar to Ansible if you didn't know about Salt), so we can leverage salt to modify dom0 or Qubes templates/VMs.
In this example, I'll show how to write a simple Salt state files, allowing you to create/modify system files, install packages, add repositories etc...
Everything will happen in dom0, you may want to install your favorite text editor in it. Note that I'm still trying to figure a nice way to have a git repository to handle this configuration, and being able to synchronize it somewhere, but I still can't find a solution I like.
The dom0 salt configuration can be found in /srv/salt/, this is where we will write:
a .top file that is used to associate state files to apply to which hosts
a state file that contain actual instructions to run
Quick extra explanation: there is a directory /srv/pillar/, where you store things named "pillars", see them as metadata you can associate to remote hosts (AppVM / Templates in the Qubes OS case). We won't use pillars in this guide, but if you want to write more advanced configurations, you will surely need them.
On my computer, I added the following piece of configuration to /srv/salt/dom0.sls to automatically assign the USB mouse to dom0 instead of being asked every time, this implements the instructions explained in the documentation link below:
This snippet makes sure that the line sys-usb dom0 allow in the file /etc/qubes-rpc/policy/qubes.InputMouse is present above the line matching ^sys-usb dom0 ask. This is a more reproducible way of adding lines to configuration file than editing by hand.
Now, we need to apply the changes by running salt on dom0:
qubesctl --target dom0 state.apply
You will obtain a list of operations done by salt, with a diff for each task, it will be easy to know if something changed.
Note: state.apply used to be named state.highstate (for people who used salt a while ago, don't be confused, it's the same thing).
Using the same method as above, we will add a match for the fedora templates in the custom top file:
In /srv/salt/custom.top add:
  'fedora-*':
    - globbing: true
    - fedora
This example is slightly different than the one for dom0 where we matched the host named "dom0". As I want my salt files to require the least maintenance possible, I won't write the template name verbatim, but I'd rather use a globbing (this is the name for simpler wildcard like foo*) matching everything starting by fedora-, I currently have fedora-37 and fedora-38 on my computer, so they are both matching.
In order to apply, we can type qubesctl --all state.apply, this will work but it's slow as salt will look for changes in each VM / template (but we only added changes for fedora templates here, so nothing would change except for the fedora templates).
For a faster feedback loop, we can specify one or multiple targets, for me it would be qubesctl --targets fedora-37,fedora-38 state.apply, but it's really a matter of me being impatient.
An interesting setup with Qubes OS is to have your SSH key in a separate VM, and use Qubes OS internal RPC to use the SSH from another VM, with a manual confirmation on each use. However, this setup requires modifying files at multiple places, let's see how to manage everything with salt.
Reusing the file /srv/salt/custom.top created earlier, we add split_ssh_client.sls for some AppVMs that will use the split SSH setup. Note that you should not deploy this state to your Vault, it would self reference for SSH and would prevent the agent to start (been there :P):
Create /srv/salt/split_ssh_client.sls: this will add two files to load the environment variables from /rw/config/rc.local and ~/.bashrc. It's actually easier to separate the bash snippets in separate files and use source, rather than using salt to insert the snippets directly in place where needed.
Now, run qubesctl --all state.apply to configure all your VMs, which are the template, dom0 and the matching AppVMs. If everything went well, you shouldn't have errors when running the command.
Create /srv/salt/default_www.sls with the following content, this will run xdg-settings to set the default browser:
xdg-settings set default-web-browser browser_vm.desktop:
  cmd.run:
    - runas: user
Now, run qubesctl --target fedora-38,dom0 state.apply.
From there, you MUST reboot the VMs that will be configured to use the WWW AppVm as the default browser, they need to have the new file browser_vm.desktop available for xdg-settings to succeed. Run qubesctl --target vault,qubes-communication,qubes-devel state.apply.
Congratulations, now you will have a RPC prompt when an AppVM wants to open a file to ask you if you want to open it in your browsing AppVM.
This method is a powerful way to handle your hosts, and it's ready to use on Qubes OS. Unfortunately, I still need to figure a nicer way to export the custom files written in /srv/salt/ and track the changes properly in a version control system.
Erratum: I found a solution to manage the files :-) stay tuned for the next article.
Recently, OpenBSD package manager received a huge speed boost when updating packages, but it's currently only working in -current due to an issue.
Fortunately, espie@ fixed it for the next release, I tried it and it's safe to fix yourself. It will be available in the 7.4 release, but for 7.3 users, here is how to apply the change.
There is a single file modified, just download the patch and apply it on /usr/libdata/perl5/OpenBSD/PackageRepository/Installed.pm with the command patch.
On -current, there is a single directory to look for packages, but on release for architectures amd64, aarch64, sparc64 and i386, there are two directories: the packages generated for the release, and the packages-stable directory receiving updates during the release lifetime.
The code wasn't working with the two paths case, preventing pkg_add to build a local packages signature to compare the remote signature database in the "quirks" package in order to look for updates. The old behavior was still used, making pkg_add fetching the first dozen kilobytes of each installed packages to compare their signature package by package, while now everything is stored in quirks.
If you have any issue, just revert the patch by adding -R to the patch command, and report the problem TO ME only.
This change is not officially supported for 7.3, so you are on your own if there is an issue, but it's not harmful to do. If you were to have an issue, reporting it to me would help solving it for 7.4 for everyone, but really, it just work without being harmful in the worse case scenario.
I hope you will enjoy this change so you don't have to wait for 7.4. This makes OpenBSD pkg_add feeling a bit more modern, compared to some packages manager that are now almost instant to install/update packages.
As a reed-alert user for monitoring my servers, while using emails works efficiently, I wanted to have more instant notifications for critical issues. I'm also an happy XMPP user, so I looked for a solution to send XMPP messages from a command line.
I will explain how to use the program go-sendxmpp to send messages from a command line, this is a newer drop-in replacement for the old perl sendxmpp that doesn't seem to work anymore.
Following go-sendxmpp documentation, you need go to be installed, and then run go install salsa.debian.org/mdosch/go-sendxmpp@latest to compile the binary in ~/go/bin/go-sendxmpp. Because it's a static binary, you can move it to a directory in $PATH.
If I'm satisfied of it, I'll import go-sendxmpp into the OpenBSD ports tree to make it available as a package for everyone.
Now, your user should be ready to use go-sendxmpp, I recommend always enabling the flag -t to use TLS to connect to the server, but you should really choose an XMPP server providing TLS-only.
The program usage is simple: echo "this is a message for you" | go-sendxmpp dest@remote, and you are done. It's easy to integrate it in shell tasks.
Note that go-sendxmpp allows you to get the password for a command instead of storing it in plain text, this may be more convenient and secure in some scenarios.
Back to reed-alert, using go-sendxmpp is as easy as declaring a new alert type, especially using the email template:
(alert xmpp "echo -n '[%state%] Problem with %function% %date% %params%' | go-sendxmpp user@remote")

;; example of use
(=> xmpp ping :host "dataswamp.org" :desc "Ping to dataswamp.org")
XMPP is a very reliable communication protocol, I'm happy that I found go-sendxmpp, a modern, working and simple way to programmatically send me alerts using XMPP.
I'm still playing with Qubes OS, today I had to figure how to install Nix because I rely on it for some tasks. It turned out to be a rather difficult task for a Qubes beginner like me when not using a fully persistent VM.
Here is how to install Nix in an AppVm (only /home/ is persistent) and some links to the documentation about bind-dirs, an important component of Qubes OS that I didn't know about.
Behind this unfriendly name is a smart framework to customize templates or AppVM. It allows running commands upon VM start, but also make directories explicitly persistent.
The configuration can be done at the local or template level, in our case, we want to create /nix and make it persistent in a single VM, so that when we install nix packages, they will stay after a reboot.
The implementation is rather simple, the persistent directory is under the /rw partition in ext4, which allows mounting subdirectories. So, if the script finds /rw/bind-dirs/nix it will mount this directory on /nix on the root filesystem, making it persistent and without having to copy at start and sync on stop.
A limitation for this setup is that we need to install nix in single user mode, without the daemon. I suppose it should be possible to install Nix with the daemon, but it should be done at the template level as it requires adding users, groups and systemd units (service and socket).
In your AppVM, run the following commands as root:
mkdir -p /rw/config/qubes-bind-dirs.d/
echo "binds+=( '/nix' )" > /rw/config/qubes-bind-dirs.d/50_user.conf
install -d -o user -g user /rw/bind-dirs/nix
This creates an empty directory nix owned by the regular Qubes user named user, and we tell bind-dirs that this directory is persistent.
/!\ It's not clear if it's a bug or a documentation issue, but the creation of /rw/bind-dirs/nix wasn't obvious. Someone already filled a bug about this, and funny enough, they reported it using Nix installation as an example.
Now, reboot your VM, you should have a /nix directory that is owned by your user. This mean it's persistent, and you can confirm that by looking at mount | grep /nix output which should have a line.
Finally, install nix in single user mode, using the official method:
sh <(curl -L https://nixos.org/nix/install) --no-daemon
Now, we need to fix the bash code to load Nix into your environment. The installer modified ~/.bash_profile, but it isn't used when you start a terminal from dom0, it's only used when using a full shell login with bash -l, which doesn't happen on Qubes OS.
Copy the last line of ~/.bash_profile in ~/.bashrc, this should look like that:
if [ -e /home/user/.nix-profile/etc/profile.d/nix.sh ]; then . /home/user/.nix-profile/etc/profile.d/nix.sh; fi # added by Nix installer
Now, open a new shell, you have a working Nix in your environment \o/
You can try it using nix-shell -p hello and run hello. If you reboot, the same command should work immediately without need to download packages again.
Installing Nix in a Qubes OS AppVM is really easy, but you need to know about some advanced features like bind-dirs. This is a powerful feature that will allow me to make lot of fun stuff with Qubes now, and using nix is one of them!
If you plan to use Nix like this in multiple AppVM, you may want to set up a local substituter cache in a dedicated VM, this will make your bandwidth usage a lot more efficient.
If you use Qubes OS, you already know that installed software in templates are available in your XFCE menu for each VM, and can be customized from the Qubes Settings panel.
However, if you want to locally install a software, either by compiling it, or using a tarball, you won't have a application entry in the Qubes Settings, and running this program from dom0 will require using an extra terminal in the VM. But we can actually add the icon/shortcut by creating a file at the right place.
In this example, I'll explain how I made a menu entry for the program DeltaChat, "installed" by downloading an archive containing the binary.
In the VM (with a non-volatile /home) create the file /home/user/.local/share/applications/deltachat.desktop, or in a TemplateVM (if you need to provide this to multiple VMs) in the path /usr/share/applications/deltachat.desktop:
This will create a desktop entry for the program named DeltaChat, with the path to the executable and a few other information. You can add an Icon= attribute with a link toward an image file, I didn't have one for DeltaChat.
Knowing how to create desktop entries is useful, not even on Qubes OS but for general Linux/BSD use. Being able to install custom programs with a launcher in Qubes dom0 is better than starting yet another terminal to run a GUI program from there.
These days, I've been playing a lot with Qubes OS, it has an interesting concept of deploying VMs (using Xen) in a well integrated and transparent manner in order to hardly separate every tasks you need.
By default, you get default environments such as Personal, Work and an offline Vault, plus specials VMs to handle USB proxy, network and firewall. What is cool here is that when you run a program from a VM, only the window is displayed in your window manager (xfce), and not the whole VM desktop.
The cool factor with this project is their take on the real world privacy and security need, allowing users to run what they need to run (proprietary software, random binaries), but still protect them. Its goal is totally different from OpenBSD and Tails. Did I say you can also route a VM network through Tor out of the box? =D
If you want to learn more, you can visit Qubes OS website (or ask if you want me to write about it):
If you know me, you should know I'm really serious about backups. This is incredibly important to have backups.
Qubes OS has a backup tool that can be used out of the box, it just dump the VMs storage into an encrypted file, it's easy but not efficient or practical enough for me.
If you want to learn more about the format used by Qubes OS (and how to open them outside of Qubes OS), they wrote some documentation:
Now, let's see how to store the backups in Restic or Borg in order to have proper backups.
/!\ While both software support deduplication, this doesn't work well in this case because the stored data are compressed + encrypted already, which has a very high entropy (it's hard to find duplicated patterns).
Qubes OS backup tool offers compression and encryption out of the box, but when it comes to the storage location, we can actually use a command to send the backups to the command's stdin, and guess what, both restic and borg support receiving data on their standard input!
I'll demonstrate how to proceed both with restic and borg with a simple example, I recommend to build your own solution on top of it the way you need.
As we are running Qubes OS, I prefer to create a dedicated backup VM using the Fedora template, it will contain the passphrase to the repository and an SSH key for remote backup.
You need to install restic/borg in the template to make it available in that VM.
If you don't know how to install software in a template, it's well documented:
In order to simplify the backup command configuration in the backup tool (it's a single input line), but don't sacrifice on features like pruning, we will write a script on the backup VM doing everything we need.
While I'm using a remote repository in the example, nothing prevents you from using a local/external drive for your backups!
The script usage will be simple enough for most tasks:
./script init to create the repository
./script backup to create the backup
./script list to display snapshots
./script restore $snapshotID to restore a backup, the output file will always be named stdin
Write a script in /home/user/restic.sh in the backup VM, it will allow simple customization of the backup process.
#!/bin/sh

export RESTIC_PASSWORD=mysecretpass

# double // is important to make the path absolute
export RESTIC_REPOSITORY=sftp://solene@10.42.42.150://var/backups/restic_qubes

KEEP_HOURLY=1
KEEP_DAYS=5
KEEP_WEEKS=1
KEEP_MONTHS=1
KEEP_YEARS=0


case "$1" in
    init)
        restic init
        ;;
    list)
    	restic snapshots
    	;;
    restore)
    	restic restore --target . $2
    	;;
    backup)
        cat | restic backup --stdin
        restic forget \
        	--keep-hourly $KEEP_HOURLY \
        	--keep-daily $KEEP_DAYS \
        	--keep-weekly $KEEP_WEEKS \
        	--keep-monthly $KEEP_MONTHS \
        	--keep-yearly $KEEP_YEARS \
        	--prune
        ;;
esac
Obviously, you have to change the password, you can even store it in another file and use the according restic option to load the passphrase from a file (or from a command). Although, Qubes OS backup tool enforces you to encrypt the backup (which will be store in restic), so encrypting the restic repository won't add any more security, but it can add privacy by hiding what's in the repo.
/!\ You need to run the script with the parameter "init" the first time, in order to create the repository:
Write a script in /home/user/borg.sh in the backup VM, it will allow simple customisation of the backup process.
#!/bin/sh

export BORG_PASSPHRASE=mysecretpass
export BORG_REPO=ssh://solene@10.42.42.150/var/solene/borg_qubes

KEEP_HOURLY=1
KEEP_DAYS=5
KEEP_WEEKS=1
KEEP_MONTHS=1
KEEP_YEARS=0

case "$1" in
    init)
        borg init --encryption=repokey
        ;;
    list)
    	borg list
    	;;
    restore)
    	borg extract ::$2
    	;;
    backup)
        cat | borg create ::{now} -
	borg prune \
        	--keep-hourly $KEEP_HOURLY \
        	--keep-daily $KEEP_DAYS \
        	--keep-weekly $KEEP_WEEKS \
        	--keep-monthly $KEEP_MONTHS \
        	--keep-yearly $KEEP_YEARS
        ;;
esac
Same explanation as with restic, you can save the password elsewhere or get it from a command, but Qubes backup already encrypt the data, so the repo encryption will mostly only add privacy.
/!\ You need to run the script with the parameter "init" the first time, in order to create the repository:
While it's nice to have backups, it's important to know how to use them. The setup doesn't add much complexity, and the helper script will ease your life.
On the backup VM, run ./borg.sh list (or the restic version) to display available snapshots in the repository, then use ./borg.sh restore $snap with the second parameter being a snapshot identifier listed in the earlier command.
You will obtain a file named stdin, this is the file to use in Qubes OS restore tool.
If you don't always backup all the VMs, if you keep the retention policy like in the example above, you may lose data.
For example, if you have a KEEP_HOURLY=1, create a backup of all your VMs, and just after, you specifically want to backup a single VM, you will lose the previous full backup due to the retention policy.
In some cases, it may be better to not have any retention policy, or simply time based (keep snapshots which date < n days).
Using this configuration, you get all the features of a industry standard backup solution such as integrity check, retention policy or remote encrypted storage.
In case of an issue with the backup command, Qubes backup will display a popup message with the command output, this helps a lot debugging problems.
An easy way to check if the script works by hand is to run it from the backup VM:
echo test | ./restic.sh backup
This will create a new backup with the data "test" (and prune older backups, so take care!), if it doesn't work this is a simple way to trigger a new backup to solve your issue.
Hi, back on OpenBSD desktop, I miss being able to use my bluetooth headphones (especially the Shokz ones that allow me to listen to music without anything on my ears).
Unfortunately, OpenBSD doesn't have a bluetooth stack, but I have a smartphone (and a few other computers), so why not stream my desktop sound to another device with bluetooh? Let's see what we can do!
I'll often refer to the "monitor" input source, which is the name of an input that provides "what you hear" from your computer.
While it would be easy to just allow a remote device to play music files, I want to stream the computer's monitor input, so it could be litteraly anything, and not just music files.
This method can be used on any Linux distribution, and certainly on other BSDs, but I will only cover OpenBSD.
One simple setup is to use icecast, the program used by most web radios, and ices, a companion program to icecast, in order to stream your monitor input to the network.
The pros:
it works with anything that can read OGG from the network (any serious audio client or web browser can do this)
it's easy to set up
you can have multiple clients at once
secure (icecast is in a chroot, and other components are sending data or playing music)
The cons:
there is a ~10s delay, which prevents you from watching a video on your computer and listening the audio from another device (you could still set 10s offset, but it's not constant)
reencoding happens, which can slightly reduce the sound quality (if you are able to tell the difference)
The default sound server in OpenBSD, namely sndiod, supports network streaming!
Too bad, if you want to use Bluetooth as an output, you would have to run sndiod on Linux (which is perfectly fine), but you can't use Bluetooth with sndiod, even on Linux.
So, no sndiod. Between two OpenBSD, or OpenBSD and Linux, it works perfectly well without latency, and it's a super simple setup, but as Bluetooth can't be used, I won't cover this setup.
This sound server is available as a port on OpenBSD, and has two streaming modes: native-protocol-tcp and RTP, the former is exchanging pulseaudio internal protocol from one server to another which isn't ideal and prone to problems over a bad network, the latter being more efficient and resilient.
However, the RTP sender doesn't work on OpenBSD, and I have no interest in finding out why (the bug doesn't seem to be straightforward), but the native protocol works just fine.
The pros:
almost no latency (may depend of the network and remote hardware)
Snapcast is an amazing piece of software that you can use to broadcast your audio toward multiple other client (using snapcast or a web page) with the twist that the audio will be synchronized on each client, allowing a multi room setup at no cost.
Unfortunately, I've not been able to build it on OpenBSD :(
The pros:
multi room setup with synchronized clients
compatible with almost any client able to display an HTML5 page
On the local OpenBSD, you need to install pulseaudio and ffmpeg packages.
You also need to set sndiod flags, using rcctl set sndiod flags -s default -m play,mon -s mon, this will allow you to use the monitor input through the device snd/0.mon.
Now, when you want to stream your monitor to a remote pulseaudio, run this command in your terminal:
This will load the module accepting network connections, the auth-anonymous option is there to simplify connection to the server, otherwise you would have to share the pulseaudio cookie between computers, which I recommend doing but on a smartphone this can be really cumbersome to do, and out of scope here.
The other option is pretty obvious, just give a list of IPs you want to allow to connect to the server.
If you want the changes to be persistent, edit /etc/pulse/default.pa to add the line load-module module-native-protocol-tcp auth-anonymous=1 auth-ip-acl=192.168.1.0/24.
On Android, you can install pulseaudio using Termux (available on f-droid), using the commands:
There is a project named PulseDroid, the original project has been unmaintained for 13 years, but someone took it back quite recently, unfortunately no APK are provided, and I'm still trying to build it to try, it should provide an easier user experience to run pulseaudio on Android.
Using icecast, you will have to setup an icecast server, and locally use ices2 client to broadcast your monitor input. Then, any client can play the stream URL.
in the <authentication> node, change all the passwords. The only one you will need is the source password used to send the audio to icecast, but set all other passwords to something random.
in the <hostname> node, set the IP or hostname of the computer with icecast.
add a <bind-address> node to <listen-socket> using the example for 127.0.0.1, but use the IP of the icecast server, this will allow other to connect.
Keep in mind this is the bare minimum for a working setup, if you want to open it to the wide Internet, I'd strongly recommend reading icecast documentation before. Using a VPN may be wiser if it's only for private use.
Then, to configure ices2, copy the file /usr/local/share/examples/ices2/ices-sndio.xml somewhere you feel comfortable for storing user configuration files. The example file is an almost working template to send sndio sources to icecast.
Edit the file, under the <instance> node:
modify <hostname> with the hostname used in icecast.
modify <password> with the source password defined earlier.
modify <mount> to something ending in .ogg of your liking, this will be the filename in the URL (can be /stream.ogg if you are out of ideas).
set <yp> to 0, otherwise the stream will appear on the icecast status page (you may want to have it displayed though).
Now, search for <channels> and set it to 2 because we want to broadcast stereo sound, and set <downmix> to 0 because we don't need to merge both channels into a mono output. (If those values aren't in sync, you will have funny results =D)
When you want to broadcast, run the command:
env AUDIORECDEVICE=snd/0.mon ices2 ices-sndio.xml
With any device, open the url http://<hostname>:8000/file.ogg with file.ogg being what you've put in <mount> earlier. And voilà, you have a working local audio streaming!
With these two setup, you have a choice for occasionnaly streaming your audio to another device, which may have bluetooth support or something making it interesting enough to go through the setup.
I'm personally happy to be able to use bluetooth headphones through my smartphone to listen to my OpenBSD desktop sound.
If you want to directly attach bluetooth headphones to your OpenBSD, you can buy an USB dongle that will pair to the headphones and appear as a sound card to OpenBSD.
While I like Alpine because it's lean and minimal, I have always struggled to install it for a desktop computer because of the lack of "meta" packages that install everything.
However, there now is a nice command that just picks your desktop environment of choice and sets everything up for you.
This article is mostly a cheat sheet to help me remember how to install Alpine using a desktop environment, NetworkManager, man pages etc... Because Alpine is still a minimalist distribution and you need to install everything you think is useful.
By default, the installer will ask you to set up networking, but if you want NetworkManager, you need to install it, enable it and disable the other services.
As I prefer to avoid duplication of documentation, please refer to the relevant Wiki page.
By default, Alpine Linux sticks to Long Term Support (LTS) kernels, which is fine, but for newer hardware, you may want to run the latest kernel available.
Fortunately, the Alpine community repository provides the linux-edge package for the latest version.
If you want to keep all the installed packages in cache (so you could keep them for reinstalling, or share on your network), it's super easy.
Run setup-apkcache and choose a location (or even pass it as a parameter), you're done. It's very handy for me because when I need to use Alpine in a VM, i just hook it to my LAN cache and I don't have to download packages again and again.
Alpine Linux is becoming a serious, viable desktop Linux distribution, not just for containers or servers. It's still very minimalist and doesn't hold your hand, so while it's not for everyone, it's becoming accessible to enthusiasts and not just hardcore users.
I suppose it's a nice choice for people who enjoy minimalism and don't like SystemD.
Calendar and contacts syncing, it's something I pushed away for too long, but when I've lost data on my phone and my contacts with it, setting up a local CalDAV/CardDAV server is the first thing I did.
Today, I'll like to show you how to set up the server radicale to have your own server.
On OpenBSD 7.3, the latest version of radicale is radicale 2, available as a package with all the service files required for a quick and efficient setup.
You can install radicale with the following command:
# pkg_add radicale
After installation, you will have to edit the file /etc/radicale/config in order to make a few changes. The syntax looks like INI files with sections between brakets and then key/values on separate lines.
For my setup, I made my radicale server to listen on the IP 10.42.42.42 and port 5232, and I chose to use htpasswd files encrypted in bcrypt to manage users. This was accomplished with the following piece of configuration:
After saving the changes, you need to generate the file /etc/radicale/users to add credentials and password in it, this is done using the command htpasswd.
In order to add the user solene to the file, use the following command:
Now you should be able to reach radicale on the address it's listening, in my example it's http://10.42.42.42:5232/ and use your credentials to log in.
Then, just click on the link "Create new addressbook or calendar", and complete the form.
Back on the index, you will see each item managed by radicale and the URL to access it. When you will configure your devices to use CalDAV and CardDAV, you will need the crendentials and the URL.
Radicale is very lightweight and super easy to configure, and I finally have a proper calendar synchronization on my computers and smartphone, which turned to be very practical.
If you want to setup HTTPS for radicale, you can either use a certificate file and configure radicale to use it, or use a reverse http proxy such as nginx and handle the certificate there.
As the owner of a Steam Deck (a handeld PC gaming device), I wanted to explore alternatives to the pre-installed SteamOS you can find on it. Fortunately, this machine is a plain PC with UEFI Firmware allowing you to boot whatever you want.
It's like a Nintendo Switch, but much bigger. The "deck" is a great name because it's really what it looks like, with two touchpads and four extra buttons behind the deck. By default, it's running SteamOS, an ArchLinux based system working in two modes:
Steam gamepadUI mode with a program named gamescope as a wayland compositor, everything is well integrated like you would expect from a gaming device. Special buttons trigger menus, integration with monitoring tool to view FPS, watts consumption, TDP limits, screen refresh rate....
Desktop mode, using KDE Plasma, and it acts like a regular computer
Unfortunately for me, I don't like ArchLinux and I wanted to understand how the different modes were working, because on Steam, you just have a button menu to switch from Gaming to Desktop, and a desktop icon to switch from desktop to gaming.
Here is a picture I took to compare a Nintendo Switch and a Steam Deck, it's really beefy and huge, but while its weight is higher than the Switch, I prefer how it holds and the buttons' placement.
This project purpose is to reimplement SteamOS the best it can, but only using open source components. They also target alternative devices if you want to have a Steam Deck experience.
My experience wasn't great with it, once installation was done, I had to log in into Steam, and at every reboot it was asking me to log-in again. As the project was mostly providing the same experience based on ArchLinux, I wasn't really interested to look into it further.
This project purpose is to give Steam Deck user (or similar device owners) an OS that would fit the device, it's currently offering a similar experience, but I've read plans to offer alternative UI. On top of that, they integrated a web server to manage emulations ROMS, or Epic Games and GOG installer, instead of having to fiddle with Lutris, minigalaxy or Heroic game launcher to install games from these store.
The project also has many side-projects such as gamescope-session, chimera or forks with custom patches.
This project is truly amazing, it's currently what I'm running on my own devices. Let's use NixOS with some extra patches to run your Deck, and it's just working fine!
Jovian-NixOS (in reference to Neptune, the Deck codename) is a set of configuration to use with NixOS to adapt to the Steam Deck, or any similar handeld device. The installation isn't as smooth as the two other above because you have to install NixOS from console, write a bit of configuration, but the result is great. It's not for everyone though.
Obviously, my experience is very good. I'm in full control of the system, thanks to NixOS declarative approach, no extra services running until I want to, it even makes a great Nix remote builder...
3.4. Plain linux installed like a regular computer §
The first attempt was to install openSUSE on the Deck like I would do on any computer. The experience was correct, installation went well, and I got in GNOME without issues.
However, some things you must know about the Deck:
patches are required on the Linux kernel to have proper fan control, they work out of the box now but the fan curve isn't ideal, like the fan will never stop even under low temperature
in Desktop mode, the controller is seen as a poor mouse with triggers to click, the touchscreen is working, but Linux isn't really ready to be used like a tablet, you need Steam in big picture mode to make the controller useful
many patches here and there (Mesa, mangohud, gamescope) are useful to improve the experience
In order to switch between Desktop and Gaming mode, I found a weird setup that was working for me:
gaming mode is started by automatically log-in my user on tty1 with the user .bashrc checking if running on tty1 and running steam over gamescope
desktop mode is started by setting automatic login in GDM
a script started from a .desktop file that would toggle between gaming and desktop mode. Either by killing gamescope and starting GDM, or by stopping gdm and startin tty1. The .desktop was added to Steam, so from Steam or GNOME I was able to switch to the other. It worked surprisingly well.
I turned out Steam GamepadUI with Gamescope button "Switch to desktop mode" is using a dbus signal to switch to desktop, distributions above handle it correctly.
Although it was mostly working, my main issues were:
No fan curve control because it's not easy to find the kernel patches, and then run the utility to control the fans, my deck was constantly doing some fan noise, and it was irritating
I had no idea how to allow firmware update (OS above support that)
Integration with mangohud was bad, and performance control in Gaming mode wasn't working
Sometimes, XWayland would crash or stay stuck when starting a game from Gaming mode
But, despite these issues, performance was perfectly fine, as well as battery life. But usability should be priority for such a device, and it didn't work very well here.
If you already enjoy your Steam Deck the way it is, I recommend you to stick to SteamOS. It does the job fine, allows you to install programs from Flatpak, and you can also root it if you really need to install system packages.
If you want to do more on your Deck (use it as a server maybe? Who knows), you may find it interesting to get everything under your control.
I'm using syncthing on my Steam Deck and other devices to synchronize GOG/Epic save games, Steam cloud is neat, but with one minute per game to configure syncthing, you have something similar.
Nintendo Switch emulation works fine on Steam Deck, more about that soon :)
Une petite sélection de haikus qui ont été publiés sur Mastodon, cela dit, il ne sont pas toujours bien fichus mais ce sont mes premiers, espérons que l'expérience m'aide à faire mieux par la suite.
Merle qui chasse
Un ciel bleu teinté de blanc
Le thym en fleurs
Plateaux enneigés
Bien au chaud et à l'abri -
Violente tempête
As you may have understood by now, I like efficiency on my systems, especially when it comes to network usage due to my poor slow ADSL internet connection.
Flatpak is nice, I like it for many reasons, and what's cool is that it can download only updated files instead of the whole package again.
Unfortunately, when you start using more and more packages that are updated daily, and which require subsystems like NVIDIA drivers, MESA etc... this adds up to quitea lot of daily downloads, and multiply that by a few computers and you gets a lot of network traffic.
But don't worry, you can cache it on your LAN to download updates only once.
As usual for this kind of job, we will use Nginx on a local server on the network, and configure it to act as a reverse proxy to the flatpak repositories.
This requires modifying the URL of each flatpak repository on the machines, it's a one time operation.
Here is the configuration you need on your Nginx to proxy Flathub:
map $status $cache_header {
    200     "public";
    302     "public";
    default "no-cache";
}

server {
    listen 0.0.0.0:8080; # you may want to listen on port 80, or add TLS
    server_name my-cache.local; # replace this with your hostname, or system IP

    # flathub cache
    set $flathub_cache https://dl.flathub.org;

    location /flathub/ {
        rewrite  ^/flathub/(.*) /$1 break;
        proxy_cache flathub;
        proxy_cache_key     "$request_filename";
        add_header Cache-Control $cache_header always;
        proxy_cache_valid   200 302     300d;
        expires max;
        proxy_pass  $flathub_cache;
    }
}

proxy_cache_path    /var/cache/nginx/flathub/cache levels=1:2
    keys_zone=flathub:5m
    max_size=20g
    inactive=60d
    use_temp_path=off;
This will cause nginx to proxy requests to the flathub server, but keep files in a 20 GB cache.
You will certainly need to create the /var/cache/nginx/flathub directory, and make sure it has the correct ownership for your system configuration.
If you want to support another flatpak repository (like Fedora's), you need to create a new location, and new cache in your nginx config.
Please note that if you add flathub repo, you must use the official URL to have the correct configuration, and then you can change its URL with the above command.
If you use OpenBSD and administrate machines, you may be aware that packages can install new dedicated users and groups, and that if you remove a package doing so, the users/groups won't be deleted, instead, pkg_delete displays instructions about deletion.
In order to keep my OpenBSD systems clean, I wrote a script looking for users and groups that have been installed (they start by the character _), and check if the related package is still installed, if not, it outputs instructions that could be run in a shell to cleanup your system.
Write the content of the script above in a file, mark it executable, and run it from the shell, it should display a list of userdel and groupdel commands for all the extra users and groups.
Smokeping is a Perl daemon that will regularly run a command (fping, some dns check, etc…) multiple times to check the availability of the remote host, but also the quality of the link, including the standard deviation of the response time.
It becomes very easy to know if a remote host is flaky, or if the link where Smokeping runs isn't stable any more when you see that all the remote hosts have connectivity issues.
Let me explain how to install and configure it on OpenBSD 7.2 and 7.3.
Smokeping comes in two parts, but they are in the same package, the daemon components to run it 24/7 to gather metrics, and the fcgi component used to render the website for visualizing data.
First step is to install the smokeping package.
# pkg_add smokeping
The package will also install the file /usr/local/share/doc/pkg-readmes/smokeping giving explanations for the setup. It contains a lot of instructions, from the setup to advanced configuration, but without many explanations if you are new to smokeping.
Once you installed the package, the first step is to configure smokeping by editing the file /etc/smokeping/config as root.
Under the *** General *** section, you can change the variables owner and contact, this information is displayed on Smokeping HTML interface, so if you are in company and some colleague look at the graphs, they can find out who to reach if there is an issue with smokeping or with the links. This is not useful if you use it for yourself.
Under the *** Alerts *** section, you can configure the emails notifications by configuring to and from to match your email address, and a custom address for smokeping emails origin.
Then, under *** Targets *** section, you can configure each host to monitor. The syntax is unusual though.
lines starting with + SomeSingleWord will create a category with attributes and subcategories. Attribute title is used to give a name to it when showing the category, and menu is the name displayed on the sidebar on the website.
lines starting with ++ SomeSingleWord will create a subcategory for a host. Attributes title and menu works the same as the first level, and host is used to define the remote host to monitor, it can be a hostname or an IP address.
That's for the simplest configuration file. It's possible to add new probes such as "SSH Ping", DNS, Telnet or LDAP...
Let me show a simple example of targets configuration I'm using:
*** Targets ***

probe = FPing

menu = Top
title = Network Latency Grapher
remark = Welcome to the SmokePing

+ Remote
menu= Remote
title= Remote hosts

++ Persopw

menu = perso.pw
title = My server perso.pw
host = perso.pw

++ openportspl

menu = openports.pl
title = openports.pl VM at openbsd.amsterdam
host = openports.pl

++ grifonfr

menu = grifon.fr
title = grifon.fr VPN endpoint
host = 89.234.186.37

+ LAN
menu = Lan
title = Lan network at home

++ solaredge

menu = solaredge
title = solardedge
host = 10.42.42.246

++ modem

menu = ispmodem
title = ispmodem
host = 192.168.1.254
Now you configured smokeping, you need to enable the service and run it.
# rcctl enable smokeping
# rcctl start smokeping
If everything is alright, rcctl check smokeping shouldn't fail, if so, you can read /var/log/messages to find why it's failing. Usually, it's a + line that isn't valid because of a non-authorized character or a space.
I recommend to always add a public host of a big platform that is known to be working reliably all the time, to have a comparison point against all your other hosts.
Now the daemon is running, you certainly want to view the graphs produced by Smokeping. Reusing the example from the pkg-readme file, you can configure httpd web server with this:
    server "smokeping.example.org" {
	listen on * port 80
	location "/smokeping/smokeping.cgi*" {
	    fastcgi socket "/run/smokeping.sock"
	    root "/"
	}
    }
Your service will be available at the address http://smokeping.example.org/smokeping/smokeping.cgi.
For this to work, we need to run a separate FCGI server, fortunately packaged as an OpenBSD service.
Note that there is a way to pre-render all the HTML interface by a cron job, but I don't recommend it as it will drain a lot of CPU for nothing, except if you have many users viewing the interface and that they don't need interactive zoom on the graphs.
Smokeping is very effective because of the way it renders data, you can easily spot issues in your network that a simple ping or response time wouldn't catch.
Please note it's better to have two smokeping setup at different places in order to monitor each other remote smokeping link quality. Otherwise, if a remote host appear flaky, you can't entirely be sure if the Internet access of the smokeping is flaky, or if it's the remote host, or a peering issue.
Here is the 10 days graph for a device I have on my LAN but connected to the network using power line networking.
C'est rare, mais ceci est un message de ras-le-bol.
Ayant besoin d'une formation, pour finir les procédures en lignes sur un compte CPF (Compte Formation Professionnelle), j'ai besoin d'avoir une "identité numérique +".
Sur le principe, c'est cool, c'est un moyen de créer un compte en validant l'identité de la personne via une pièce d'identité, jusque là c'est normal et plutot bien pensé.
Ayant libéré mon téléphone Android de Google grâce à LineageOS, j'ai choisi de ne pas installer Google Play pour être 100% dégooglisé, et j'installe mes applications depuis le dépôt F-droid qui couvre tous mes besoins.
Dans ma situation, il existe une solution pour installer des applications (heuresement très rares) nécessaires pour certains services, qui consiste à utiliser "Aurora Store" depuis mon téléphone pour télécharger un APK de Google Play (le fichier d'installation d'application) et l'installer. Pas de soucis, j'ai pu installer le programme de La Poste.
Le problème, c'est que je le lance et j'obtiens ce magnifique message "Erreur, vous devez installer l'application depuis Google Play", et là, je ne peux absolument rien faire d'autre que de quitter l'application.
Et voilà, je suis coincée, l'État m'impose d'utiliser Google pour utiliser ses propres services 🙄, mes solutions sont les suivantes :
installer les services Google sur mon téléphone, et ça me ferait bien mal au coeur car cela va à l'encontre de mes valeurs
installer l'application dans un émulateur Android avec les services Google, c'est absolument pas pratique mais ça résoud le problème
m'asseoir sur l'argent de mon compte de formation (500 € / an)
remonter le problème publiquement en espérant que cela fasse changer quelque chose, au moins que l'on puisse installer l'application sans services Google
Why would you do that in the first place? Well, this would allow me to take time off my job, and spend it either writing on the blog, or by contributing to open source projects, mainly OpenBSD or a bit of nixpkgs.
I've been publishing on the blog for almost 7 years now, for the most recent years, I've been writing a lot here, and I still enjoy doing so! However, I have a less free time now, and I'd prefer to continue writing here instead of working at my job full time. I've been ocasionaly receiving donation for my blog work, but one-shot gifts (I appreciate! :-) ) won't help me much against regular monthly incomes that I can expect, and help me to organize myself with my job.
I chose Patreon because the platform is reliable and offers managing some extras for the people patronizing me.
Let be clear about the advantages:
you will ocasionaly be offered to choose the topic for the blog post I'm writing. I often can't decide what to write about when I look at my pipe of ideas.
you will have access to the new blog posts a few days in advance.
you give me incentive to write better content in order to make you happy of your expenses.
It's hard for me to frame exactly what I'll be working on. I include the OpenBSD webzine as an extension of the blog, and sometimes ports work too because I'm writing about a program, I go down the rabbit-hole of updating it, and then there is a whole story to tell.
To conclude, let me thank you if you plan to support me financially, every bit will help, even small sponsors. I'm really motivated by this, I want to promote community driven open source projects such as OpenBSD, but I also want to cover a topic that matters a lot to me which is old hardware reuse. I highlighted this with the old computer challenge, but this is also the core of all my self-hosting articles and what drives me when using computers.
In this article, I'd like to share with you about the Linux specific feature ecryptfs, which allows users to have encrypted directories.
While disk encryption done with cryptsetup/LUKS is very performant and secure, there are some edge cases in which you may want to use ecryptfs, whether the disk is LUKS encrypted or not.
I've been able to identify a few use cases making ecryptfs relevant:
a multi-user system, people want their files to be private (and full disk encryption wouldn't help here)
an encrypted disk on which you want to have an encrypted directory that is only available when needed (preventing a hacked live computer to leak important files)
a non-encrypted disk on which you want to have an encrypted directory/$HOME instead of reinstalling with full disk encryption
In this configuration, you want all the files in the $HOME directory of your user to be encrypted. This works well and especially as it integrates with PAM (the "login manager" in Linux) so it unlocks the files upon login.
I tried the following setup on Gentoo Linux, the setup is quite standard for any Linux distribution packaging ecryptfs-utils.
In this configuration, you will have ecryptfs encrypting a single directory named Private in the home directory.
That can be useful if you already have an encrypted disk, but you have very secret files that must be encrypted when you don't need them, this will protect file leak on a compromised running system, except if you unlock the directory while the system is compromised.
This can also be used on a thrashable system (like my netbook) that isn't encrypted, but I may want to save a few files there that are private.
install a package named ecryptfs-utils (may depend on your distribution)
run ecryptfs-setup-private --noautomount
Type your login password
Press enter to use an auto generated mount passphrase (you don't use this one to unlock the directory)
Done!
The mount passphrase is used in addition to the login passphrase to encrypt the files, you may need it if you have to unlock backuped encrypted files, so better save it in your password manager if you make backup of the encrypted files.
You can unlock the access to the directory ~/Private by typing ecryptfs-mount-private and type your login password. Congratulations, now you have a local safe for your files!
Ecryptfs was available in older Ubuntu installer releases as an option to encrypt a user home directory without the full disk, it seems it has been abandoned due to performance reasons.
I didn't make extensive benchmarks here, but I compared the writing speed of random characters into a file on an unencrypted ext4 partition, and the ecryptfs private directory on the same disk. On the unencrypted directory, it was writing at 535 MB/s while on the ecryptfs it was only writing at 358 MB/s, that's almost 33% slower. However, it's still fast enough for a daily workstation. I didn't measure the time to read or browse many files, but it must be slower. A LUKS encrypted disk should only have a performance penalty of a few percent, so ecryptfs is really not efficient in comparison, but it's still fast enough if you don't do database operation on it.
There are extra security shortcomings coming with ecryptfs: when using your encrypted files unlocked, they may be copied in swap or in temporary directories, or in cache.
If you use the Private encrypted directories, for instance, you should think that most image reader will create a thumbnail in your HOME directory, so pictures in Private may have a local copy that is available outside the encrypted directory. Some text editors may cache a backup file in another directory.
If your system is running a bit out of memory, data may be written to the swap file, if it's not encrypted then one may be able to recover files that were opened during that time. There is a command ecryptfs-setup-swap from the ecryptfs package which check if the swap files are encrypted, and if not, propose to encrypt them using LUKS.
One major source of leakage is the /tmp/ directory, that may be used by programs to make a temporary copy of an opened file. It may be safe to just use a tmpfs filesystem for it.
Finally, if you only have a Private directory encrypted, don't forget that if you use a file browser to delete a file, it may end up in a trash directory on the unencrypted filesystem.
If you get the error setreuid: Operation not permitted when running ecryptfs commands, this mean the ecryptfs binaries aren't using suid bit. On Gentoo, you have to compile ecryptfs-utils with the USE suid.
Ecryptfs is can be useful in some real life scenarios, and doesn't have much alternative. It's especially user-friendly when used to encrypt the whole home because users don't even have to know about it.
Of course, for a private encrypted directory, the most tech-savvy can just create a big raw file and format it in LUKS, and mount it on need, but this mean you will have to manage the disk file as a separate partition with its own size, and scripts to mount/umount the volume, while ecryptfs offers an easy secure alternative with a performance drawback.
In this blog post, I'd like to share how I had fun using GitHub actions in order to maintain a repository of generic x86-64 Gentoo packages up to date.
Built packages are available at https://interbus.perso.pw/ and can be used in your binrepos.conf for a generic x86-64 packages provider, it's not building many packages at the moment, but I'm open to add more packages if you want to use the repository.
I don't really like GitHub, but if we can use their CPU for free for something useful, why not? The whole implementation and setup looked fun enough that I should give it a try.
I was using a similar setup locally to build packages for my Gentoo netbook using a more powerful computer, so it was actually achievable, so I had to try. I don't have much use of it myself, but maybe a reader will enjoy the setup and do something similar (maybe not for Gentoo).
My personal infrastructure is quite light, with only an APU router plus a small box with an Atom CPU as a NAS, I was looking for a cheap way to keep their Gentoo systems running without having to compile locally.
Building a generic Gentoo packages repository isn't straighforward for a rew reasons:
compilation flags must match all the consumers' architecture
default USE flags must be useful for many
no support for remote builders
the whole repository must be generated on a single machine with all the files (can't be incremental)
Fortunately, there are Gentoo containers images that can be used to start a fresh Gentoo, and from there, build packages from a clean system every time. Packages have to be added into the container before each change, otherwise the file Packages that will be generated as a repository index won't contain all the files.
Using a -march=x86-64 compiler flag allows targeting all the amd64 systems, at the cost of less optimized binaries.
For the USE flags, a big part of Gentoo, I chose to select a default profile and simply stick with it. People using the repository could still change their USE flags, and only pick the binary packages from the repo if they still match expectations.
We will use GitHub actions (Free plan) to build packages for a given Gentoo profile, and then upload it to a remote server that will share the packages over HTTPS.
The plan is to use a docker image of a stage3 Gentoo provided by the project gentoo-docker-images, pull previously built packages from my server, build new packages or updating existing packages, and push the changes to my server. Meanwhile, my server is serving the packages over https.
GitHub's actions are a feature from GitHub allowing to create Continuous Integration easy by providing "actions" (reusable components made by other) that you organize in steps.
For the job, I used the following steps on an Ubuntu system:
Deploy SSH keys (used to pull/push packages to my server) stored as secrets in the GitHub project
Checkout the sources of the project
Make a local copy of the packages repository
Create a container image based on the Gentoo stage3 + instructions to run
Run the image that will use emerge to build the packages
Copy the new repository on the remote server (using rsync to copy the diff)
While the idea is simple, I faced a lot of build failures, here is a list of problems I remember.
5.1. Go is failing to build (problem is Docker specific) §
For some reasons, Go was failing to build with a weird error, this is due to some sandboxing done by emerge that wasn't allowed by the Docker environment.
The solution is to loose the sandboxing with FEATURES="-ipc-sandbox -pid-sandbox -sandbox -usersandbox" in /etc/portage/make.conf. That's not great.
The starter image is a stage3 of Gentoo, it's quite bare, one critical package missing to build other but never pulled as dependency is kernel sources.
You need to install sys-kernel/gentoo-sources if you want builds to succeed for many packages.
The gentoo docker images repository isn't provided merged-usr profiles (yet?), I had to install merged-usr and run it, to have a correct environment matching the selected profile.
The job time is limited to 6h00 on the free plan, I added a timeout for the emerge doing the building job to stop a bit earlier, to let it some time to push the packages to the remote server, this will allow saving time for the next run. Of course, this only works until a single package require more than the timeout time to build (but it's quite unlikely given the CI is fast enough).
One has to trust GitHub actions, GitHub employees may have access to jobs running there, and could potentially compromise built packages using a rogue container image. While it's unlikely, this is a possibility.
Also, please note that the current setup doesn't sign the packages. This is something that could be added later, you can find documentation on the Gentoo Wiki for this part.
Another interesting area for security was the rsync access of the GitHub actions to easily synchronize the packages with the builder. It's possible to restrict an SSH key to a single command to run, like a single rsync with no room to change a single parameter. Unfortunately, the setup requires using rsync in two different cases: downloading and pushing files, so I had to write a wrapper looking at the variable SSH_COMMAND and allowing either the "pull" rsync, or the "push" rsync.
The GitHub free plan allows you to run a builder 24/7 (with no parallel execution), it's really fast enough to keep a non-desktop @world up to date. If you have a pro account, the local cache GitHub cache may not be limited, and you may be able to keep the built packages there, removing the "pull packages" step.
If you really want to use this, I'd recommend using a schedule in the GitHub action to run it every day. It's as simple as adding this in the GitHub workflow.
on:
  schedule:
   - cron: '0 2 * * *'  # every day at 02h00
I would like to thank Jonathan Tremesaygues who wrote most of the GitHub actions pieces after I shared with him about my idea and how I would implement it.
Here is a simple script I'm using to use a local Linux machine as a Gentoo builder for the box you run it from. It's using a gentoo stage3 docker image, populated with packages from the local system and its /etc/portage/ directory.
Note that you have to use app-misc/resolve-march-native to generate the compiler command line parameters to replace -march=native because you want the remote host to build with the correct flags and not its own -march=native, you should also make sure those flags are working on the remote system. From my experience, any remote builder newer than your machine should be compatible.
I like my servers to run the least code possible, and the least services running in general, this ease maintenance and let room for other thing to run. I recently wrote about monitoring software to gather metrics and render them, but they are all overkill if you just want to keep track of a single value over time, and graph it for visualization.
Fortunately, we have an old and robust tool doing the job fine, it's perfectly documented and called RRDtool.
RRDtool stands for "Round Robin Database Tool", it's a set of programs and a specific file format to gather metrics. The trick with RRD files is that they have a fixed size, when you create it, you need to define how many values you want to store in it, at which frequency, for how long. This can't be changed after the file creation.
In addition, RRD files allow you to create derivated time series to keep track of computed values on a longer timespan, but with a lesser resolution. Think of the following use case: you want to monitor your home temperature every 10 minutes for the past 48 hours, but you want to keep track of some information for the past year, you can tell RRD to compute the average temperature for every hour, but for a week, or the average temperature for four hours but for a month, and the average temperature per day for a year. All of this will be fixed size.
RRD files can be dumped as XML, this will give you a glimpse that may ease the understanding of this special file format.
Let's create a file to monitor the battery level of your computer every 20 seconds, with the last 5 values, don't focus at understanding the whole command line now:
The most important thing to understand here, is that we have a "ds" (data serie) named battery of type GAUGE with no last value (I never updated it), but also a "RRA" (Round Robin Archive) for our average value that contain timestamp and no value associated to each. You can see that internally, we already have our 5 slots that exist with a null value associated. If I update the file, the first null value will disappear, and a new record will be added at the end with the actual value.
In this guide, I would like to share my experience at using rrdtool to monitor my solar panel power output over the last few hours, which can be easily displayed on my local dashboard. The data are also collected and sent to a graphana server, but it's not local and displaying to know the last values is wasting resources and bandwidth.
First, you need rrdtool to be installed, you don't need anything else to work with RRD files.
Creating the RRD file is the most tricky part, because you can't change it afterward.
I want to collect a data every 5 minutes (300 seconds), this is an absolute data between 0 and 4000, so we will define a step of 300 seconds to tell the file must receive a value every 300 seconds. The type of the value will be GAUGE, because it's just a value that doesn't depend on the previous one. If we were monitoring power change over time, we would like to use DERIVE, because it computes the delta between each value.
Furthermore, we need to configure the file to give up on a value slot if it's not updated within 600 seconds.
Finally, we want to be able to graph each measurement, this can be done by adding an AVERAGE calculated value in the file, but with a resolution of 1 value, with 240 measurements stored. What this mean, is for each time we add a value in the RRD file, the field for AVERAGE will be calculated with only the last value as input, and we will keep 240 of them, allowing us to graph up to 240 * 5 minutes of data back in time.
rrdtool create solar-power.rrd --step 300 ds:value:gauge:600:0:4000   rra:average:0.5:1:240
                                               ^    ^     ^  ^  ^            ^     ^  ^  ^
                                               |    |     |  |  | max value  |     |  |  | number of values to keep
                                               |    |     |  | min value     |     |  | how many previous values should be used in the function, 1 means just a single value, so averaging itself
                                               |    |     | time before null |     | (xfiles factor) how much percent of unknown values do we agree to use for calculating a value
                                               |    | measurement type       | function to apply, can be AVERAGE, MAX, MIN, LAST, or mathematical operations
                                               | variable name
And then, you have your solar-power.rrd file created. You can inspect it with rrdtool info solar-power.rrd or dump its content with rrdtool dump solar-power.rrd.
Now that we have prepared the file to receive data, we need to populate it with something useful. This can be done using the command rrdtool update.
CURRENT_POWER=$(some-command-returning-a-value)
rrdtool update solar-power.rrd "N:${CURRENT_POWER}"
                                ^    ^
                                |    | value of the first field of the RRD file (we created a single field)
                                | when the value has been measured, N equals to NOW
The trickiest part, but less problematic, is to generate a usable graph from the data. The operation is not destructive as it's not modifying the file, so we can make a lot of experimentations on it without affecting the content.
We will generate something simple like the picture below. Of course, you can add a lot more information, color, axis, legends etc.. but I need my dashboard to stay simple and clean.
rrdtool graph --end now -l 0 --start end-14000s --width 600 --height 300 \
    /var/www/htdocs/dashboard/solar.svg -a SVG \
    DEF:ds0=/var/lib/rrdtool/solar-power.rrd:value:AVERAGE \
    "LINE1:ds0#0000FF:power" \
    "GPRINT:ds0:LAST:current value %2.1lf"
I think most flags are explicit, if not you can look at the documentation, what interests us here are the last three lines.
The DEF line associates the RRA AVERAGE of the variable value in the file /var/lib/rrdtool/solar-power.rrd to the name ds0 that will be used later in the command line.
The LINE1 line associates a legend, and a color to the rendering of this variable.
The GPRINT line adds a text in the legend, here we are using the last value of ds0 and format it in a printf style string current value %2.1lf.
RRDtool is very nice, it's a storage engine for monitoring software such as collectd or munin, but we can also use them on the spot with simple scripts. However, they have drawbacks, when you start to create many files it doesn't scale well, generate a lot of I/O and consume CPU if you need to render hundreds of pictures, that's why a daemon named rrdcached has been created to help mitigate the load issue by delegating updates of a lot of RRD files in a more sequential way.
I encourage you to look at the official project website, all the other command can be very useful, and rrdtool also exports data as XML or JSON if needed, which is perfect to plug in with other software.
Linux kernel has an integrated firewall named netfilter, but you manipulate it through command lines such as the good old iptables, or nftables which will eventually superseed iptables.
Today, I'll share my experience in using nftables to manage my Linux home router, and my workstation.
I won't explain much in this blog post because I just want to introduce nftables and show what it looks like, and how to get started.
I added comments in my configuration files, I hope it's enough to get a grasp and make you curious to learn about nftables if you use Linux.
nftables works by creating a file running nft -f in the shebang, this allows atomic replacement of the ruleset if it's valid.
Depending on your system, you may need to run the script at boot, but for instance on Gentoo, a systemd service is provided to save rules upon shutdown and restore them at boot.
#!/sbin/nft -f
flush ruleset

table inet filter {

    # defines a list of networks for further reference
    set safe_local {
	type ipv4_addr
	flags interval

	elements = { 10.42.42.0/24 }
    }

    chain input {
        # drop by default
        type filter hook input priority 0; policy drop;
        ct state invalid drop comment "early drop of invalid packets"

        # allow connections to work when initiated from this system
        ct state {established, related} accept comment "accept all connections related to connections made by us"

        # allow loopback
        iif lo accept comment "accept loopback"

        # remove weird packets
        iif != lo ip daddr 127.0.0.1/8 drop comment "drop connections to loopback not coming from loopback"
        iif != lo ip6 daddr ::1/128    drop comment "drop connections to loopback not coming from loopback"

        # make ICMP work
        ip protocol icmp accept comment "accept all ICMP types"
        ip6 nexthdr icmpv6 accept comment "accept all ICMP types"

        # only for known local networks
        ip saddr @safe_local tcp dport {22, 53, 80, 2222, 19999, 12344, 12345, 12346} accept
        ip saddr @safe_local udp dport {53} accept

        # allow on WAN
        iif eth0 tcp dport {80} accept
        iif eth0 udp dport {7495} accept
    }

    # allow NAT to get outside
    chain lan_masquerade {
        type nat hook postrouting priority srcnat;
        meta nfproto ipv4 oifname "eth0" masquerade
    }

    # port forwarding
    chain lan_nat {
        type nat hook prerouting priority dstnat;
        iif eth0 tcp dport 80 dnat ip to 10.42.42.102:8080
    }

}
#!/sbin/nft -f

flush ruleset

table inet filter {

    set safe_local {
	type ipv4_addr
	flags interval

	elements = { 10.42.42.0/24, 10.43.43.1/32 }
    }

    chain input {
        # drop by default
        type filter hook input priority 0; policy drop;
        ct state invalid drop comment "early drop of invalid packets"

        # allow connections to work when initiated from this system
        ct state {established, related} accept comment "accept all connections related to connections made by us"

        # allow loopback
        iif lo accept comment "accept loopback"

        # remove weird packets
        iif != lo ip daddr 127.0.0.1/8 drop comment "drop connections to loopback not coming from loopback"
        iif != lo ip6 daddr ::1/128    drop comment "drop connections to loopback not coming from loopback"

        # make ICMP work
        ip protocol icmp accept comment "accept all ICMP types"
        ip6 nexthdr icmpv6 accept comment "accept all ICMP types"

        # only for known local networks
        ip saddr @safe_local tcp dport 22 accept comment "accept SSH"
        ip saddr @safe_local tcp dport {7905, 7906} accept comment "accept musikcube"
        ip saddr @safe_local tcp dport 8080 accept comment "accept nginx"
        ip saddr @safe_local tcp dport 1714-1764 accept comment "accept kdeconnect TCP"
        ip saddr @safe_local udp dport 1714-1764 accept comment "accept kdeconnect UDP"
        ip saddr @safe_local tcp dport 22000 accept comment "accept syncthing"
        ip saddr @safe_local udp dport 22000 accept comment "accept syncthing"
        ip saddr @safe_local tcp dport {139, 775, 445} accept comment "accept samba"
        ip saddr @safe_local tcp dport {111, 775, 2049} accept comment "accept NFS TCP"
        ip saddr @safe_local udp dport 111 accept comment "accept NFS UDP"

        # for my public IP over VPN
        ip daddr 78.224.46.36 udp dport 57500-57600 accept comment "accept mosh"
        ip6 daddr 2a00:5854:2151::1 udp dport 57500-57600 accept comment "accept mosh"

    }

    # drop anything that looks forwarded
    chain forward {
        type filter hook forward priority 0; policy drop;
    }

}
Fossil is a DVCS (decentralized version control software), an alternative to programs such as darcs, mercurial or git. It's developed by the same people doing sqlite and rely on sqlite internally.
Why not? I like diversity in software, and I'm unhappy to see Git dominating the field. Fossil is a viable alternative, with simplified workflow that work very well for my use case.
One feature I really like is the autosync, when a remote is configured, fossil will automatically push the changes to the remote, then it looks like a centralizer version control software like SVN, but for my usage it's really practical. Of course, you can disable autosync if you don't want to use this feature. I suppose this could be reproduced in git using a post-commit hook that run git push.
Fossil is opinionated, so you may not like it if that doesn't match your workflow, but when it does, it's a very practical software that won't get in your way.
A major and disappointing fact at first is that a fossil repository is a single file. In order to checkout the content of the repository, you will need to run fossil open /path/to/repo.fossil in the directory you want to extract the files.
Fossil supports multiple checkout of different branches in different directories, like git worktrees.
Because I'm used to other versionning software, I need a simple cheatsheet to learn most operations, they are easy to learn, but I prefer to note it down somewhere.
Copy the .fossil file to a remote server (I'm using ssh), and in your fossil checkout, type fossil remote add my-remote ssh://hostname//home/solene/my-file.fossil, and then fossil remote my-remote.
Note that the remote server must have the fossil binary available in $PATH.
fossil ui will open your web browser and log in as admin user, you can view the timeline, bug trackers, wiki, forum etc... Of course, you can enable/disable everything you want.
Fossil doesn't allow staging and committing partial changes in a file like with git add -p, the official way is to stash your changes, generate a diff of the stash, edit the diff, apply it and commit. It's recommended to use a program named patchouli to select hunks in the diff file to ease the process.
Quick blog entry to remember about something that wasn't as trivial as I thought. I needed to use syncthing to keep a single file in sync (KeePassXC database) without synchronizing the whole directory.
You have to use mask exclusion feature to make it possible. Put it simple, you need the share to forbid every file, except the one you want to sync.
This configuration happens in the .stignore file in the synchronized directory, but can also be managed from the Web interface.
I always wanted to have a simple rollback method on Linux systems, NixOS gave me a full featured one, but it wasn't easy to find a solution for other distributions.
Fortunately, with BTRFS, it's really simple thanks to snapshots being mountable volumes.
When you are in the bootloader (GRUB, systemd-boot, Lilo etc..), edit the command line, and add the new option (replace if already exists) with the following, the example uses the snapshot ROOT.20230102:
rootflags=subvol=gentoo/.snapshots/ROOT.20230103
Boot with the new command line, and you should be on your snapshot as the root filesystem.
This is mostly a reminder for myself. I installed Gentoo on a machine, but I reused the same BTRFS filesystem where NixOS is already installed, the trick is the BTRFS filesystem is composed of two partitions (a bit like raid 0) but they are from two different LUKS partitions.
It wasn't straightforward to unlock that thing at boot.
Grub was trying to autodetect the root partition to add root=/dev/something, but as my root filesystem requires /dev/mapper/ssd1 and /dev/mapper/ssd2, it was simply adding root=/dev/mapper/ssd1 /dev/mapper/ssd2, which is wrong.
This required a change in the file /etc/grub.d/10_linux where I entirely deleted the root= parameter.
A mistake I made was to try to boot without systemd compiled with cryptsetup support, this was just failing because in the initramfs, some systemd services were used to unlock the partitions, but without proper support for cryptsetup it didn't work.
In /etc/default/grub, I added this line, it contains the UUID of both LUKS partitions needed, and a root=/dev/dm-0 which is unexpectedly the first unlocked device path, and rd.luks=1 to enble LUKS support.
It's working fine now, I thought it would require me to write a custom initrd script, but dracut is providing all I needed, but there were many quirks on the path with no really helpful message to understand what's failing.
Now, I can enjoy my dual boot Gentoo / NixOS (they are quite antagonists :D), but they share the same filesystem and I really enjoy this weird setup.
As a flatpak user, but also someone with a slow internet connection, I was looking for a way to export a flatpak program to install it on another computer. It turns out flatpak supports this, but it's called "create-usb" for some reasons.
So today, I'll show how to export a flatpak program from a computer to another.
For some reasons, the default flathub parameters doesn't associate it a "Collection ID", which is required for the create-usb feature to work, so we need to associate a "Collection ID" to the flathub remote repository on both systems.
We can use the example from the official documentation:
The export process is simple, create a directory in which you want the flatpak application to be exported, we will use ~/export/ in the examples, with the program org.mozilla.firefox.
flatpak create-usb ~/export/ org.mozilla.firefox
The export process will display a few lines and tell you when it finished.
If you export multiple programs into the same directory, the export process will be smart and skip already existing components.
Take the ~/export/ directory, either on a USB drive, or copy it using rsync, share it over NFS/Samba etc... It's up to you. In the example, ~/export/ refers to the same directory transferred from the previous step onto the new system.
Now, we can run the import command to install the program.
Because the flatpak components/dependencies of a program can differ depending on the host (for example if you have an NVIDIA card, it will pull some NVIDIA dependencies), so if you export a program from a non-NVIDIA system to the other, it won't be complete to work reliably on the new system, but the missing parts can be downloaded on the Internet, it's still reducing the bandwidth requirement.
I kinda like Flatpak, it's convenient and reliable, and allow handling installed programs without privileges escalation. The programs can be big, it's cool to be able to save/export them for later use.
A neat feature in OpenBSD is the program authpf, an authenticating gateway using SSH.
Basically, it allows to dynamically configure the local firewall PF by connecting/disconnecting into a user account over SSH, either to toggle an IP into a table or rules through a PF anchor.
This program is very useful for the following use case:
firewall rules dedicated to authenticated users
enabling NAT to authenticated users
using a different bandwidth queue for authenticated users
logging, or not logging network packets of authenticated users
Of course, you can be creative and imagine other use cases.
This method is actually different from using a VPN, it doesn't have encryption extra cost but is less secure in the sense it only authenticates an IP or username, so if you use it over the Internet, the triggered rule may also benefit to people using the same IP as yours. However, it's much simpler to set up because users only have to share their public SSH key, while setting up a VPN is another level of complexity and troubleshooting.
In the following example, you manage a small office OpenBSD router, but you only want Chloe's workstation to reach the Internet with the NAT. We need to create her a dedicated account, set the shell to authpf, deploy her SSH key and configure PF.
Now, you can edit /etc/pf.conf and use the default table name authpf_users. With the following PF snippet, we will only allow authenticated users to go through the NAT.
table <authpf_users> persist
match out on egress inet from <authpf_users> to any nat-to (egress)
Reload your firewall, and when Chloe will connect, she will be able to go through the NAT.
The program authpf is an efficient tool for the network administrator's toolbox. And with the use of PF anchors, you can really extend its potential as you want, it's really not limited to tables.
It's possible to ban users, for various reasons you may want to block someone with a message asking to reach the help desk. This can be done by creating a file name after the username, like in the following example for user chloe: /etc/authpf/banned/chloe, the file text content will be displayed to the user upon connection.
It's possible to write a custom greeting message displayed upon connection, this can be global or per user, just write a message in /etc/authpf/authpf.message for a global one, or /etc/authpf/users/chloe/authpf.message for user chloe.
I have remote systems that only have /home as encrypted partitions, the reason is it ease a lot of remote management without a serial access, it's not ideal if you have critical files but in my use case, it's good enough.
In this blog post, I'll explain how to get the remote system to prompt you the unlocking passphrase automatically when it boots. I'm using OpenBSD in my example, but you can achieve the same with Linux and cryptsetup (LUKS), if you want to push the idea on Linux, you could do this from the initramfs to unlock your root partition.
on the remote system generate ssh-keys without a passphrase on your root account using ssh-keygen
copy the content of /root/.ssh/id_rsa.pub for the next step (or the public key file if you chose a different key algorithm)
edit ~/.ssh/authorized_keys on your workstation
create a new line with: restrict,command="/usr/local/bin/zenity --forms --text='Unlock t400 /home' --add-password='passphrase' --display=:0" $THE_PUBLIC_KEY_HERE
The new line allows the ssh key to connect to our local user, but it gets restricted to a single command: zenity, which is a GUI dialog program used to generate forms/dialogs in X sessions.
In the example, this creates a simple form in an X window with a label "Unlock t400 /home" and add a field password hiding typed text, and showing it on display :0 (the default one). Upon connection from the remote server, the form is displayed, you can type in and validate, then the content is passed to stdout on the remote server, to the command bioctl which unlocks the disk.
On the server, creates the file /etc/rc.local with the following content (please adapt to your system):
#!/bin/sh

ssh solene@10.42.42.102 | bioctl -s -c C -l 1a52f9ec20246135.k softraid0
if [ $? -eq 0 ]
then
    mount /home
fi
In this script, solene@10.42.42.102 is my user@laptop-address, and 1a52f9ec20246135.k is my encrypted partition. The file /etc/rc.local is run at boot after most of the services, including networking.
You should get a display like this when the system boots:
With this simple setup, I can reboot my remote systems and wait for the passphrase to be asked quite reliably. Because of ssh, I can authenticate which system is asking for a passphrase, and it's sent encrypted over the network.
It's possible to get more in depth in this idea by using a local password database to automatically pick the passphrase, but you lose some kind of manual control, if someone steals a machine you may not want to unlock it after all ;) It would also be possible to prompt a Yes/No dialog before piping the passphrase from your computer, do what feels correct for you.
This blog post is for Mastodon users who may not like the official Mastodon web interface. It has a lot of features, but it's using a lot of CPU and requires a large screen.
Fortunately, there are alternatives front-ends to Mastodon, this is possible through calls between the front-end to then instance API. I would like to introduce you Pinafore.
Pinafore is a "web application" consisting of a static website, this implies nothing is actually store on the server hosting Pinafore, think about it like a page loaded in your browser that stores data in your browser and make API calls from your browser.
This design is elegant because it delegates everything to the browser and requires absolutely no processing on the Pinafore hosting server, it's just a web server there serving static files once.
As I said previously, Pinafore is a Mastodon (but also extends to other Fediverse instances whenever possible) front-end with a bunch of features such as:
There are two ways to use it, either by using the official hosted service, or by hosting it yourself.
Whether you choose the official or self-hosted, the principle is the following: you enter your account instance address in it the first time, this will trigger an oauth authentication on your instance and will ask if you want pinafore to use your account through the API (this can be revoked later from your Mastodon account). Accept, and that's it!
The official service is run by the developers and kept up to date. You can use it without installing anything, simply visit the address below and go through the login process.
This is a very convenient way to use pinafore, but it comes with a tradeoff: it involves a third party between your social network account and your client. While pinafore.social is trustable, this doesn't mean it can't be compromised and act as a "Man In The Middle". As I mentionned earlier, no data are stored by Pinafore because everything is in your browser, but nothing prevent a malicious attacker to modify the hosted Pinafore code to redirect data from your browser to a remote server they control in order to steal information.
It's possible to create Pinafore static files from your system and host it on any web server. While it's more secure than pinafore.social (if your host is secure), it still involves extra code that could "potentially" be compromised through a rogue commit, but it's not realistic to encounter this case when using Pinafore releases versions.
For this step, I'll link to the according documentation in the project:
This blog post is a republication of the article I published on my employer's blog under CC BY 4.0. I'm grateful to be allowed to publish NixOS related content there, but also to be able to reuse it here!
This guide explains how to install NixOS on a computer, with a twist.
If you use the same computer in different contexts, let's say for work and for your private life, you may wish to install two different operating systems to protect your private life data from mistakes or hacks from your work. For instance a cryptolocker you got from a compromised work email won't lock out your family photos.
But then you have two different operating systems to manage, and you may consider that it's not worth the effort and simply use the same operating system for your private life and for work, at the cost of the security you desired.
I offer you a third alternative, a single NixOS managing two securely separated contexts. You choose your context at boot time, and you can configure both context from either of them.
You can safely use the same machine at work with your home directory and confidential documents, and you can get into your personal context with your private data by doing a reboot. Compared to a dual boot system, you have the benefits of a single system to manage and no duplicated package.
For this guide, you need a system either physical or virtual that is supported by NixOS, and some knowledge like using a command line. You don't necessarily need to understand all the commands. The system disk will be erased during the process.
You can find an example of NixOS configuration files to help you understand the structure of the setup on the following GitHub repository:
We will create a 512 MB space for the /boot partition that will contain the kernels, and allocate the space left for an LVM partition we can split later.
We will use LVM so we need to initialize the partition and create a Volume Group with all the free space.
pvcreate /dev/sda2
vgcreate pool /dev/sda2
We will then create three logical volumes, one for the store and two for our environments:
lvcreate -L 15G -n root-private pool
lvcreate -L 15G -n root-work pool
lvcreate -l 100%FREE -n nix-store pool
NOTE: The sizes to assign to each volume is up to you, the nix store should have at least 30GB for a system with graphical sessions. LVM allows you to keep free space in your volume group so you can increase your volumes size later when needed.
We will enable encryption for the three volumes, but we want the nix-store partition to be unlockable with either of the keys used for the two root partitions. This way, you don't have to type two passphrases at boot.
cryptsetup luksFormat /dev/pool/root-work
cryptsetup luksFormat /dev/pool/root-private
cryptsetup luksFormat /dev/pool/nix-store # same password as work
cryptsetup luksAddKey /dev/pool/nix-store # same password as private
We unlock our partitions to be able to format and mount them. Which passphrase is used to unlock the nix-store doesn't matter.
Please note we don't encrypt the boot partition, which is the default on most encrypted Linux setup. While this could be achieved, this adds complexity that I don't want to cover in this guide.
Note: the nix-store partition isn't called crypto-nix-store because we want the nix-store partition to be unlocked after the root partition to reuse the password. The code generating the ramdisk takes the unlocked partitions' names in alphabetical order, by removing the prefix crypto the partition will always be after the root partitions.
We format each partition using ext4, a performant file-system which doesn't require maintenance. You can use other filesystems, like xfs or btrfs, if you need features specific to them.
The boot partition should be formatted using fat32 when using UEFI with mkfs.fat -F 32 /dev/sda1. It can be formatted in ext4 if you are using legacy boot (MBR).
Mount the partitions onto /mnt and its subdirectories to prepare for the installer.
mount /dev/mapper/crypto-work /mnt
mkdir -p /mnt/etc/nixos /mnt/boot /mnt/nix
mount /dev/mapper/nix-store /mnt/nix
mkdir /mnt/nix/config
mount --bind /mnt/nix/config /mnt/etc/nixos
mount /dev/sda1 /mnt/boot
We generate a configuration file:
nixos-generate-config --root /mnt
Edit /mnt/etc/nixos/hardware-configuration.nix to change the following parts:
We need two configuration files to describe our two environments, we will use hardware-configuration.nix as a template and apply changes to it.
sed '/imports =/,+3d' /mnt/etc/nixos/hardware-configuration.nix > /mnt/etc/nixos/work.nix
sed '/imports =/,+3d ; s/-work/-private/g' /mnt/etc/nixos/hardware-configuration.nix > /mnt/etc/nixos/private.nix
rm /mnt/etc/nixos/hardware-configuration.nix
Edit /mnt/etc/nixos/configuration.nix to make the imports code at the top of the file look like this:
imports =
  [
    ./work.nix
    ./private.nix
  ];
Remember we removed the file /mnt/etc/nixos/hardware-configuration.nix so it shouldn't be imported anymore.
Now we need to hook each configuration to become a different boot entry, using the NixOS feature called specialisation. We will make the environment you want to be the default in the boot entry as a non-specialised environment and non-inherited so it's not picked up by the other, and a specialisation for the other environment.
For the hardware configuration files, we need to wrap them with some code to create a specialisation, and the "non-specialisation" case that won't propagate to the other specialisations.
Starting from a file looking like this, some code must be added at the top and bottom of the files depending on if you want it to be the default context or not.
It's now the time to configure your system as you want. The file /mnt/etc/nixos/configuration.nix contains shared configuration, this is the right place to define your user, shared packages, network and services.
The files /mnt/etc/nixos/private.nix and /mnt/etc/nixos/work.nix can be used to define context specific configuration.
During the numerous installation tests I've made to validate this guide, on some hardware I noticed an issue with LVM detection, add this line to your global configuration file to be sure your disks will be detected at boot.
The partitions are mounted and you configured your system as you want it, we can run the NixOS installer.
nixos-install
Wait for the copy process to complete after which you will be prompted for the root password of the current crypto-work environment (or the one you mounted here), you also need to define the password for your user now by chrooting into your NixOS system.
# nixos-enter --root /mnt -c "passwd your_user"
New password:
Retape new password:
passwd: password updated successfully
# umount -R /mnt
From now, you have a password set for root and your user for the crypto-work environment, but no password are defined in the crypto-private environment.
We will rerun the installation process with the other environment mounted:
mount /dev/mapper/crypto-private /mnt
mkdir -p /mnt/etc/nixos /mnt/boot /mnt/nix
mount /dev/mapper/nix-store /mnt/nix
mount --bind /mnt/nix/config /mnt/etc/nixos
mount /dev/sda1 /mnt/boot
As the NixOS configuration is already done and is shared between the two environments, just run nixos-install, wait for the root password to be prompted, apply the same chroot sequence to set a password to your user in this environment.
You can reboot, you will have a default boot entry for the default chosen environment, and the other environment boot entry, both requiring their own passphrase to be used.
Now, you can apply changes to your NixOS system using nixos-rebuild from both work and private environments.
Congratulations for going through this long installation process. You can now log in to your two contexts and use them independently, and you can configure them by applying changes to the corresponding files in /etc/nixos/.
With this setup, I chose to not cover swap space because this would allow to leak secrets between the contexts. If you need some swap, you will have to create a file on the root partition of your current context, and add the according code to the context filesystems.
If you want to use hibernation in which the system stops after dumping its memory into the swap file, your swap size must be larger than the memory available on the system.
It's possible to have a single swap for both contexts by using a random encryption at boot for the swap space, but this breaks hibernation as you can't unlock the swap to resume the system.
As you noticed, you had to run passwd in both contexts to define your user password and root's password. It is possible to define their password declaratively in the configuration file, refers to the documentation ofusers.mutableUsers and users.extraUsers.<name>.initialHashedPassword
If something is wrong when you boot the first time, you can reuse the installer to make changes to your installation: you can run again the cryptsetup luksOpen and mount commands to get access to your filesystems, then you can edit your configuration files and run
This may appear like a very niche use case, in my quest of software conservancy for nixpkgs I didn't encounter many people understanding why I was doing this.
I would like to present you a project I made to easily download all the sources files required to build packages from nixpkgs, allowing to keep offline copies.
Why would you like to keep a local copy? If upstream disappear, you can't get access to the sources anymore, except maybe in Hydra, but you rely on a third party to access the sources, so it's still valuable to have local copies of software you care about, just to make copies. It's not that absolutely useful for everyone, but it's always important to have such tools available.
After cloning and 'cd-ing' into the directory, simply run ./run.sh some package list | ./mirror.pl. The command run.sh will generate a JSON structure containing all the dependencies used by the packages listed as arguments, and the script mirror.pl will iterate over the JSON list and use nix's fetcher to gather the sources in the nix store, verifying the checksum on the go. This will create a directory distfiles containing symlinks to the sources files stored in the store.
The symlinks are very important as they will prevent garbage collection from the store, and it's also used internally to quickly check if a file is already in the store.
To delete a file from the store, remove its symlink and run the garbage collector.
I still need to figure how to get a full list of all the packages, I currently have a work in progress relying on nix search --json but it doesn't work on 100% of the packages for some reasons.
It's currently not possible to easily trim distfiles that aren't useful anymore, I plan to maybe add it someday.
This task is natively supported in the OpenBSD tool building packages (dpb), it can fetch multiples files in parallel and automatic remove files that aren't used anymore. This was really complicated to figure how to replicate this with nixpkgs.
Let me introduce you to a nice project I found while lurking on the Internet. It's called nushell and is a non-POSIX shell, so most of your regular shells knowledge (zsh, bash, ksh, etc…) can't be applied on it, and using it feels like doing functional programming.
It's a good tool for creating robust data manipulation pipelines, you can think of it like a mix of a shell which would include awk's power, behave like a SQL database, and which knows how to import/export XML/JSON/YAML/TOML natively.
You may want to try nushell only as a tool, and not as your main shell, it's perfectly fine.
With a regular shell, iterating over a command output can be complex when it involves spaces or newlines, for instance, that's why find and xargs have a -print0 parameter to have a special delimited between "items", but it doesn't compose well with other tools. Nushell handles correctly this situation as its manipulates the data using indexed entries, given you correctly parsed the input at the beginning.
Nushell is a rust program, so it should work on every platform where Rust/Cargo are supported. I packaged it for OpenBSD, so it's available on -current (and will be in releases after 7.3 is out), the port could be used on 7.2 with no effort.
With Nix, it's packaged under the name nushell, the binary name is nu.
For other platforms, it's certainly already packaged, otherwise you can find installation instructions to build it from sources.
At first run, you are prompted to use default configuration files, I'd recommend accepting, you will have files created in ~/.config/nushell/.
The only change I made from now is to make Tab completion case-sensitive, so D[TAB] completes to Downloads instead of asking between dev and Downloads. Look for case_sensitive_completions in .config/nushell/config.nu and set it to true.
If you are like me, and you prefer learning by doing instead of reading a lot of documentation, I prepared a bunch of real world use case you can experiment with. The documentation is still required to learn the many commands and syntax, but examples are a nice introduction.
Help from nushell can be parsed directly with nu commands, it's important to understand where to find information about commands.
Use help a-command to learn from a single command:
> help help
Display help information about commands.
Usage:
> help {flags} ...(rest)
Flags:
-h, --help - Display this help message
-f, --find <String> - string to find in command names, usage, and search terms
[cut so it's not too long]
Use help commands to list all available commands (I'm limiting to 5 between there are a lot of commands)
help commands | last 5
╭───┬─────────────┬────────────────────────┬───────────┬───────────┬────────────┬───────────────────────────────────────────────────────────────────────────────────────┬──────────────╮
│ # │ name │ category │ is_plugin │ is_custom │ is_keyword │ usage │ search_terms │
├───┼─────────────┼────────────────────────┼───────────┼───────────┼────────────┼───────────────────────────────────────────────────────────────────────────────────────┼──────────────┤
│ 0 │ window │ filters │ false │ false │ false │ Creates a sliding window of `window_size` that slide by n rows/elements across input. │ │
│ 1 │ with-column │ dataframe or lazyframe │ false │ false │ false │ Adds a series to the dataframe │ │
│ 2 │ with-env │ env │ false │ false │ false │ Runs a block with an environment variable set. │ │
│ 3 │ wrap │ filters │ false │ false │ false │ Wrap the value into a column. │ │
│ 4 │ zip │ filters │ false │ false │ false │ Combine a stream with the input │ │
╰───┴─────────────┴────────────────────────┴───────────┴───────────┴────────────┴───────────────────────────────────────────────────────────────────────────────────────┴──────────────╯
Add sort-by category to list them... sorted by category.
help commands | sort-by category
Use where category == filters to only list commands from the filters category.
help commands | where category == filters
Use find foobar to return lines containing foobar.
A complicated task using a regular shell, recursively find files matching a pattern and then run a given command on each of them, in parallel. Which is exactly what you need if you want to convert your music library into another format, let's convert everything from FLAC to OPUS in this example.
In the following command line, we will look for every .flac file in the subdirectories, then run in parallel using par-each the command ffmpeg on it, from its current name to the old name with .flac changed to .opus.
The let convert and | complete commands are used to store the output of each command into a result table, and store it in the variable convert so we can query it after the job is done.
Now, we have a structure in convert that contains the columns stdout, stderr and exit_code, so we can look if all the commands did run correctly using the following query.
$convert | where exit_code != 0
4.2.4. Synchronize a music library to a compressed one §
I had a special need for my phone and my huge music library, I wanted to have a lower quality version of it synced with syncthing, but I needed this to be easy to update when adding new files.
It takes all the music files in /home/user/Music/ and creates a 64K opus file in /home/user/Stream/ by keeping the same file tree hierarchy, and if the opus destination file exists it's skipped.
cd /home/user/Music/
let dest = "/home/user/Stream/"
let convert = (ls **/* |
where name =~ ".(mp3|flac|opus|ogg)$" |
where name !~ "(Audiobook|Piano)" |
par-each {
|file| do -i {
let new_name = ($file.name | str replace -r ".(flac|ogg|mp3)" ".opus")
if (not ([$dest, $new_name] | str join | path exists)) {
mkdir ([$dest, ($file.name | path dirname)] | str join)
ffmpeg -i $file.name -b:a 64K ([$dest, $new_name] | str join)
} | complete
}
})
$convert
4.2.5. Convert PDF/CBR/CBZ pages into webp and CBZ archives §
I have a lot of digitalized books/mangas/comics, this conversion is a handy operation reducing the size of the files by 40% (up to 70%).
def conv [] {
if (ls | first | get name | str contains ".jpg") {
ls *jpg | par-each {|file| do -i { cwebp $file.name -o ($file.name | str replace jpg webp) } | complete }
rm *jpg
}
if (ls | first | get name | str contains ".ppm") {
ls *ppm | par-each {|file| do -i { cwebp $file.name -o ($file.name | str replace ppm webp) } | complete }
rm *ppm
}
}
ls * | each {|file| do -i {
if ($file.name | str contains ".cbz") { unzip $file.name -d ./pages/ } ;
if ($file.name | str contains ".cbr") { unrar e -op./pages/ $file.name } ;
if ($file.name | str contains ".pdf") { mkdir pages ; pdfimages $file.name pages/page } ;
cd pages ; conv ; cd ../ ; ^zip -r $"($file.name).webp.cbz" pages ; rm -fr pages
} }
Nushell is very fun, it's terribly different from regular shells, but it comes with a powerful language and tooling. I always liked shells because of pipes commands, allowing to construct a complex transformation/analysis step by step, and easily inspect any step, or be able to replace a step by another.
With nushell, it feels like I finally have a better tool to create more reliable, robust, portable and faster command pipelines. The learning curve didn't feel too hard, but maybe it's because I'm already used to functional programming.
This blog post aims to be a quick clarification about the website openports.pl: an online database that could be used to search for OpenBSD packages and ports available in -current.
The software used by openports.pl is the package ports-readmes-dancer which uses the sqlite database from the sqlports package.
The host is running OpenBSD -current through snapshots, it tries twice a day to upgrade when possible, and regularly try to upgrade all packages, so it's as fresh as it can be through snapshots.
The program packaged in ports-readmes-dancer has been created by espie@, it's using a Perl web framework named Dancer. It's open source software and you can contribute to it if you want to enhance openports.pl itself
For security reasons, as it's running "too much" unaudited code server side, it's not possible to host it in the OpenBSD infrastructure under the domain .openbsd.org.
The main alternative is OpenBSD.app, a website but also a command line tool, using sqlports package as a data source, and it supports -stable and -current.
I wrote a GUI application named AppManager (the package name is appmanager) that allows to view all packages available for the running OpenBSD version, and install/remove them. It also has surprisingly effective heuristic to tell if search results are GUI/CLI/other programs.
Let's have fun doing OpenBSD kiosks! As explained in a recent article, a kiosk is a computer dedicated to display things or to be used interactively without being able to escape the current program.
I modified the script surf-display which run the web browser surf in full screen and run various commands to sanitize the environment to prevent users to escape surf to make it compatible with OpenBSD.
edit ~/.xsession to use /usr/local/bin/surf-display as a window manager
You will also need dependencies:
pkg_add surf wmctrl blackbox xdotool unclutter
Now, when you log in your user, surf will be started automatically, and you can't escape it, so you will need to switch to a TTY if you want to disable it, or through ssh.
The configuration is relatively simple for a single screen setup. Edit the file /etc/surf-display and put the URL you want to display as the value of DEFAULT_WWW_URI=, this file will be loaded by surf-display when it runs, otherwise OpenBSD website will be displayed.
It's still a bit rough for OpenBSD, I'd like to add xprintidle to automatically restart the session if the user has been inactive, but it's working really well already!
The open question may want a different answer depending on the context. For an operating system, I think most people want a boring one which work, and doesn't require having to fight it ever.
In that ground, NixOS is extremely boring. It just works, when you don't want something anymore, remove it from its config, and it's gone. Auto upgrades are reliable, in case of a rare issue after an update, you can still easily rollback.
In two years running the unstable version, I may have had one major issue.
NixOS can be bent in many ways, but can still get its shape back once you are done. It's very annoying to me because it's so smooth I can't find anything to repair.
This is disappointing to me, because I used to have fun with my computers by breaking them, and then learning how to repair it, which often involve a various area of knowledge, but this just never happen with NixOS.
Most people will certainly enjoy something super reliable.
Here is the story of the biggest problem I had when running NixOS. My disk was full, and I had to delete a few files to make some room, that's it. It wasn't very straightforward because it requires to know where to delete profiles to run the garbage collector manually, but nothing more serious ever happened.
This blog post may look like an ode to NixOS, but I'm really disappointed. Actually, now I need to find something to do on my computer which is not in the list ["fix the operating system"].
I suppose someone enjoying mechanics may feel the same when using a top-notch electric bike with high grade components made to be reliable.
As shown in my previous article about the NILFS file system, continuous snapshots are great and practical as they can save you losing data accidentally between two backups jobs.
Today, I'll demonstrate how to do something quite similar using BTRFS and regular snapshots.
In the configuration, I'll show the code for NixOS using the tool btrbk to handle snapshots retention correctly.
Snapshots are not backups! It is important to understand this. If your storage is damaged or the file system get corrupted, or the device stolen, you will lose your data. Backups are archives of your data that are on another device, and which can be used when the original device is lost/destroyed/corrupted. However, snapshots are superfast and cheap, and can be used to recover accidentally deleted files.
The program btrbk is simple, it requires a configuration file /etc/btrbk.conf defining which volume you want to snapshot regularly, where to make them accessible and how long you want to keep them.
In the following example, we will keep the snapshots for 2 days, and create them every 10 minutes. A SystemD service will be scheduled using a timer in order run btrbk run which handle snapshot creation and pruning. Snapshots will be made available under /.snapshots/.
Rebuild your system, you should now have systemd units btrfs-snapshot.service and btrfs-snapshot.timer available.
As the configuration file will be at the standard location, you can use btrbk as root to manually list or prune your snapshots in case you need to, like immediately reclaiming disk space.
After publishing this blog post, I realized a NixOS module existed to simplify the setup and provide more features. Here is the code used to replicate the behavior of the code above.
btrbk is a powerful tool, as not only you can create snapshots with it, but it can stream them on a remote system with optional encryption. It can also manage offline backups on a removable media and a few other non-simple cases. It's really worth taking a look.
A kiosk, in the sysadmin jargon, is a computer that is restricted to a single program so anyone can use it for the sole provided purpose. You may have seen kiosk computers here and there, often wrapped in some kind of box with just a touch screen available. ATM are kiosks, most screens showing some information are also kiosks.
What if you wanted to build a kiosk yourself? For having done a bunch of kiosk computers a few years ago, it's not an easy task, you need to think about:
how to make boot process bullet proof?
which desktop environment to use?
will the system show notifications you don't want?
can the user escape from the kiosk program?
Nowadays, we have more tooling available to ease kiosk making. There is also a distinction that has to be made between kiosks used displaying things, and kiosks used by users. The latter is more complicated and require lot of work, the former is a bit easier, especially with the new tools we will see in this article.
Using cage, we will be able to start a program in fullscreen, and only it, without having any notification, desktop, title bar etc...
In my case, I want to open firefox to open a local file used to display monitoring information. Firefox can still be used "normally" because hardening it would require a lot of work, but it's fine because I'm at home and it's just to display gauges and diagrams.
Here is the piece of code that will start the firefox window at boot automatically. Note that you need to disable any X server related configuration.
services.cage = {
enable = true;
user = "solene";
program = "${pkgs.firefox}/bin/firefox -kiosk -private-window file:///home/solene/monitoring.html";
};
Firefox has a few special flags, such as -kiosk to disable a few components, and -private-window to not mix with the current history. This is clearly not enough to prevent someone to use Firefox for whatever they want, but it's fine to handle a display of a single page reliably.
I wish I had something like Cage available back in the time I had to make kiosks. I can enjoy my low power netbook just displayin monitoring graphs at home now.
Today, I'll share about a special Linux file system that I really enjoy. It's called NILFS and has been imported into Linux in 2009, so it's not really a new player, despite being stable and used in production it never got popular.
In this file system, there is a unique system of continuous checkpoint creation. A checkpoint is a snapshot of your system at a given point in time, but it can be deleted automatically if some disk space must be reclaimed. A checkpoint can be transformed into a snapshot that will never be removed.
This mechanism works very well for workstations or file servers on which redundancy is nonexistent, and on which backups are done every day/weeks which give room for unrecoverable mistakes.
As NILFS is a Copy-On-Write file system (CoW), which mean when you make a change to a file, the original chunk on the disk isn't modified but a new chunk is created with the new content, this play well with making an history of the files.
From my experience, it performs very well on SSD devices on a desktop system, even during heavy I/O operation.
The continuous checkpoint creation system may be very confusing, so I'll explain how to learn about this mechanism and how to tame it.
The concept of a garbage collector may appear given for most people, but if it doesn't speak to you, let me give a quick explanation. In computer science, a garbage collector is a task that will look at unused memory and make it available again.
On NILFS, as a checkpoint is created every few seconds, used data is never freed and one would run out of disk pretty quickly. But here is the nilfs_cleanerd program, the garbage collector, that will look at the oldest checkpoint and delete them to reclaim the disk space under certain condition. Its default strategy is trying to keep checkpoints as long as possible, until it needs to make some room to avoid issues, it may not suit a workload creating a lot of files and that's why it can be tuned very precisely. For most desktop users, the defaults should work fine.
The garbage collector is automatically started on a volume upon mount. You can use the command nilfs-clean to control that daemon, reload its configuration, stop it etc...
When you delete a file on a NILFS file system, it doesn't free up any disk space because it's still available in a previous checkpoint, you need to wait for the according checkpoints to be removed to have some space freed.
4. How to find the current size of your data set §
As the output of df for a NILFS filesystem will give you the real data used on the disk for your data AND the snapshots/checkpoints, it can't be used to know how much free disk is available/used.
In order to figure the current disk usage (without accounting older checkpoints/snapshots), we will use the command lscp to look at the number of blocks contained in the most recent checkpoint. On Linux, a block is 4096 bytes, we can then turn the total in bytes into gigabytes by dividing three time by 1024 (bytes -> kilobytes -> megabytes -> gigabytes).
Let's say you deleted an important in-progress work, you don't have any backup and no way to retrieve it, fortunately you are using NILFS and a checkpoint was created every few seconds, so the files are still there and at reach!
The first step is to pause the garbage collector to avoid losing the files: nilfs-clean --suspend. After this, we can think slowly about the next steps without having to worry.
The next step is to list the checkpoints using the command lscp and look at the date/time in which the files still existed and preferably in their latest version, so the best is to get just before the deletion.
Then, we can mount the checkpoint (let's say number 12345 for the example) on a different directory using the following command:
mount -t nilfs2 -r -o cp=12345 /dev/sda1 /mnt
If it went fine, you should be able to browse the data in /mnt to recover your files.
Once you finished recovering your files, umount /mnt and resume the garbage collector with nilfs-clean --resume.
I recently got interested into what's possible with machine learning programs, and this has been an exciting journey. Let me share about a few programs I added to my toolbox.
They all work well on NixOS, but they might require specific instructions to work except for upscayl and whisper that are in nixpkgs. However, it's not that hard, but may not be accessible to everyone.
This program analyzes audio content of an audio or video file, and make a transcript of it. It supports many languages, I tried it with English, French and Japanese, and it worked very reliably.
Not only it creates a transcript text file, but it also generates a subtitles (.srt) file, you can create video subtitles automatically. It has a translation function which pass all the transcript text to Google translate and give you the result in English.
It's quite slow using a CPU, but it definitely works, using a GPU gives an 80 times speed boost.
It requires a weight to work, it exists in different sizes: tiny, small, base, medium, large, and each has an English only variant that is smaller. It will download them automatically on demand in the ~/.cache/whisper/ directory.
This program can be used to generate pictures from a sentence, it's actually very effective. You need a weight file which is like a database on how to interpret stuff in the sentence.
You need an account on https://huggingface.co/CompVis/stable-diffusion-v-1-4-original to download the free weight file (4 GB).
This program can be used to colorize a picture. The weights are provided. This works well without a GPU.
I tried to use it on mangas, it works to some extent, it adds some shading and identify things with colors, but the colorization isn't reliable and colors may be weird. However, this improves readability for me 👍🏻.
This program upscales a picture to 4 times its resolution, the result can be very impressive, but in some situation it gives a "plastic" and unnatural feeling.
I've been very impressed by it, I've been able to improve some old pictures taken with a poor phone.
Fail2ban is a wonderful piece of software, it can analyze logs from daemons and ban them in the firewall. It's triggered by certain conditions like a single IP found in too many lines matching a pattern (such as a login failure) under a certain time.
What's even cooler is that writing new filters is super easy! In this text, I'll share how to write new filters for NixOS.
Before continuing, if you are not familiar with fail2ban, here are the few important keywords to understand:
action: what to do with an IP (usually banning an IP)
filter: set of regular expressions and information used to find bad actors in logs
jail: what ties together filters and actions in a logical unit
For instance, a sshd jail will have a filter applied on sshd logs, and it will use a banning action. The jail can have more information like how many times an IP must be found by a filter before using the action.
The easiest part is to enable fail2ban. Take the opportunity to declare IPs you don't want to block, and also block IPs on all ports if it's something you want.
services.fail2ban = {
enable = true;
ignoreIP = [
"192.168.1.0/24"
];
};
# needed to ban on IPv4 and IPv6 for all ports
services.fail2ban = {
extraPackages = [pkgs.ipset];
banaction = "iptables-ipset-proto6-allports";
};
Now we can declare fail2ban jails with each filter we created. If you use a log file, make sure to have backend = auto, otherwise the systemd journal is used and this won't work.
The most important settings are:
filter: choose your filter using its filename minus the .conf part
maxretry: how many times an IP should be reported before taking an action
findtime: how long should we keep entries to match in maxretry
Fail2ban is a fantastic tool to easily create filtering rules to ban the bad actors. It turned out most rules didn't work out of the box, or were too narrow for my use case, so extending fail2ban was quite straightforward.
Since I switched my server from OpenBSD to NixOS, I was missing a feature. The previous server was using iblock, a program I made to block IPs connecting on a list of ports, I don't like people knocking randomly on ports.
iblock is simple, if you connect to any port on which it's listening, you get banned in the firewall.
Iptables provides a feature adding an IP to a set if the address connects n times before s seconds. Let's just set it to ONCE so the address is banned on first connection.
For the record, a "set" is an extra iptables feature allowing to add many IP addresses like an OpenBSD PF table. We need separate sets for IPv4 and IPv6, they don't mix well.
The configuration isn't stateless, it creates a file /var/lib/ipset.conf , so if you want to make changes like expiration time to the sets while they already exist, you will need to use ipset yourself.
And most importantly, because of the way the firewall service is implemented, if you don't use this file anymore, the firewall won't reload.
I've lost a lot of time figuring why: when NixOS reloads the firewall service, it uses the new reload script which doesn't include the cleanup from stopCommand, and this fails because the NixOS service didn't expect anything in the INPUT chain.
In this case, you have to manually delete the rules in the INPUT chain in for IPv4 and IPv6, or reboot your system that will start with a fresh set, or flush all rules in iptables and restart the firewall service.
Within operating system kernels, at least for Linux and the BSDs, there is a mechanism called "out of memory killer" which is triggered when the system is running out of memory and some room must be made to make the system responsive again.
However, in practice this OOM mechanism doesn't work well. If the system is running out of memory, it will become totally unresponsive, and sometimes the OOM killer will help, but it may take like 30 minutes, but sometimes it may be stuck forever.
Today, I stumbled upon a nice project called "earlyoom", which is an OOM manager working in the user land instead of inside the kernel, which gives it a lot more flexibility about its actions and the consequences.
earlyoom is simple in that it's a daemon running as root, using nearly no memory, that will regularly poll for remaining swap memory and RAM memory, if the current level are below the threshold of both, actions will be taken.
What's cool is you can tell it to prefer some processes to terminate first, and some processes to avoid as much as possible. For some people, it may be preferable to terminate a web browser first and instant messaging than their development software.
The command line above means that if my system has less than 2% of its RAM and less than 2% of its swap available, earlyoom will try to terminate existing program whose binary matches electron/libreoffice/gimp etc.... and avoid programs named X/Plasma.*/konsole/kwin.
For configuring it properly as a service, explanations can be found in the project README file.
This program is a pleasant surprise to me, I often run out of memory on my laptop because I'm running some software requiring a lot of memory for good reasons, and while the laptop has barely enough memory to run them, I should have most of the other software close to make it fit in. However, when I forget to close them, the system would just lock up for a while, which most often require a hard reboot. Being able to avoid this situation is a big plus for me. Of course, adding some swap space would help, but I prefer to avoid adding more swap as it's terribly inefficient and only postpone the problem.
Keeping an OpenBSD system up-to-date requires two daily operation:
updating the base system with the command: /usr/sbin/syspatch
updating the packages (if any) with the command: /usr/sbin/pkg_add -u
However, OpenBSD isn't very friendly with regard to what to do after upgrading: modified binaries should be restarted to use the new code, and a new kernel requires an upgrade
It's not useful to update if the newer binaries are never used.
I wrote a small script to automatically reboot if syspatch deployed a new kernel. Instead of running syspatch from a cron job, you can run a script with this content:
#!/bin/sh
OUT=$(/usr/sbin/syspatch)
SUCCESS=$?
if [ "$SUCCESS" -eq 0 ]
then
if echo "$OUT" | grep reboot >/dev/null
then
reboot
fi
fi
It's not much, it runs syspatch and if the output contains "reboot", then a reboot of the system is done.
This works well for system services, except when the binary is different from the service name like for prosody, in which case you must know the exact name of the binary.
But for long-lived commands like a 24/7 emacs or an IRC client, there isn't any mechanism to handle it. At best, you can email you checkrestart output, or run checkrestart upon SSH login.
All the computers above used to run OpenBSD, let me explain why I migrated. It was a very complicated choice for me, because I still like OpenBSD despite I uninstalled it.
NixOS offers more software choice than OpenBSD, this is especially true for recent software, and porting them to OpenBSD is getting difficult over time.
After spending too much time with OpenBSD, I wanted to explore a whole new world, NixOS being super different, it was a good opportunity. As a professional IT worker, it's important for me to stay up to date, Linux ecosystem evolved a lot over that past ten years. What's funny is OpenBSD and NixOS share similar issues such as not being able to use binaries found on the Internet (but for various reasons)
NixOS maintenance is drastically reduced compared to OpenBSD
NixOS helps me to squeeze more from my hardware (speed, storage capacity, reliability)
systemd: I bet this one will be controversial, but since I learned how to use it, I really like it (and NixOS make it even greater for writing units)
Security is hard to measure, but it's the main argument in favor of OpenBSD, however it is possible to enable mitigations on Linux as well such as hardened memory allocator or a hardened Kernel. OpenBSD isn't practical to separate services from running all in the same system, while on Linux you can easily sandbox services. In the end, the security mechanisms are different, but I feel the result is pretty similar for my threat model of protecting against script kiddies.
I give a bonus point for Linux for its ability to account CPU/Memory/Swap/Disk/network per user, group and process. This allows spotting unusual activity. Security is about protection, but also about being aware of intrusion, OpenBSD isn't very good at it at the moment.
One issue I had migrating my mail server and the router was to find what changes were made in /etc. I was able to figure which services were enabled, but not really all the steps done a few years ago to configure them. I had to scrape all the configuration file to see if it looked like verbatim default configuration or something I changed manually.
This is where NixOS shines for maintenance and configuration, everything is declarative, so you never touch anything in /etc. At anytime, even in a few years, I'll be able to exactly tell what I need for each service, without having to dig up /etc/ and compare with default files. This is a saner approach, and also ease migration toward another system (OpenBSD? ;) ) because I'd just have to apply these changes to configuration files.
Working with NixOS can be disappointing. Most of the system is read-only, you need to learn a new language (Nix) to configure services, you have to "rebuild" your system to make a change as simple as adding an entry in /etc/hosts, not very "Unix-like".
Your biggest friend is the man page configuration.nix which contains all the possible configurations settings available in NixOS, from Kernel choice and grub parameters, to Docker containers started at boot or your desktop environment.
The workflow is pretty easy, take your configuration.nix file, apply changes to it, and run "nixos-rebuild test" (or switch if you prefer) to try the changes. Then, you may want something more elaborated like tracking your changes in a git or darcs repository, and start sharing pieces of configuration between machines.
But in the end, you just declare some configuration. I prefer to keep my configurations very easy to read, I still don't have any modules or much variable, the common pieces are just .nix files imported for the systems needing it. It's super easy to track and debug.
After a while, I found it very tedious to have to run nixos-rebuild on each machine to keep them up to date, so I started using the autoUpgrade module which basically do it for you in a scheduled task.
But then, I needed to centralize each configuration file somewhere, and have fun with ssh keys because I don't like publishing my configuration files publicly. Which isn't optimal either as if you make a change locally, you need to push the changes and connect to the remote host to pull the changes and rebuild immediately instead of waiting for the auto upgrade process.
So, I wrote bento, which allows me to manage all the configuration files in a single place, but better than that, I can build the configuration locally to ensure they will work once shipped. I quickly added a way to track the status of each remote system to be sure they picked up and applied the changes (every 10 minutes). Later, I improved the network efficiency by central management computer as a local binary cache, so other systems are now downloading packages from it locally, instead of downloading them again from the Internet.
The coolest thing ever is that I can manage offline systems such as my work laptop, I can update its configuration file in the weekend for an update or to improve the environment (it mostly shares the same configuration as my main laptop), and it will automatically pick it up when I boot it.
Moving to NixOS was a very good and pleasant experience, but I had some knowledge about it before starting. It might be confusing a lot of people, and you certainly need to get into NixOS mindset to appreciate it.
This is my work computer with a big Nix store, and some build programs involving a lot of cache files and many git repositories.
Processed 3570629 files, 894690 regular extents (1836135 refs), 2366783 inline.
Type Perc Disk Usage Uncompressed Referenced
TOTAL 61% 55G 90G 155G
none 100% 35G 35G 52G
zlib 37% 20G 54G 102G
prealloc 100% 138M 138M 67M
The output reads that the real disk usage is 61%, so 39% of the disk compressed data. We have more details per compression algorithm about the content, none represents uncompressed data and zlib the files compressed using this algorithm.
Files compressed with zlib are down to 37% of their real size, this is not bad. I made a mistake when creating the BTRFS mount point: I used zlib compression algorithm which is quite obsolete nowadays. For history record, zlib is the library used to provide the "deflate compression algorithm" found in zip or gzip.
Let's change the compression to use zstd algorithm instead. This can be changed with the command btrfs filesystem defrag -czstd -r /. Basically, all files are scanned, if they can be compressed with zstd, they are rewritten on the disk with the new algorithm.
My own laptop has a huge Nix store, a lot of binaries files (music, pictures), a few hundreads of gigabytes of video games. I suppose it's quite a realistic and balanced environment.
Processed 1804099 files, 755845 regular extents (1295281 refs), 980697 inline.
Type Perc Disk Usage Uncompressed Referenced
TOTAL 93% 429G 459G 392G
none 100% 414G 414G 332G
zstd 34% 15G 45G 59G
prealloc 100% 92M 92M 91M
The saving due to compression is 30 GB, but this only count as 7% of the global file system. That's not impressive compared to the other computer, but having an extra 30 GB for free is clearly something I enjoy.
NixOS is cool, but it's super cool because it has modules for many services, so you don't have to learn how to manage them (except if you want them in production), and you don't need to update them like a container image.
But it's specific to NixOS, while the modules are defined in the nix nixpkgs repository, you can't use them if you are not using NixOS.
But there is a trick, it's called arion and is able to generate containers to leverage NixOS modules power in them, without being on NixOS. You just need to have Nix installed locally.
Long story short, docker is a tool to manage containers but requires going through a local socket and root daemon to handle this. Podman is a docker drop-in alternative that is almost 100% compatible (including docker-compose), and can run containers in userland or through a local daemon for more privileges.
Arion works best with podman, this is so because it relies on some systemd features to handle capabilities, and docker is diverting from this while podman isn't.
Arion can create different kind of container, using more or less parts of NixOS. You can run systemd services from NixOS, or a full blown NixOS and its modules, this is what I want to use here.
There are examples of the various modes that are provided in arion sources, but also in the documentation.
We are now going to create a container to run a Netdata instance:
Create a file arion-compose.nix
{
project.name = "netdata";
services.netdata = { pkgs, lib, ... }: {
nixos.useSystemd = true;
nixos.configuration.boot.tmpOnTmpfs = true;
nixos.configuration = {
services.netdata.enable = true;
};
# required for the service, arion tells you what is required
service.capabilities.SYS_ADMIN = true;
# required for network
nixos.configuration.systemd.services.netdata.serviceConfig.AmbientCapabilities =
lib.mkForce [ "CAP_NET_BIND_SERVICE" ];
# bind container local port to host port
service.ports = [
"8080:19999" # host:container
];
};
}
And a file arion-pkgs.nix
import <nixpkgs> {
system = "x86_64-linux";
}
And then, run arion up -d, you should have Netdata reachable over http://localhost:8080/ , it's managed like any docker / podman container, so usual commands work to stop / start / export the container.
Of course, this example is very simple (I choose it for this reason), but you can reuse any NixOS module this way.
If you change the network parts, you may need to delete the previous network creating in docker. Just use docker network ls to find the id, and docker network rm to delete it, then run arion up -d again.
Arion is a fantastic tool allowing to reuse NixOS modules anywhere. These modules are a huge weight in NixOS appeal, and being able to use them outside is a good step toward a ubiquitous Nix, not only to build programs but also to run services.
This program is a simple service to run on a computer, it will automatically gather a ton of metrics and make them easily available over the local TCP port 19999. You just need to run Netdata and nothing else, and you will have every metrics you can imagine from your computer, and some explanations for each of them!
That's pretty cool because Netdata is very efficient, it draws nearly no CPU while gathering a few thousands metrics every few seconds, and is memory efficient and can be constrained to a dozen of megabytes.
While you can export its metrics to something like graphite or Prometheus, you lose the nice display which is absolutely a blast compare to Grafana (in my opinion).
Update: as pointed out by a reader (thanks!), it's possible to connect Netdata instances to only one used for viewing metrics. I'll investigate this soon.
Netdata also added some machine learning anomaly detection, it's simple and doesn't use many resources or require a GPU, it only builds statistical models to be able to report if some metrics have an unusual trend. It takes some time to gather enough data, and after a few days it's starting to work.
Here is a simple configuration on NixOS to connect a headless node without persistency to send all on a main Netdata server storing data but also displaying them.
You need to generate an UUID with uuidgen, replace UUID in the text with the result. It can be per system or shared by multiple Netdata instances.
My networks are 10.42.42.0/24 and 10.43.43.0/24, I'll allow everything matching 10.* on the receiver, I don't open port 19999 on a public interface.
Netdata company started a "cloud" offer that is free, but they plan to keep it free but also propose more services for paying subscribers. The free plan is just a convenience to see metrics from multiple nodes at the same place, they don't store any metrics apart metadata (server name, OS version, kernel, etc..), when you look at your metrics, they just relay from your server to your web browser without storing the data.
The free cloud plan offers a correlating feature, but I still didn't have the opportunity to try it, and also email alerting when an alarm is triggered.
I strongly dislike this method as I'm not a huge fan of downloading script to run as root that are not provided by my system.
When you want to add a new node, you will be given a long command line and a token, keep that token somewhere. NixOS Netdata package offers a script named netdata-claim.sh (which seems to be part of Netdata source code) that will generate a pair of RSA keys, and look for the token in a file.
Netdata is really a wonderful tool, ideally I'd like it to replace all the Grafana + storage + agent stack, but it doesn't provide persistent centralized storage compatible with its dashboard. I'm going to experiment with their Netdata cloud service, I'm not sure if it would add value for me, and while they have a very correct data privacy policy, I prefer to self-host everything.
Hello 👋🏻, it's been a long time I didn't have to take a look at monitoring servers. I've set up a Grafana server six years ago, and I was using Munin for my personal servers.
However, I recently moved my server to a small virtual machine which has CPU and memory constraints (1 core / 1 GB of memory), and Munin didn't work very well. I was curious to learn if the Grafana stack changed since the last time I used it, and YES.
There is that project named Prometheus which is used absolutely everywhere, it was time for me to learn about it. And as I like to go against the flow, I tried various changes to the industry standard stack by using VictoriaMetrics.
In this article, I'm using NixOS configuration for the examples, however it should be obvious enough that you can still understand the parts if you don't know anything about NixOS.
VictoriaMetrics is a Prometheus drop-in replacement that is a lot more efficient (faster and use less resources), which also provides various API such as Graphite or InfluxDB. It's the component storing data. It comes with various programs like VictoriaMetrics agent to replace various parts of Prometheus.
Update: a dear reader shown me VictoriaMetrics can be used to scrape remote agents without the VictoriaMetrics agent, this reduce the memory usage and configuration required.
Prometheus is a time series database, which also provide a collecting agent named Node Exporter. It's also able to pull (scrape) data from remote services offering a Prometheus API.
NixOS is an operating system built with the Nix package manager, it has a declarative approach that requires to reconfigure the system when you need to make a change.
4. Setup 2: VictoriaMetrics + node-exporter in pull model §
In this setup, a VictoriaMetrics server is running on a server along with Grafana. A VictoriaMetrics agent is running locally to gather data from remote servers running node_exporter.
Running it on my server, Grafana takes 67 MB, the local node_exporter 12.5 MB, VictoriaMetrics 30 MB and its agent 13.8 MB.
5. Setup 3: VictoriaMetrics + node-exporter in push model §
In this setup, a VictoriaMetrics server is running on a server along with Grafana, on each server node_exporter and VictoriaMetrics agent are running to export data to the central VictoriaMetrics server.
Running it on my server, Grafana takes 67 MB, the local node_exporter 12.5 MB, VictoriaMetrics 30 MB and its agent 13.8 MB, which is exactly the same as the setup 2, except the VictoriaMetrics agent is running on all remote servers.
In this setup, a VictoriaMetrics server is running on a server along with Grafana, servers are running Collectd sending data to VictoriaMetrics graphite API.
Running it on my server, Grafana takes 67 MB, VictoriaMetrics 30 MB and Collectd 172 kB (yes).
The server requires VictoriaMetrics to run exposing its graphite API on ports 2003.
Note that in Grafana, you will have to escape "-" characters using "\-" in the queries. I also didn't find a way to automatically discover hosts in the data to use variables in the dashboard.
UPDATE: Using write_tsdb exporter in collectd, and exposing a TSDB API with VictoriaMetrics, you can set a label to each host, and then use the query "label_values(status)" in Grafana to automatic discover hosts.
The first section named #!/bin/introduction" is on purpose and not a mistake. It felt super fun when I started writing the article, and wanted to keep it that way.
The Collectd setup is the most minimalistic while still powerful, but it requires lot of work to make the dashboards and configure the plugins correctly.
bento is now a single script, easy to package and add to $PATH. Before that it was a set of scripts with a shared shell files with functions in it, not very practical…
the hosts directory can contain directories with flakes in it, that may contain multiple hosts, it’s now handled. If there is no flake in it, then the machine is named after the directory name
bento supports rollbacks, if something is wrong during the deployment then the previous system is roll backed
enhancement to the status output when you don't have a flaked system, as build are not reproducible (without efforts) we can't really compare local and remote builds
machine local version remote version state time
------- --------- ----------- ------------- ----
interbus non-flakes 1dyc4lgr 📌 up to date 💚 (build 11s)
kikimora 996vw3r6 996vw3r6 💚 sync pending 🚩 (build 5m 53s) (new config 2m 48s)
nas r7ips2c6 lvbajpc5 🛑 rebuild pending 🚩 (build 5m 49s) (new config 1m 45s)
t470 b2ovrtjy ih7vxijm 🛑 rollbacked 🔃 (build 2m 24s)
x1 fcz1s2yp fcz1s2yp 💚 up to date 💚 (build 2m 37s)
network measurements shown that polling for configuration changes costs 5.1 kB IN and OUT
many checks has been added when something is going wrong
At work, we have a weekly "knowledge sharing" meeting, yesterday I talked about the state of NixOS deployments tools.
I had to look at all the tools we currently have at hand before starting my own, so it made sense to share all what I found.
This is a real topic, it doesn't make much sense to use regular sysadmins tools like ansible / puppet / salt etc... on NixOS, we need specific tools, and there is currently a bunch of them, and it can be hard to decide which one to use.
I was looking for a simple way to prevent pushing a specific git branch. A few searches on the Internet didn't give me good results, so let me share a solution.
Project update: the report is now able to compare if the remote server is using the NixOS version we built locally. This is possible as NixOS builds are reproducible, I get the same result on the server and the remote system.
The tool is getting in a better shape, the code received extra checks in a lot of place.
A bit later (blog post update), I added the possibility to trigger the update from the user.
With systemd it's possible to trigger a command upon connecting on a socket, I made bento systemd service to listen on port TCP/51337, a connection would start the service "bento-update.service", and display the output to the TCP client.
This totally works in the web browser, it's now possible to create a bookmark that just starts the update and give instant feedback about the update process. This will be particularly useful in case of a debug phone session to ask the remote person to trigger an update on their side instead of waiting for a timer.
It is now possible to differenciate the "not up to date" state into two categories:
the bento scripts were updated but not NixOS version change, this is called "sync pending". Changes could be distributing the updating file to give a new address for the remote server, so we can ensure they all received it.
the local NixOS version differs from the remote version, a rebuild is required, thus it's called "rebuild pending"
The "sync pending" is very fast, it only need to copy the files, but won't rebuild anything.
machine local version remote version state time
------- --------- ----------- ------------- ----
kikimora 996vw3r6 996vw3r6 💚 sync pending 🚩 (build 5m 53s) (new config 2m 48s)
nas r7ips2c6 lvbajpc5 🛑 rebuild pending 🚩 (build 5m 49s) (new config 1m 45s)
t470 ih7vxijm ih7vxijm 💚 up to date 💚 (build 2m 24s)
x1 fcz1s2yp fcz1s2yp 💚 up to date 💚 (build 2m 37s)
Bento received a new feature, it is now able to report if the remote hosts are up-to-date, how much time passed since their last update, and if they are not up-to-date, how long passed since the configuration change.
As Bento is using SFTP, it's possible to deposit information on the central server, I'm currently using log files from the builds, and compare this date to the date of the configuration.
This will be very useful to track deployments across the fleet. I plan to also check the version expected for a host and make them report their version after an update, this should possible for flakes system at least.
I pushed a new version affecting all hosts on the SFTP server, and run the status report regularly.
This is the output 15 seconds after making the changes available.
status of kikimora not up to date 🚩 (last_update 15m 6s ago) (since config change 15s ago)
status of nas not up to date 🚩 (last_update 12m ago) (since config change 15s ago)
status of t470 not up to date 🚩 (last_update 16m 9s ago) (since config change 15s ago)
status of x1 not up to date 🚩 (last_update 16m 24s ago) (since config change 14s ago)
This is the output after two systems picked up the changes and reported a success.
status of kikimora not up to date 🚩 (last_rebuild 16m 46s ago) (since config change 1m 55s ago)
status of nas up to date 💚 (last_rebuild 8s ago)
status of t470 not up to date 🚩 (last_rebuild 17m 49s ago) (since config change 1m 55s ago)
status of x1 up to date 💚 (last_rebuild 4s ago)
This is the output after all systems reported a success.
status of kikimora up to date 💚 (last_rebuild 0s ago)
status of nas up to date 💚 (last_rebuild 1m 24s ago)
status of t470 up to date 💚 (last_rebuild 1m 2s ago)
status of x1 up to date 💚 (last_rebuild 1m 20s ago)
secure 🛡️: each client can only access its own configuration files (ssh authentication + sftp chroot)
efficient 🏂🏾: configurations can be built on the central management server to serve binary packages if it is used as a substituters by the clients
organized 💼: system administrators have all configurations files in one repository to easy management
peace of mind 🧘🏿: configurations validity can be verified locally by system administrators
smart 💡: secrets (arbitrary files) can (soon) be deployed without storing them in the nix store
robustness in mind 🦾: clients just need to connect to a remote ssh, there are many ways to bypass firewalls (corkscrew, VPN, Tor hidden service, I2P, ...)
extensible 🧰 🪡: you can change every component, if you prefer using GitHub repositories to fetch configuration files instead of a remote sftp server, you can change it
for all NixOS 💻🏭📱: it can be used for remote workstations, smartphones running NixoS, servers in a datacenter
The project is still bare right now, I started it yesterday and I have many ideas to improve it:
package it to provide commands in $PATH instead of adding scripts to your config repository
add a rollback features in case an upgrade is losing connectivity
upgrades can depose a log file in the remote sftp server
upgrades could be triggered by the user by accessing a local socket, like opening a web page in a web browser to trigger it, if it returns output that'd be better
provide more useful modules in the utility nix file (automatically use the host as a binary cache for instance)
have a local information how to ssh to the client to ease the rebuild trigger (like a SSH file containing ssh command line)
a way to tell a client (when using flakes) to try to update flakes every time even if no configuration changed, to keep them up to date
Let's continue my series trying to design a NixOS fleet management.
Yesterday, I figured out 3 solutions:
periodic data checkout
pub/sub - event driven
push from central management to workstations
I retained solutions 2 and 3 only because they were the only providing instantaneous updates. However, I realize we could have a hybrid setup because I didn't want to let the KISS solution 1 away.
In my opinion, the best we can create is a hybrid setup of 1 and 3.
In this setup, all workstations will connect periodically to the central server to look for changes, and then trigger a rebuild. This simple mechanism can be greatly extended per-host to fit all our needs:
periodicity can be configured per-host
the rebuild service can be triggered on purpose manually by the user clicking on a button on their computer
the rebuild service can be triggered on purpose manually by a remote sysadmin having access to the system (using a VPN), this partially implements solution 3
the central server can act as a binary cache if configured per-host, it can be used to rebuild each configuration beforehand to avoid rebuilding on the workstations, this is one of Cachix Deploy arguments
using ssh multiplexing, remote checks for the repository can have a reduced bandwidth usage for maximum efficiency
a log of the update can be sent to the sftp server
the sftp server can be used to check connectivity and activate a rollback to previous state if you can't reach it anymore (like "magic rollback" with deploy-rs)
the sftp server is a de-facto available target for potential backups of the workstation using restic or duplicity
The mechanism is so simple, it could be adapted to many cases, like using GitHub or any data source instead of a central server. I will personally use this with my laptop as a central system to manage remote servers, which is funny as my goal is to use a server to manage workstations :-)
the sysadmin writes configuration files for each workstation in a dedicated directory
the sysadmin creates a symlink to a directory of common modules in each workstation directories
after a change, the sysadmin runs a program that will copy each workstation configuration into a directory in a chroot, symlinks have to be resolved
OPTIONAL: we can dry-build each host configuration to check if they work
OPTIONAL: we can build each host configuration to provide them as a binary cache
The directory holding configuration is likely to have a flake.nix file (can be a symlink to something generic), a configuration file, a directory with a hierarchy of files to copy as-this in the system to copy things like secrets or configuration files not managed by NixOS, and a symlink to a directory of nix files factorized for all hosts.
The NixOS clients will connect to their dedicated users with ssh using their private key, this allows to separate each client on the host system and restrict what they can access using the SFTP chroot feature.
A diagram of a real world case with 3 users would look like this:
The setup is very easy and requires only a few components:
a program to translates the configuration repository into separate directories in the chroot
some NixOS configuration to create the SFTP chroots, we just need to create a nix file with a list of pair of values containing "hostname" "ssh-public-key" for each remote host, this will automate the creation of the ssh configuration file
a script on the user side that connects and look for changes and run nixos-rebuild if something changes, maybe rclone could be used to "sync" over SFTP efficiently
a systemd timer for the user script
a systemd socket triggering the user script, so people can just open http://localhost:9999 to trigger the socket and forcing the update, create a bookmark named "UPDATE MY MACHINE" on the user system
I absolutely love this design, it's simple, and each piece can easily be replaced to fit one's need. Now, I need to start writing all the bits to make it real, and offer it to the world 🎉.
There is a NixOS module named autoUpgrade, I'm aware of its existence, but while it's absolutely perfect for the average user workstation or server, it's not practical for managing a fleet of NixOS efficiently.
I'm not a consumer of proprietary social networks, but sometimes I have to access content hosted there, and in that case I prefer to use a front-end reimplementation of the service.
These front-ends are network services that acts as a proxy to the proprietary service, and offer a different interface (usually cleaner) and also remove tracking / ads.
In your web browser, you can use the extension Privacy Redirect to automatically be redirected to such front-ends. But even better, you can host them locally instead of using public instances that may be unresponsive, on NixOS it's super easy.
As September 2022, libreddit, invidious and nitter have NixOS modules to manage them.
The following pieces of code can be used in your NixOS configuration file (/etc/nixos/configuration.nix as the default location) before running "nixos-rebuild" to use the newer configuration.
I focus on running the services locally and not expose them on the network, thus you will need a bit more configuration to add HTTPS and tune the performance if you need more users.
I very enjoy these front-ends, they draw a lot less resources when browsing these websites. I prefer to run them locally for performance reasons.
If you run such instances on your local computer, this doesn't help with regard to privacy. If you care about privacy, you should use public instances, or host your own public instances so many different users are behind the same service and this makes profiling harder. But if you want to host such instance, you may need to tweak the performance, and add a reverse proxy and a valid TLS certificate.
I have a grand project in my mind, and I need to think about it before starting any implementation. The blog is a right place for me to explain what I want to do and the different solutions.
It's related to NixOS. I would like to ease the management of a fleet of NixOS workstations that could be anywhere.
This could be useful for companies using NixOS for their employees, to manage all the workstations remotely, but also for people who may manage NixOS systems in various places (cloud, datacenter, house, family computers).
In this central management, it makes sense to not have your users with root access, they would have to call their technical support to ask for a change, and their system could be updated quickly to reflect the request. This can be super useful for remote family computers when they need an extra program not currently installed, and that you took the responsibility of handling your system...
With NixOS, this setup totally makes sense, you can potentially reproduce users bugs as you have their configuration, stage new changes for testing, and users can roll back to a previous working state in case of big regression.
Cachix company made it possible before I figure a solution. It's still not late to propose an open source alternative.
The purpose of this project is to have a central management system on which you keep the configuration files for all the NixOS around, and allow the administrator to make the remote NixOS to pick up the new configuration as soon as possible when required.
We can imagine three different implementations at the highest level:
a scheduled job on each machine looking for changes in the source. The source could be a git repository, a tarball or anything that could be used to carry the configuration.
NixOS systems could connect to something like a pub/sub and wait for an event from the central management to trigger a rebuild, the event may or not contain information / sources.
the central management system could connect to the remote NixOS to trigger the build / push the build
These designs have all pros and cons. Let's see them more in details.
this can lead to privacy issue as you know when each host is connected
this adds complexity to the server
this adds complexity on each client
firewalls usually don't like long-lived connections, HTTPS based solution would help bypass firewalls
2.3. Solution 3 - The central management pushes the updates to the remote systems §
In this scenario, the NixOS system would be reachable over a protocol allowing to run commands like SSH. The central management system would run a remote upgrade on it, or push the changes using tools like deploy-rs, colmena, morph or similar...
offline systems may be complicated to update, you would need to try to connect to them often until they are reachable
you can connect to the remote machine and potentially spy the user. In the alternatives above, you can potentially achieve the same by reconfiguring the computer to allow this, but it would have to be done on purpose
I tried to state the pros and cons of each setup, but I can't see a clear winner. However, I'm not convinced by the Solution 1 as you don't have any feedback or direct control on the systems, I prefer to abandon it.
The Solutions 2 and 3 are still in the competition, we basically ended with a choice between a PUSH and a PULL workflow.
This blog post is a republication of the article I published on my employer's blog under CC BY 4.0. I'm grateful to be allowed to publish NixOS related content there, but also to be able to reuse it here!
After the publication of the original post, the NixOS wiki got updated to contain most of this content, I added some extra bits for the specific use case of "options for the non-specialisation that shouldn't be inherited by specialisations" that wasn't convered in this text.
I often wished to be able to define different boot entries for different uses of my computer, be it for separating professional and personal use, testing kernels or using special hardware. NixOS has a unique feature that solves this problem in a clever way — NixOS specialisations.
A NixOS specialisation is a mechanism to describe additional boot entries when building your system, with specific changes applied on top of your non-specialised configuration.
You may have hardware occasionally connected to your computer, and some of these devices may require incompatible changes to your day-to-day configuration. Specialisations can create a new boot entry you can use when starting your computer with your specific hardware connected. This is common for people with external GPUs (Graphical Processing Unit), and the reason why I first used specialisations.
With NixOS, when I need my external GPU, I connect it to my computer and simply reboot my system. I choose the eGPU specialisation in my boot menu, and it just works. My boot menu looks like the following:
You can also define a specialisation which will boot into a different kernel, giving you a safe opportunity to try a new version while keeping a fallback environment with the regular kernel.
We can push the idea further by using a single computer for professional and personal use. Specialisations can have their own users, services, packages and requirements. This would create a hard separation without using multiple operating systems. However, by default, such a setup would be more practical than secure. While your users would only exist in one specialisation at a time, both users’ data are stored on the same partition, so one user could be exploited by an attacker to reach the other user’s data.
In a follow-up blog post, I will describe a secure setup using multiple encrypted partitions with different passphrases, all managed using specialisations with a single NixOS configuration. This will be quite awesome :)
As an example, we will create two specialisations, one having the user Chani using the desktop environment Plasma, and the other with the user Paul using the desktop environment Gnome. Auto login at boot will be set for both users in their own specialisations. Our user Paul will need an extra system-wide package, for example dune-release. Specialisations can use any argument that would work in the top-level configuration, so we are not limited in terms of what can be changed.
After applying the changes, run "nix-rebuild boot" as root. Upon reboot, in the GRUB menu, you will notice a two extra boot entries named “chani” and “paul” just above the last boot entry for your non-specialised system.
Rebuilding the system will also create scripts to switch from a configuration to another, specialisations are no exception.
Run "/nix/var/nix/profiles/system/specialisation/chani/bin/switch-to-configuration switch" to switch to the chani specialisation.
When using the switch scripts, keep in mind that you may not have exactly the same environment as if you rebooted into the specialisation as some changes may be only applied on boot.
Specialisations are a perfect solution to easily manage multiple boot entries with different configurations. It is the way to go when experimenting with your system, or when you occasionally need specific changes to your regular system.
I recently switched my home "NAS" (single disk!) to BTRFS, it's a different ecosystem with many features and commands, so I had to write a bit about it to remember the various possibilities...
BTRFS is an advanced file-system supported in Linux, it's somehow comparable to ZFS.
A BTRFS file-system can be made of multiple disks and aggregated in mirror or "concatenated", it can be split into subvolumes which may have specific settings.
Snapshots and quotas are applying on subvolumes, so it's important to think beforehand when creating BTRFS subvolumes, one may want to use a subvolume for /home and for /var for most cases.
It's possible to take an instant snapshot of a subvolume, this can be used as a backup. Snapshots can be browsed like any other directory. They exist in two flavors: read-only and writable. ZFS users will recognize writable snapshots as "clones" and read-only as regular ZFS snapshots.
Snapshots are an effective way to make a backup and rolling back changes in a second.
Raw filesystem can be sent / receive over network (or anything supporting a pipe) to allow incremental differences backup. This is a very effective way to do incremental backups without having to scan the entire file-system each time you run your backup.
I covered deduplication with bees, but one can also use the program "duperemove" (works on XFS too!). They work a bit differently, but in the end they have the same purpose. Bees operates on the whole BTRFS file-system, duperemove operates on files, it's different use cases.
BTRFS supports on-the-fly compression per subvolume, meaning the content of each file is stored compressed, and decompressed on demand. Depending on the files, this can result in better performance because you would store less content on the disk, and it's less likely to be I/O bound, but also improve storage efficiency. This is really content dependent, you can't compress binary files like pictures/videos/music, but if you have a lot of text and sources files, you can achieve great ratios.
From my experience, compression is always helpful for a regular user workload, and newer algorithm are smart enough to not compress binary data that wouldn't yield any benefit.
There is a program named compsize that reports compression statistics for a file/directory. It's very handy to know if the compression is beneficial and to which extent.
Fragmentation is a real thing and not specific to Windows, it matters a lot for mechanical hard drive but not really for SSDs.
Fragmentation happens when you create files on your file-system, and delete them: this happens very often due to cache directories, updates and regular operations on a live file-system.
When you delete a file, this creates a "hole" of free space, after some time, you may want to gather all these small parts of free space to have big chunks of free space, this matters for mechanical disks has the physical location of data is tied to the raw performance. The defragmentation process is just physically reorganizing data to order files chunks and free space into continuous blocks.
Defragmentation can be used to force compression in a subvolume, like if you want to change the compression algorithm or enabled compression after saving the files.
The scrubbing feature is one of the most valuable feature provided by BTRFS and ZFS. Each file in these file-system is associated with its checksum in some metadata index, this mean you can actually check each file integrity by comparing its current content with the checksum known in the index.
Scrubbing costs a lot of I/O and CPU because you need to compute the checksum of each file, but it's a guarantee for validating the stored data. In case of a corrupted file, if the file-system is composed of multiple disks (raid1 / raid5), it can be repaired from mirrored copies, it should work most of the time because such file corruption is often related to the drive itself, thus other drives shouldn't be affected.
Scrubbing can be started / paused / resumed, this is handy if you need to operate heavy I/O and you don't want the scrubbing process to increase time. While the scrub commands can take a device or a path, the path parameter is only used to find the related file-system, it won't just scrub the files in that directory.
When you are aggregating multiple disks into one BTRFS file-system, files are written on a disk and some other files are written to the other, after a while, a disk may contain more data than the other.
The rebalancing purpose is to redistribute data across the disks more evenly.
You can't create a swap file on a BTRFS disk without a tweak. You must create the file in a directory with the special attribute "no COW" using "chattr +C /tmp/some_directory", then you can move it anywhere as it will inherit the "no COW" flag.
If you try to use a swap file with COW enabled on it, swapon will report a weird error, but you get more details in the dmesg output.
It's possible to convert a ext2/3/4 file-system into BTRFS, obviously it must not be currently in use. The process can be rolled back until a certain point like defragmenting or rebalancing.
I occasionally get feedback about my blog, most of the time people are impressed with the rate of publication when they see the index page. I'm surprised it appears to be huge efforts, so I'll explain how I work on my blog.
I rarely spend more than 40 minutes for a blog post, the average blog post takes 20 minutes. Most of them are sharing something I fiddled with in the day or week, so the topic is still fresh for me. The content of the short articles often consists of dumping a few commands / configuration I used, and write a bit of text around so the reader knows what to expect from the article, how to use the content and what's the point of the topic.
It's important to keep track of commands/configuration beforehand, so when I'm trying something new, and I think I could write about it, I keep a simple text file somewhere with the few commands I typed or traps I encountered.
My fear with regard to the blog is to be out of ideas, this would mean I would have boring days and I would have nothing to write about. Sometimes I look at packages repository updates in different Linux distribution, and look at the projects homepages for which the name is unknown to me. This is a fun way to discover new programs / tools and ideas. When something looks interesting, I write its name down somewhere and may come later to it. I also write down any idea that I could get in my mind about some unusual setup I would like to try, if I come to try it, it will certainly end up as a new blog entry to share my experience.
There are two rules for the blog: having fun and not lie/be accurate. Having fun? Yes, writing can be fun, organizing ideas and sharing them is a cool exercise. Watching the result is fun. Thinking too much about perfection is not fun.
I prefer to write most of the blog posts in one shot, quickly proofread and publish, and be done with it. If I save a blog post as a draft, I may not pick it up quickly, and it's not fun to get into the context to continue it. I occasionally abandon some posts because of that, or simply delete the file and start over.
Sometimes it happens I'm wrong when writing, in the case I prefer to remove the blog post than keeping it online at all cost. When I know a text is terribly outdated, I either remove it from the index or update it.
I don't use any analytics services and I do the blog for free, the only incentive is to have fun and to know it will certainly help someone to look for information.
This website is generated with a custom blog generator I wrote a few years ago (cl-yag), the workflow to use it is very simple it never fails to me:
write the blog file in the format I want, I currently use GemText but in the past some blog posts were written in org-mode, man page or markdown
add an entry in the list of articles, this contains all the metadata such as the title, date, tags and description for the open graph protocol (optional)
run "make"
wait 30s, it's online on HTTP / gopher / Gemini
The program is really fast despite it's generating all the files every time, the "raw text to HTML" content is cached and reused when wrapping the HTML in the blog layout, the Gemini version is published as-this, and the gopher files are processed by a Perl script rewriting all the links and wrapping the text (takes a while).
Before publishing, I read my text and run a spellcheck program on it, my favorite is LanguageTool because it finds so many mistake versus aspell which only finds obvious typos.
It happens for some blog posts to be more elaborated, they often describe a complex setup and I need to ensure readers can reproduce all the steps and get the same results as me. This kind of blog post takes a day to write, they often require using a spare computer for experimentation, formatting, installing, downloading things, adjusting the text, starting over because I changed the text...
If you want to publish a blog, my advices would be to have fun, to use a blog/website generator that doesn't get in your way, and to not be afraid to get started. It could be scary at first to publish texts on the wild Internet, and fear to be wrong, but it happens, accept it, learn from your mistakes and improve for the next time.
There is a cool project related to NixOS, called Peerix. It's a local daemon exposed as a local substituter (a server providing binary packages) that will discover other Peerix daemon on the local network, and use them as a source of binary packages.
Peerix is a simple way to reuse package already installed somewhere on the network instead of downloading it again. Packages delivered by Peerix substituters are signed with a private key, so you need to import each computer public key before being able to download/use their packages. While this can be cumbersome, this also mandatory to prevent someone on the network to spoof packages.
Perrix should be used wisely, because secrets in your store could be leaked to others.
There is nothing special to do, when you update your system, or use nix-shell, the nix-daemon will use the local Peerix substituter first which will discover other Peerix instances if any, and will use them when possible.
You can check the logs of the peerix daemons using "journalctl -f -u peerix.service" on both systems.
While Peerix isn't a big project, it has a lot of potential to help NixOS users with multiple computers to have a more efficient bandwidth usage, but also build time. If you build the same project (with same inputs) on your computers, you can pull the result from the other.
Dear readers, given the popular demand for a RSS feed with HTML in it (which used to be the default), I modified the code to generate a new RSS file using HTML for its content.
I submitted a change to the nix package manager last week, and it got merged! It's now possible to define a bandwidth speed limit in the nix.conf configuration file.
This kind of limit setting is very important for users who don't have a fast Internet access, this allows the service to download packages while keep the network usable meanwhile.
Unfortunately, we need to wait for the next Nix version to be available to use it, fortunately it's easy to override a package settings to use the merge commit as a new version for nix.
Let's see how to configure NixOS to use a newer Nix version from git.
Minecraft is quite slow and unoptimized, fortunately using the mod "Sodium", you get access to more advanced video settings that allow to reduce the computer power usage, or just make the game playable for older computers.
Sometimes it feels I have specific use cases I need to solve alone. Today, I wanted to have a local Minecraft server running on my own workstation, but only when someone needs it. The point was that instead of having a big java server running all the system, Minecraft server would start upon connection from a player, and would stop when no player remains.
However, after looking a bit more into this topic, it seems I'm not the only one who need this.
As often, I prefer not to rely on third party tools when I can, so I found a solution to implement this using only systemd.
Even better, note that this method can work with any daemon given you can programmatically get the information whether to let it running or stop. In this example, I'm using Minecraft and the server stop is decided based on the player connecting fetch through rcon (a remote administration protocol).
The important part is the use of the systemd proxifier, it's a command to accept a connection over TCP and relay it to another socket, meanwhile you can do things such as starting a server and wait for it to be ready. This is the key of this setup, without it, this couldn't be possible.
Basically, listen-minecraft.socket listens on the public TCP port and runs listen-minecraft.service upon connection. This service needs hook-minecraft.service which is responsible for stopping or starting minecraft, but will also make listen-minecraft.service wait for the TCP port to be open so the proxifier will relay the connection to the daemon.
Then, minecraft-server.service is started alongside with stop-minecraft.timer which will regularly run stop-minecraft.service to try to stop the server if possible.
I used NixOS to configure my on-demand Minecraft server. This is something you can do on any systemd capable system, but I will provide a NixOS example, it shouldn't be hard to translate to a regular systemd configuration files.
{ config, lib, pkgs, modulesPath, ... }:
let
# check every 20 seconds if the server
# need to be stopped
frequency-check-players = "*-*-* *:*:0/20";
# time in second before we could stop the server
# this should let it time to spawn
minimum-server-lifetime = 300;
# minecraft port
# used in a few places in the code
# this is not the port that should be used publicly
# don't need to open it on the firewall
minecraft-port = 25564;
# this is the port that will trigger the server start
# and the one that should be used by players
# you need to open it in the firewall
public-port = 25565;
# a rcon password used by the local systemd commands
# to get information about the server such as the
# player list
# this will be stored plaintext in the store
rcon-password = "260a368f55f4fb4fa";
# a script used by hook-minecraft.service
# to start minecraft and the timer regularly
# polling for stopping it
start-mc = pkgs.writeShellScriptBin "start-mc" ''
systemctl start minecraft-server.service
systemctl start stop-minecraft.timer
'';
# wait 60s for a TCP socket to be available
# to wait in the proxifier
# idea found in http://web.archive.org/web/20240215035104/https://blog.developer.atlassian.com/docker-systemd-socket-activation/
wait-tcp = pkgs.writeShellScriptBin "wait-tcp" ''
for i in `seq 60`; do
if ${pkgs.libressl.nc}/bin/nc -z 127.0.0.1 ${toString minecraft-port} > /dev/null ; then
exit 0
fi
${pkgs.busybox.out}/bin/sleep 1
done
exit 1
'';
# script returning true if the server has to be shutdown
# for minecraft, uses rcon to get the player list
# skips the checks if the service started less than minimum-server-lifetime
no-player-connected = pkgs.writeShellScriptBin "no-player-connected" ''
servicestartsec=$(date -d "$(systemctl show --property=ActiveEnterTimestamp minecraft-server.service | cut -d= -f2)" +%s)
serviceelapsedsec=$(( $(date +%s) - servicestartsec))
# exit if the server started less than 5 minutes ago
if [ $serviceelapsedsec -lt ${toString minimum-server-lifetime} ]
then
echo "server is too young to be stopped"
exit 1
fi
PLAYERS=`printf "list\n" | ${pkgs.rcon.out}/bin/rcon -m -H 127.0.0.1 -p 25575 -P ${rcon-password}`
if echo "$PLAYERS" | grep "are 0 of a"
then
exit 0
else
exit 1
fi
'';
in
{
# use NixOS module to declare your Minecraft
# rcon is mandatory for no-player-connected
services.minecraft-server = {
enable = true;
eula = true;
openFirewall = false;
declarative = true;
serverProperties = {
server-port = minecraft-port;
difficulty = 3;
gamemode = "survival";
force-gamemode = true;
max-players = 10;
level-seed = 238902389203;
motd = "NixOS Minecraft server!";
white-list = false;
enable-rcon = true;
"rcon.password" = rcon-password;
};
};
# don't start Minecraft on startup
systemd.services.minecraft-server = {
wantedBy = pkgs.lib.mkForce [];
};
# this waits for incoming connection on public-port
# and triggers listen-minecraft.service upon connection
systemd.sockets.listen-minecraft = {
enable = true;
wantedBy = [ "sockets.target" ];
requires = [ "network.target" ];
listenStreams = [ "${toString public-port}" ];
};
# this is triggered by a connection on TCP port public-port
# start hook-minecraft if not running yet and wait for it to return
# then, proxify the TCP connection to the real Minecraft port on localhost
systemd.services.listen-minecraft = {
path = with pkgs; [ systemd ];
enable = true;
requires = [ "hook-minecraft.service" "listen-minecraft.socket" ];
after = [ "hook-minecraft.service" "listen-minecraft.socket"];
serviceConfig.ExecStart = "${pkgs.systemd.out}/lib/systemd/systemd-socket-proxyd 127.0.0.1:${toString minecraft-port}";
};
# this starts Minecraft is required
# and wait for it to be available over TCP
# to unlock listen-minecraft.service proxy
systemd.services.hook-minecraft = {
path = with pkgs; [ systemd libressl busybox ];
enable = true;
serviceConfig = {
ExecStartPost = "${wait-tcp.out}/bin/wait-tcp";
ExecStart = "${start-mc.out}/bin/start-mc";
};
};
# create a timer running every frequency-check-players
# that runs stop-minecraft.service script on a regular
# basis to check if the server needs to be stopped
systemd.timers.stop-minecraft = {
enable = true;
timerConfig = {
OnCalendar = "${frequency-check-players}";
Unit = "stop-minecraft.service";
};
wantedBy = [ "timers.target" ];
};
# run the script no-player-connected
# and if it returns true, stop the minecraft-server
# but also the timer and the hook-minecraft service
# to prepare a working state ready to resume the
# server again
systemd.services.stop-minecraft = {
enable = true;
serviceConfig.Type = "oneshot";
script = ''
if ${no-player-connected}/bin/no-player-connected
then
echo "stopping server"
systemctl stop minecraft-server.service
systemctl stop hook-minecraft.service
systemctl stop stop-minecraft.timer
fi
'';
};
}
The OpenBSD operating system is known to be secure, but also for having an accurate and excellent documentation. In this text, I'll try to figure out what makes the OpenBSD documentation so great.
After you installed OpenBSD, when you log in as root for the first time, you are greeted by a message saying you received an email. In fact, there is an email from Theo De Raadt crafted at install time which welcomes you to OpenBSD. It gives you a few hints about how to get started, but most notably it leads you to the afterboot(8) man page.
The afterboot(8) man page is described as "things to check after the first complete boot", it will introduce you to the most common changes you may want to do on your system. But most importantly, it explains how to use the man page like looking at the SEE ALSO section leading to other man pages related to the current one.
The man pages are a way to ship documentation with a software, usually you find a man page with the same name as the command or configuration file you want to document. It seems man pages appeared in 1971, the "man" stands for manual.
The manual pages are literally the core of the OpenBSD documentation, they follow some standard and contains much metadata in it. When you write a man page, you not only write text, but you describe your text. For instance, when we need to refer to another man page, we will use the tag "cross-reference", this rich format allows accurate rendering but also accurate searches.
When we refer at a page in a text discussion, we often write their name including the section, like man(1). If you see man(1), you understand it's a man page for "man" within the first section. There are 9 sections of man pages, this is an old way to sort them into categories, so if two things have the same name, you use the section to distinguishes them. Here is an example, "man passwd" will display passwd(1), which is a program to change the password of a user, however you could want to read passwd(5) which describes the format of the file /etc/passwd, in this case you would use "man 5 passwd". I always found this way of referring to man pages very practical.
On OpenBSD, there are man pages for all the base systems programs, and all the configuration files. We always try to be very consistent in the way information is shown, and the wording is carefully chosen to be as clear as possible. They are a common effort involving multiple reviewers, changes must be approved by at least one member of the team. When an OpenBSD program is modified, the man page must be updated accordingly. The pages are also occasionally updated to include more history explaining the origins of the commands, it's always very instructive.
When it comes to packages, there is no guarantee as we just bundle upstream software, they may not provide a man page. However, packages maintainers offers a "pkg-readme" file for packages requiring very specific tuning, theses files can be found in /usr/local/share/doc/pkg-readmes/.
One way to distribute information related to OpenBSD is the website, it explains what the project is about, on which hardware you can install it, why it exists and what it provides. It has a lot of information which are interesting before you install OpenBSD, so they can't be in a man pages.
I chose the treat the Frequently Asked Questions part of the website as a different support for documentation. It's a special place that contains real world use cases, while the man pages are the reference for programs or configuration, they lack the big picture overview like "how to achieve XY on OpenBSD". The FAQ is particularly well crafted, it has different categories such as multimedia, virtualization and VPNs...
The OpenBSD installation comes with a directory /etc/examples/ providing configuration file samples and comments. They are a good way to get started with a configuration file and understand the file format described in the according man page.
This part is not for end users, but for contributors. When a change is done in the sources, there is often a great commit message explaining the logic of the code and the reasons for the changes. I say often because some trivial changes doesn't require such explanations every time. The commit messages are a valuable source of information when you need to know more about a component.
Documentation is also keeping the users informed about important news. OpenBSD is using an opt-in method with the mailing lists. One list that is important for information is announce@openbsd.org, news releases and erratas are published here. This is a simple and reliable method working for everyone having an email.
This is an important point in my opinion, all the OpenBSD documentation is stored in the sources trees, they must be committed by someone with a commit access. Wiki often have orphan pages, outdated information, duplicates pages with contrary content. While they can be rich and useful, their content often tend to rot if the community doesn't spend a huge time to maintain them.
Finally, most of the above is possible because OpenBSD is developed by the same team. The team can enforce their documentation requirements from top to bottom, which lead to accurate and consistent documentation all across the system. This is more complicated on a Linux system where all components come from various teams with different methods.
When you get your hands on OpenBSD, you should be able to understand how to use all the components from the base system (= not the packages) with just the man pages, being offline doesn't prevent you to configure your system.
What makes a good documentation? It's hard to tell. In my opinion, having a trustful source of knowledge is the most important, whatever the format or support. If you can't trust what you read because it may be outdated, or not applying on your current version, it's hard to rely on it. Man pages are a good format, very practical, but only when they are well written, but this is a difficult task requiring a lot of time.
BTRFS is a Linux file system that uses a Copy On Write (COW) model. It is providing many features like on the fly compression, volumes management, snapshots and clones etc...
However, BTRFS doesn't natively support deduplication, which is a feature that looks for chunks in files to see if another file share that block, if so, only one chunk of data can be used for both files. In some scenarios, this can drastically reduce the disk space usage.
This is where we can use "bees", a program that can do offline deduplication for BTRFS file systems. In this context, offline means it's done when you run a command, while it could be live/on the fly where deduplication is instantly applied. HAMMER file system from DragonFly BSD is doing offline deduplication, while ZFS is doing it live. There are pros and cons for both models, ZFS documentation recommends 1 GB of memory per Terabyte of disk when deduplication is enabled, because it requires to have all chunks hashes in memory.
Bees is a service you need to install and start on your system, it has some limitations and caveats documented, but it should work for most users.
You can define a BTRFS file system on which you want deduplication and a load target. Bees will work silently when your system is below the load threshold, and will stop when the load exceeds the limit, this is a simple mechanism to prevent bees to eat all your system resources after some freshly modified/created files need to be scanned.
First time you run bees on a file system that is not empty, it may take a while to scan everything, but then it's really quiet except if you do heavy I/O operation like downloading big files, but it's doing a good job at staying behind the scene.
The code suppose your root partition is labelled "nixos", you want a hash table of 256 MB (this will be used by bees) and you don't want bees to run when the system load is more than 2.0.
You may want to tune the values, mostly the hash size, depending on your file system size. Bees is for terabytes file systems, but this doesn't mean you can use it for the average user disks.
I tried on my workstation with a lot of build artifacts and git repositories, bees reduced the disk usage from 160 GB to 124 GB, so it's a huge win here.
Later, I tried again on some Steam games with a few proton versions, it didn't save much on the games but saved a lot on the proton installations.
On my local cache server, it did save nothing, but is to be expected.
BTRFS is a solid alternative to ZFS, it requires less memory while providing volumes, snapshots and compression. The only thing it needed for me was deduplication, and I'm glad it's offline, so it doesn't use too much memory.
In this guide, I'll explain how to create a NixOS VM in the hosting company OpenBSD Amsterdam which only provides OpenBSD VMs hosted on OpenBSD.
I'd like to thank the team at OpenBSD Amsterdam who offered me a VM for this experiment. While they don't support NixOS officially, they are open to have customers running non-OpenBSD systems on their VMs.
You need to order a VM at OpenBSD Amsterdam first. You will receive an email with your VM name, its network configuration (IPv4 and IPv6), and explanations to connect to the hypervisor. We will need to connect to the hypervisor to have a serial console access to the virtual machine. A serial console is a text interface to a machine, you get the machine output displayed in your serial console client, and what you type is sent to the machine as if you had a keyboard connected to it.
It can be useful to read the onboarding guide before starting.
Our first step is to get into the OpenBSD installer, so we can use it to overwrite the disk with our VM.
Connect to the hypervisor, attach to your virtual machine serial console by using the following command, we admit your VM name is "vm40" in the example:
vmctl console vm40
You can leave the console anytime by typing "~~." to get back into your ssh shell. The keys sequence "~." is used to drop ssh or a local serial console, but when you need to leave a serial console from a ssh shell, you need to use "~~.".
You shouldn't see anything because you won't get anything displayed until something is showed in the machine virtual first tty, you can press "enter" and you should see a login prompt. We don't need it, but it confirms the serial console is working.
In parallel, connect to your VM using ssh, find the root password at the end of ~/.ssh/authorized_keys, use "su -" to become root and run "reboot".
You should see the shutdown sequence scrolling in the hypervisor ssh session displaying the serial console, wait for the machine to reboot to spot for the login prompt, in which you will type bsd.rd:
Using drive 0, partition 3.
Loading......
probing: pc0 com0 mem[638K 3838M 4352M a20=on]
disk: hd0+
>> OpenBSD/amd64 BOOT 3.53
com0: 115200 baud
switching console to com0
>> OpenBSD/amd64 BOOT 3.53
boot> bsd.rd [ENTER] # you need to type bsd.rd
At this step, in the serial console you should see a GRUB boot menu, it will boot the first entry after a few seconds. Then NixOS will start booting. In this menu you can access older versions of your system.
After the text stopped scrolling press enter. You should see a login prompt, you can log in with the username "root" and the default password "nixos" if you used my disk image.
If you used my template, your VM still doesn't have network connectivity, you need to edit the file /etc/nixos/configuration.nix in which I've put the most important variables you want to customize at the top of the file. You need to configure your IPv4 and IPv6 addresses and their gateways, and also your username with an ssh key to connect to it, and the system name.
Once you are done, run "nixos-rebuild switch", you should have network if you configured it correctly.
After the rebuild, run "passwd your_user" if you want to assign a password to your newly declared user.
You should be able to connect to your VM using its public IP and your ssh key with your username.
EXTRA: You may want to remove the profile minimal.nix which is imported: it disables documentation and the use of X libraries, but this may trigger packages compilation as they are not always built without X support.
Because we started with a small 2 GB raw disk to create the virtual machine, the partition still has 2 GB only. We will have to resize the partition /dev/vda1 to take all the disk space, and then resize the ext4 file system.
First step is to extend the partition to 50 GB, the size of the virtual disk offered at openbsd.amsterdam.
# nix-shell -p parted
# parted /dev/vda
(parted) resizepart 1
Warning: The partition /dev/vda1 is currently in use. Are you sure to continue?
Yes/No? yes
End? [2147MB]? 50GB
(parted) quit
Second step is to resize the file system to fill up the partition:
# resize2fs /dev/vda1
The file system /dev/vda1 is mounted on / ; Resizing done on the fly
old_desc_blocks = 1, new_desc_blocks = 6
The file system /dev/vda1 now has a size of 12206775 blocks (4k).
While I provide a bootable NixOS disk image at https://perso.pw/nixos/vm.disk.gz , you can generate yours with this guide.
create a raw disk of 2 GB to install the VM in it
qemu-img create -f raw vm.disk 2G
run qemu in a serial console to ensure it works, in the grub boot menu you will need to select the 4th choice enabling serial console in the installer. In this no graphics qemu mode, you can stop qemu by pressing "ctrl+a" and then "c" to drop into qemu's own console, and type "quit" to stop the process.
edit the file /mnt/etc/nixos/configuration.nix , the NixOS install has nano available by default, but you can have your favorite editor by using "nix-shell -p vim" if you prefer vim. Here is a configuration file that will work:
we can run the installer, it will ask for the root password, and then we can shut down the VM
nixos-install
systemctl poweroff
Now, you have to host the disk file somewhere to make it available through http or ftp protocol in order to retrieve it from the openbsd.amsterdam VM. I'd recommend compressing the file by running gzip on it, that will drastically reduce its size from 2GB to ~500MB.
The ext4 file system offers a way to encrypt specific directories, it can be enough for most users.
However, if you want to enable full disk encryption, you need to use the guide above to generate your VM, but you need to create a separate /boot partition and create a LUKS volume for the root partition. This is explained in the NixOS manual, in the installer section. You should adapt the according bits in the configuration file to match your new setup.
Don't forget you will need to connect to the hypervisor to type your password through the serial access every time you will reboot.
There is an issue with the OpenBSD hypervisor and Linux kernels at the moment, when you reboot your Linux VM, the VM process on the OpenBSD host crashes. Fortunately, it crashes after all the shutdown process is done, so it doesn't let the file system in a weird state.
This problem is fixed in OpenBSD -current as of August 2022, and won't happen in OpenBSD 7.2 hypervisors that will be available by the end of the year.
A simple workaround is to open a tmux session in the hypervisor to run an infinite loop regularly checking if your VM is running, and starting it when it's stopped:
while true ; do vmctl status vm40 | grep stopped && vmctl start vm40 ; sleep 30 ; done
It's great to have more choice when you need a VM. The OpenBSD Amsterdam team is very kind, professional and regularly give money to the OpenBSD project.
This method should work for other hosting providers, given you can access the VM disk from an live environment (installer, rescue system etc..). You may need to pay attention to the disk device, and if you can't obtain a serial console access to your system, you need to get the network done right in the VM before copying it to the disk.
In the same vein, you can use this method to install any operating system supported by the hypervisor. I chose NixOS because I love this system, and it's easy to reproduce a result with its declarative paradigm.
So, I recently switched my home router to Linux but had a network issues for devices that would get/renew their IP with DHCP. They were obtaining an IP, but they couldn't reach the router before a while (between 5 seconds to a few minutes), which was very annoying and unreliable.
After spending some time with tcpdump on multiple devices, I found the issue, it was related to ARP (the protocol to discover MAC addresses associate them with IPs).
I have an unusual network setup at home as I use my ISP router for Wi-Fi, switch and as a modem, the issue here is that there are two subnets on its switch.
Because the modem is reachable over 192.168.1.0/24 and is used by the router on that switch, but that the LAN network uses the same switch with 10.42.42.0/24, ARP packets arrives on two network interfaces of the router, for addresses that are non routables (ARP packets for 10.42.42.0 would arrive at the interface 192.168.1.0 or the opposite).
There is simple solution, but it was very complicated to find as it's not obvious. We can configure the Linux kernel to discard ARP packets that are related to non routable addresses, so the interface with a 192.168.1.0/24 address will discard packets for the 10.42.42.0/24 network and vice-versa.
You need to define the sysctl net.ipv4.conf.all.arp_filter to 1.
sysctl net.ipv4.conf.all.arp_filter=1
This can be set per interface if you have specific need.
This was a very annoying issue, incredibly hard to troubleshoot. I suppose OpenBSD has this strict behavior by default because I didn't have this problem when the router was running OpenBSD.
A while ago I wrote an OpenBSD guide to fairly share the Internet bandwidth to the LAN network, it was more or less working. Now I switched my router to Linux, I wanted to achieve the same. Unfortunately, it's not really documented as well as on OpenBSD.
The command needed for this job is "tc", acronym for Traffic Control, the Jack of all trades when it comes to manipulate your network traffic. It can add delays or packets lost (this is fun when you want to simulate poor conditions), but also traffic shaping and Quality of Service (QoS).
Fortunately, tc is not that complicated for what we will achieve in this how-to (fair share) and will give results way better than what I achieved with OpenBSD!
I don't want to explain how the whole stack involved works, but with tc we will define a queue on the interface we want to apply the QoS, it will create a number of flows assigned to each active network streams, each active flow will receive 1/total_active_flows shares of bandwidth. It mean if you have three connections downloading data (from the same computer or three different computers), they should in theory receive 1/3 of bandwidth each. In practice, you don't get exactly that, but it's quite close.
I made a script with variables to make it easy to reuse, it deletes any traffic control set on the interfaces and then creates the configuration. You are supposed to run it at boot.
It contains two variables, DOWNLOAD_LIMIT and UPLOAD_LIMIT that should be approximately 95% of each maximum speed, it can be defined in bits with kbits/mbits or in bytes with kbps/mbps, the reason to use 95% is to let the router some room for organizing the packets. It's like a "15 puzzle", you need one empty square to use it.
#!/bin/sh
TC=$(which tc)
# LAN interface on which you have NAT
LAN_IF=br0
# WAN interface which connects to the Internet
WAN_IF=eth0
# 95% of maximum download
DOWNLOAD_LIMIT=13110kbit
# 95% of maximum upload
UPLOAD_LIMIT=840kbit
$TC qdisc del dev $LAN_IF root
$TC qdisc del dev $WAN_IF root
$TC qdisc add dev $WAN_IF root handle 1: htb default 1
$TC class add dev $WAN_IF parent 1: classid 1:1 htb rate $UPLOAD_LIMIT
$TC qdisc add dev $WAN_IF parent 1:1 fq_codel noecn
$TC qdisc add dev $LAN_IF root handle 1: htb default 1
$TC class add dev $LAN_IF parent 1: classid 1:1 htb rate $DOWNLOAD_LIMIT
$TC qdisc add dev $LAN_IF parent 1:1 fq_codel
tc is very effective but not really straightfoward to understand. What's cool is you can apply it on the fly without incidence.
It has been really effective for me, now if some device is downloading on the network, it doesn't affect much the other devices when they need to reach the Internet.
After lurking on the Internet looking for documentation about tc, I finally found someone who made a clear explanation about this tool. tc is documented, but it's too abstract for me.
At home, I'm running my own router to manage Internet, run DHCP, do filter and caching etc... I'm using an APU2 running OpenBSD, it works great so far, but I was curious to know if I could manage to run NixOS on it without having to deal with serial console and installation.
It turned out it's possible! By configuring and creating a live NixOS USB image, one can plug the USB memory stick into the router and have an immutable NixOS.
Here is a diagram of my network. It's really simple except the bridge part that require an explanation. The APU router has 3 network interfaces and I only need 2 of them (one for WAN and one for LAN), but my switch doesn't have enough ports for all the devices, just missing one, so I use the extra port of the APU to connect that device to the whole LAN by bridging the two network interfaces.
There is currently an issue when trying to use a non default kernel, ZFS support is pulled in and create errors. By redefining the list of supported file systems you can exclude ZFS from the list.
In order to reduce usage of the USB memory stick, upon boot all the content of the liveUSB will be loaded in memory, the USB memory stick can be removed because it's not useful anymore.
boot.kernelParams = [ "copytoram" ];
The service irqbalance is useful as it assigns certain IRQ calls to specific CPUs instead of letting the first CPU core to handle everything. This is supposed to increase performance by hitting CPU cache more often.
As my APU wasn't running Linux, I couldn't know the name if the interfaces without booting some Linux on it, attach to the serial console and check their names. By using this setting, Ethernet interfaces are named "eth0", "eth1" and "eth2".
networking.usePredictableInterfaceNames = true;
Now, the most important part of the router setup, doing all the following operations:
- assign an IP for eth0 and a default gateway
- create a bridge br0 with eth1 and eth2 and assign an IP to br0
- enable NAT for br0 interface to reach the Internet through eth0
This creates a user solene with a predefined password, add it to the wheel and sudo groups in order to use sudo. Another setting allows wheel members to run sudo without password, this is useful for testing purpose but should be avoided on production systems. You could add your SSH public key to ease and secure SSH access.
This enables the service unbound, a DNS resolver that is able to do some caching as well. We need to allow our network 10.42.42.0/24 and listen on the LAN facing interface to make it work, and not forget to open the ports TCP/53 and UDP/53 in the firewall. This caching is very effective on a LAN server.
This enables the service miniupnpd, this can be quite dangerous because its purpose is to allow computer on the network to create NAT forwarding rules on demand. Unfortunately, this is required to play some video games and I don't really enjoy creating all the rules for all the video games requiring it.
This enables the service munin-node and allow a remote server to connect to it. This service is used to gather metrics of various data and make graphs from them. I like it because the agent running on the systems is very simple and easy to extend with plugins, and on the server side, it doesn't need a lot of resources. As munin-node listens on the port TCP/4949 we need to open it.
By building a NixOS live image using Nix, I can easily try a new configuration without modifying my router storage, but I could also use it to ssh into the live system to install NixOS without having to deal with the serial console.
Today we will learn about how to use sshfs, a program to mount a remote directory through ssh into our local file system.
But OpenBSD has a different security model than in other Unixes systems, you can't use FUSE (Filesystem in USErspace) file systems from a non-root user. And because you need to run your fuse mount program as root, the mount point won't be reachable by other users because of permissions.
Fortunately, with the correct combination of flags, this is actually achievable.
As root, we will run sshfs to mount a directory from t470-wifi.local (my laptop Wi-Fi IP address on my LAN) to make it available to our user with uid 1000 and gid 1000 (this is the ids for the first user added), you can find the information about your users with the command "id". We will also use the allow_other mount option.
This article will explain how to make the flakes enabled nix commands reusing the nixpkgs repository used as input to build your NixOS system. This will regularly save you time and bandwidth.
By default, nix commands using flakes such as nix shell or nix run are pulling a tarball of the development version of nixpkgs. This is the default value set in the nix registry for nixpkgs.
$ nix registry list | grep nixpkgs
global flake:nixpkgs github:NixOS/nixpkgs/nixpkgs-unstable
Because of this, when you run a command, you are likely to download a tarball of the nixpkgs repository including the latest commit every time you use flakes, this is particularly annoying because the tarball is currently around 30 MB. There is a simple way to automatically set your registry to define the nixpkgs repository to the local archive used by your NixOS configuration.
To your flake.nix file describing your system configuration, you should have something similar to this:
Edit /etc/nixos/configuration.nix and make sure you have "inputs" listed in the first line, such as:
{ lib, config, pkgs, inputs, ... }:
And add the following line to the file, and then rebuild your system.
nix.registry.nixpkgs.flake = inputs.nixpkgs;
After this change, running a command such as "nix shell nixpkgs#gnumake" will reuse the same nixpkgs from your nix store used by NixOS, otherwise it would have been fetching the latest archive from GitHub.
If you started using flakes, you may wonder why there are commands named "nix-shell" and "nix shell", they work totally differently.
nix-shell and non flakes commands use the nixpkgs offered in the NIX_PATH environment variable, which should be set to a directory managed by nix-channel, but the channels are obsoleted by flakes...
Fortunately, in the same way we synchronized the system flakes with the commands flakes, you can add this code to use the system nixpkgs with your nix-shell:
This requires your user to logout from your current session to be effective. You can then check nix-shell and nix shell use the same nixpkgs source with this snippet. This asks the full path of the test program named "hello" and compares both results, they should match if they use the same nixpkgs.
Flakes are awesome, and are in the way of becoming the future of Nix. I hope this article shed some light about nix commands, and saved you some bandwidth.
I found this information on a blog post of the company Tweag (which is my current employer) in a series of articles about Nix flakes. That's a bit sad I didn't find this information in the official NixOS documentation, but as flakes are still experimental, they are not really covered.
We will enable the attribute IPAccounting on the systemd service nix-daemon, this will make systemd to account bytes and packets that received and sent by the service. However, when the service is stopped, the counters are reset to zero and the information logged into the systemd journal.
In order to efficiently gather the network information over time into a database, we will run a script just before the service stops using the preStop service hook.
The script checks the existence of a sqlite database /var/lib/service-accounting/nix-daemon.sqlite, creates it if required, and then inserts the received bytes information of the nix-daemon service about to stop. The script uses the service attribute InvocationID and the current day to ensure that a tuple won't be recorded more than once, because if we restart the service multiple times a day, we need to distinguish all the nix-daemon instances.
Here is the code snippet to add to your /etc/nixos/configuration.nix file before running nixos-rebuild test to apply the changes.
systemd.services.nix-daemon = {
serviceConfig.IPAccounting = "true";
path = with pkgs; [ sqlite busybox systemd ];
preStop = ''
#!/bin/sh
SERVICE="nix-daemon"
DEST="/var/lib/service-accounting"
DATABASE="$DEST/$SERVICE.sqlite"
mkdir -p "$DEST"
# check if database exists
if ! dd if="$DATABASE" count=15 bs=1 2>/dev/null | grep -Ea "^SQLite format.[0-9]$" >/dev/null
then
cat <<EOF | sqlite3 "$DATABASE"
CREATE TABLE IF NOT EXISTS accounting (
id TEXT PRIMARY KEY,
bytes INTEGER NOT NULL,
day DATE NOT NULL
);
EOF
fi
BYTES="$(systemctl show "$SERVICE.service" -P IPIngressBytes | grep -oE "^[0-9]+$")"
INSTANCE="'$(systemctl show "$SERVICE.service" -P InvocationID | grep -oE "^[a-f0-9]{32}$")'"
cat <<EOF | sqlite3 "$DATABASE"
INSERT OR REPLACE INTO accounting (id, bytes, day) VALUES ($INSTANCE, $BYTES, date('now'));
EOF
'';
};
If you want to apply this to another service, the script has a single variable SERVICE that has to be updated.
Systemd services are very flexible and powerful thanks to the hooks provided to run script at the right time. While I was interested into network usage accounting, it's also possible to achieve a similar result with CPU usage and I/O accesses.
To be honest, this challenge was hard and less fun than the previous one as we couldn't communicate about our experiences. It was so hard to schedule my Internet needs over the days than I tried to not use it at all, leaving some time when I had some unexpected need to check something.
Nevertheless, it was still a good experience to go through, it helped me realize many daily small things required Internet without me paying attention anymore. Fortunately, I avoid most streaming services and my multimedia content is all local.
I spend a lot of time every day in instant messaging software, even if they work asynchronously, it often happen to have someone answering within seconds and then we start to chat and time passes. This was a huge time consumer of the daily limited Internet time available in the challenge.
We have a few other people who made the challenge, reading their reports was very interesting and fun.
Now this second challenge is over, our community is still strong and regained some activity. People are already thinking about the next edition and we need to find what do to next. An currently popular idea would be to reduce the Internet speed to RTC (~5 kB/s) instead of limiting time, but we still have some time to debate about the next rules.
We waited one year between the first and second challenge, but this doesn't mean we can't do this more often!
To conclude this article and challenge, I would like to give special thanks to all the people who got involved or interested into the challenge.
It's often said Docker is not very good with regard to security, let me illustrate a simple way to get root access to your Linux system through a docker container. This may be useful for people who would have docker available to their user, but whose company doesn't give them root access.
This is not a Docker vulnerability being exploited, just plain Docker by design. It is not a way to become root from *within* the container, you need to be able to run docker on the host system.
If you use this to break against your employer internal rules, this is your problem, not mine. I do write this to raise awareness about why Docker for systems users could be dangerous.
UPDATE: It is possible to run the Docker as a regular user since October 2021.
We will start a simple Alpine docker container, and map the system root file system / on the /mnt container directory.
docker run -v /:/mnt -ti alpine:latest
From there, you can use the command chroot /mnt to obtain a root shell of your system.
You are now free to use "passwd" to change root password, or visudo to edit sudo rules, or you could use the system package manager to install extra software you want.
If you don't understand why this works, here is a funny analogy. Think about being in a room as a human being, but you have a super power that allows you to imagine some environment in a box in front of you.
Now, that box (docker) has a specific feature: it permits you to take a piece of your current environment (the filesystem) to project it in the box itself. This can be useful if you want to imagine a beach environment and still have your desk in it.
Now, project your whole room (the host filesystem) into your box, and now, you are all mighty for what's happening in the box, which turn to be your own room (you are root, the super user).
Here is a draft for a protocol named PTPDT, an acronym standing for Pen To Paper Data Transfer. It comes with its companion specification Paper To Brain.
The protocol describes how a pen can be used to write data on a sheet of paper. Maybe it would be better named as Brain To Paper Protocol.
The writer uses a pen on a paper in order to duplicate information from his memories into the paper.
We won't go into technical implementation details about how the pen does transmit information into the paper, we will admit some ink or equivalent is used in the process without altering data.
When storing data with this protocol, paper should be incrementally numbered for ordered information that wouldn't fit on a single storage paper unit. The reader could then read the papers in the correct order by following the numbering.
It is advised to add markers before and after the data to delimit its boundaries. Such mechanism can increase reliability of extracting data from paper, or help to recover from mixed up papers.
It is recommended to use a single encoding, often known as language, for a single piece of paper. Abstract art is considered a blob, and hence doesn't have any encoding.
lossless: all the information is extracted and can be used and replicated by the reader
lossy: all the information is extracted and could be used by the reader
partial: some pieces of information are extracted with no guarantee it can be replicated or used
In order to retrieve data from paper, reader and anoreader must use their eyesight to pass the paper data to their brain which will decode the information and store it internally. If reader's brain doesn't know the encoding, the data could be lossy or partially extracted.
It's often required to make multiple read passes to achieve a lossless extraction.
There are different compression algorithms to increase the pen output bandwidth, the reader and anoreader must be aware of the compression algorithm used.
The protocol doesn't enforce encryption. The writer can encrypt data on paper so anoreader won't be able to read this, however this will increase the mental charge for both the writer and the reader.
As it's too tedious to monitor the time spent on the Internet, I'm now using a chronometer for the day... and stopped using Internet in small bursts. It's also currently super hot where I live right now, so I don't want to do much stuff with the computer...
I can handle most of my computer needs offline. When I use Internet, it's now for a solid 15 minutes, except when I connect from my phone for checking something quickly without starting my computer, I rarely need to connect it more than a minute.
This is a very different challenge than the previous one because we can't stay online on IRC all day speaking about tricks to improve our experience with the current challenge. On the other hand, it's the opportunity to show our writing skills to tell about what we are going through.
I didn't write the last days because there wasn't much to say. I miss internet 24/7 though, and I'll be happy to get back on the computer without having to track my time and stop after the hour, which always happen too soon!
I think my parents switched their Internet subscription from RTC to DSL around 2005, 17 years ago, it was a revolution for us because not only it was multiple time faster (up to 16 kB/s !) but it was unlimited in time! Since then, I only had unlimited Internet (no time, no quota), and it became natural to me to expect to have Internet all the time.
Because of this, it's really hard for me to just think about tracking my Internet time. There are many devices in my home connected to the Internet and I just don't think about it when I use them, I noticed I was checking emails or XMPP on my phone, I turned its Wi-Fi on in the morning and forgot about it then.
There are high chances I used more than my quota yesterday because of my phone, but I also forgot to stop the time accounting script. (It had a bug preventing it to stop correctly for my defense). And then I noticed I was totally out of time yesterday evening, I had to plan a trip for today which involved looking at some addresses and maps, despite I have a local OpenStreetMap database it's rarely enough to prepare a trip when you go somewhere the first time, and that you know you will be short on time to figure things out on the spot.
Ah yes, my car also has an Internet connection with its own LTE access, I can't count it as part as the challenge because it's not really useful (I don't think I used it at all), but it's there.
And it's in my Nintendo Switch too, but it has an airplane mode to disable connectivity.
And Steam (the game library) requires being online when streaming video games locally (to play on the couch)...
So, there are many devices and software silently (not always) relying on the Internet to work that we don't always know exactly why they need it.
While I said I wasn't really restrained with only one hour of Internet, this was yesterday. I didn't have a feeling to work on open source project in the day, but today I would like to help to review packages updates/changes, but I couldn't. Packaging requires a lot of bandwidth and time, it requires searching for errors if they are known or new, it just can't be done offline because it relies on many external packages that has to be downloaded, and with a DSL line it takes a lot of time to keep a system up to date with its development branch.
Of course, with some base materials like the project main repository, it's possible to contribute, but not really at reviewing packages.
I will add my counter a 30 minutes penalty for not tracking my phone Internet usage today. I still have 750 seconds of Internet when writing this blog post (including the penalty).
Yesterday I improved my blog deployment to reduce the time taken by the file synchronization process, from 18s to 4s. I'm using rsync, but I have four remote servers to synchronize: 1 for http, 1 for gemini, 1 for gopher and 1 for a gopher backup. As the output files of my blog are always generated and brand new, rsync was recopying all the files to update the modification time, now I'm using -c for checksum and -I to ignore times, and it's significantly faster and ensure the changes are copied. I insist about the changes being copied, because if you rely on size only, it will work 99% of the time, except when you fix a single letter type that won't change the file size... been there.
For now, I turned off my smartphone Wi-Fi because it would be hard to account its time.
My main laptop is using the very nice script from our community member prahou.
The script design is smart, it's accounting time and displaying time consumed, it can be described as a machine state like this:
+------------+ +----------------------------+
| wait for | | Accounting time for today |
| input | Type Enter | Internet is enabled |
| |------------------->| |
| Internet | | display time used |
| offline | | today |
+------------+ +----------------------------+
^ v
| press ctrl+C |
| (which is trapped to run a func) |
+-----------------------------------------+
As the way to disable / enable internet is specific to every one, the script has two empty fuctions: NETON and NETOFF, they enable or disable Internet access. On my Linux computer I found an easy way to achieve this by adding a bogus default route with a metric 1, bypassing my default route. Because the default route doesn't work my system can't reach the Internet, but it let my LAN in a working state.
So far, it's easy to remember I don't have Internet all the time, but with my Internet usage it works fine. I use the script to "start" Internet, check my emails, read IRC channels and reply, and then I disconnect. By using small amount of time, I can achieve most of my needs in less than a minute. However, that wouldn't be practical if I had to download anything big, and people with a fast Internet access (= not me) would have an advantage.
My guess about this first day being easy is that as I don't use any streaming service, I don't need to be connected all the time. All my data are saved locally, and most of my communication needs can be done asynchronously. Even publishing this blog post shouldn't consume more than 20 seconds.
I suppose it will be easy to forget about limited Internet time, so it will be best for me to run the accounting script in a terminal (disabling Internet until I manually accept to enable it), and think a bit ahead if I will need more time later so I can be more conservative about time usage.
So far, it's a great experience I enjoy a lot. I hope other participant will enjoy it as much as I do. We will start gathering and aggregating reports soon, so you could enjoy all the reports from our community.
Despite the challenge officially started today (10th July), it's not late to start it yourself. The important is to have fun, if you want to try, you could just use a chronometer and see if you could hold with only 60 minutes a day.
The first edition of the challenge consisted into spending a week (during your non-work time) using an old computer, the recommended machine specifications were 1 core and 512 MB of memory at best, however some people enjoyed doing this challenge with other specifications and requirements, and it's fine, the purpose of the challenge is to have fun.
While experimenting the challenge last year, a small but solid community gathered on IRC, we shared tips and our feelings about the challenge, it was very fun and a good opportunity to meet new people. One year later, the community is still there and over the last months we had regular ideas exchange for renewing the challenge.
I didn't want to do the same challenge again, the fun would be spoiled, and it would have a feeling of déjà vu. I recently shared a new idea and many adopted it, and it was clear this would be the main topic of the new challenge.
This new challenge will embrace the old time of RTC modems with a monthly time budget. Back in these days, in France at least, people had to subscribe to an ISP for a given price, but you would be able to connect only for 10, 20, 30, 40... hours a month depending on your subscription. Any extra hour was very expensive. We used the Internet the most efficiently possible because it was time limited (and very slow, 4 kB/s at best). Little story, phone lines were not available while a modem was connected, and we had to be careful not to forget to manually disconnect the modem after use, otherwise it would stay connected and wasting the precious Internet time! (and making expensive bills)
The new challenge rules are easy: you are allowed to _connect_ your computer to the Internet for a maximum cumulated time of 1h per day, from 10th to 17th July included. This mean you can connect six times for ten minutes, twice for thirty minutes, or once for one hour in the day.
Remember, the challenge is about having fun and helping you to step back on your computer habits, it's also recommended to share your thoughts and feeling a few times over the challenge week on your usual medias. There is nothing to prove to anyone, if you want to cheat or do the challenge with two or six hours a day, please do as you prefer.
This artwork was created by our community member prahou (thanks!), and is under the license CC BY-NC-ND 4.0, you can reuse it as-this. It features a CD because back in the RTC time, ISP were offering CDs to connect to the Internet and subscribe from home, I remember using those as flying discs.
When selling a product, it's always important to talk about the killer features, what makes a product a good one and why it would solve the customer problems.
If you were to use OpenBSD, you certainly would have a slight learning curve, but then the system is so stable over time that the acquired knowledge would be reused from release to release. Most base tools in OpenBSD are evolving while keeping compatibility with regard to how you administrate them.
Can we say so for the Linux ecosystem which changes its sound and init system every 5 years? Can we say so for Windows which revisites most of its interface at every new release?
Learning OpenBSD is a good investment that will save you time later, so you can use your computer without frustration.
OpenBSD comes with strong security defaults, you don't have to tweak anything, the development did it for you! You can confidently use your OpenBSD computer, and you will be safe from all the bad actors targetting mainstream systems.
Even more, OpenBSD takes care of your privacy and doesn't run any telemetry, doesn't record what you type, doesn't upload any data. The team took care of disabling microphone and webcam by faking their input stream with empty data until you explicitely allow one or the other to record audio/video.
Because you certainly don't want to suffer from big IT actors decisions affecting your favorite OS, OpenBSD is community driven and take care of not being infecting by big tech agendas. The system is made for the developers, by the developers, and you can use it as a customer! Doesn't this feel great to know the authors use their own software?
Rest assured that your brand-new computer will still be able to run OpenBSD in 20 years. The team is taking a special care of keeping compatibility for older hardware until it's too hard to find spare components. It's almost a lifetime of system upgrades for your hardware! Are the competitors still supporting Sparc64 and 32-bit PowerPC for a modern computer experience? I don't think so! The installer is still available for floppy disk, I think this says it all!
As OpenBSD is designed to be highly resilient and so simple that it can't break, be sure you won't waste time fixing problems on your system. With a FREE major update every six months and regular security updates, your system keeps being bulletproof with no more maintenance from you than running the update; more experienced users can even automate this using the built-in and free of charge task scheduler.
OpenBSD is perfect for people who want to become rich! Think about this, you love your OpenBSD system, and you want to make a product out of it? Perfect! The licencing allows you to make changes to OpenBSD, redistribute it, charge people for it, and you don't even have to show a single line of your product source code to your customers. This is a perfect licencing for people who would like to build proprietary devices based on OpenBSD, a rock solid system.
Against all industry standards, in case you would improve your OpenBSD, you are allowed to make changes to it without losing the warrantly coming with the licensing.
If you ever need help, you will have direct access for free to the mailing lists of the project, allowing you to exchange directly with the people developping OpenBSD.
Don't be afraid to jump into OpenBSD from another operating system, we took care of documenting everything you will need. We are very proud of our documentation, and you can even use your OpenBSD system without Internet connectivity and still being able to read the top-notch documentation to configure your system to your needs. No more need to use a search engine to find old blog posts with outdated and inaccurate advice.
You can install OpenBSD very fast by just answering to a few questions about the setup. However, you should never need to install OpenBSD more than once so most people will never notice about it. Experimented users can even automate installation to spread OpenBSD to their family without effort.
Of course, as a good salesperson, I would have to avoid some topics because this would make the customer lose interest into OpenBSD. However, they could be turned as a positive fact:
OpenBSD doesn't support Bluetooth, but you can see this as a security feature. The code was entirely removed from the kernel because Bluetooth is full of traps and could easily leak data over the air. You certainly don't want that?
You may think OpenBSD slow performance could hit your productivity, but on the contrary it's a feature that will prevent you from losing focus on what you are currently working on. Think about the Tortoise and the Hare!
Maybe your favorite software is proprietary and will not be provided for OpenBSD, then your provider is entirely at fault because they don't want to make their software compliant with OpenBSD strong quality requirements to provide a working binary
You may have heard some hardware won't run on OpenBSD, this can happen for very niche hardware. The OpenBSD team is working hard to give you the best experience on a selection of affordable hardware with premium support.
I hope you understood this was a fiction; OpenBSD is free and anyone can use it. It has strength and weaknesses, as always it's important to use the right tool for the right job. The team would be happy to receive contributions from you if you want to improve OpenBSD, by doing so you could help me improve my speech as a saleperson.
This is certainly not a common setup, but I have a laptop plugged on my TV through an external GPU, and it always has a gamepad connected to it. I was curious to see if I could use the gamepad to control mpv when watching videos; it turns out it's possible.
In this text, you will learn how to control mpv using a gamepad / game controller by configuring mpv.
All the work will happen in the file ~/.config/mpv/inputs.conf. As mpv uses the SDL framework this gives easy names to the gamepad buttons and axis. For example, forget about brand specific buttons names (A, B, Y, square, triangle etc...), and welcome generic names such as action UP, action DOWN etc...
Here is my own configuration file, comments included:
# left and right (dpad or left stick axis) will move time by 30 seconds increment
GAMEPAD_DPAD_RIGHT seek +30
GAMEPAD_DPAD_LEFT seek -30
# using up/down will move to next/previous chapter if the video supports it
GAMEPAD_DPAD_UP add chapter 1
GAMEPAD_DPAD_DOWN add chapter -1
# button down will pause or resume playback, the "cycle" keyword means there are different states (pause/resume)
GAMEPAD_ACTION_DOWN cycle pause
# button up will switch between windowed or fullscreen
GAMEPAD_ACTION_UP cycle fullscreen
# right trigger will increase playback speed every time it's pressed by 20%
# left trigger resets playback speed
GAMEPAD_RIGHT_TRIGGER multiply speed 1.2
GAMEPAD_LEFT_TRIGGER set speed 1.0
You can find the actions list in mpv man page, or by looking at the sample inputs.conf that should be provided with mpv package.
By default, mpv won't look for gamepad inputs, you need to add --input-gamepad=yes parameter when you run mpv, or add "input-gamepad=yes" as a newline in ~/.config/mpv/mpv.conf mpv configuration file.
If you use a button on the gamepad while mpv is running from a terminal, you will have some debug output showing you which button was pressed, including its name, this is helpful to find the inputs names.
If like me, you have multiple NixOS system behind the same router, you may want to have a local shared cache to avoid downloading packages multiple time.
This can be done simply by using nginx as a reverse proxy toward the official repository and by enabling caching the result.
We will declare a nginx service on the server, using http protocol only to make setup easier. The packages are signed, so their authenticity can't be faked. In this setup, using https would add anonymity which is not much of a concern in a local network, for my use case.
In the following setup, the LAN cache server will be reachable at the address 10.42.42.150, and will be using the DNS resolver 10.42.42.42 every time it needs to reach the upstream server.
services.nginx = {
enable = true;
appendHttpConfig = ''
proxy_cache_path /tmp/pkgcache levels=1:2 keys_zone=cachecache:100m max_size=20g inactive=365d use_temp_path=off;
# Cache only success status codes; in particular we don't want to cache 404s.
# See https://serverfault.com/a/690258/128321
map $status $cache_header {
200 "public";
302 "public";
default "no-cache";
}
access_log /var/log/nginx/access.log;
'';
virtualHosts."10.42.42.150" = {
locations."/" = {
root = "/var/public-nix-cache";
extraConfig = ''
expires max;
add_header Cache-Control $cache_header always;
# Ask the upstream server if a file isn't available locally
error_page 404 = @fallback;
'';
};
extraConfig = ''
# Using a variable for the upstream endpoint to ensure that it is
# resolved at runtime as opposed to once when the config file is loaded
# and then cached forever (we don't want that):
# see https://tenzer.dk/nginx-with-dynamic-upstreams/
# This fixes errors like
# nginx: [emerg] host not found in upstream "upstream.example.com"
# when the upstream host is not reachable for a short time when
# nginx is started.
resolver 10.42.42.42;
set $upstream_endpoint http://cache.nixos.org;
'';
locations."@fallback" = {
proxyPass = "$upstream_endpoint";
extraConfig = ''
proxy_cache cachecache;
proxy_cache_valid 200 302 60d;
expires max;
add_header Cache-Control $cache_header always;
'';
};
# We always want to copy cache.nixos.org's nix-cache-info file,
# and ignore our own, because `nix-push` by default generates one
# without `Priority` field, and thus that file by default has priority
# 50 (compared to cache.nixos.org's `Priority: 40`), which will make
# download clients prefer `cache.nixos.org` over our binary cache.
locations."= /nix-cache-info" = {
# Note: This is duplicated with the `@fallback` above,
# would be nicer if we could redirect to the @fallback instead.
proxyPass = "$upstream_endpoint";
extraConfig = ''
proxy_cache cachecache;
proxy_cache_valid 200 302 60d;
expires max;
add_header Cache-Control $cache_header always;
'';
};
};
};
Be careful, the default cache is located under /tmp/ but the nginx systemd service is hardened and its /tmp/ is faked in a temporary directory, meaning if you restart nginx you lose the cache. I'd advise using a directory like /var/cache/nginx/ if you want your cache to persist across restarts.
Using the cache server on a system is really easy. We will define the binary cache to our new local server, the official cache is silently added so we don't have to list it.
nix.binaryCaches = [ "http://10.42.42.150/" ];
Note that you have to use this on the cache server itself if you want the system to use the cache for its own needs.
Using a local cache can save a lot of bandwidth when you have more than one computer at home (or if you extensively use nix-shell and often run the garbage collector). Due to NixOS packages names being unique, we won't have any issues of a newer package version behind hidden by a local copy cached, which make the setup really easy.
This article will cover a use case I suppose very personal, but I love the way I solved it so let me share this story.
I'm a gamer, mostly on computer, but I have a big rig running Windows because many games still don't work well with Linux, but I also play video games on my Linux laptop. Unfortunately, my laptop only has an intel integrated graphic card, so many games won't run well enough to be played, so I'm using an external GPU for some games. But it's not ideal, the eGPU is big (think of it as a big shoes box), doesn't have mouse/keyboard/usb connectors, so I've put it into another room with a screen at a height to play while standing up, controller in hands. This doesn't solve everything, but I can play most games running on it and allowing a controller.
But if I install a game on both the big rig and the laptop, I have to manually sync the saves (I'm buying most of the games on GOG which doesn't have a Linux client to sync saves), it's highly boring and error-prone.
So, thanks to NixOS, I made a recipe to generate a USB live media to play on the big rig, using the data from the laptop, so it's acting as a thin client. The idea of a read only media to boot from is very nice, because USB memory sticks are terrible if you try to install Linux on them (I tried many times, it always ended with I/O errors quickly) and there is exactly what you need, generated from a declarative file.
What does it solve concretely? I can play some games on my laptop anywhere on the small screen, I can also play with my eGPU on the standing desk, but now I can also play all the installed games from the big rig with mouse/keyboard/144hz screen.
The generated ISO (USB capable) should come with a desktop environment like Xfce, Nvidia drivers, Steam, Lutris, Minigalaxy and some other programs I like to use, I keep the programs list minimal because I could still use nix-shell to run a program later.
For the system configuration, I declare the user "gaming" with the same uid as the user on my laptop, and use an NFS mount at boot time.
I'm not using Network Manager because I need the system to get an IP before connecting to a user account.
{ config, pkgs, ... }:
{
# compress 6x faster than default
# but iso is 15% bigger
# tradeoff acceptable because we don't want to distribute
# default is xz which is very slow
isoImage.squashfsCompression = "zstd -Xcompression-level 6";
# my azerty keyboard
i18n.defaultLocale = "fr_FR.UTF-8";
services.xserver.layout = "fr";
console = {
keyMap = "fr";
};
# xanmod kernel for better performance
# see https://xanmod.org/
boot.kernelPackages = pkgs.linuxPackages_xanmod;
# prevent GPU to stay at 100% performance
hardware.nvidia.powerManagement.enable = true;
# sound support
hardware.pulseaudio.enable = true;
# getting IP from dhcp
# no network manager
networking.dhcpcd.enable = true;
networking.hostName = "biggy"; # Define your hostname.
networking.wireless.enable = false;
# many programs I use are under a non-free licence
nixpkgs.config.allowUnfree = true;
# enable steam
programs.steam.enable = true;
# enable ACPI
services.acpid.enable = true;
# thermal CPU management
services.thermald.enable = true;
# enable XFCE, nvidia driver and autologin
services.xserver.desktopManager.xfce.enable = true;
services.xserver.displayManager.lightdm.autoLogin.timeout = 10;
services.xserver.displayManager.lightdm.enable = true;
services.xserver.enable = true;
services.xserver.libinput.enable = true;
services.xserver.videoDrivers = [ "nvidia" ];
services.xserver.xkbOptions = "eurosign:e";
time.timeZone = "Europe/Paris";
# declare the gaming user and its fixed password
users.mutableUsers = false;
users.users.gaming.initialHashedPassword = "$6$bVayIA6aEVMCIGaX$FYkalbiet783049zEfpugGjZ167XxirQ19vk63t.GSRjzxw74rRi6IcpyEdeSuNTHSxi3q1xsaZkzy6clqBU4b0";
users.users.gaming = {
isNormalUser = true;
shell = pkgs.fish;
uid = 1001;
extraGroups = [ "networkmanager" "video" ];
};
services.xserver.displayManager.autoLogin = {
enable = true;
user = "gaming";
};
# mount the NFS before login
systemd.services.mount-gaming = {
path = with pkgs; [ nfs-utils ];
serviceConfig.Type = "oneshot";
script = ''
mount.nfs -o fsc,nfsvers=4.2,wsize=1048576,rsize=1048576,async,noatime t470-eth.local:/home/jeux/ /home/jeux/
'';
before = [ "display-manager.service" ];
wantedBy = [ "display-manager.service" ];
after = [ "network-online.target" ];
};
# useful packages
environment.systemPackages = with pkgs; [
bwm_ng
chiaki
dunst # for notify-send required in Dead Cells
file
fzf
kakoune
libstrangle
lutris
mangohud
minigalaxy
ncdu
nfs-utils
steam
steam-run
tmux
unzip
vlc
xorg.libXcursor
zip
];
}
Then I can update the sources using "nix flake lock --update-input nixpkgs", that will tell you the date of the nixpkgs repository image you are using, and you can compare the dates for updating. I recommend using a program like git to keep track of your files, if you see a failure with a more recent nixpkgs after the lock update, you can have fun pinpointing the issue and reporting it, or restoring the lock to the previous version and be able to continue building ISOs.
You can build the iso with the command "nix build .#nixosConfigurations.isoimage.config.system.build.isoImage", this will create a symlink "result" in the directory, containing the ISO that you can burn on a disk or copy to a memory stick using dd.
Of course, because I'm using NFS to share the data, I need to configure my laptop to serves the files over NFS, this is easy to achieve, just add the following code to your "configuration.nix" file and rebuild the system:
In this case, you can see my NFS client is 10.42.42.141, and previously the NFS server was referred to as laptop-ethernet.local which I declare in my LAN unbound DNS server.
You could make a specialisation for the NFS server part, so it would only be enabled when you choose this option at boot.
If you have a few GB of spare memory on the gaming computer, you can enable cachefilesd, a service that will cache some NFS accesses to make the experience even smoother. You need memory because the cache will have to be stored in the tmpfs and it needs a few gigabytes to be useful.
If you want to enable it, just add the code to the iso.nix file, this will create a 10 MB * 300 cache disk. As tmpfs lacks user_xattr mount option, we need to create a raw disk on the tmpfs root partition and format it with ext4, then mount on the fscache directory used by cachefilesd.
Opening an NFS server on the network must be done only in a safe LAN, however I don't consider my gaming account to contain any important secret, but it would be bad if someone on the LAN mount it and delete all the files.
However, there are two NFS alternatives that could be used:
using sshfs using an SSH key that you transport on another media, but it's tedious for a local LAN, I've been surprised to see sshfs performance were nearly as good as NFS!
using sshfs using a password, you could only open ssh to the LAN, which would make security acceptable in my opinion
using WireGuard to establish a VPN between the client and the server and use NFS on top of it, but the secret of the tunnel would be in the USB memory stick so better not have it stolen
It's possible to rebuild Wine used by Lutris without support for the mingw compiler, replace the lutris line in the "systemPackages" list with the following code:
It could be possible to try getting a package from the nix-store on the NFS server before trying cache.nixos.org which would improve bandwidth usage, it's easy to achieve but yet I need to try it in this context.
I really love this setup, I can backup my games and saves from the laptop, play on the laptop, but now I can extend all this with a bigger and more comfortable setup. The USB live media doesn't take long to be copied to a USB memory stick, so in case one is defective, I can just recopy the image. The live media can be booted all in memory then be unplugged, this gives a crazy fast responsive desktop and can't be altered.
My previous attempts at installing Linux on an USB memory stick all gave bad results, it was extremely slow, i/o errors were common enough that the system became unusable after a few hours. I could add a small partition to one disk of the big rig or add a new disk, but this will increase the maintenance of a system that doesn't do much.
I'm really trying hard to lower the barrier entry to OpenBSD, I realize most of my efforts are toward making OpenBSD easier.
One thing I often mumbled about on OpenBSD was the lack of a user interface to browse packages and install them, there was a console program named pkg_mgr, but I never got it to work. Of course, I'm totally able to install packages using the command line, but I like to stroll looking for packages I wouldn't know about, a GUI is perfect for doing so, and is also useful for people less comfortable with the command line.
So, today, I made a graphical user interface (GUI) using OpenBSD, using a game engine. Don't worry, all the packages operations are delegated to pkg_add and pkg_delete because they are doing they job fine.
The purpose of this program is simple, display the list of available packages, highlight in yellow the one you have installed on your system, and let you select new packages to install or installed packages to remove.
It features a search input instead of displaying a blunt list of a dozen of thousands of entries. The development was made on my Thinkpad T400 (core 2 duo), performance are excellent.
One simple feature I'm proud of is the automatic classification of packages into three categories: GUI programs, terminal/console user interface programs and others. While this is not perfect because we don't have this metadata anywhere, I'm reusing the dependencies' information to guess in which category each package belongs, so far it's giving great results.
I rarely write GUI application because it's often very tedious and give poor results, so the ratio time/result is very bad. I've been playing with the Godot game engine for a week now, and I was astonished when I've been told the engine editor is done using the engine itself. As it was blazing fast and easy to make small games, I wondered if this would be suitable for a simple program like a package manager interface.
First thing I checked was if it was supporting sqlite or json data natively without much work. This was important as the data used to query the package list is originally found in a sqlite database provided by the sqlports package, however the sqlite support was only available through 3rd party code while JSON was natively supported. When writing then simple script converting data from the sqlite database into a json, I took the opportunity to add the logic to determine if it's a GUI or a TUI (Terminal UI) and make the data format very easy to reuse.
Finally, I got a proof of concept within 2h, it was able to install packages from a list. Then I added support for displaying already installed packages and then to delete packages. The polishing of the interfaces took the most time, but the whole project didn't take more than 8h which is unbelievable for me.
From today, I'll seriously think about using Godot for writing GUI application, did I say it's cross platform? AppManager can be run on Linux or Windows (given you have pkg.json), except it will just fail at installing packages, but the whole UI works.
Thinking about it, it could be easy to reuse it for another package manager.
Instead of running many pkg_add or pkg_delete commands to manage my packages, now I can use a configuration file (allowing includes) to define which package should be installed, and the installed but not listed packages should be removed.
After using NixOS too long, it's a must have for me to manage packages this way.
pkgset works by marking extra packages as "auto installed" (the opposite is manually installed, see pkg_info -m), and by installing missing packages. After those steps, pkgset runs "pkg_delete -a" to remove unused packages (the one marked as auto installed) if they are not a dependency of another required package.
The only "issue" with pkgset is that for some packages that "pkg_add" may find ambiguous due to multiples versions or favors available without a default one, you must define the exact package version/flavor you want to install.
I know pkg_add as an option to install packages from a list, but it won't remove the extra packages. I may look at adding the "pkgset" feature to pkg_add one day maybe.
You like OpenBSD? Then, I'm quite sure you can contribute to it! Let me explain the many ways your skills can be used to improve the project and contribute back.
Programmers who enjoy writing operating systems are naturally always welcome. The team would appreciate your skills on the base system, kernel, userland.
Switch your systems to the branch -current and report system or packages regressions. With more users testing the development version, the releases are more likely to be bug free. Why not join the
Follow the mailing lists, you may be able to help answer questions from other users. This is also a good opportunity to proofread submitted changes proposed by others or to try those and report how it works for you.
Spread the word on social networks, show the project under a good light, share your experiences and your use cases. OpenBSD is definitely not a niche operating system anymore.
Make a case to your employer for using OpenBSD at work. If you're a student, talk to your professors about using OpenBSD as a learning tool for Computer Science or Engineering courses.
The project has a constant need for cash to pay for equipment, network connectivity, etc. Even small donations make a profound difference, donating money or hardware is important.
I've been enjoying learning how to use a game engine for three days now. I also published my two last days on the itch.io platform for independant video games. I'm experimenting a lot with various ideas, a new game must be different than the other to try new mechanics, new features and new gameplay.
This is absolutely refreshing to have a tool in hand that let me create interactive content, this is really fantastic. I wish I studied this earlier.
Despite my games being very short and simplistic, I'm quite proud of the accomplished work. If someone in the world had fun with them even for 20 seconds, this is a win for me.
I'm a huge fan of video games but never really thought about writing one. Well, this crossed my mind a few times, but I don't know anything about writing a GUI software or using OpenGL, but a few days ago I discovered the open source game engine Godot.
This game engine is a full-featured tool allowing to easily write 2D or 3D games that are portables on Android, Mac, Windows, Linux, HTML5 (using WebASM) and operating systems where the Godot engine is available, like OpenBSD.
Godot offers a GUI to write games, the GUI itself being a Godot game, it's full featured and come with a code editor, documentation, 2D/3D views, animation, tile set management, and much more.
The documentation is well written and gives introduction to the concepts, and then will just teach you how to write a simple 2D game! It only took me a couple of hours to be able to start creating my very own first game and getting the grasps.
I had no experience into writing games but only programming experience. The documentation is excellent and give simple examples that can be easily reused thanks to the way Godot is designed. The forums are also a good way to find a solution for common problems.
I wrote a simple game, OpenBSD themed, especially themed against its 6.8 version for which the artwork is dedicated to the movie "Hackers". It took me like 8 hours I think to write it, it's long, but I didn't see time passing at all, and I learned a lot. I have a very interesting game in my mind, but I need to learn a lot more to be able to do it, so starting with simple games is a nice training for me.
It's easy to play and fun (I hope so), give it a try!
If you wish to play on OpenBSD or any other operating system having Godot, download the Linux binary and run "godot --main-pack puffy-bubble.x86_64" and enjoy.
I chose a neon style to fit to the theme, it's certainly not everyone's taste :)
I have a special network need on Linux, I must have a single user going through specific VPN tunnel. This can't be done using a different metric for the VPN or by telling the program to bind on a specific interface.
The setup is easy once you find how to proceed on Linux: we define a new routing table named 42 and add a rule assigning user with uid 1002 to this routing table. It's important to declare the VPN default route on the exact same table to make it work.
#!/bin/sh
REMOTEGW=YOUR_VPN_REMOTE_GATEWAY_IP
LOCALIP=YOUR_VPN_LOCAL_IP
INTERFACE=tun0
ip route add table 42 $REMOTEGW dev tun0
ip route add table 42 default via $REMOTEGW dev tun0 src $LOCALIP
ip rule add pref 500 uidrange 1002-1002 lookup 42
ip rule add from $LOCALIP table 42
It's quite complicated to achieve this on Linux because there are many ways to proceed like netns (network namespace), iptables or vrf but the routing solution is quite elegant, and the documentation are never obvious for this use case.
I'd like to thank @loweel@bbs.keinpfusch.net from the Fediverse for giving me the first bits about ip rules and using a different route table.
I asked the community recently if they would like to have a video tutorial about installing OpenBSD, many people answered yes so here it is! I hope you will enjoy it, I'm quite happy of the result while I'm not myself fan of watching video tutorials.
The videos are published on Peertube, but you are free to reupload them on YouTube if you want to, the licence permits it. I won't publish on YouTube because I don't want to feed this platform.
The English video has Italian subtitles that have been provided by a fellow reader.
I really wanted to use a real hardware (an IBM ThinkPad T400 with an old Core 2 Duo) instead of a virtual machine because it feels a lot more real (WoW :D) and has real world quirks like firmwares that would be avoided in a VM.
I rarely make videos, and it was a first time for me to create this, so I wanted to share about how I made it because it was very amateurish and weird :D
My first setup trying to record the screen of a laptop using another laptop and an USB camera, it didn't work well
The first part on Linux was recorded locally with ffmpeg from the T400 computer, the rest is recorded with the GoPro camera, I applied a few filters with the shotcut video editing software to flatten the picture (the lens is crazy on the GoPro).
I spent like 8 hours to create the video, most of the time was editing, blurring my Wi-Fi password, adjusting the speed of the sequences, and once the video was done I recorded my audio comment (using a USB Rode microphone) while watching it, I did it in English and in French, and used shotcut again to sync the audio with the video and merge them together.
When reaching a website, most web browsers will send a header (some metadata about the requestion) informing the web server that you supported compressed content. In OpenBSD 7.1, the httpd web server received a new feature allowing it to serves a pre-compressed file of a requested file if the web browser supports compression. The benefits are a bandwidth usage reduced by 2x to 10x depending on the file content, this is particularly interesting for people who self-host and for high traffic websites.
In addition to this change, I added a new flag to the gzip command to easily compress files while keeping the original files. Run "gzip -k" on the files you want to serve compressed when the clients support the feature.
It's best to compress text files, such as HTML, JS or CSS for the most commons. Compressing binary files like archives, pictures, audio or videos files won't provide any benefit.
When the client connects to the httpd server requesting "foobar.html", if gzip-static is used for this location/server, httpd will look for a file named "foobar.html.gz" that is not older than "foobar.html". When found, "foobar.html.gz" is transparently transferred to the client requesting "foobar.html".
Take care to regenerate the gz files when you update the original files, remember that the gz files must be newer to be used.
This is for me a major milestone for using httpd in self-hosting and with static websites. We battle tested this change with the webzine server often hitting big news websites leading to many people visiting the website in a short time span, this drastically reduced the bandwidth usage of the server, allowing it to support more clients per second.
OpenBSD 7.1 has been released with a change that will set the CPU to max speed when plugged to the wall. This brings better performance and entirely let the CPU and mainboard do the frequency throttling.
However, it may doesn't throttle well for some users, resulting in huge power usage even when idle, heat from the CPU and also fan noise.
As the usual "automatic" frequency scheduling mode is no longer available when connected to powergrid, I wrote a simple utility to manage the frequency when the system is plugged to the wall, I took the opportunity to improve it, giving better performance than the previous automatic mode, but also giving more battery life when using on a laptop on battery.
Since OpenBSD 7.2 obsdfreqd is available as a packge. An extra important step is to remove the automatic mode in apmd which would kill obsdfreqd, you can keep apmd for its ability to run commands on resume/suspend etc...
pkg_add obsdfreqd
rcctl ls on | grep ^apmd && rcctl set apmd flags -L && rcctl restart apmd
rcctl enable obsdfreqd
rcctl start obsdfreqd
No configuration are required, it works out of the box with a battery saving profile when on battery and a performance profile when connected to power.
If you feel adventurous, obsdfreqd man page will give you information about all the parameters available if you want to tailor yourself a specific profile.
Note that obsdfreqd can target a specific temperature limit using -T parameter, see the man page for explanations.
Using apmd -A doesn't solve the issue because apmd was simply setting the sysctl hw.perfpolicy to auto, which as explained above set the frequency to full speed when not on battery.
While I'm an OpenBSD contributor, I also enjoy using Linux especially the NixOS distribution which I consider a system apart from the other Linux distributions because of how different it is. Because I use both, I have two SSDs in my laptop with each system installed and I can jump from one to another depending on the task I'm doing or which I want to use.
My main system, the one with all my data, is OpenBSD, unfortunately the lack of an interoperable and good file system between NixOS and OpenBSD make it difficult to share data between them without using a network storage offering a protocol they have in common.
Let me quickly introduce the two operating systems if you don't know them.
OpenBSD is a 25+ years old fork of NetBSD, it's full of history and a solid system, it's also the place where OpenSSH or tmux are developed. It's a BSD system with its own kernel and own drivers, it's not related to Linux but will share most of well known open source programs you can have on Linux, they are provided as packages (programs such as GIMP, Libreoffice, Firefox, Chromium etc...). The whole OpenBSD system (kernel, drivers, userland and packages) is managed by a team of approximately 150 persons (without counting people sending updates and who don't have a commit access).
NixOS will be soon a 20 years old Linux distribution based on the nix package manager. It's offering a new approach to system management, based on reproducible builds and declarative configurations, basically you define how your computer should be configured (packages, services, name, users etc..) in a configuration file and "build" the system to configure itself, if you share this configuration file on another computer, you should be able to reproduce the exact same system. Packages are not installed in a standard file hierarchy but each package files are stored into a dedicated directory and the users profiles are made of symbolic links and many environment variables to permit programs to find libraries or dependencies, for example the path to Firefox may look like something like /nix/store/b6gvzjyb2pg0kjfwrjmg1vfhh54ad73z-firefox-33.1/bin/firefox.
OpenBSD is lacking hardware acceleration for encoding/decoding video, this make it a lot slower when working with videos.
Interactive desktop usage and I/O also feel slower on OpenBSD, on the other hand the Linux kernel used in NixOS benefits from many people working full time at improving its performance, we have to admit the efforts pay off.
Although OpenBSD is slower than Linux, it's actually usable for most tasks one may need to achieve.
OpenBSD doesn't support as many devices as NixOS and its Linux kernel. On NixOS I can use an external NVIDIA card using a thunderbolt case, OpenBSD doesn't have support for this case nor has it a driver for NVIDIA cards (which is mostly NVIDIA's fault for not providing documentation).
However, OpenBSD barely requires any configuration to work, if the hardware is supported, it will work.
Finally, OpenBSD can be used on old computers from various architectures, like i386, old Apple powerpc, risc, arm, while NixOS is only focusing on modern hardware such as Amd64 and Arm64.
Both systems provide a huge packages set, but the one from Nix has more choice. It's not that bad on the OpenBSD side though, most common packages are available and often with a recent version, I also found many times a package available in OpenBSD but not in Nix.
Most notably, I feel the quality of OpenBSD packages is slightly higher than on Nix, they have less issues (Nix packages sometimes have issues that may be related to nix unusual file hierarchy) and are sometimes patched to have better defaults (for instance I'm thinking of disabling network accesses opened by default in some GUI applications).
Both of them make a new release every six months, but while OpenBSD only backport packages security fixes for its latest release, NixOS provides a lot more updates to its packages for the release users.
Updating packages is painless on OpenBSD and NixOS, but it's easier to find which version you are currently using on OpenBSD. This may be because I don't know enough the nix shell but I find it very hard to know if I'm actually using a program that has been updated (after a CVE I often check that) or if it's not.
Network is certainly the area where OpenBSD is the most well-known, its firewall Packet Filter is easy to use/configure and efficient. OpenBSD provides mechanisms such as routing tables/domains to assign a network interface to an entire separated network, allowing to expose a program/user to a specific interface reliably, I didn't find how to achieve this on Linux yet. OpenBSD comes with all the required daemons to manage a network (dhcp, slaacd, rpki, email, http, NAT, ftp, tftp etc...) within its base system.
The performance when dealing with network throughput may be sub-par on OpenBSD compared to Linux but for the average user or server it's fine, it will mostly depend on the network card used and its driver support.
I don't really enjoy playing with network on Linux as I find it very complicated, I never found how to aggregate wifi and Ethernet interfaces to transparently switch from one to the other when I (un)plug the rj45 cable on my laptop, doing this is easy to achieve on OpenBSD (I don't enjoy losing all my TCP connections when moving the laptop around).
The maintenance topic will be very personal, for a personal workstation/server case and not a farm of hundreds of servers.
OpenBSD doesn't change much, it has a new release every six months but the upgrades are always easy to handle, most corner cases are documented in the upgrade guide and I'm ALWAYS confident when I have to update an OpenBSD system.
NixOS is also easy to update and keep clean, I never had any issue when upgrading yet and it would still be possible to rollback to the previous version in case something is going wrong.
I can say they have both a different approach but they both work well.
I have to say the NixOS documentation is rather huge but yet not always useful. There is a nice man page named "configuration.nix" giving all the options to parameter a system, but it's generated from the Nix code and is often lacking explanations in addition to describe an API. There are also a few guides and manual available on NixOS website but they are either redundant or not really describing how to solve real world problems.
On the OpenBSD side, the website provides a simple "Frequently Asked Questions" section for some use case, and then all the system and its internal are detailed in very well written man pages, it may feel unfriendly or complicated at first but once you taste the OpenBSD man pages you easily get sad when looking at another documentation. If you had to setup an OpenBSD system for some task relying on components from the base system (= not packages), I'm confident to say you could do it offline with only the man pages. OpenBSD is not a system that you find its documentation on various forums or github gists, while I often feel this with NixOS :(
I would say NixOS have a modern contribution system, it relies on github and a bot automatically do many checks to the contributions, helping contributors to check their work quickly without "wasting" the time of someone who would have to read every submitted code.
OpenBSD is doing exactly that, changes to the code are done on a mailing list, only between humans. It doesn't scale very well but the human contact will give better explanations than a bot, but this is when your work is interesting someone who want to spend time on it, sometimes you will never get any feedback and it's a bit sad we are losing updates and contributors because of this.
I can't say one is better to the other nor that one is doing absolutely better at one task.
My love for OpenBSD may come from its small community, made of humans that like working on something different. I know how OpenBSD works, when something is wrong it's easy to debug because the system has been kept relatively simple. It's painless, when your hardware is supported, it just works fine. The default configuration is good and I don't have to worry about it.
But I also love NixOS, it's adventurous, it offers a new experience (transactional updates, reproducibility) that I feel are the future of computing, but it also make the whole very complicated to understand and debug. It's a huge piece of software that could be bend to many forms given you are a good Nix arcanist.
I'd be happy to hear about your experiences with regards to OpenBSD and NixOS, feel free to write me (mastodon or email) about this!
Last week I wrote a system daemon to manage the CPU frequency from userland, entirely bypassing the kernel automatic mode. While this was more of a toy at first because I only implemented the same automatic mode used in the kernel but with all the variables being easily changed, I found it valuable for many use case to improve battery life or even temperature.
The coolest feature I added today is to support a maximum temperature and let the program do its best to keep the CPU temperature below the limit.
A nice benchmark to run was to start the compilation of the rust package with all the four cores of my T470 laptop and run obsdfreqd with various temperature limits and see how it goes. The program did a good job at reducing the CPU frequency to keep the temperature around the threshold.
While this is ultimately not a replacement for the in-kernel frequency scheduler, it can be used to keep a computer a lot cooler or make a system comply with some specific requirements (performance for given battery life or maximum temperature).
The customization is so that you can have various settings depending if the system is running on battery or not, which can be tailored to suit every kind of user. The defaults are made to provide good performance when on AC, and provide a balanced performance/battery life mode when on battery.
Let me present you my latest project: home-impermanence, under this name is a reference to the NixOS community project impermanence. The name may not be obvious about what it is doing, let me explain.
The original goal of impermanence in NixOS is to have a fully reproducible system mounted on tmpfs where only user-defined files and directories are hooked into the temporary file system to be persistent (such as /home, /var/lib and some /etc files for instance). Why this is something achievable on NixOS, on OpenBSD side we are far from having the tooling to go that deep so I wrote home-impermanence that allows an user to just do that at their $HOME level.
What does it mean exactly? When you start your system, your $HOME directory will be mounted with an empty memory based file system (using mfs) and symbolic links to files and directories listed in the configuration file will be done in your $HOME. Every time you reboot, you will have the exact same set of files, extra files created meanwhile will be lost. When you hold a $HOME directory for long, you know you get many directories and files created in various ~/.config or ~/.local or directly as dotfiles in the top level of the home directory, with impermanence you can get ride of all the noise.
A benefit is that you can run software as if it was their first run, in some software upgrade you will avoid old settings that would create troubles, or settings that would disturb a whole class of applications (like a gtk setting affecting all gtk programs), with impermanence the user can decide exactly what should remain across reboots or disappear.
My implementation is a Perl script relying on some libraries packaged on OpenBSD, it will run as root from a rc service and the settings done in rc.conf.local. It will read the configuration file from the persistent directory holding the user data and create symlinks in the target directory to the files and directories, doing some sanitizing in the process to prevent listed files to be included in listed directories which would nest symlinks incorrectly.
I chose Perl because it's a stable language, OpenBSD ships with Perl and the very few dependencies required were already available in the ports tree.
The program could easily be ported to Linux, FreeBSD and maybe NetBSD, the mount_mfs calls could be replaced by a mount_tmpfs and the directories symlinks could be done with a mount_bind or mount_nullfs which we don't have on OpenBSD, if someone wants to port my project to another system I could help adding the required logic.
I wrote a complete README file explaining the installation and configuration process, for full instructions refer to this document and the man page that ships with home-impermanence.
git clone https://tildegit.org/solene/home-impermanence/
cd home-impermanence
doas make install
doas rcctl enable impermanence
doas rcctl set impermanence flags -u user -d /home/persist/
doas install -d /home/persist/
From now, you may want to make things quickly, logout from your user and run these commands, this will move your user directory and prepare the mountpoint.
mv /home/user /home/persist/user
install -d -o user -g wheel /home/user
Now, it's time to configure impermanence before running it.
Reusing the paths from the installation example, the configuration file should be in /home/persist/user/impermanence.yml , the file must be using YAML formatting. Here is my personal configuration file that you can use as a base.
When you think you are done, start the impermanence rc service with rcctl start impermanence and log-in. You should see all the symlinks you defined in your configuration file.
I really don't want to go back to not using impermanence since I tried it on NixOS. I thought implementing it only for $HOME would be good enough as a start and started thinking about it, made a proof of concept to see if the symbolic links method was enough to make it work, and it was!
I hope you will enjoy this as much as I do, feel free to contact me if you need some help understanding the setup.
I wrote the program reed-alert five years ago, I've been using it since its first days, here is some feed back about it.
The software reed-alert is meant to be used by system administrators who want to monitor their infrastructures and get alerts when things go wrong. I got a lot more experience in the monitoring field over time and I wanted to share some thoughts about this project.
The code didn't receive many commits over the last years, I consider the program to be complete with regard to features, but new probes could be added, or bug fixes could be done. But the core of the software itself is perfect to me.
The probes are small parts of code allowing to monitor extra states, like http return code, working ping, service started etc... It's already easy to extend reed-alert using a shell command returning 0 or not 0 to define a custom probe.
I don't remember having a single issue with reed-alert since I've set it up on my server. It's run by a cron job every 10 minutes, this mean a common lisp interpreter is loading the code, evaluating the configuration file, running the check commands and alerts commands if required, and stops. I chose a serviceless paradigm for reed-alert as it make the code and usage a lot simpler. With a running service, it could fail, leak memory, be exploited and certainly many other bugs I can't think of.
Reed-alert is simple as it only need a common lisp interpreter, the most notable sbcl and ecl interpreters are absolutely reliable and change very little over time. Some unix standard commands are required for some checks or default alerts, such as ping, service, mail or curl but this defers all the work to well established binaries.
The source code is minimal with 179 lines for reed-alert core and 159 lines for the probes, a total of 338 lines of code (including empty lines and comments), hacking on reed-alert is super easy and always a lot of fun for me. For whatever reason, my common lisp software often work at first try when I add new features, so it's always pleasant to work on them.
One aspect of reed-alert that may disturb users at first is the choice of common lisp code as a configuration file, this may look complicated at first, but a simple configuration doesn't require more common lisp knowledge than what is explained in reed-alert documentation. But it gives all its power when you need to loop over a data entry to run checks, allowing to make reed-alert dynamic instead of handwriting all the configuration.
The use of common lisp as configuration has other advantages, it's possible to chain checks to easily prevent some checks to be done in case a condition is failing. Let me give a few examples for this:
if you monitor a web server, you first want to check if it replies on ICMP before trying to check and report errors on HTTP level
if you monitor remote servers, you first want to check if you can reach the internet and that your local gateway is online
if you check a local web server, it would be a good idea to check if all the required services are running first
All the previous conditions can be done with reed-alert thanks to the code-as-configuration choice.
I've been asked a few times if reed-alert could be used in a professional context. Depending on what you call a professional environment, I will reply it depends.
Reed-alert is dumb, it needs to be run from a scheduling software (such as cron) and will sequentially run the checks. It won't guarantee a perfect timing between checks.
If you need multiples machines to run a set of checks, reed-alert is not able to share the states to continue to work reliably in a high availability environment.
In regard to resources usage, while reed-alert is small it needs to run the command lisp interpreter every time, if you want to run reed-alert every minute or multiple time per minute, I'd recommend using something else.
I wrote a simple software using an old programming language (Common LISP ANSI is from 1994), the result is that it's reliable over time, require no code maintenance and is fun to code on.
Coming from an OpenBSD background, I wanted to harden my NixOS system for better security. As you may know (or not), security mitigations must be thought against a security threat model. My model here is to prevent web browsers to leak data, prevent services to be exploitable remotely and prevent programs from being exploited to run malicious code.
NixOS comes with a few settings to improve in these areas, I'll share a sample of configuration to increase the default security. Unrelated to security defense itself, but you should absolutely encrypt your filesystem, so in case of physical access to your computer no data could be extracted.
There are a few profiles available by default in NixOS which are files with a set of definitions and one of them is named "hardened" because it enables many security measures.
use the hardened Linux kernel (different defaults and some extra patches from https://github.com/anthraxx/linux-hardened/)
use the memory allocator "scudo", protecting against some buffer overflow exploits
prevent kernel modules to be loaded after boot
protect against rewriting kernel image
increase containers/virtualization protection at a performance cost (L1 flush or page table isolation)
apparmor is enabled by default
many filesystem modules are forbidden because old/rare/not audited enough
many other specific tweaks
Of course, using this mode will slightly reduce the system performance and may trigger some runtime problems due to the memory management being less permissive. On one hand, it's good because it allows to catch programming errors, but on the other hand it's not fun to have your programs crashing when you need them.
With the scudo memory allocator, I have troubles running Firefox, it will only start after 2 or 3 crashes and then will work fine. There is a less permissive allocator named graphene-hardened, but I had too much troubles running programs with it.
One simple rule is to block any incoming traffic that would connect to listening services. It's way more secure to block everything and then allow the services you know must be open to the outside than relying on the service's configuration to not listen on public interfaces.
I featured firejail previously on my blog, I'm convinced of its usefulnes. You can run a program using firejail, and it will restrict its permissions and rights so in case of security breach, the program will be restricted.
This is rather important to run web browsers with it because it will prevent them any access to the filesystem except ~/Downloads/ and a few required directories (local profile, /etc/resolv.conf, font cache etc...).
Because NixOS is declarative, it's easy to share the configuration. My configuration supports both Firefox and Chromium, you can remove the related lines you don't need.
Be careful about the import declaration, you certainly already have one for the ./hardware-configuration.nix file.
imports =
[
./hardware-configuration.nix
<nixpkgs/nixos/modules/profiles/hardened.nix>
];
# enable firewall and block all ports
networking.firewall.enable = true;
networking.firewall.allowedTCPPorts = [];
networking.firewall.allowedUDPPorts = [];
# disable coredump that could be exploited later
# and also slow down the system when something crash
systemd.coredump.enable = false;
# required to run chromium
security.chromiumSuidSandbox.enable = true;
# enable firejail
programs.firejail.enable = true;
# create system-wide executables firefox and chromium
# that will wrap the real binaries so everything
# work out of the box.
programs.firejail.wrappedBinaries = {
firefox = {
executable = "${pkgs.lib.getBin pkgs.firefox}/bin/firefox";
profile = "${pkgs.firejail}/etc/firejail/firefox.profile";
};
chromium = {
executable = "${pkgs.lib.getBin pkgs.chromium}/bin/chromium";
profile = "${pkgs.firejail}/etc/firejail/chromium.profile";
};
};
# enable antivirus clamav and
# keep the signatures' database updated
services.clamav.daemon.enable = true;
services.clamav.updater.enable = true;
Rebuild the system, reboot and enjoy your new secure system.
If you want to absolutely control your network connections, I'd absolutely recommend the service OpenSnitch. This is a daemon that will listen to all the network done on the system and allow you to allow/block connections per executable/source/destination/protocol/many parameters.
OpenSnitch comes with a GUI app called opensnitch-ui which is mandatory, if the ui is not running, no filtering is done. When the ui is running, every time a new connection is not matching an existing rule, you will be prompted with information telling you what executable is trying to do on which protocol with which host, then you can decide how long you allow this (or block).
Just use services.opensnitch.enable = true; in the system configuration and run opensnitch-ui program in your graphical session. To have persistent rules, open opensnitch-ui, go in the Preferences menu and tab Database, choose "Database type: File" and pick a path to save it (it's a sqlite database).
From this point, you will have to allow / block all network done on your system, it can be time-consuming at first, but it's user-friendly enough and rules can be done like "allow this entire executable" so you don't have to allow every website visited by your web browser (but you could!). You may be surprised by the amount of traffic done by non networking programs. After some time, the rule set should be able to cope with most of your needs without needing to add new entries.
In the past I shared a bit about Nix nix-shell tool, allowing to have a "temporary" environment with a specific set of tools available. I'm using it on my blog to get all the dependencies required to rebuild it without having to remember what programs to install.
But while this method was practical, as I'm running NixOS development version (called unstable channel), I have to download the new versions of the dependencies every time I use the nix shell. This is long on my DSL line, and also a waste of bandwidth.
There is a way to pin the version of the packages, so I always use the exact same environment, whatever the version of my nix.
Let's introduce you to niv, a program to manage nix dependencies, for this how-to I will only use a fraction of its features. We just want it to init a directory with a default configuration pinning the nixpkgs repository to a branch / commit ID, and we will tell the shell to use this version.
Let's start by running niv (you can get niv from nix package manager) in your directory:
niv init
It will create a nix/ directory with two files: sources.json and sources.nix, looking at the content is not fascinating here (you can take a look if you are curious though). The default is to use the latest nixpkgs release.
Yes, I need all of this for my blog to work because I have texts in org-mode/markdown/mandoc/gemtext/custom. The blog also requires toot (for mastodon), sbcl (for the generator), make (for building and publishing).
Now, I will make a few changes to use the nix/sources.nix file to tell it where to get the nixpkgs information, instead of which is the system global.
let
sources = import ./nix/sources.nix;
pkgs = import sources.nixpkgs {};
in
with pkgs;
pkgs.mkShell {
buildInputs = [
gnumake sbcl multimarkdown python3Full emacs-nox
toot nawk mandoc libxml2
];
}
That's all! Now, when I run nix-shell in the directory, I always get the exact same shell and set of packages every day.
Because it's important to update from time to time, you can easily manage this using niv, it will bump the latest commit id of the branch of the nixpkgs repository:
niv update nixpkgs -b master
When a new release is out, you can switch to the new branch using:
It's possible to use niv to pin the git revision you want to use to build your system, it's very practical for many reasons like following the development version on multiple machines with the exact same revision. The snippet to use sources.nix for rebuilding the system is a bit different.
Of course, you need to run "niv init" in /etc/nixos/ before if you want to manage your system with niv.
6. Extra tip: automatically run nix-shell with direnv §
It's particularly comfortable to have your shell to automatically load the environment when you cd into a project requiring a nix-shell, this is doable with the direnv program.
Greetings dear readers, I wish you a happy new year and all the best. Like I did previously at the new year time, although it's not a yearly exercise, I would like to talk about the blog and my plan for the next twelve months.
Let's talk about me first, it will make sense for the blog part after. I plan to find a new job, maybe switch into the cybersecurity field or work in some position allowing me to contribute to an open source project, it's not that easy to find, but I have hope.
This year, I will work at getting new skills, this should help me find jobs, but I also think I've been a resting a bit about learning over the last two years. My plan is to dedicate 45 minutes every day to learn about a topic. I already started doing so with some security and D language readings.
With regular learning time, I'm not sure yet if I will have much desire to write here as often as I did in 2021. I'm absolutely sure the publication rate will drop, but I will try to maintain a minimum, because I'm learning I will want to share some ideas, experiences or knowledge hopefuly.
I'm thanksful to readers community I have, I often get feedback by email or IRC or mastodon about my posts, so I can fix them, extend them or rework them if I was wrong. This is invaluable to me, it helps me to make connections to other people, and it's what make life interesting.
In December 2021, I had the chance to be interviewed by the people of the BSDNow podcast, I'm talking about how I got into open source, about my blog but also about the old laptop challenge I made last year.
Let me share my NixOS configuration file, the one in /etc/nixos/configuration.nix that describe what is installed on my Lenovo T470 laptop.
The base of NixOS is that you declare every user, services, network and system settings in a file, and finally it configures itself to match your expectations. You can also install global packages and per-user packages. It makes a system environment reproducible and reliable.
We can use simple rules using the "owner" module, basically, we will allow traffic through tun0 interface (the VPN) for the user, and reject traffic for any other interface.
Iptables is applying first matching rule, so if traffic is going through tun0, it's allowed and otherwise rejected. This is quite simple and reliable.
We will need the user id (uid) of the user we want to restrict, this can be found as third field of /etc/passwd or by running "id the_user".
iptables -A OUTPUT -o lo -m owner --uid-owner 1002 -j ACCEPT
iptables -A OUTPUT -o tun0 -m owner --uid-owner 1002 -j ACCEPT
iptables -A OUTPUT -m owner --uid-owner 1002 -j REJECT
Note that instead of --uid-owner it's possible to use --gid-owner with a group ID if you want to make this rule for a whole group.
To make the rules persistent across reboots, please check your Linux distribution documentation.
I trust firewall rules to do what we expect from them. Some userland programs may be able to restrict the traffic, but we can't know for sure if it's truly blocking or not. With iptables, once you made sure the rules are persistent, you have a guarantee that the traffic will be blocked.
There may be better ways to achieve the same restrictions, if you know one that is NOT complex, please share!
While I mostly make posts about playing on OpenBSD, I also do play video games on Linux. There is a lot more choice, but it comes with the price that the choice comes from various sources with pros and cons.
Itch.io is dedicated to indie games, you can find many games running on Linux, most games there are free. Most games could be considered "amateurish" but it's a nice pool from which some gems get out like Celeste, Among Us or Noita.
It is certainly the biggest commercial platform, it requires the steam desktop Client and an account to be useful. You can find many free-to-play video games, (including some open source games like OpenTTD or Wesnoth who are now available on Steam for free) but also paid games. Steam is working hard on their tool to make Windows games running on Linux (based on Wine + many improvements on the graphic stack). The library manager allows Linux games filtering if you want to search native games. Steam is really a big DRM platform, but it also works well.
GOG is a webstore selling video games (many old games from people's childhood but not only), they only require you to have an account. When you buy a game in their store, you have to download the installer, so you can keep/save it, without any DRM beyond the account registration on their website to buy games.
There are many open source video games around, they may be available in your package manager, allowing a painless installation and maintenance.
Flatpak package manager also provides video games, some are recent and complex games that are not found in many package managers because of the huge work required.
Sometimes, when you want to buy a game, you can buy it directly on the developer's website, it usually comes without any DRM and doesn't rely on a third party vendor. I know I did it for Rimworld, but some other developers offer this "service", it's quite rare though.
It's now possible to play remotely through "cloud computing", using a company's computer with a good graphic card. There are solutions like Nvidia with Geforce Now or Stadia from Google, both should work in a web browser like Chromium.
They require a very decent Internet access with at least 15 MB/s of download speed for a 1080p stream but will work almost anywhere.
Lutris is an ambitious open source project, it aims to be a game library manager allowing to mix any kind of game: emulation / Steam / GOG / Itch.io / Epic game Store (through Wine) / Native linux games etc...
Its website is a place where people can send recipes for installing some games that could be complicated, allowing to automate and distribute in the community ways to install some games. But it makes very easy to install games from GOG. There is a recent feature to handle the Epic game store, but it's currently not really enjoyable and the launcher itself running through wine draw for CPU like madness.
It has nice features such as activating a HUD for displaying FPS, automatically run "gamemode" (disabling screen effects, doing some optimization), easy offloading rendering to graphic card, set locale or switch to qwerty per game etc...
It's really a nice project that I follow closely, it's very useful as a Linux gamer.
Minigalaxy is a GUI to manage GOG games, installing them locally with one click, keeping them updated or installing DLC with one click too. It's really simplistic compared to Lutris, but it's made as a simple client to manage GOG games which is perfectly fine.
Minigalaxy can update games while Lutris can't, both can be used on the same installed video games. I find these two are complementary.
This tool is a set of script to help you install native Linux video games in your system, depending on their running method (open source engine, installer, emulator etc...).
It has never been so easy to play video games on Linux. Of course, you have to decide if you want to run closed sources programs or not. Even if some games are closed sources, some fans may have developed a compatible open source engine from scratch to play it again natively given you have access to the "assets" (sets of files required for the game which are not part of the engine, like textures, sounds, databases).
Today I will explain how to establish an OpenVPN tunnel through a dedicated rdomain to only expose the VPN tunnel as an available interface, preventing data leak outside the VPN (and may induce privacy issues). I did the same recently for WireGuard tunnels, but it had an integrated mechanism for this.
Let's reuse the network diagram from the WireGuard text to explain:
We have our computer and have been provided an OpenVPN configuration file, we want to establish the OpenVPN toward the server 1.2.3.4 using rdomain 1. We will set our network interfaces into rdomain 1 so when the VPN is NOT up, we won't be able to connect to the Internet (without the VPN).
Add "rdomain 1" to your network interfaces configuration file like "/etc/hostname.trunk0" if you use a trunk interface to aggregate Ethernet/Wi-Fi interfaces into an automatic fail over trunk, or in each interface you are supposed to use regularly. I suppose this setup is mostly interesting for wireless users.
Create a "/etc/hostname.tun0" file that will be used to prepare the tun0 interface for OpenVPN, add "rdomain 0" to the file, this will be enough to create the tun0 interface at startup. (Note that the keyword "up" would work too, but if you edit your files I find it easier to understand the rdomains of each interface).
Run "sh /etc/netstart" as root to apply changes done to the files, you should have your network interfaces in rdomain 1 now.
From here, I assume your OpenVPN configuration works. The OpenVPN client/server setup is out of the scope of this text.
We will use rcctl to ensure openvpn service is enabled (if it's already enabled this is not an issue), then we will configure it to use rtable 1 to run, this mean it will connect through the interfaces in the rdomain 1.
If your OpenVPN configuration runs a script to set up the route(s) (through "up /etc/something..." directive in the configuration file), you will have to by add parameter -T0 to the command route in the script. This is important because openvpn will run in rdomain 1 so calls to "route" will apply to routing table 1, so you must change the route command to apply the changes in routing table 0.
Now, you should have your tun0 interface in rdomain 0, being the default route and the other interfaces in rdomain 1.
If you run any network program it will go through the VPN, if the VPN is down, the programs won't connect to the Internet (which is the wanted behavior here).
The rdomain and routing tables concepts are powerful tools, but they are not always easy to grasp, especially in a context of a VPN mixing both (one for connectivity and one for the tunnel). People using VPN certainly want to prevent their programs to not go through the VPN and this setup is absolutely effective in that task.
For saving my SSD and also speeding up my system, I store some cache files into memory using the mfs filesystem on OpenBSD. But that would be nice to save the content upon shutdown and restore it at start, wouldn't it?
I found that storing the web browser cache in a memory filesystem drastically improve its responsiveness, but it's hard to make measurements of it.
This mean I have a 400 MB partition using system memory, it's super fast but limited. tmpfs is disabled in the default kernel because it may have issues and is not well enough maintained, so I stick with mfs which is available out of the box. (tmpfs is faster and only use memory when storing file, while mfs reserves the memory chunk at first).
We will write /etc/rc.d/persistency with the following content, this is a simple script that will store as a tgz file under /var/persistency every mfs mountpoint found in /etc/fstab when it receives the "stop" command. It will also restore the files at the right place when receiving the "start" command.
#!/bin/ksh
STORAGE=/var/persistency/
if [[ "$1" == "start" ]]
then
install -d -m 700 $STORAGE
for mountpoint in $(awk '/ mfs / { print $2 }' /etc/fstab)
do
tar_name="$(echo ${mountpoint#/} | sed 's,/,_,g').tgz"
tar_path="${STORAGE}/${tar_name}"
test -f ${tar_path}
if [ $? -eq 0 ]
then
cd $mountpoint
if [ $? -eq 0 ]
then
tar xzfp ${tar_path} && rm ${tar_path}
fi
fi
done
fi
if [[ "$1" == "stop" ]]
then
install -d -m 700 $STORAGE
for mountpoint in $(awk '/ mfs / { print $2 }' /etc/fstab)
do
tar_name="$(echo ${mountpoint#/} | sed 's,/,_,g').tgz"
cd $mountpoint
if [ $? -eq 0 ]
then
tar czf ${STORAGE}/${tar_name} .
fi
done
fi
All we need to do now is to use "rcctl enable persistency" so it will be run with start/stop at boot/shutdown times.
Now I'll be able to carry my Firefox cache across reboots while keeping it in mfs.
Beware! A situation like using a mfs for a cache can lead to getting a full filesystem because it's never emptied, I think I'll run into the mfs filesystem full after a week or two.
Beware 2! If the system has a crash, mfs data will be lost. The script remove the archives at boot after using it, you could change the script to remove them before creating the newer archive upon stop, so at least you could recover "latest known version", but it's absolutely not a backup. mfs data are volatile and I just want to save it softly for performance purpose.
I wanted to write this text for some time, a list of VPN with encryption that can be used on OpenBSD. I really don't plan to write about all of them but I thought it was important to show the choices available when you want to create a VPN between two peers/sites.
VPN is an acronym for Virtual Private Network, is the concept of creating a network relying on a virtual layer like IP to connect computers, while regular network use physical network layer like Ethernet cable, wifi or light.
There are different VPN implementation existing, some are old, some are new. They have pros and cons because they were done for various purpose. This is a list of VPN protocols supported by OpenBSD (using base or packages).
Certainly the most known, it's free and open source and is widespread.
Pros:
works with tun or tap interfaces. tun device is a virtual network interface using IP while tap device is a virtual network interface passing Ethernet and which can be used to interconnect Ethernet networks across internet (allowing remote dhcp or device discovery)
secure because it uses SSL, if the SSL lib is trusted then OpenVPN can be trusted
can work with TCP or UDP, this allow setups such as using TCP/443 or UDP/53 to try to bypass local restrictions
flexible in regards to version difference allowed between client and server, it's rare to have an incompatible client
Cons:
certificate management isn't straightforward for the initial setup
A recent VPN protocol joined the party with an interesting approach. It's supported by OpenBSD base system using ifconfig.
Pros:
connection is stateless, so if your IP change (when switching network for example) or you experience network loss, you don't need to renegotiate the connection every time this happen, making the connection really resilient.
setup is easy because it only require exchanging public keys between clients
Cons:
the crypto choice is very limited and in case of evolution older clients may have issue to connect (this is a cons as deployment but may be considered a good thing for security)
SSH is known for being a secure way to access a remote shell but it can also be used to create a VPN with a tun interface. This is not the best VPN solution available but at least it doesn't require much software and could be enough for some users.
Pros:
everyone has ssh
Cons:
performance are not great
documentation about the -w flag used for creating a VPN may be sparse for many
IPSec is handled with iked in base system or using strongswan from ports. This is the most used VPN protocol, it's reliable.
Pros:
most network equipment know how to do IPsec
it works
Cons:
it's often complicated to debug
older compatibility often means you have to downgrade security to make the VPN work instead of saying it's not possible and ask the other peer to upgrade
small and recent project, one could say it has less "eyes" reading the code so security may be hazardous (the crypto should be fine because it use common crypto)
I never heard of it before, I found it in the ports tree while writing this text. There is openconnect package to act as a client and ocserv to act as a server.
Pros:
it can use TCP to try to bypass filtering through TCP/443 but can fallback to UDP for best performance
Cons:
the open source implementation (server) seems minimalist
gre is a special device on OpenBSD to create VPN without encryption, it's recommended to use it over IPSec. I don't cover it more because I was emphasing on VPN with encryption.
If you never used a VPN, I'd say OpenVPN is a good choice, it's versatile and it can easily bypass restrictions if you run it on port TCP/443.
I personnaly use WireGuard on my phone to reach my emails, because of WireGuard stateless protocol the VPN doesn't draw battery to maintain the connection and doesn't have to renogicate every time the phone gets Internet access.
The Port of the week of this end of 2021 is Cozy a GTK audio book player. There are currently not much alternative outside of audio players if you want to listen to audio books.
On OpenBSD I imported cozy in December 2021 so it will be available from OpenBSD 7.1 or now in -current, a simple "pkg_add cozy" is required to install.
On Linux, there is a flatpak package if your distribution doesn't provide a package.
I previously wrote about using an eGPU on Gentoo Linux. It was working when using the eGPU display but I never got it to work for accelerating games using the laptop display.
My laptop has a thunderbolt connector and I'm using a Razer Core X external GPU case that is connected to the laptop using a thunderbolt cable. This allows to use an external "real" GPU on a laptop but it has performance trade off and on Linux also compatibility issues.
There are three ways to use the nvidia eGPU:
- run the nvidia driver and use it as a normal card with its own display connected to the GPU, not always practical with a laptop
- use optirun / primerun to run programs within a virtual X server on that GPU and then display it on the X server (very clunky, originally created for Nvidia Optimus laptop)
- use Nvidia offloading module (it seems recent and I learned about it very recently)
The first case is easy, just install nvidia driver and use the right card, it should work on any setup. This is the setup giving best performance.
The most complicated setup is to use the eGPU to render what's displayed on the laptop, meaning the video signal has to come back from the thunderbolt cable, reducing the bandwidth.
Nvidia made work in their proprietary driver to allow a program to have its OpenGL/Vulkan calls to be done in a GPU that is not the one used for the display. This allows to throw optirun/primerun for this use case, which is good because they added performance penalty, complicated setup and many problems.
I really love NixOS and for writing articles it's so awesome, because instead of a set of instructions depending on conditions, I only have to share the piece of config required.
This is the bits to add to your /etc/nixos/configuration.nix file and then rebuild system:
- only add nvidia to the list of video drivers, at first I was adding modesetting but this was creating troubles
- the PCI bus ID can be found with lspci, it has to be translated in decimal, here my nvidia id is 10:0:0 but in lspci it's 0a:00:00 with 0a being 10 in hexadecimal
The use of offloading is controlled by environment variables. What's pretty cool is that if you didn't connect the eGPU, it will still work (with integrated GPU).
Previously I only explained how to use the laptop screen and the eGPU as a discrete GPU (not doing display). For some reasons, I've struggled a LOT to be able to use the eGPU display (which gives more performance because it's hitting less thunderbolt limitations).
I've discovered NixOS "specialisation" feature, allowing to add an alternative boot entry to start the system with slight changes, in this case, this will create a new "external-display" entry for using the eGPU as the primary display device:
With this setup, the default boot is the offloading mode but I can choose "external-display" to use my nvidia card and the screen attached to it, it's very convenient.
I had to force the xserver configuration file because the one built by NixOS was not working for me.
You use OpenBSD and when you upgrade your packages you often wonder which one is a rebuild and which one is a real version update? The packages updates are logged in /var/log/messages and using awk it's easy to achieve some kind of report.
The typical update line will display the package name, its version, a "->" and the newer version of the installed package. By verifying if the newer version is different from the original version, we can report updated packages.
awk is already installed in OpenBSD, so you can run this command in your terminal without any other requirement.
The command seems to mangle the separators when displaying the result and doesn't work well with flavors packages that will always be shown as updated.
At least it's a good start, it requires a bit more polishing but that's already useful enough for me.
Steam is a closed source program, while it's now also available on Linux doesn't mean it run on OpenBSD. The Linux Steam version is compiled for linux and without the sources we can't port it on OpenBSD.
Even if Steam was able to be installed and could be launched, games are not made for OpenBSD and wouldn't work either.
On FreeBSD it may be possible to install Windows Steam using Wine, but Wine is not available on OpenBSD because it require some specific Kernel memory management we don't want to implement for security reasons (I don't have the whole story), but FreeBSD also has a Linux compatibility mode to run Linux binaries, allowing to use programs compiled for Linux. This linux emulation layer has been dropped in OpenBSD a few years ago because it was old and unmaintained, bringing more issues than helping.
So, you can't install Steam or use it on OpenBSD. If you need Steam, use a supported operating system.
I wanted to make an article about this in hope my text will be well referenced within search engines, to help people looking for Steam on OpenBSD by giving them a reliable answer.
Hello, if you remember my previous publications about Nethack and my character "Sery the tourist", I have bad news. On OpenBSD, nethack saves are stored in /usr/local/lib/nethackdir-3.6.0/logfile and obviously I didn't save this when changing computer a few months ago.
I'm very sad of this data loss because I was enjoying a lot telling the story of the character while playing. Sery reached 7th floor while being a Tourist, which is incredible given all the nethack plays I've done and this one was going really well.
I don't know if you readers enjoyed that kind of content, if so please tell me so I may start a new game and write about it.
As an end, let's say Sery stayed too long in 7th floor and the Langoliers came to eat the Time of her reality.
Hi! If you run a server or a router, you may want to have a nice view of the bandwidth usage and statistics. This is easy and quick to achieve using vnstat software. It will gather data regularly from network interfaces and store it in rrd files, it's very efficient and easy to use, and its companion program vnstati can generate pictures, perfect for easy visualization.
Create a script in /var/www/htdocs/dashboard and make it executable:
#!/bin/sh
cd /var/www/htdocs/dashboard/ || exit 1
# last 60 entries of 5 minutes stats
vnstati --fiveminutes 60 -o 5.png
# vertical summary of last two days
# refresh only after 60 minutes
vnstati -c 60 -vs -o vs.png
# daily stats for 14 last days
# refresh only after 60 minutes
vnstati -c 60 --days 14 -o d.png
# monthly stats for last 5 months
# refresh only after 300 minutes
vnstati -c 300 --months 5 -o m.png
and create a simple index.html file to display pictures:
Add a cron as root to run the script every 10 minutes using _vnstat user:
# add /usr/local/bin to $PATH to avoid issues finding vnstat
PATH=/bin:/sbin:/usr/bin:/usr/sbin:/usr/local/bin
*/10 * * * * -ns su -m _vnstat -c "/var/www/htdocs/dashboard/vnstat.sh"
My personal crontab runs only from 8h to 23h because I will never look at my dashboard while I'm sleeping so I don't need to keep it updated, just replace * by 8-23 for the hour field.
Vnstat is fast, light and easy to use, but yet it produces nice results.
As an extra, you can run the vnstat commands (without the i) and use the raw text output to build an pure text dashboard if you don't want to use pictures (or http).
I had a high suspicion about something but today I made measurements. My feeling is that downloading data from OpenBSD use more "upload data" than on other OS
I originally thought about this issue when I found that using OpenVPN on OpenBSD was limiting my download speed because I was reaching the upload limit of my DSL line, but it was fine on Linux. From there, I've been thinking since then that OpenBSD was using more out data but I never measured anything before.
Now that I have an OpenBSD router it was easy to make the measures with a match rule and a label. I'll be downloading a specific file from a specific server a few times with each OS, so I'm adding a rule matching this connection.
match proto tcp from 10.42.42.32 to 145.238.169.11 label benchmark
Then, I've been downloading this file three times per OS and resetting counter after each download and saved the results from "pfctl -s labels" command.
A quick look will show that OpenBSD sent +42% OUT packets compared to Linux and also +42% OUT bytes, meanwhile the OpenBSD/Linux IN bytes ratio is nearly identical (100.02%).
Hi! This was a while without much activity on my blog, the reason is that I stabbed through my right index with a knife by accident, the injury was so bad I can barely use my right hand because I couldn't move my index at all without pain. So I've been stuck with only my left hand for a month now. Good news, it's finally getting better :)
Which leads me to the topic of this article, why I ended liking GNOME!
I will first start about why I didn't use it before. I like to try everything all the time, I like disruption, I like having an hostile (desktop/shell/computer) environment to stay sharp and not being stuck on ideas.
My current setup was using Fvwm or Stumpwm, mostly keyboard driven, with many virtual desktop to spatially regroup different activities. However, with an injured hand, I've been facing a big issue, most of my key binding were for two hands and it seemed too weird for me to change the bindings to work with one hand.
I tried to adapt using only one hand, but I got poor results and using the cursor was not very efficient because stumpwm is hostile to cursor and fvwm is not really great for this either.
With only one hand to use my computer, I found the awesome program ibus-typing-booster to help me typing by auto completing words (a bit like on touchscreen phones), it worked out of the box with GNOME due to the ibus integration working well. I used GNOME to debug the package but ended liking it in my current condition.
How do I like it now, while I was pestling about it a few months ago as I found it very confusing? Because it's easy to use and spared me movements with my hands, absolutely.
The activity menu is easy to browse, icons are big, dock is big. I've been using a trackball with my left hand instead of the usual right hand, aiming at a small task bar was super hard so I was happy to have big icons everywhere, only when I wanted them
I actually always liked the alt+tab for windows and alt+² (on my keyboard the key up to TAB is ², must be ~ for qwerty keyboards) for switching into same kind of window
alt+tab actually display everything available (it's not per virtual desktop)
I can easily view windows or move them between virtual desktop when pressing "super" key
This is certainly doing in MATE or Xfce too without much work, but it's out of the box with GNOME. It's perfectly usable without knowing any keyboard shortcut.
I'm pretty sure I'll return to my previous environment once my finger/hand because I have a better feeling with it and I find it more usable. But I have to thanks the GNOME project to work on this desktop environment that is easy to use and quite accessible.
It's important to put into perspective when dealing with desktop environment. GNOME may not be the most performing and ergonomic desktop, but it's accessible, easy to use and forgiving people who doesn't want to learn tons of key bindings or can't do them.
There is a very recurrent question I see on IRC or forums: what's the best desktop environment/window manager? What are YOU using? I stopped having a bold opinion about this topic, I simply reply there are many desktop environments because they are many kind of people and the person asking the question need to find the right one to suiting them.
Using the xfdashboard program and assigning it to Super key allows to mimic the GNOME "activity" view in your favorite window manager: choosing windows, moving them between desktops, running applications. I think this can easily turn any window manager into something more accessible, or at least "GNOME like".
What if we lose Internet tomorrow and we stop building computers? What would you want on your computer in the eventuality we would still have *some* power available to run it?
I find it to be an interesting exercise in the continuity of my old laptop challenge.
My biggest point would be that my computer could be used to replicate itself to other computer owners, give them the data so they can spread it again. Data copied over and over will be a lot more resilient than a single copy with a few local backups (local as in same city at best because there is no Internet).
Because most people's computers relying on the Internet to have data turned into useless bricks, I think everyone would be glad to be part of an useful infrastructure that can replicate and extend.
I think I would have to argue this is very useful to have computers and knowledge they can carry if we are short on electricity for running computers. We would want science knowledge (medicine, chemistry, physics, mathematics) but also history and other topics in the long run. We would also require maps of the local region/country to make long term plans and help decisions and planning to build infrastructures (pipes, roads, lines). We would require software to display but also edit these data.
Here is a list of sources I would keep synced on my computer.
wikipedia dumps (by topics so it's lighter to distribute)
openstreetmap local maps
OpenBSD source code
OpenBSD ports distfiles
kiwix and openstreetmap android APK files
The wikipedia dumps in zim format are very practical to run an offline wikipedia, we would require some OpenBSD programs to make it work but we would like more people to have them, Android tablets and phones are everywhere, small and doesn't draw much battery, I'd distribute the wikipedia dumps along with a kiwix APK file to view them without requiring a computer. Keeping the sources of the Android programs would be a wise decision too.
As for maps, we can download areas on openstreetmap and rework them with Qgis on OpenBSD and redistribute maps and a compatible viewer for Android devices with the OSMand~ free software app.
It would be important to keep the data set rather small, I think under 100 GB because it would be complicated to have a 500GB requirement for setting up a new machine that can re-propagate the data set.
If I would ever need to do that, the first time would be to make serious backups of the data set using multiples copies on hard drives that I would I hand to different people. Once the propagation process is done, it matters less because I could still gather the data somewhere.
I'd choose OpenBSD because it's a system I know well, but also because it's easy to hack on it to make changes on the kernel. If we ever need to connect a computer to an industrial machine, I'd rather try to port if on OpenBSD.
This is also true for the ports library, with all the distfiles it's possible to rebuild packages for multiple architectures, allowing to use older computers that are not amd64, but also easily patching distfiles to fix issues or add new features. Carrying packages without their sources would be a huge mistake, you will have a set of binary blobs that can't evolve.
OpenBSD is also easy to install and it works fine most of the time. I'd imagine automatic installation process from USB or even from PXE, and then share all the data so other people can propagate installation and data again.
This would also work with another system of course, the point is to keep the sources of the system and of its package to be able to rebuild the system for older supported architecture but also be able to enhance and work on the sources for bug fixing and new features.
I think a very nice solution would be to use Git, there are plugins to handle binary data so the repository doesn't grow over time. Git is decentralized, you can get updates from someone who receives an update from someone else and git can also report if someone messed with the history.
We could imagine some well known places running a local server with a WiFi hotspot that can receive updates from someone allowed to (using ssh+git) push updates to a git repository. There could be repositories for various topics like: news, system update, culture (music, videos, readings), maybe some kind of social network like twtxt. Anyone could come and sync their local git repository to get the news and updates, and be able to spread it again.
This is often a topic I have in mind when I think at why we are using computers and what makes them useful. In this theoretic future which is not "post-apocalyptic" but just something went wrong and we have a LOT of computers that become useless. I just want to prove that computers can still be useful without the Internet but you just need to understand their genuine purpose.
I'd be interested into what others would do, please let me know if you want to write on that topic :)
fzf is a powerful tool to interactively select a line among data piped to stdin, a simple example is to pick a line in your shell history and it's my main fzf use.
fzf ships with bindings for bash, zsh or fish but doesn't provide anything for ksh, OpenBSD default shell. I found a way to run it with Ctrl+R but it comes with a limitation!
This setup will run fzf for looking a history line with Ctrl+R and will run it without allowing you to edit the line! /!\
In your interactive shell configuration file (should be the one set in $ENV), add the following function and binding, it will rebind Ctrl+R to fzf-histo function that will look into your shell history.
The purpose of this tool is to assist the user by proposing words while typing, a bit like smartphones do. It can be trained with a dictionary, a text file but also learn from user inputs over time.
This program requires ibus to work, on Gnome it is already enabled but in other environments some configuration are required. Because this may be subject to change over time and duplicating information is bad, I'll give the links for configuring ibus-typing-booster.
Once you have setup ibus and ibus-typing-booster you should be able to switch from normal input to assisted input using "super"+space.
When you type with ibus-typing-booster enabled, with default settings, the input should be underlined to show a suggestion can be triggered using TAB key. Then, from a popup window you can pick a word by using TAB to cycle between the suggestions and pressing space to validate, or use the F key matching your choice number (F1 for first, F2 for second etc...) and that's all.
There are many ways to configure it, suggestions can be done inline while typing which I think is more helpful when you type slowly and you want a quick boost when the suggestion is correct. The suggestions popup can be vertical or horizontal, I personally prefer horizontal which is not the default. Colors and key bindings can changed.
While I type very fast when I have both my hands, using one hand requires me to look the keyboard and make a lot of moves with my hand. This work fine and I can type reasonably fast but this is extremely exhausting and painful for my hand. With ibus-typing-booster I can type full sentences with less efforts but a bit slower. However this is a lot more comfortable than typing everything using my hand.
This is an assistive technology easy to setup and that can be a life changer for disabled users who can make use of it.
This is not the first time I'm temporarily disabled in regards to using a keyboard, I previously tried a mirrored keyboard layout reverting keys when pressing caps lock, and also Dasher which allow to make words from simple movements such as moving mouse cursor. I find this ibus plugin to be easier to integrate for the brain because I just type with my keyboard in the programs, with Dasher I need to cut and paste content, and with mirrored layout I need to focus on the layout change.
We want all our network traffic to go through a WireGuard VPN tunnel automatically, both WireGuard client and server are running OpenBSD, how to do that? While I thought it was simple at first, it soon became clear that the "default" part of the problem was not easy to solve, fortunately there are solutions.
For this setup I assume we have a server running OpenBSD with a public IP address (1.2.3.4 for the example) and an OpenBSD computer with Internet connectivity.
Because you want to use the WireGuard tunnel as the default route, you can't define a default route through WireGuard as this, that would prevent our interface to reach the WireGuard endpoint to make the tunnel working. We could play with the routing table by deleting the default route found on the interface, create a new route to reach the WireGuard server and then create a default route through WireGuard, but the whole process is fragile and there is no right place to trigger a script doing this.
Instead, you can assign the network interface used to access the Internet to the rdomain 1, configure WireGuard to reach its remote peer through rdomain 1 and create a default route through WireGuard on the rdomain 0. Quick explanation about rdomain: they are different routing tables, default is rdomain 0 but you can create new routing tables and run commands using a specific routing table with "route -T 1 exec ping perso.pw" to make a ping through rdomain 1.
The configuration process will be done in this order:
create the WireGuard interface on your computer to get its public key
create the WireGuard interface on the server to get its public key
configure PF to enable NAT and enable IP forwarding
reconfigure computer's WireGuard tunnel using server's public key
time to test the tunnel
make it default route
Our WireGuard server will accept connections on address 1.2.3.4 at the UDP port 4433, we will use the network 192.168.10.0/24 for the VPN, the server IP on WireGuard will be 192.168.10.1 and this will be our future default route.
We will make a simple script to generate the configuration file, you can easily understand what is being done. Replace "1.2.3.4 4433" by your IP and UDP port to match your setup.
PRIVKEY=$(openssl rand -base64 32)
cat <<EOF > /etc/hostname.wg0
wgkey $PRIVKEY
wgpeer wgendpoint 1.2.3.4 4433 wgaip 0.0.0.0/0
inet 192.168.10.2/24
up
EOF
# start interface so you can get the public key
# we should have an error here, this is normal
sh /etc/netstart wg0
PUBKEY=$(ifconfig wg0 | grep 'wgpubkey' | cut -d ' ' -f 2)
echo "You need $PUBKEY to setup the remote peer"
Like we did on the computer, we will use a script to configure the server. It's important to get the PUBKEY displayed in the previous step.
PUBKEY=PASTE_PUBKEY_HERE
PRIVKEY=$(openssl rand -base64 32)
cat <<EOF > /etc/hostname.wg0
wgkey $PRIVKEY
wgpeer $PUBKEY wgaip 192.168.10.0/24
inet 192.168.10.1/24
wgport 4433
up
EOF
# start interface so you can get the public key
# we should have an error here, this is normal
sh /etc/netstart wg0
PUBKEY=$(ifconfig wg0 | grep 'wgpubkey' | cut -d ' ' -f 2)
echo "You need $PUBKEY to setup the local peer"
You want to enable NAT so you can reach the Internet through the server using WireGuard, edit /etc/pf.conf to add the following line (after the skip lines):
pass out quick on egress from wg0:network to any nat-to (egress)
Reload with "pfctl -f /etc/pf.conf".
NOTE: if you block all incoming traffic by default, you need to open UDP port 4433. You will also need to either skip firewall on wg0 or configure PF to open what you need. This is beyond the scope of this guide.
We need to enable IP forwarding because we will pass packets from an interface to another, this is done with "sysctl net.inet.ip.forwarding=1" as root. To make it persistent across reboot, add "net.inet.ip.forwarding=1" to /etc/sysctl.conf (you may have to create the file).
Edit /etc/hostname.wg0 and paste the public key between "wgpeer" and "wgaip", the public key is wgpeer's parameter. Then run "sh /etc/netstart wg0" to reconfigure your wg0 tunnel.
After this step, you should be able to ping 192.168.10.1 from your computer (and 192.168.10.2 from the server). If not, please double check the WireGuard and PF configurations on both side.
This simple setup for the default route will truly make WireGuard your default route. You have to understand services listening on all interfaces will only attach to WireGuard interface because it's the only address in rdomain 0, if needed you can use a specific routing table for a service as explained in rc.d man page.
Replace the line "up" with the following:
wgrtable 1
up
!route add -net default 192.168.10.1
Because you may use a nameserver in /etc/resolv.conf that was provided by your local network, it's not reachable anymore. I highly recommend to use unwind (in every case anyway) to have a local resolver, or modify /etc/resolv.conf to use a public resolver.
unwind can be enabled with "rcctl enable unwind" and "rcctl start unwind", from OpenBSD 7.0 you should have resolvd running by default that will rewrite /etc/resolv.conf if unwind is started, otherwise you need to write "nameserver 127.0.0.1" in /etc/resolv.conf
If you need for some reason to run a program and not route its traffic through the VPN, it is possible. The following command will run firefox using the routing table 1, however depending on the content of your /etc/resolv.conf you may have issues resolving names (because 127.0.0.1 is only reachable on rdomain 0!). So a simple fix would be to use a public resolver if you really need to do so often.
If you are behind a NAT you may need to use the KeepAlive option on your WireGuard tunnel to keep it working. Just add "wgpka 20" to enable a KeepAlive packet every 20 seconds in /etc/hostname.wg0 like this:
WireGuard is easy to deploy but making it a default network interface adds some complexity. This is usually simpler for protocols like OpenVPN because the OpenVPN daemon can automatically do the magic to rewrite the routes (and it doesn't do it very well) and won't prevent non-VPN access until the VPN is connected.
Today I wanted to share with you about the program Foliate, a GTK Ebook reader with interesting features. First, there aren't many epub readers available on OpenBSD (and also on Linux).
A week ago I joked on an french OpenBSD IRC channel that it would be nice to do a webzine to gather some quotes and links about OpenBSD, I didn't thought it would be real a few days later. OpenBSD has a small community and even if we can get some news from Mastodon, Twitter, watching new commits, writing blog articles about stuff, we had nothing gathering all of that. I can't imagine most OpenBSD users being able or willing to follow everything happening in the project, so I thought a Webzine targeting average OpenBSD users would be fine. The ultimate accomplishment would be that when we release a new Webzine issue, readers would enjoy reading it with a nice cup of their favorite drink, like if it was one's favorite hobby 'zine.
At first I wanted the Webzine to look like a news paper, so I tried to use Scribus (used to make magazines and serious stuff) and make a mockup to see what it would look like. Then I shared it with a small French community and some people suggested I should use LaTeX for the job, I replied it was not great for handling the layout exactly as I wanted but I challenged that person to show me something done with LaTeX that looks better than my Scribus mockup.
One hour later, that person came with a PDF generated from LaTeX with the same content, and it looked very great! I like LaTeX but I couldn't believe it could be used efficiently for this job. I immediately made changes to my Scribus version to improve it, taking the LaTeX PDF version as a model and I released a new version. At that time, I had two PDF generated from two different tools.
A few people suggested me to make a version using mdoc, I joked because it wasn't serious, but because boredom is a powerful driving force I decided to reuse the content of my mockup to do another mockup with mdoc. I chose to export it to html and had to write a simple CSS style sheet to make it look nice, but ultimately mdoc export had some issues and required to apply changes with sed to the output to fix the HTML rendering to not look like a man page misused for something else.
Anyway, I got three mockups of the same Webzine example and decided to use Scribus to export its version as a SVG file and embed it in a html file for allowing web browsers to display it natively.
I asked the Mastodon community (thank you very much to everyone who participated!) which version they liked the most and I got many replies: the mdoc html version was the most preferred by with 41%, while 32% liked the SVG-in-html version and 27% the PDF. Results were very surprising! The version I liked the least was the most preferred, but there were reasons underneath.
The PDF version was not available in web browsers (or at least didn't display natively) and some readers didn't enjoy that. As for the SVG version it didn't work well on mobile phones and both versions didn't work at all in console web clients (links, lynx, w3m). There was also accessibility concerns with the PDF or SVG for screen readers / text-to-speech users and I wanted the Webzine to be available for everyone so both formats were a no-go.
Ultimately, I decided the best way would be to publish the Webzine as HTML if I wanted it to look nice and being accessible on any device for any users. I'm not a huge fan of web and html, but it was the best choice for the readers. From this point, I started working with a few people (still from the same French OpenBSD community) to decide how to make it as HTML, from this moment I wasn't alone anymore in the project.
In the end, the issue is done by writing html "by hand" because it just works and doesn't require extra complexity layer. Simple html is not harder than markdown or LaTeX or weird format because it doesn't require extra tweaks after conversion.
I created a git repository on tildegit.org where I already host some projects so we could work on this project as a team. Requirements and what we wanted to do was getting refined a bit more every day. I designed a simplistic framework in shell that would suits our needs. It wasn't long before we got the framework to generate html pages, some styles changes happened all along the development and I think this will still happen regularly in the near future. We had a nice base to start writing content.
We had to choose a licensing, contributions processes, who is doing what etc... Fun times, I enjoyed this a lot. Our goal was to make a Webzine that would work everywhere, without JS, with a dark mode and still usable on phone or console clients so we regularly checked all of that and reported issues that were getting fixed really quickly.
Let's talk a bit about the website framework. There is a simple hierarchy of directories, one used to write each issue in a dedicated directory, a Makefile to build everything, parts that are common to each generated pages (containing style, html header and footer). Each issue is made from of lot of file starting with a number, so when a page is generated by the concatenation of all the parts parts we can keep the numbers ordering.
It may not be optimized CPU wise, but concatenating parts allow reusing common parts (mainly header and footer) but also working on smaller files: each file of the issues represents a section of it (Quote, Going further, Headlines etc...).
This is a fantastic journey, we are starting to build a solid team for the webzine. Everyone is allowed to contribute. My idea was to give every reader a small slice of the OpenBSD project life every so often and I think we are on good tracks now. I'd like to thanks all the people from the https://openbsd.fr.eu.org/ community who joined me at the early stages to make this project great.
I started to work on the OpenBSD code dealing with the CPU frequency scaling. The current automatic logic is a trade-off between okay performance and okay battery. I'd like the auto policy to be different when on battery and when on current (for laptops) to improve battery life for nomad users and performance for people connected to the grid.
I've been able to make raw changes to produce this effect but before going further, I wanted to see if I got any improvement in regards to battery life and to which extent if it was positive.
In the incoming sections of the article I will refer to Wh unit, meaning Watt-hour. It's a measurement unit for a quantity of energy used, because energy used is absolutely not linear, we can make an average of the usage and scale it to one hour so it's easy to compare. An oven drawing 1 kW when on and being on for an hour will use 1 kWh (one kilowatt-hour), while an electric heater drawing 2 kW when on and turned on for 30 minutes will use 1 kWh too.
2. How to understand power usage for nomad users §
While one may think that the faster we do a task, the less time the system stay up and the less battery we use, it's not entirely true for laptops or computers.
There are two kinds of load on a system: interactive and non-interactive. In non-interactive mode, let's imagine the user powers on the computer, run a job and expect it to be finished as soon as possible and then shutdown the computer. This is (I think) highly unusual for people using a laptop on battery. Most of the time, users with a laptop will want their computer to be able to stay up as long as possible without having to charge.
In this scenario I will call interactive, the computer may be up with lot of idle time where the human operator is slowly typing, thinking or reading. Usually one doesn't power off a computer and power it on again while the person is sitting in front of the laptop. So, for a given task among the main task "staying up" may not be more efficient (in regards to battery) if it takes less time, because whatever the time it will take to do X() the system will stay up after.
Here is the protocol I did for the testing "powersaving" frequency policy and then the regular auto policy.
Clean package of games/gzdoom
Unplug charger
Dump hw.sensors.acpibat1.watthour3 value in a file (it's the remaining battery in Wh)
Run compilation of the port games/gzdoom with dpb set to use all cores
Dump watthour3 value again
Wait until 18 minutes and 43 seconds
Dump watthour3 value again
Why games/gzdoom? It's a port I know can be compiled with parallel build allowing to use all CPU and I know it takes some times but isn't too short too.
Why 18 minutes and 43 seconds? It's the time it takes for the powersaving policy to compile games/gzdoom. I needed to compare the amount of energy used by both policies for the exact same time with the exact same job done (remember the laptop must be up as long as possible, so we don't shutdown it after compiling gzdoom).
I could have extended the duration of the test so the powersaving would have had some idle time but given the idle time is drawing the exact same power with both policies, that would have been meaningless.
We see that the powersaving used more energy for the duration of the compilation of gzdoom, 5.9 Wh vs 5.6 Wh, but as we don't turn off the computer after the compilation is done, the auto mode also spent a few minutes idling and used 0.74 Wh in that time.
Policy Compile power Idle power Total (Wh)
------ ------------ --------- ----------
powersaving 5,90 0,00 5,90
auto 5,60 0,74 6,34
For the same job done: compiling games/gzdoom and stay on for 18 minutes and 43 seconds, the powersaving policy used 5.90 Wh while the auto mode used 6.34 Wh. This is a saving of 6.90% of power.
This is a testing policy I made for testing purposes, it may be too conservative for most people, I don't know. I'm currently playing with this and with a reproducible benchmark like this one I'm able to compare results between changes in the scheduler.
So, I'm currently playing with OpenBSD trying each end user package (providing binaries) and see if they work when installed alone. I needed a simple way to keep packages downloaded and I didn't want to go the hard way by using rsync on a package mirror because it would waste too much bandwidth and would take too much time.
The most efficient way I found rely on a cache and ordering the source of packages.
pkg_add has a special variable named PKG_CACHE that when it's set, downloaded packages are copied in this directory. This is handy because every time I will install a package, all the packages downloaded by will kept in that directory.
The other variable that interests us for the job is PKG_PATH because we want pkg_add to first look up in $PKG_CACHE and if not found, in the usual mirror.
Every time pkg_add will have to get a package, it will first look in the cache, if not there it will download it in the mirror and then store it in the cache.
Because I try packages one by one, installing and removing dependencies takes a lot of time (I'm using old hardware for the job). Instead of installing a package, deleting it and removing its dependencies, it's easier to work with manually installed packages and once done, remove dependencies, this way you will keep already installed dependencies that will be required for the next package.
#!/bin/sh
# prepare the packages passed as parameter as a regex for grep
KEEP=$(echo $* | awk '{ gsub(" ","|",$0); printf("(%s)", $0) }')
# iterate among the manually installed packages
# but skip the packages passed as parameter
for pkg in $(pkg_info -mz | grep -vE "$KEEP")
do
# instead of deleting the package
# mark it installed automatically
pkg_add -aa $pkg
done
# install the packages given as parameter
pkg_add $*
# remove packages not required anymore
pkg_delete -a
This way, I can use this script (named add.sh) "./add.sh gnome" and then reuse it with "./add.sh xfce", the common dependencies between gnome and xfce packages won't be removed and reinstalled, they will be kept in place.
There are always tricks to make bandwidth and storage more efficient, it's not complicated and it's always a good opportunity to understand simple mechanisms available in our daily tools.
When using Nix/NixOS and requiring some development libraries available in pip (for python) or cpan (for perl) but not available as package, it can be extremely complicated to get those on your system because the usual way won't work.
The command nix-shell will be our friend here, we will define a new environment in which we will have to create the package for the libraries we need. If you really think this library is useful, it may be time to contribute to nixpkgs so everyone can enjoy it :)
The simple way to invoke nix-shell is to use packages, for example the command nix-shell -p python38Packages.pyyaml will give you access to the python library pyyaml for Python 3.8 as long as you run python from this current shell.
The same way for Perl, we can start a shell with some packages available for databases access, multiples packages can be passed to "nix-shell -p" like this: nix-shell -p perl532Packages.DBI perl532Packages.DBDSQLite.
Reading the explanations found on a blog and help received on Mastodon, I've been able to understand how to use a simple nix-shell definition file to declare new cpan or pip packages.
Create a file with the nix extension (or really, whatever the file name you want), special file name "shell.nix" will be automatically picked up when using "nix-shell" instead of passing the file name as parameter.
with (import <nixpkgs> {});
let
# we will declare new packages here
in
mkShell {
buildInputs = [ ]; # we will declare package list here
}
Now we will see how to declare a python or perl library.
For python, we need to know the package name on pypi.org and its version. Reusing the previous template, the code would look like this for the package Crossplane
with (import <nixpkgs> {}).pkgs;
let
crossplane = python37.pkgs.buildPythonPackage rec {
pname = "crossplane";
version = "0.5.7";
src = python37.pkgs.fetchPypi {
inherit pname version;
sha256 = "a3d3ee1776bcccebf7a58cefeb365775374ab38bd544408117717ccd9f264f60";
};
meta = { };
};
in
mkShell {
buildInputs = [ crossplane python37 ];
}
If you need another library, replace crossplane variable name but also pname value by the new name, don't forget to update that name in buildInputs at the end of the file. Use the correct version value too.
There are two references to python37 here, this implies we need python 3.7, adapt to the version you want.
The only tricky part is the sha256 value, the only way I found to find it easily is the following.
declare the package with a random sha256 value (like echo hello | sha256)
run nix-shell on the file, see it complaining about the wrong checksum
get the url of the file, download it and run sha256 on it
For perl, it is required to use a script available in the official git repository when packages are made. We will only download the latest checkout because it's quite huge.
In this example I will generate a package for Data::Traverse.
We will only reuse the part after the ===, this is nix code that defines a package named DataTraverse.
The shell definition will look like this:
with (import <nixpkgs> {});
let
DataTraverse = buildPerlPackage {
pname = "Data-Traverse";
version = "0.03";
src = fetchurl {
url = "mirror://cpan/authors/id/F/FR/FRIEDO/Data-Traverse-0.03.tar.gz";
sha256 = "dd992ad968bcf698acf9fd397601ef23d73c59068a6227ba5d3055fd186af16f";
};
meta = { };
};
in
mkShell {
buildInputs = [ DataTraverse perl ];
# putting perl here is only required when not using NixOS, this tell you want Nix perl binary
}
Then, run "nix-shell myfile.nix" and run you perl script using Data::Traverse, it should work!
Using not packaged libraries is not that bad once you understand the logic of declaring it properly as a new package that you keep locally and then hook it to your current shell session.
Finding the syntax, the logic and the method when you are not a Nix guru made me despair. I've been struggling a lot with this, trying to install from cpan or pip (even if it wouldn't work after next update of my system and I didn't even got it to work.
I always wondered how to make packages building faster. There are at least two easy tricks available: storing temporary data into RAM and caching build objects.
Caching build objects can be done with ccache, it will intercept cc and c++ calls (the programs compiling C/C++ files) and depending on the inputs will reuse a previously built object if available or build normally and store the result for potential next reuse. It has nearly no use when you build software only once because it requires objects to be cached before being useful. It obviously doesn't work for non C/C++ programs.
The other trick is using a temporary filesystem stored in memory (RAM), on OpenBSD we will use mfs but on Linux or FreeBSD you could use tmpfs. The difference between those two is mfs will reserve the given memory usage while tmpfs is faster and won't reserve the memory of its filesystem (which has pros and cons).
So, I decided to measure the build time of the Gemini browser Lagrange in three cases: without ccache, with ccache but first build so it doesn't have any cached objects and with ccache with objects in it. I did these three tests multiple time because I also wanted to measure the impact of using memory base filesystem or the old spinning disk drive in my computer, this made a lot of tests because I tried with ccache on mfs and package build objects (later referenced as pobj) on mfs, then one on hdd and the other on mfs and so on.
To proceed, I compiled net/lagrange using dpb after cleaning the lagrange package generated everytime. Using dpb made measurement a lot easier and the setup was reliable. It added some overhead when checking dependencies (that were already installed in the chroot) but the point was to compare the time difference between various tweaks.
Here are the results, raw and with a graphical view. I did run multiples time the same test sometimes to see if the result dispersion was huge, but it was reliable at +/- 1 second.
Type Duration for second build Duration with empty cache
ccache mfs + pobj mfs 60 133
ccache mfs + pobj hdd 63 130
ccache hdd + pobj mfs 61 127
ccache hdd + pobj hdd 68 137
no ccache + pobj mfs 124
no ccache + pobj hdd 128
At first glance, we can see that not using ccache results in builds a bit faster, so ccache definitely has a very small performance impact when there is no cached objects.
Then, we can see results are really tied together, except for the ccache and pobj both on the hdd which is the slowest combination by far compared to the others times differences.
My building system has 16 GB of memory and 4 cores, I want builds to be as fast as possible so I use the 4 cores, for some programs using Rust for compilation (like Firefox), more than 8 GB of memory (4x 2GB) is required because of Rust and I need to keep a lot of memory available. I tried to build it once with 10GB of mfs filesystem but when packaging it did reach the filesystem limit and fail, it also swapped during the build process.
When using a 8GB mfs for pobj, I've been hitting the limit which induced build failures, building four ports in parallel can take some disk space, especially at package time when it copies the result. It's not always easy to store everything in memory.
I decided to go with a 3 GB ccache over MFS and keep the pobj on the hdd.
Using mfs for at least ccache or pobj but not necessarily both is beneficial. I would recommend using ccache in mfs because the memory required to store it is only 1 or 2 GB for regular builds while storing the pobj in mfs could requires a few dozen gigabytes of memory (I think chromium requires 30 or 40 GB last time I tried).
This article is not an how to or explaining anything, I just wanted to share how I spend my current free time. It's obviously OpenBSD related.
When updating or making new packages, it's important to get the dependencies right, at least for the compilation dependencies it's not hard because you know it's fine once the building process can run entirely, but at run time you may have surprises and discover lacking dependencies.
Software are made of written text called source code (or code to make it simpler), but to avoid wasting time (because writing code is hard enough already) some people write libraries which are pieces of code made in the purpose of being used by other programs (through fellow developers) to save everyone's time and efforts.
A library can propose graphics manipulation, time and date functions, sound decoding etc... and the software we are using rely on A LOT of extra code that comes from other piece of code we have to ship separately. Those are dependencies.
There are dependencies required for building a program, they are used to manipulate the source code to transform it into machine readable code, or for organizing the building process to ease the development and so on and there are libraries dependencies which are required for the software to run. The simplest one to understand would be the library to access the audio system of your operating system for an audio player.
And finally, we have run time dependencies which can be found upon loading a software or within its use. They may not be well documented in the project so we can't really know they are required until we try to use some feature of the software and it crashes / errors because of something missing. This could be a program that would call an extra program to delegate the resizing of a picture.
In order to spot these run time dependencies, I've started to use an old laptop (a thinkpad T400 that I absolutely love) with a clean OpenBSD installation, lot of local packages on my network (see it later) and a very clean X environment.
The point of this computer is to clean every package, install only one I need to try (pulling the dependencies that come with it) and see if it works under the minimal conditions. They should work with no issue if the packages are correctly done.
Once I'm satisfied with the test process, I will clean every packages on the system and try another one.
Sometimes, as we have many many packages installed, it happens we have a run time dependency installed by that is not declared in the software package we are working on, and we don't see the failure as the requirement is provided by some other package. By using a clean environment to check every single program separately, I remove the "other packages" that could provide a requirement.
When I work on packages I often need to compile many of them, and it takes time, a lot of time, and my laptop usually make a lot of noise and is hot and slow to do something else, it's not very practical. I'm going to setup a dedicated building machine that I will power on when I'll work on ports, and it will be hidden in some isolated corner at home building packages when I need it. That machine is a bit more powerful and will prevent my laptop to be unusable for some time.
This machine in combination with the laptop are a great combination to make quick changes and test how it goes. The laptop will pull packages directly from the building machine, and things could be fixed on the building machine quite fast.
Contributing to packages is an endless work, making good packages is hard work and requires tests. I'm not really good at doing packages but I want to improve myself in that field and also improve the way we can test packages are working. With these new development environments I hope I will be able to contribute a bit more to the quality of the futures OpenBSD releases.
This article is about comparing "distraction free" editors running on Linux. This category of editors is supposed to be used in full screen and shouldn't display much more than text, allowing to stay focused on the text.
I've found a few programs that run on Linux and are open source, I deliberately omitted web browser based editors
Apostrophe
Focuswriter
Ghostwriter
Quilter
Vi (the minimal vi from busybox)
I used them on Alpine, three of them installed from Flatpak and Apostrophe installed from the Alpine packages repositories.
I'm writing this on my netbook and wanted to see if a "distraction" free editor could be valuable for me, the laptop screen and resolution are small and using it for writing seems a fun idea, although I'm not really convinced of the use (for me!) of such editors.
Quick tour of the memory usage (reported in top in the SHR column)
Apostrophe: 63 MB of memory
Focuswriter: 77 MB of memory
Ghostwriter: 228 MB of memory
Quilter: 72 MB of memory
vi: 0.89 MB of memory + 41 MB of memory for xfce4-terminal
As for the perceived performance when typing I've had mixed results.
Apostrophe: writing is smooth and pleasant
Focuswriter: writing is smooth and pleasant
Ghostwriter: writing is smooth and pleasant
Quilter: there is a delay when typing, I've been able to type an entire sentence and being so fast I've been able to see the last word being drawn on the screen
I didn't know much what to expect from these editors, I've seen some common features and some other that I discovered.
focus mode: keep the current sentence/paragraph/line in focus and fade the text around
helpers for markdown mode: shortcuts to enable/disable bold/italic, bullet lists etc... Outlining window to see the structure of the document or also real time rendering from the markdown
full screen mode
changing fonts and display: color, fonts, background, style sheet may be customized to fit what you prefer
"Hemingway" mode: you can't undo what you type, I suppose it's to write as much as possible and edit later
Export as multiple format: html, ODT, PDF, epub...
It's the one I used for writing this article, it feels very nice, it proposes only three themes that you can't customize and the font can't be changed. Although you can't customize that much, it's the one that looks the best out of the box, that is easiest to use and which just works fine. From a distraction free editor, it seems it's the best approach.
This is the one I would recommend to anyone wanting a distraction free editor.
Because of the input lag when typing text, this was the worse experience for me, maybe it's platform specific? The user interface looks a LOT like apostrophe at the point I'd think one is a fork from another, but in regards to performance it's drastically different. It offers three themes but also allow choosing the fonts from three named "Quilt something" which is disappointing.
This one has potential, it has a lot of things you can tweak in the preferences menu, from which character should be doubled (like quotes) when typed, daily goals, statistics, configurable shortcuts for everything, writing from right to left.
It also relies a lot on the theming features to choose which background (picture or color) you want, how to space the text, which font, which size, opacity of the typing area. It has too many tweaks required to be usable to me, the default themes looked nice but the text was small and ugly, it was absolutely not enjoying to type and see the text appending. I tried to duplicate a theme (from the user interface) and change the font and size, but I didn't get something that I enjoyed. Maybe with some time spent it could look good, but what the other tools provide is something that just works and looks good out of the box.
I tried ghostwriter 1.x at first then I saw there was a 2.x version with a lot more features, so I used both for this review, I'll only cover the 2.x version but looking at the repositories information many distributions providing the old version, including flatpak.
Ghostwriter seems to be the king of the arena. It has all the features you would expect from a distraction free editor, it has sane defaults but is customizable and is enjoyable out of the box. For writing long documents, the markdown outlining panel to see the structure of the document is very useful and there are features for writing goal and statistics, this may certainly be useful for some users.
I couldn't review some editors without including a terminal based editor. I chose vi because it seemed the most distraction free to me, emacs has too many features and nano has too much things displayed at the bottom of the screen. I choose vi instead of ed because it's more beginner friendly, but ed would work as fine. Note that I am using vi (from busybox on Alpine linux) and not Vim or nvi.
vi doesn't have much features, it can save text to a file. The display can be customized in the terminal emulator and allow a great choice of font / theme / style / coloring after decades of refinements in this field. It has no focus mode or markdown coloration/integration, which I admit can be confusing for big texts with some markup involved, at least for bullet lists and headers. I always welcome a bit of syntactic coloration and vi lacks this (this can be solved with a more advanced text editor). vi won't allow you to export into any kind of file except plain text, so you need to know how to convert the text file into the output format you are looking for.
It's hard for me to tell if typing this article using Apostrophe editor was better or more efficient than using my regular kakoune terminal text editor. The font looks absolutely better in Apostrophe but I never gave much attention to the look and feel of my terminal emulator.
I'll try using Apostrophe or Ghostwriter for further articles, at least by using my netbook as a typing machine.
This is a simple announce to gather some changes I made to my blog recently.
The web version of the blog now display the articles list grouped by year when viewing a tag page, previously it was displaying the whole article contents and I think tags were unusable this way, although it was so because initially I had two articles when I wrote the blog generator and it made sense.
The RSS file was embedding the whole HTML content of each article, I switched to use the article original plain text format, HTML should only be used in a Web browser and RSS is not meant to be dedicated for web browsers. I know this is a step back for some users but many users also appreciated this move and I'm happy to not contribute at putting HTML everywhere.
Most texts are now written using the gemtext format, served raw on gemini and gopher and converted into HTML for the http version using gmi2html python tool slightly modified (I forgot where I got it initially). I use gemtext because I like this format and often forced me to rethink the way I present an idea because I had to separate links and code from the content and I'm convinced it's a good thing. No more links named "here" or inlined code hard to spot.
If you think changes could be done on my blog, on the web / gopher or gemini version please share your ideas with me, it's also the opportunity for me to play with the code of the blog generator cl-yag that I absolutely love.
I have been publishing a lot more this year, I enjoy much more sharing my ideas or knowledge this way than I used to and writing is also the opportunity for me to improve my English and when I compare to the first publications I'm proud to see I improved the quality over time (I hope so at least). I got more feedback for strangers reading this blog, by mail or IRC and I'm thankful to them, they just drop by to tell me they like what I write or that I made a mistake so I can fix it, it's invaluable and allows me to make new connections to people I would never have reached otherwise.
I should try to find some time and motivation to get back at my Podcast publications now but I find it a lot harder to speak than to write some text, maybe it would be an habit to take. We will see soon.
This is a simple article explaining how to manage entries in /etc/hosts in a NixOS system. Modifying this file is quite useful when you need to make tests on a remote server while its domain name is still not updated so you can force a domain name to be resolved by a given IP address, bypassing DNS queries.
NixOS being what is is, you can't modify the /etc/hosts file directly.
I'll copy the reply here in case the archives get lost. When you get the OpenBSD boot prompt, type the following commands to tell about the serial port.
stty com0 115200
set tty com0
boot
And you are done! During the installation process you will be asked about serial devices to use but the default offered will match what you set at boot.
Dear open source and libre software developers, I would like to share thoughts with you. This could be considered as an open letter but I'm not sure to know what an open letter is, and I don't want to give instructions to anyone. I have feelings I want to share about my beloved hobby: computers and open source.
Computers are amazing, they do stuff, lot of stuff, at hardware and software level. We can use them for anything, they are a great tool and we can program our tools to match our expectations, wishes and needs, it's not easy, it's an art but also a science, we do it together because it's a huge task requiring more than one brain time to achieve.
We are currently facing supply chain issues at many levels in the electronic industry, making modern high end computers is always more complicated, we also face pollution concerns and limited resources that will prevent an infinity of computers.
I would like to see my hobby affordable for anyone. There are many many computers already built and most of their parts can be replaced which is a crazy opportunity when you compare this to the smartphone industry where no parts can be changed.
As people writing software used by others, it is absolutely important to keep old computers useful. They were useful when they were built, they should still be useful in the future to some extent.
Nowadays, a computer without network access would be considered useless but it's not. But if you want to connect a computer to the Internet, facing continuously increase of network attacks, one should only use an up to date operating system and latest software version, unfortunately it's not always easy on old computers.
Some cryptography may require regularly increased minimum requirements, this is acceptable. What is not is that doing the same task on a computer requires more resources over the years as software grows and evolves.
Nowadays, regularly, more operating systems are dropping support for older architectures to only focus on amd64. This is understandable, volunteer work is limited and it's important to focus on the hardware found in most of the users computers. But then, by doing so they are making old hardware obsolete which is not acceptable.
I understand this is a huge dilemma and I have no solution, maybe we should need less operating systems to gather the volunteers to maintain older but still relevant architectures. It is not possible obviously, volunteers work on what they want because they like it, you can't assign contributors to some task against their will.
The issue is at a higher scale and every person working in the IT field is part of the problem.
Some are dropping old architectures because there are no users. There are no users because they have to replace their hardware with a more powerful new hardware to cope with software becoming more and more hungry of resources. They become so because of people writing software, because companies want to do unoptimized code to release the product with less development time implying a cheaper cost, with the trade-off of asking customers to use a more powerful computer.
The web become unusable on old hardware, you can't use the world wide web anymore on old hardware because of lack of memory, lack of javascript support or too much animations using the CPU that you can't disable.
When you think about open source systems, many think "Linux", and most people think "amd64". A big part of the open source ecosystem is now driven toward Linux/amd64 target, at the cost of all the OS / architectures that are still in use, existing, not dead.
We could argue that technology is evolving and that those should make the work to stay in the race with the holy Linux/amd64 combo, this is a receivable argument as open source can be used / forked by everyone. But it would work so much better if we worked as a whole team.
I just wanted to express my feelings with this blog post. I don't want to tell anyone what to do, we are the open source community, we do what we enjoy.
I own old computers, from 15 years old to 8 years old, I still like to use them. Why would they be "old"? because of their date of manufacture, this is a fact. But because of the software ecosystem, they are becoming more obsolete every year and I definitely don't understand why it must be this way.
If you can give a thought to my old computers when writing code, thinking about them and make a three lines changes to improve your software for them, I would be absolutely grateful for the extra work. We don't really need more computers, we need to dig out the old computers to make them useful again.
Today as a "Port of the Week" article (that isn't published every week now but who cares) I would like to present you pngquant.
pngquant is a simple utility to compress png files in order to reduce them, with the goal of not altering the file in a visible way. pngquant is lossy which mean it modify the content, at the opposite of the optipng program which optimize the png file to try to reduce its size as possible without modifying the visual.
The easiest way to use pngquant is simply give the file to compress as an argument, a new file with the original file name with "-fs8" added before the file extension will be created.
I made a simple screenshot of four terminals on my computer, I compared the file size of the original png, the png optimized with optipng and the compressed png using pngquant. I also included a conversion to jpg of the same size as the original file.
I used defaults of each commands.
File size (in kilobytes) % of original (lower is better)
======== =============== ===============================
original 168 100
optipng 144 85.7
pngquant 50.2 29.9
jpeg 71% 169 100
The file produced by pngquant is less than a third of the original. Here are the files so you can try to check if you see differences with the pngquant version.
Most of the time, compressing a png is suitable for publishing or sharing. For screenshots or digital pictures, jpg format is usually very bad and is only suitable for camera pictures.
For a drawn picture you should keep the original if you ever plan to make changes on it.
ElementaryOS is a linux distribution based on Ubuntu that also ship with a in-house developed desktop environment Pantheon and ecosystem apps. Since their 6th release named Odin, the development team made a bold choice of proposing software through the Flatpak package manager.
I've been using this linux distribution on my powerful netbook (4 cores atom, 4 GB of memory) for some weeks, trying not to use the terminal and now this is my review.
I've been using ElementaryOS a little in the past so I was already aware of the Pantheon desktop when I installed ElementaryOS Odin on my netbook, I've been pleased to see it didn't change in term of usability. Basically, Pantheon looks like a Gnome3 desktop with a nice and usable dock à la MacOS.
Using the Super key (often referred to as the "Windows key") and you will be disappointed by getting a window with a list of shortcuts that works with Pantheon. Putting the help on this button is quite clever as we are used to press it for sending commands, but after a while it's misleading to have a single button triggering help, fortunately this behaviour can be configured to display the desktop or the applications menu.
Pantheon has a very nice feature I totally love which create a floating miniature of a target window that stay on top of everything, I often need to keep an eye on a window or watch a movie, and this mode allow me to exactly do that. The miniature is easy to move on the screen, easy to resize, and upon a click the window appears and the miniature is then hidden until you switch to another window. It may seems a gadget, but on a small screens I really appreciate. You can create this for a window by pressing Super+f and clicking on a target.
The desktop comes with some programs made specifically for Pantheon: terminal emulator, file browser, text editor, calendar etc... They are simple but effective.
The whole environment is stable, good looking, coherent and usable.
As I said before, ElementaryOS is based on Ubuntu so it inherits all the packages available on Ubuntu, but they will be only installable from the command line. The Application center GUI shows an entirely different package sets that comes from the ElementaryOS flatpak repository but also the one from flathub. Official repository apps are clearly designated as official while programs from flathub will be displayed as third party and a warning about quality/security will be displayed for each program from this repository when you want to install.
Flatpak has a pretty bad reputation among the groups I regularly read, however I like flatpak. Crash course to flatpak: it is a Linux agnostic package manager that will not reuse your system library but instead install the whole basics dependencies required (such as X11, KDE, Gnome etc...) and then programs are installed upon this, but still separated from each other. Programs running from flatpak will have different permissions and may be limited in their permissions (no network, can only reach ~/Downloads/ etc..), this is very nice but not always convenient especially for programs that require plugins. The whole idea of flatpak is that you install a program and it shouldn't mess with the current system, and it can be installed in such way that when you use it, the person making the program bundle can restrict the permissions as much as wanted.
While installing flatpak programs take a good amount of data to download because of the big dependencies, you need them only once and updating flatpak programs will use delta changes, so only difference is downloaded, I found updates to be very small in regards to network consumption. While installing a single GUI app from flatpak on a Linux system can be seen as overkill, the small Gemini browser Lagrange involve more than 1GB of dependencies from flatpak, it totally make sense to install everything needed by the user from flatpak.
If you are unhappy with the current permissions of a program, you can use the utility Flatseal to tweak its permissions, which is very cool.
I totally understand and love the move to full flatpak, it has proven me to be solid, easy to use and easy to tweak despite flatpak still being very young. I liked very much that my Firefox on OpenBSD had the unveil feature preventing it from accessing my data in case of security breach, now with Firefox from Flatpak or Firefox run from firejail I can get the same on Linux. There is one thing I regret in the AppCenter though but this is my opinion and I can understand why it is so, some programs have a priced button like "3,00$" while the other are "Free", there is a menu near the price that let you choose the amount you want to pay but you can also put 0,00 and then the program is free. This can be misleading for users because the program is actually free but in "pay what you want" mode.
I have no issues paying for Free software as long as it's 100% free, but suggesting a price for a package while you don't know you can install it for free can be weird. The payment implementation of the AppCenter could be the beginning of paid software integrated into ElementaryOS, I have no strong opinion about this because people need money for a living, but I hope it will be used wisely.
While trying ElementaryOS for some time, I gave myself a little challenge that was to avoid using the Terminal as much as possible. I quite succeeded as I only required a terminal to install a regular package (lutris, not available as flatpak). Of course, I couldn't prevent myself to play with a terminal to check for bandwidth or CPU usage but it doesn't count as a normal computer use.
Everything worked fine so far, network access, wireless, installing and playing video games, video players.
I'd feel confident if I recommended a non linux users to install ElementaryOS and use it. On first boot the system provides a nice introduction to explain basics.
This is a feature I'm not using but I found it in the configuration panel and I've been surprised to see it. ElementaryOS comes with a feature to restrict time in week days and week-end days, but also prevent an user to reach some URLs (no idea how this is implemented) and also forbid to run some installed Apps.
I don't have kids but I assume this can be very useful to prevent the use of the computer past some time or prevent them to use some programs, to make it work they would obviously need their own account and not able to be root. I can't judge if it works fine, if it's suitable for real world, but I wanted to share about this unique feature.
My netbook proved to be quite okay to use Pantheon. The worse cases I figured out are displaying the applications menu which takes a second, and the AppCenter that is slow to browse and the "searching for update" takes a long time.
As I said in the introduction, my Netbook has a quad core atom and a good amount of memory but the eMMC storage is quite slow. I don't know if the lack of responsiveness comes from my CPU or storage, but I can tell everything works smoothly on an older Core2 Duo!
Using ElementaryOS was delightful, it just works. The team made a very good work for the whole coherence of the desktop. It is certainly not the distribution you need when you want full control or if you want something super light, but it definitely does the job for users that just want things to work, and who like Pantheon. It doesn't seem straightforward to switch to another desktop environment.
Today I'll introduce you to the interactive shell fish. Usually, Linux distributions ships bash (which can be a hidden dash, a limited shell), MacOS is providing zsh and OpenBSD ksh. There are other shells around and fish is one of them.
fzf is a simple utility for searching data among a file (the history file in that case) in fuzzy mode, meaning in not a strict matching, on OpenBSD I use the following configuration file in ~/.config/fish/config.fish to make fzf active.
When pressing ctrl+r with some history available, you can type any words you can think about an old command like "ssh bar" and it should return "ssh foobar" if it exists.
4.1. Disable caret character for redirecting to stderr §
The defaults works pretty well but as I said before, fish is not POSIX compatible, meaning some habits must be changed. By default, ^ character like in "grep ^foobar" is the equivalent of 2> which is very misleading.
# make typing ^ actually inserting a "^" and not stderr redirect
set -U fish_features stderr-nocaret qmark-noglob
If you want to change behaviors or colors of your shell, just type "fish_config" while in a shell fish, it will run a local web server and open your web browser.
When you type a command and you see more text suggested as you type the command you can press ctrl+e to validate the suggestion. If you don't care about the suggestion, continue typing your command.
I love this shell. I've been using the shell that come with my system since forever, and a few months ago I wanted to try something different, it felt weird at first but over time I found it very convenient, especially for git commands or daily tasks, suggesting me exactly the command I wanted to type in that exact directory.
Obviously, as the usual syntax changes, it may not please everyone and it's totally fine.
I like playing video games, and most games I play require a GPU that is more powerful than the integrated graphic chipset that can be found in laptop or computers. I recently found that external graphic card were a thing, and fortunately I had a few spare old graphic card for trying.
The hardware is called an eGPU (for external GPU) and are connected to the computer using a thunderbolt link. Because I buy most of my hardware second hand now, I've been able to find a Razer Core X eGPU (the simple core X and not the core X Chroma which provides USB and RJ45 connectivity on the case through thunderbolt), exactly what I was looking for. Basically, it's an external case with a PSU inside and a rack, pull out the rack and insert the graphic card, and you are done. Obviously, it works fine on Windows or Mac but it can be tricky on Linux.
I'm using a Lenovo T470 with an i5 CPU. When I want to use the eGPU, I connect the thunderbolt wire and keyboard / mouse (which I connect through an USB KVM to switch those from a computer to another). The thunderbolt port also provide power to the laptop which is good to know.
There are two ways to use this device, the display can be connected to the eGPU itself or the rendering could be done on the laptop (let's say we only target laptops here) using the eGPU as a discrete card (only rendering, without display). Both modes have pros and cons.
External display Pros: best performance, allow many displays to be used
External display Cons: require a screen
Discrete mode Pros: no extra wire, no different setup when using the laptop without the eGPU
Discrete mode Cons: performance penalty, support doesn't work well on Linux
The performance penalty comes from the fact the thunderbolt bandwidth is limited, and if you want to display on your screen you need to receive the data back which will reduce the bandwidth allowed for rendering. A penalty of at least 20% should be expected in normal mode, and around 40% in discrete mode. This is not really fun but for a nice boost with an old graphic card this is still nice.
- Add your user to the video group (at least on Gentoo)
- No /etc/X11/xorg.conf file is required
- The graphical card should appear in nvidia-settings under a "PRIME" menu
- Use prime-run as a prefix to run commands, the discrete mode is simply enabled by environment variables. If prime-run isn't a thing in your distribution, create a script nvidia-offload like explained in the NixOS wiki
If you want to run Flatpak programs with the discrete GPU, you will need to set all the environment variables in the flatpak program environment. You can't just set them in your shell and run flatpak from there because of the sandboxing.
I ended figuring a xorg.conf allowing me to keep the same file with and without the eGPU, and to use the discrete and external display at the same time. The funniest part is if you run a program on the nvidia screen and move it back to the laptop screen, the eGPU continues to render it.
It's by far the most convenient configuration as you have nothing to tweak, and you can use laptop + eGPU displays.
If you want to switch from one to the other, you need to exit all X servers first. Booting with a xorg.conf for Nvidia while not having a Nvidia card plugged in will prevent X to start, which is annoying.
The program egpu-switch can help in that regard, but it can't choose between discrete or external display mode, you will need to decide which mode you prefer when the card is plugged by providing the according xorg.conf file.
I've been using this on Gentoo only so far, but I had a previous experience with a pretty similar setup a few years ago with a laptop with a discrete nvidia card (called Optimus at that time), and the GPU was only usable as a discrete GPU and it was a mess at that time.
As for the eGPU, in external mode it works fine using the nvidia driver, I needed an xorg.conf file to tell to use the nvidia driver, then the display would be fine and 3D would work perfectly as if I was using a "real" card on a computer. I can play high demanding games such as Control, Death Stranding or other games using my Thinkpad Laptop when docked, this is really nice!
The setup is a bit weird though, if I want to undock, I need to prepare the new xorg.conf file and stop X, disconnect the eGPU and restart the display manager to login. Not very easy. I've been able to script it using a simple script at boot that will detect the Nvidia GPU and choose the correct xorg.conf file just before starting the display manager, it works quite fine and makes life easier.
I've been playing Steam video games, it works absolutely perfectly due to their work on Proton to make Windows games running. GOG games works fine too, I use Lutris games library manager to handle them and it works so far.
Now, there is the tricky discrete mode. On linux, the bumblebee project allows rendering a program in a virtual display to benefit from the 3D acceleration and then show it on another device, this work was done for Optimus hardware hence the bumblebee name (related to Transfomers lore). Steam doesn't like bumblebee at all and won't start game, this is a known bug, Steam is bad at managing multiple GPUs. I've not been able to display anything using bumblebee.
On the other hand, native Linux GOG games were working fine using bumblebee, however I don't own much high demanding Linux games so I've not been able to see if the performance hit was hard. Windows GOG games wouldn't run, partially because the DXVK (directX to vulkan) Wine rendering can't be used because bumblebee doesn't allow using Vulkan graphical API and error messages were unhelpful. I have literally lost two days of my life trying to achieve something useful with the discrete GPU mode but nothing came out of it, except native Linux games.
Laptops are very limited in their upgrade capabilities, adding a GPU could avoid someone to own a "gaming" tower PC and a good laptop. The GPU is 100% replaceable because the case offers a pci express port and a standard PSU (which can be replaced too!). The EGPU could be shared among a few users in a home too. This is a nice way to recycling old GPUs for a nice graphic boost to play everything that is more than 5 years old (and that's a bunch of good games!). I think using a top notch GPU in this would be a waste though.
I'm pretty happy with the experience so far, now I can play my favorites games on Linux using the same computer I like to use all the day. While the experience is not as plug and play than it is on Windows, it is solid and stable.
This distribution ships with a tool "prime-select" which is very convenient, you can pick which driver you want to enable first, or if you want to do discrete rendering.
An udev rule is certainly blocking the audio device for some reasons... On a system, I found the file "/lib/udev/rules.d/90-nvidia-udev-pm-G05.rules" with a comment about disabling audio devices, commenting it solves the problem.
I have a simple DSL line with a 15 Mb/s download and 900 kb/s upload rates and there are many devices using the Internet and two people in remote work. Some poorly designed software (mostly on windows) will auto update without allowing to reduce the bandwidth or some huge bloated website will require lot of download and will impact workers using the network.
The point of this article is to explain how to use OpenBSD as a router on your network to allow the Internet access to be used fairly by devices on the network to guarantee everyone they will have at least a bit of Internet to continue working flawlessly.
I will use the queuing features from the OpenBSD firewall PF (Packet Filter) which relies on the CoDel network scheduler algorithm, which seems to bring all the features we need to do what we want.
I'm writing this in a separate section of the article because it is important to understand.
It is not possible to limit the download bandwidth, because once the data are already in the router, this mean they came from the modem and it's too late to try to do anything. But there is still hope, if the router receives data from the Internet it's that some devices on the network asked to receive it, you can act on the uploaded data to throttle what we receive. This is not obvious at first but it makes totally sense once you get the idea.
The biggest point to understand is that you can throttle download speed through the ACK packets. Think of two people on a phone, let's say Alice and Bob, Alice is your network and calls Bob who is very happy to tell his life to Alice. Bob speaking is data you download. In a normal conversation, Bob will talk and will hear some sounds from Alice who acknowledge what Bob is saying. If Alice stops or shut her microphone, Bob may ask if Alice is still listening and will wait for an answer. When Alice is making a sound (like "hmmhm or yes"), this is an acknowledgement for Bob to continue. Literally, Bob is sending a voice stream to Alice who is sending ACK (acknowledgement short name) packets to Bob so he can continue.
This is exactly where you can control bandwidth, if we reduce the bandwidth used by ACK packets for a download, you can reduce the given download. If you can allow multiple systems to fairly send their share of ACK, they should have a fair share of the downloaded data.
What's even more important is that you absolutely don't use all the upload bandwidth with ACK packets to reach your maximum download bandwidth. We will have to separate ACK from uploaded data so we don't limit file upload or similar flows.
For the setup I used a laptop with two network cards, one was connected to the ISP box and the other was on the LAN side. I've enabled a DHCP server on the OpenBSD router to automatically give IP addresses and gateway and name servers addresses to devices on the network.
Basically, you can just plug an equivalent router on your current LAN, disable DHCP on your ISP router and enable DHCP on your OpenBSD system using a different subnet, both subnets will be available on the network but for tests it requires little changes, when you want to switch from a router to another by default, toggle the DHCP service on both and renew DHCP leases on your devices. This is extremely easy.
I'll explain first all the config lines from my /etc/pf.conf file, and later in this article you will find a block with the complete rules set.
The following lines are default and can be kept as-is except if you want to filter what's going in or out, but it's another topic as we only want to apply queues. Filtering would be as usual.
set skip on lo
block return # block stateless traffic
pass # establish keep-state
This is where it get interesting. The upstream router is accessed through the interface re0, so we create a queue of the speed of the link of that interface, which is 1 Gb/s. pf.conf syntax requires to use bits per second (b/s or bps) and not bytes per second (Bps or B/s) which can be misleading.
queue std on re0 bandwidth 1G
Then, we create a queue that inherits from the parent created before, this represent the whole upload bandwidth to reach the Internet. We will make all the traffic reaching the Internet to go through this queue.
I've set a bandwidth of 900K with a max of 900K, this mean, that this queue can't let pass more than 900 kilo bits per second (which represent 900/8 = 112.5 kB/s or kilo Bytes per second). This is the extreme maximum my Internet access allows me.
queue internet parent std bandwidth 900K max 900K
The following lines are all sub queues to divide the upload usage, we want to have a separate queue for DNS request which must not be delayed to keep responsiveness, but also voip or VPN queues to guarantee a minimum available for the users.
The web queue is the one which is likely to pass the most data, if you upload a file through a website, it will pass through the web queue. The unknown queue is the outgoing traffic that is not known, it's up to you to put a maximum or not.
Finally, the ackp queue that is split into two other queues, it's the most important part of the setup.
The "bandwidth xxxK" values should sum up to something around the 900K defined as a maximum in the parent, this only mean we target to keep this amount for this queue, this doesn't enforce a minimum or a maximum which can be defined with min and max keywords.
As explained earlier, you can control the downloading speed by regulating the sent ACK packets, all ACK will go through the queues ack_web and ack.
ack_web is a queue dedicated for http/https downloads and the other ack queue is used for other protocol, I preferred to divide it in two so other protocol will have a bit more room for themselves to counterbalance a huge http download (Steam game platform like to make things hard on this topic by making downloads to simultaneous server for maximum bandwidth usage).
The two ack queues accumulated can't get over the parent queue set as 406K here. Finding the correct value is empirical, I'll explain later.
All these queues created will allow each queue to guarantee a minimum from the router point of view, roughly said per protocol here. Unfortunately, this won't guarantee computers on the network will have a fair share of the queues! This is a crucial understanding I lacked at first when trying to do this a few years ago. The solution is to use the "flow" scheduler by using the flow keyword in the queue, this will give some slot to every session on the network, guarantying (at least theoretically) every session have the same time passed to send data.
I used "flows" only for ACK, it proved to work perfectly fine for me as it's the most critical part but in fact, it could be applied to every leaf queues.
queue web parent internet bandwidth 220K qlimit 100
queue dns parent internet bandwidth 5K
queue unknown parent internet bandwidth 150K min 100K qlimit 150 default
queue vpn parent internet bandwidth 150K min 200K qlimit 100
queue voip parent internet bandwidth 150K min 150K
queue ping parent internet bandwidth 10K min 10K
queue ackp parent internet bandwidth 200K max 406K
queue ack_web parent ackp bandwidth 200K flows 256
queue ack parent ackp bandwidth 200K flows 256
Because packets aren't magically assigned to queues, we need some match rules for the job. You may notice the notation with parenthesis, this mean the second member of the parenthesis is the queue dedicated for ACK packets.
The VOIP queuing is done a bit wide, it seems Microsoft Teams and Discord VOIP goes through these port ranges, it worked fine from my experience but may depend of protocols.
match proto tcp from em0:network to any queue (unknown,ack)
match proto tcp from em0:network to any port { 80 443 8008 8080 } queue (web,ack_web)
match proto tcp from em0:network to any port { 53 } queue (dns,ack)
match proto udp from em0:network to any port { 53 } queue dns
# VPN (wireguard, ssh, openvpn)
match proto udp from em0:network to any port { 4443 1194 } queue vpn
match proto tcp from em0:network to any port { 1194 22 } queue (vpn,ack)
# voip (teams)
match proto tcp from em0:network to any port { 3479 50000:50060 } queue voip
match proto udp from em0:network to any port { 3479 50000:50060 } queue voip
# keep some bandwidth for ping packets
match proto icmp from em0:network to any queue ping
Simple rule to enable NAT so devices from the LAN network can reach the Internet.
# NAT to the outside
pass out on egress from !(egress:network) nat-to (egress)
Default OpenBSD rules that can be kept here.
# By default, do not permit remote connections to X11
block return in on ! lo0 proto tcp to port 6000:6010
# Port build user does not need network
block return out log proto {tcp udp} user _pbuild
In the previous section I used absolute values, like 900K or even 406K. A simple way to define them is to upload a big file to the Internet and check the upload rate, I use bwm-ng but vnstat or even netstat (with the correct combination of flags) could work, see your average bandwidth over 10 or 20 seconds while transferring, and use that value as a maximum in BITS as a maximum for the internet queue.
As for the ACK queue, it's a bit more tricky and you may tweak it a lot, this is a balance between full download mode or conservative download speed. I've lost a bit of download rate for the benefit of keeping room for more overall responsiveness. Like previously, monitor your upload rate when you download a big file (or even multiples files to be sure to fill your download link) and you will see how much will be used for ACK. It will certainly be a few try and guesses before you get the perfect value, too low and the maximum download rate will be reduced, and too high and your link will be filled entirely when downloading.
set skip on lo
block return # block stateless traffic
pass # establish keep-state
queue std on re0 bandwidth 1G
queue internet parent std bandwidth 900K min 900K max 900K
queue web parent internet bandwidth 220K qlimit 100
queue dns parent internet bandwidth 5K
queue unknown parent internet bandwidth 150K min 100K qlimit 120 default
queue vpn parent internet bandwidth 150K min 200K qlimit 100
queue voip parent internet bandwidth 150K min 150K
queue ping parent internet bandwidth 10K min 10K
queue ackp parent internet bandwidth 200K max 406K
queue ack_web parent ackp bandwidth 200K flows 256
queue ack parent ackp bandwidth 200K flows 256
match proto tcp from em0:network to any queue (unknown,ack)
match proto tcp from em0:network to any port { 80 443 8008 8080 } queue (web,ack_web)
match proto tcp from em0:network to any port { 53 } queue (dns,ack)
match proto udp from em0:network to any port { 53 } queue dns
# VPN (ssh, wireguard, openvpn)
match proto udp from em0:network to any port { 4443 1194 } queue vpn
match proto tcp from em0:network to any port { 1194 22 } queue (vpn,ack)
# voip (teams)
match proto tcp from em0:network to any port { 3479 50000:50060 } queue voip
match proto udp from em0:network to any port { 3479 50000:50060 } queue voip
# ICMP
match proto icmp from em0:network to any queue ping
# NAT
pass out on egress from !(egress:network) nat-to (egress)
# default OpenBSD rules
# By default, do not permit remote connections to X11
block return in on ! lo0 proto tcp to port 6000:6010
# Port build user does not need network
block return out log proto {tcp udp} user _pbuild
There is an excellent tool to monitor the queues in OpenBSD which is systat in its queue view. Simply call it with "systat queue", you can define the refresh rate by pressing "s" and a number. If you see packets being dropped in a queue, you can try to increase the qlimit of the queue which is the amount of packets kept in the queue and delayed (it's a FIFO) before dropping them. The default qlimit is 50 and may be too low.
I've spent a week scrutinizing pf.conf manual and doing many tests with many hardware until I understand that ACK were the key and that the flow queuing mode was what I was looking for. As a result, my network is much more responsive and still usable even when someone/some device is using the network without any kind of limit.
The setup can appear a bit complicated but in the end it's only a few pf.conf lines and using the correct values for your internet access. I chose to make a lot of queues, but simply separating ack from the default queue may be enough.
Basically, I've explained all of this in the project repository README file.
I strongly think updating packages at boot time is important for workstation users, so the process has to be done fast and efficiently, without requiring user agreement (by setting this up, the sysadmin agreed).
As for servers, it could be useful to by running this a few time a day and using checkrestart program to notify the admin if some process is required to restart after an update.
Too long, didn't read? Here the code to make the thing up!
$ su -
# git clone https://tildegit.org/solene/pkgupdate.git
# cp pkgupdate/pkgupdate /usr/local/bin/
# crontab -e (which will open EDITOR, add the following lines)
### BEGIN this goes into crontab
# for updating on boot
@reboot /usr/local/bin/pkgupdate
### END of this goes into crontab
When you configure the mirror url in /etc/installurl, on release/stable installations when you use "pkg_add", some magic happens to expand the base url into full paths usable by PKG_PATH.
The built string passed to PKG_PATH is the concatenation (joined by a ":" character) of the URL toward /packages/ and /packages-stable/ directories for your OpenBSD version and architecture.
This is why when you use "pkg_info -Q foobar" to search for a package and that a package name matches "foobar" in /packages-stable/ pkg_info will stop, it search for a result in the first URL given by PKG_PATH, when you add -a like "pkg_info -aQ foobar", it will look in all URL available in PKG_PATH.
When you run your OpenBSD system freshly installed or after an upgrade, when you have your packages sets installed from the repository of your version, the files in /packages/ in the mirrors will NEVER CHANGE. When you run "pkg_add -u", it's absolutely 100% sure nothing changed in the directory /packages/, so checking for changes against them every time make no sense.
Using "pkg_add -u" with the defaults makes sense when you upgrade from a previous OpenBSD version because you need to upgrade all your packages. But then, when you look for security updates, you only need to check against /packages-stable/.
There are two ways, one reusing your /etc/installurl file and the other is hard coding it. Pick the one you prefer.
# reusing the content of /etc/installurl
env PKG_PATH="$(cat /etc/installurl)/%v/packages-stable/%a/" pkg_add -u
# hard coding the url
env PKG_PATH="http://ftp.fr.openbsd.org/pub/OpenBSD/%v/packages-stable/%a/" pkg_add -u
Be careful, you will certainly have a message like this:
Couldn't find updates for ImageMagick-6.9.12.2 adwaita-icon-theme-3.38.0 aom-2.0.2 argon2-20190702 aspell-0.60.6.1p10 .....
This is perfectly normal, as pkg_add didn't find the packages in /packages-stable/ it wasn't able to find the current version installed or an update, as we only want updates it's fine.
This is a very simple and reliable way to reduce the time and bandwidth required to check for updates on OpenBSD (non -current!). I wonder if this would be a good idea to provide it as a flag for pkg_add, like "only check for stable updates".
This is a short text to introduce you about an OpenBSD feature arrived in 2018 and that may not be known by everyone. Wifi interfaces can have a list of network and their associated passphrase to automatically connect when network is known.
Basically, in your /etc/hostname.if file (if being replaced by the interface name like iwm0, athn0 etc...), list every access point you know and their according password.
This will make the wifi interface to try to connect to the first declared network in the file if multiples access points are available. You can temporarily remove a hotspot from the list using "ifconfig iwm0 -join android_hotspot" if you don't want to connect to it.
For security reasons I like when my computer screen get locked when I'm away and forgot to lock it manually or when I suspend the computer. Those operations are usually native in desktop managers such as Xfce, MATE or Gnome but not when you use a simple window manager.
Yesterday, I was looking at the xlock man page and found recommendations to use it with xidle, a program that triggers a command when we don't use a computer. That was the match I required to do something.
xidle is simple, you tell it about conditions and it will run a command. Basically, it has three triggers:
no activity from the user after $TIMEOUT
cursor is moved in a screen border or corner for $SECONDS
xidle receives a SIGUSR1 signal
The first trigger is useful for automatic run, usually when you leave the computer and you forget to lock. The second one is a simple way to trigger your command manually by moving the cursor at the right place, and finally the last one is the way to script the trigger.
Reusing the example given in xidle it was easy to build the command line. You would have to use this in your ~/.xsession file that contain instructions to run your graphical session. The following command will lock the screen if you let your mouse cursor in the upper left corner of the screen for 5 seconds or if you are inactive for 1800 seconds (30 minutes), once the screen is locked by xlock, it will turn off the display after 5 seconds. It is critical to run this command in background using "&" so the xsession script can continue.
So, we currently made your computer auto locking after some time when you are not using it, but what if you put your computer on suspend and leave, this mean anyone can open it and it won't be locked. We should trigger the command just before suspending the device, so it will be locked upon resume.
This operation is possible by giving a SIGUSR1 to xidle at the right time, and apmd (the power management daemon on OpenBSD) is able to execute scripts when suspending (and not only).
Create the directory /etc/apm/ and write /etc/apm/suspend with this content:
#!/bin/sh
pkill -USR1 xidle
Make the script executable with chmod +x /etc/apm/suspend and restart apmd. Now, you should have the screen getting locked when you suspend your computer, automatically.
Locking access to a computer is very important because most of the time we have programs opened, security keys unlocked (ssh, gpg, password managers etc...) and if someone put their hands on it they can access all files. Locking the screen is a simple but very effective way to prevent this disaster to happen.
Since beginning of 2021, my blog has been popular a few times on the website Hacker News and it draws a lot of traffic. This is a report of the traffic generated by Hacker News because I found this topic quite interesting.
From data gathered from the http server access logs, my blog has an average of 1200 visitors and 1100 hits every day.
The blog was featured on hacker news: 16th February, 10th May, 7th July and 24th July. On the following diagram, you can see each spike being an appearance on hacker news.
What's really interesting, is the different between 24th July and the other spikes, only 24th July appearance made up to the front page of hacker news. That day, the server received 36 000 visitors and 132 000 hits and it continued the next date at a slower rate but still a lot more noticeable than other spikes.
The following diagram comes from the tool pfstat, gathering data from the OpenBSD firewall to produce images. We can see the firewall is usually at a rate of ~35 new TCP states per seconds, on 24th July, it drastically increased very fast to 230 states per second for at least 12h and the load continued for days compared to the usual traffic.
I don't have much more data than this, but it's already interesting to see the insane traffic drag and audience that Hacker News can generate. Having a static website and enough bandwidth didn't made it hard to absorb the load, but if you have a dynamic website running code, you could be worried to be featured on Hacker News which would certainly trigger a denial of service.
Ten days ago I finished the Old Computer Challenge I started, it gather a dozen of people over the days and we had a great week of fun restricting ourselves with a 1 CPU / 512 MB old computer and try to manage our daily tasks using it.
In my last article about it, I noticed many things about my computer use and reported them. Did it change my habits?
I have accounts on some specialized news website (bike, video games) and I used to check them every too often when I was clueless about what to do. I'm trying to reduce the number of time I look for news there, if I miss a news I can still read it the next day. I'm also more looking into RSS feed when available so I can just stop visiting the website entirely.
I started to shutdown my computer at evening after my news routine check. If nothing had to be done on the computer, I find it better to shutdown it so I'm not tempting to reuse it. I was using suspend/resume before and it was too easy to just resume the computer to look for a new IRC message. I realized IRC messages can wait.
A biggest change on the old computer was that when browsing the internet and blogs, I was actually reading the content instead of bookmarking it and never come back or reading the text very fast by looking for some key word to have some vague idea of the text.
On my laptop, when reading content in Firefox, I find it very hard to focus on text, maybe because of the font, the size, the spacing, the screen contrast, I don't know. Using the Reader mode in Firefox drastically helps me focusing on the text. When land on a page with some interesting text, I switch to reader me and read it. HUGE WIN for me here.
I really don't know why I find text easier to read in w3m, I should try it on my computer but it's quite a pain to reach a page on some websites, maybe I should try to open w3m to read content I want after I find it using Firefox.
Sometimes I found my OpenBSD computer to be slow, using a very old computer helped me put it into perspective. Using my time more efficiently with less task switching doesn't require as much as performance as one would think.
I recently wrote the software "potcasse" to manage podcasts distribution, I came to it thinking I want to record my podcasts and publish them from the old computer, I needed a simple and fast method to use it on that old system.
If for some reasons you want to block all your traffic except traffic going through Tor, here is how to proceed on OpenBSD.
The setup is simple and consists at installing Tor, running the service and configure the firewall to block every requests that doesn't come from the user _tor used by Tor daemon.
Modify /etc/pf.conf to make it look like the following:
set skip on lo
# block OUT traffic
block out
# block IN traffic and allow response to our OUT requests
block return
# allow TCP requests made by _tor user
pass out on egress proto tcp user _tor
If you forgot to save your pf.conf file, the default file is available in /etc/examples/pf.conf if you want to go back to a standard PF configuration.
Here are the commands to type as root to install tor and reload PF:
pkg_add tor
rcctl enable tor
rcctl start tor
pfctl -f /etc/pf.conf
Configure your programs to use the proxy SOCKS5 localhost:9050, if you need to reach a remote server / service of yours, you will need to have a server running tor and define HiddenServices to access them through Tor.
3. Privacy considerations in the local area network §
Please consider that if you are using DHCP to obtain an IP on the network the hostname of your system is shared and also its MAC address.
As for the MAC address, you can use "lladdr random" in your interface configuration file to have a new random MAC address on every boot.
As for the hostname, I didn't test it but it should work, rewrite your /etc/myname file with a new value at each boot, meaning the next boot you will have a new value. To do so, you could run an /etc/rc.local with this script:
The script will take a random name out of the 2000+ entries of the airport list (every airport in the list has been visited by OpenBSD developed before it is added). This still mean you have 1/2000 chance to have the same name upon reboot, if you prefer more entropy you can make a script generating a long random string.
You shouldn't use Tor for anything, this may leak your IP address depending on the software used, it may not be built with privacy in mind. The Tor Browser (modified Firefox including Tor and privacy settings) can be fully trusted to only share/send what is required and not more.
The point of this setup is to block leaking programs and only allow Tor to reach the Internet, then it's up to you to use Tor wisely. I recommend reading Tor documentation to understand how it works.
The only issue I can imagine right now is connecting on a network with a captive portal to reach the Internet, you would have to disable the PF rule (or entire PF) at the risk of some programs leaking data.
If you prefer using i2p only to reach external services, replace _tor by _i2p or _i2pd in the pf.conf rule, depending on which implementation you used.
Computers are amazing tools and Internet is an amazing network, we can share everything we want with anyone connected. As for now, most of the Internet is neutral, meaning ISP have to give access to the Internet to their customer and don't make choices depending on the destination (like faster access for some websites).
This is important to understand, this mean you can have your own website, your own chat server or your own gaming server hosted at home or on a dedicated server you rent, this is called self hosting. I suppose putting the label self hosting on dedicated server may not make everyone agree, this is true it's a grey area. The opposite of self hosting is to rely on a company to do the job for you, under their conditions, free or not.
Self hosting is about freedom, you can choose what server you want to run, which version, which features and which configuration you want. If you self host at home, You can also pick the hardware to match your needs (more Ram ? More Disk? RAID?).
Self hosting is not a perfect solution, you have to buy the hardware, replace faulty components, do the system maintenance to keep the software part alive.
When you rely on a company or a third party offering services, you become tied to their ecosystem and their decisions. A company can stop what you rely on at any time, they can decide to suspend your account at any time without explanation. Companies will try to make their services good are appealing, no doubt on it, and then lock you in their ecosystem. For example, if you move all your projects on github and you start using github services deeply (more than a simple git repository), moving away from Github will be complicated because you don't have _reversibility_, which mean the right to get out and receive help from your service to move away without losing data or information.
Self hosting empower the users instead of making profit from them. Self hosting is better when it's done in community, a common mail server for a group of people and a communication server federated to a bigger network (such as XMPP or Matrix) are a good way to create a resilient Internet while not giving away your rights to capitalist companies.
Asking everyone to host their own services is not even utopia but rather stupid, we don't need everyone to run their own server for their own services, we should rather build a constellation of communities that connect using federated protocol such as Email, XMPP, Matrix, ActivityPub (protocol used for Mastodon, Pleroma, Peertube).
In France, there is a great initiative named CHATONS (which is the french word for KITTENS) gathering associative hosting with some pre-requisites like multiple sysadmin to avoid relying on one person.
I suppose most of my readers will argue that self hosting is nice but can't compete with "cloud" services, I admit this is true. Companies put a lot of money to make great services to get customers and earn money, if their service were bad, they wouldn't exist long.
But not using open source and self hosting won't make alternatives to your service provider greater, you become part of the problem by feeding the system. For example, Google Mail GMAIL is now so big that they can decide which domain is allowed to reach them and which can't. It is such a problem that most small email servers can't send emails to Gmail without being treated as spam and we can't do anything to it, the more users they are, the less they care about other providers.
Great achievements can be done in open source federated services like Peertube, one can host videos on a Peertube instance and follow the local rules of the instance, while some other big companies could just disable your video because some automatic detection script found a piece of music or inappropriate picture.
Giving your data to a company and relying on their services make you lose your freedom. If you don't think it's true this is okay, freedom is a vague concept and it comes with various steps on a high scale.
Here are a few tips if you want to learn more about hosting your own services.
ask people you trust if they want to participate, it's better to have more than only one person to manage servers.
you don't need to be an IT professional, but you need to understand you will have to learn.
backups are not a luxury, they are mandatory.
asking (for contributing or as a requirement) for money is fine as long as you can justify why (a peertube server can be very expensive to run for example).
people around usually throw old hardware, ask friends or relative if they have old unused hardware. You can easily repair "that old Windows laptop I replaced because wifi stopped working" and use it as a server.
electricity usage must be considered but on the other hand, buying a brand new hardware to save 20W is not necessarily more ecological.
some services such as email servers can't be hosted on most ISP connection due to specific requirements
you will certainly need to buy a domain name
redundancy is overkill most of the time, shit happens but in redundant servers shit happens twice more often
There is a Linux disribution dedicated to self hosting named "Yunohost" (Y U No Host) that make the task really easy and give you a beginner friendly interface to manage your own service.
I'm self hosting since I first understood running a web server was the only thing I required to have my own PHP forum 15 years ago. I mostly keep this blog alive to show and share my experiments, most of the time happening when playing with my self hosting servers.
I have a strong opinion on the subject, hosting your own services is a fantastic way to learn new skills or perfect them, but it's also important for freedom. In France we even have associative ISP and even if they are small, their existence force the big ISP companies to be transparent on their processes and interoperatibility.
I wrote « potcasse », pronounced "pot kas", a tool to help people to publish and self host a podcast easily without using a third party service. I found it very hard to find information to self host your own podcast and make it available easily on "apps" / podcast players so I wrote potcasse.
Get the code from git and run "make install" or just copy the script "potcasse" somewhere available in your $PATH. Note that rsync is a required dependency.
Potcasse will gather your audio files with some metadata (date, title), some information about your Podcast (name, address, language) and will create an output directory ready to be synced on your web server.
Potcasse creates a RSS feed compatible with players but also a simple HTML page with a summary of your episodes, your logo and the podcast title.
I wanted to self host my podcast and I only found Wordpress, Nextcloud or complex PHP programs to do the job, I wanted something static like my static blog that will work on any hosting platform securely.
edit the metadata.sh file to configure your Podcast
Then, for every new episode:
import audio files using "potcasse episode" with the required arguments
generate the html output directory using "potcasse gen"
use rsync to push the output directory to your web server
There is a README file in the project that explain how to configure it, once you deploy you should have an index.html file with links to your episodes and also a link for the RSS feed that can be used in podcast applications.
This was a few hours of work to get the job done, I'm quite proud of the result and switched my podcast (only 2 episodes at the moment...) to it in a few minutes. I wrote the commands lines and parameters while trying to use it as if it was finished, this helped me a lot to choose what is required, optional, in which order, how I would like to manually make changes as an author etc...
I hope you will enjoy this simple tool as much as I do.
Over time I'm writing a few scripts to help me in some tasks, they are often associated to a key binding or at least in my ~/bin/ directory that I add to my $PATH.
Second most used script of mine is a uploading file utility. It will rename a file using the content md5 hash but keeping the extension and will upload it in a directory on my server where it will be deleted after a few days from a crontab. Once the transfer is finished, I get a notification and the url in my clipboard.
While I can easily transfer files, sometimes I need to share a snippet of code or a whole file but I want to ease the reader work and display the content in an html page instead of sharing an extension file that will be downloaded. I don't put those files in a cleaned directory and I require a name to give some clues about the content to potential readers. The remote directory contains a highlight.js library used to use syntactic coloration, hence I pass the text language to use the coloration.
#!/bin/sh
if [ "$#" -eq 0 ]
then
echo "usage: language [name] [path]"
exit 1
fi
cat > /tmp/paste_upload <<EOF
<html>
<head>
<meta http-equiv="Content-type" content="text/html; charset=utf-8" />
</head>
<body>
<link rel="stylesheet" href="default.min.css">
<script src="highlight.min.js"></script>
<script>hljs.initHighlightingOnLoad();</script>
<pre><code class="$1">
EOF
# ugly but it works
cat /tmp/paste_upload | tr -d '\n' > /tmp/paste_upload_tmp
mv /tmp/paste_upload_tmp /tmp/paste_upload
if [ -f "$3" ]
then
cat "$3" | sed 's/</\</g' | sed 's/>/\>/g' >> /tmp/paste_upload
else
xclip -o | sed 's/</\</g' | sed 's/>/\>/g' >> /tmp/paste_upload
fi
cat >> /tmp/paste_upload <<EOF
</code></pre> </body> </html>
EOF
if [ -n "$2" ]
then
NAME="$2"
else
NAME=temp
fi
FILE=$(date +%s)_${1}_${NAME}.html
scp /tmp/paste_upload perso.pw:/var/www/htdocs/solene/prog/${FILE}
echo -n "https://perso.pw/prog/${FILE}" | xclip -selection clipboard
notify-send -u low "https://perso.pw/prog/${FILE}"
I never remember how to resize a picture so I made a one line script to not have to remember about it, I could have used a shell function for this kind of job.
#!/bin/sh
if [ -z "$2" ]
then
PERCENT="40%"
else
PERCENT="$2"
fi
convert -resize "$PERCENT" "$1" "tn_${1}"
Because UDP requests are not reliable they make a good choice for testing network access reliability and performance. I used this as part of my stumpwm window manager bar to get the history of my internet access quality while in a high speed train.
The output uses three characters to tell if it's under a threshold (it works fine), between two threshold (not good quality) or higher than the second one (meaning high latency) or even a network failure.
The default timeout is 1s, if it works, under 60ms you get a "_", between 60ms and 150ms you get a "-" and beyond 150ms you get a "¯", if the network is failure you see a "N".
For example, if your quality is getting worse until it breaks and then works, it may look like this: _-¯¯NNNNN-____-_______ My LISP code was taking care of accumulating the values and only retaining the n values I wanted as history.
Why would you want to do that? Because I was bored in a train. But also, when network is fine, it's time to sync mails or refresh that failed web request to get an important documentation page.
#!/bin/sh
dig perso.pw @9.9.9.9 +timeout=1 | tee /tmp/latencecheck
if [ $? -eq 0 ]
then
time=$(awk '/Query time/{
if($4 < 60) { print "_";}
if($4 >= 60 && $4 <= 150) { print "-"; }
if($4 > 150) { print "¯"; }
}' /tmp/latencecheck)
echo $time | tee /tmp/latenceresult
else
echo "N" | tee /tmp/latenceresult
exit 1
fi
Those scripts are part of my habits, I'm a bit lost when I don't have them because I always feel they are available at hand. While they don't bring much benefits, it's quality of life and it's fun to hack on small easy pieces of programs to achieve a simple purpose. I'm glad to share those.
I'm writing this text while in the last hours of the challenge, I may repeat some thoughts and observations already reported in the earlier posts but never mind, this is the end of the journey.
Let's speak about Tech! My computer is 16 years old but I've been able to accomplish most of what I enjoy on a computer: IRC, reading my mails, hacking on code and reading some interesting content on the internet. So far, I've been quite happy about my computer, it worked without any trouble.
On the other hand, there were many tasks that didn't work at all:
Browsing the internet to use "modern" website relying on javascript: this is because Javascript capable browsers are not working on my combination of operating system/CPU architecture, I'm quite sure the challenge would have been easier with an old amd64 computer even with low memory.
Watching videos: for some reasons, mplayer in full screen was producing a weird issue, computer stopped working but cursor was still moving but nothing more was possible. However it worked correctly for most videos.
Listening to my big FLAC music files, if doing so I wasn't able to do anything else because of the CPU usage and sitting on my desk to listen to music was not an interesting option.
Using Go, Rust and Node programs because there are no implementation of these languages on OpenBSD PowerPC 32bits.
On the hardware side, here is what I noticed:
512MB are quite enough as long as you stay focused on one task, I rarely required to use swap even with multiple programs opened.
I don't really miss spinning hard drive, in term of speed and noise, I'm happy they are gone in my newer computers.
Using an external pointing device (mouse/trackball) is so much better than the bad touchpad.
Modern screens are so much better in term of resolution, colours and contrast!
They keyboard is pleasant but lack a "Super" modifier key which lead to issues with key binding overlapping between the window manager and programs.
Suspend and resume doesn't work on OpenBSD, so I had to boot the computer and it takes a few minutes to do so and require manual step to unlock /home which add delay for boot sequence.
Despite everything the computer was solid but modern hardware is such more pleasant to use in many ways, not only in term of raw speed. When you buy a laptop especially, you should take care about the other specs than the CPU/memory like the case, the keyboard, the touchpad and the screen, if you use a lot your laptop they are as much important as the CPU itself in my opinion.
Thanks to the programs w3m, catgirl, luakit, links, neomutt, claws-mail, ls, make, sbcl, git, rednotebook, keepassxc, gimp, sxiv, feh, windowmaker, fvwm, ratpoison, ksh, fish, mplayer, openttd, mednafen, rsync, pngquant, ncdu, nethack, goffice, gnumeric, scrot, sct, lxappearence, tootstream, toot, OpenBSD and all the other programs I used for this challenge.
Because I always felt this challenge was a journey to understand my use of computer, I'm happy of the journey.
To make things simple, here is a bullet list of what I noticed
Going to sleep earlier instead of waiting for something to happen.
I've spent a lot less time on my computer but at the same time I don't notice it much in term of what I've done with it, this mean I was more "productive" (writing blog, reading content, hacking) and not idling.
I didn't participate into web forums of my communities :(
I cleared things in my todo list on my server (such as replacing Spamassassin by rspamd and writing about it).
I've read more blogs and interesting texts than usual, and I did it without switching to another task.
Javascript is not ecological because it prevent older hardware to be usable. If I didn't needed javascript I guess I could continue using this laptop.
I got time to discover and practice meditation.
Less open source contribution because compiling was too slow.
I'm sad and disappointed to notice I need to work on my self discipline (that's why I started to learn about meditation) to waste less time on my computer. I will really work on it, I see I can still do the same tasks but spend less time doing nothing/idling/switching tasks.
I will take care of supporting old systems by my contributions, like my blog working perfectly fine in console web browsers but also trying to educate people about this.
I've met lot of interesting people on the IRC channel and for this sole reason I'm happy I made the challenge.
Good hardware is good but is not always necessary, it's up to the developers to make good use of the hardware. While some requirements can evolve over time like cryptography or video codecs, programs shouldn't become more and more resources hungry for the reason that we have more and more available. We have to learn how todo MORE with LESS with computers and it was something I wanted to highlight with this challenge.
I got quite bored two days ago because it was very frustrating to not be able to do everything I want. I wanted to contribute to OpenBSD but the computer is way to slow to do anything useful beyond editing files.
Although, it got better yesterday, 5th day of the challenge, when I decided to move away from claws-mail and switch to neomutt for my emails. I updated claws-mail to version 4.0.0 freshly released and starting updating the OpenBSD package, but claws-mail switched to gtk3 and it became too slow for the computer.
I started using a mouse on the laptop and it made some tasks more enjoyable although I don't need it too much because most of my programs are in a console but every time I need the cursor it's more pleasant to use a mouse support 3 clicks + wheel.
The computer is the sum of its software. Here is a list of the software I'm using right now:
fvwm2: window manager, doesn't bug with full screen programs and is light enough and I like it.
neomutt: mail reader, I always hate mutt/neomutt because of the complexity of their config file, fortunately I had some memories of when I used it and I've been able to build a nice simple configuration script and took the opportunity to update my Neomutt cheatsheet article.
w3m: in my opinion it's the best web browser in terminal :) the bookmark feature works very great and using https://lite.duckduckgo.com/lite for searches works perfectly fine. I use the flavor with image rendering support, however I have mixed feelings about it because pictures take time to download and render and will always render at their original size which is a pain most of the time.
keepassxc: my usual password manager, it has a cli command line to manage the entries from a shell after unlocking the database.
openttd: a game of legend that is relaxing and also very fun to play, runs fine after a few tweaks.
mastodon: tootstream but it's quite limited sometimes and I also access Mastodon on my phone with Tusky from F-droid, they make a great combination.
rednotebook: I was already using it on this computer when it was known as the "offline computer", this program is a diary where I write my day when I feel bad (anger, depressed, bored), it doesn't have much entries in it but it really helps me to write things down. While the program is very heavy and could be considered bloated for the purpose of writing about your day, I just like it because it works and it looks nice.
I'm often asked how I deal with youtube, I just don't, I don't use youtube so problem is solved :-) I use no streaming services at home.
I had to use my regular computer to order a pizza because the stupid pizza company doesn't want to take orders by phone and they are the only pizza shop around... :( I could have done using my phone but I don't really trust my phone web browser to support all the operations of the process.
I could easily handle using this computer for more time if I hadn't so many requirements on web services, mostly for ordering products I can't find locally (pizza doesn't count here) and I hate using my phone for web access because I hate smartphone most of the time.
If I had used an old i386 / amd64 computer I would have been able to use a webkit browser even if it was slow, but on PowerPC the state of web browser with javascript is complicated and currently none works for me on OpenBSD.
I recently used Spamassassin to get ride of the spam I started to receive but it proved to be quite useless against some kind of spam so I decided to give rspamd a try and write about it.
rspamd can filter spam but also sign outgoing messages with DKIM, I will only care about the anti spam aspect.
The rspamd setup for spam was incredibly easy on OpenBSD (6.9 for me when I wrote this). We need to install the rspamd service but also the connector for opensmtpd, and also redis which is mandatory to make rspamd working.
Rspamd will automatically check multiple criteria for assigning a score to an incoming email, beyond a high score the email will be rejected but between a low score and too high, it may be tagged with a header "X-spam" with the value true.
If you want to automatically put the tagged email as spam in your Junk directory, either use a sieve filter on the server side or use a local filter in your email client. The sieve filter would look like this:
if header :contains "X-Spam" "yes" {
fileinto "Junk";
stop;
}
If you want better results, the filter needs to learn what is spam and what is not spam (named ham). You need to regularly scan new emails to increase the effectiveness of the filter, in my example I have a single user with a Junk directory and an Archives directory within the maildir storage, I use crontab to run learning on mails newer than 24h.
rspamd comes with very nice reporting tools, you can get a WebUI on the port 11334 which is listening on localhost by default so you would require tuning rspamd to listen on other addresses or you can use a SSH tunnel.
You can get the same statistics on the command line using the command "rspamc stat" which should have an output similar to this:
Results for command: stat (0.031 seconds)
Messages scanned: 615
Messages with action reject: 15, 2.43%
Messages with action soft reject: 0, 0.00%
Messages with action rewrite subject: 0, 0.00%
Messages with action add header: 9, 1.46%
Messages with action greylist: 6, 0.97%
Messages with action no action: 585, 95.12%
Messages treated as spam: 24, 3.90%
Messages treated as ham: 591, 96.09%
Messages learned: 4167
Connections count: 611
Control connections count: 5190
Pools allocated: 5824
Pools freed: 5801
Bytes allocated: 31.17MiB
Memory chunks allocated: 158
Shared chunks allocated: 16
Chunks freed: 0
Oversized chunks: 575
Fuzzy hashes in storage "rspamd.com": 2936336370
Fuzzy hashes stored: 2936336370
Statfile: BAYES_SPAM type: redis; length: 0; free blocks: 0; total blocks: 0; free: 0.00%; learned: 344; users: 1; languages: 0
Statfile: BAYES_HAM type: redis; length: 0; free blocks: 0; total blocks: 0; free: 0.00%; learned: 3822; users: 1; languages: 0
Total learns: 4166
rspamd is for me a huge improvement in term of efficiency, when I tag an email as spam the next one looking similar will immediately go into Spam after the learning cron runs, it draws less memory then Spamassassin and reports nice statistics. My Spamassassin setup was directly rejecting emails so I didn't have a good comprehension of its effectiveness but I got too many identical messages over weeks that were never filtered, for now rspamd proved to be better here.
I recommend looking at the configurations files, they are all disabled by default but offer many comments with explanations which is a nice introduction to learn about features of rspamd, I preferred to keep the defaults and see how it goes before tweaking more.
I got a lot of feedback from the community, the IRC channel #oldcomputerchallenge is quite active and it seems we have a small community that may start here. I received help from various question I had in regards to the programs I'm now using.
The computer I use is using a different processor architecture than we we are used too. Our computers are now amd64 (even the intel one, amd64 is the name of the instruction sets of the processors) or arm64 for most tablets/smartphone or small boards like raspberry PI, my computer is a PowerPC but it disappeared around 2007 from the market. It is important to know that because most language virtual machines (for interpreted languages) requires some architecture specifics instructions to work, and nobody care much about PowerPC in the javascript land (that could be considered wasting time given the user base), so I'm left without a JS capable web browser because they would instantly crash. The person of cwen@ at the OpenBSD project is pushing hard to fix many programs on PowerPC and she is doing an awesome work, she got JS browsers to work through webkit but for some reasons they are broken again so I have to do without those.
w3m works very fine, I learned about using bookmarks in it and it makes w3m a lot more usable for daily stuff, I've been able to log-in on most websites but I faced some buttons not working because they triggered a javascript action. I'm using it with built-in support for images but it makes loading time longer and they are displayed with their real size which can screw up the display, I'm think I'll disable the image support...
What is the smolnet? This is a word that feature what is not on the Web, this includes mostly content from Gopher and Gemini. I like that word because it represents an alternative that I'm contributing too for years and the word carries a lot of meaning.
Gopher and Gemini are way saner to browse, thanks to a standard concept of one item per line and no style, visiting one page feels like all the others and I don't have to look for where the menu is, or even wait for the page to render. I've been recommended the av-98 terminal browser and it has a very lovely feature named "tour", you can accumulate links from pages you visit and add them to the tour, and them visit the next liked accumulated (like a First in-First out queue), this avoids cumbersome tabs or adding bookmarks for later viewing and forgetting about them.
I'm working at updating the claws-mail mail client package on OpenBSD, a new major release was done the first day of the challenge, unfortunately working with it is extremely painful on my old computer. Compiling was long, but was done only once, now I need to sort out libraries includes and using the built-in check of the ports tree takes like 15 minutes which is really not fun.
While I like this old laptop, I start to hate it too. The touchpad is extremely bad and move by increments of 5px or so which is extremely imprecise especially for copy/pasting text or playing OpenTTD, not mentioning again that it only has a left click button. (update, it has been fixed thanks to anthk_ on IRC using the command xinput set-prop /dev/wsmouse "Device Accel Constant Deceleration" 1.5)
The screen has a very poor contrast, I can deal with a 1024x768 resolution and I love the 4:3 ratio, but the lack of contrast is really painful to deal with.
The mechanical hard drive is slow, I can cope with that, but it's also extremely noisy, I forgot the crispy noises of the old HDD. It's so annoying to my hears... And talking about noise, I'm often limiting the CPU speed of my computer to avoid the temperature rising too high and triggering the super loud small CPU fan. It is really super loud and it doesn't seem quite effective, maybe the thermal paste is old...
A few months ago I wanted to replace the HDD but I looked on iFixit website the HDD replacement procedure for this laptop and there are like 40 steps to follow plus an Apple specific screwdriver, the procedure basically consists at removing all parts of the laptop to access the HDD which seems the piece of hardware in the most remote place in the case. This is insane, I'm used to work on Thinkpad laptop and after removing 4 usual screws you get access to everything, even my T470 internal battery is removable.
All of these annoying facts are not even related to the computer power but simply because modern hardware evolved, they are quality of life because they don't make the computer more or less usable, but more pleasant. Silence, good and larger screens and multiple fingers gestures touchpad bring a more comfortable use of the computer.
Because of context switching cost a lot of time, I take my time to read content and appreciate it in one shot instead of bookmarking after reading a few lines and never read the bookmark again. I was quite happy to see I'm able to focus more than 2 minutes on something and I'm a bit relieved in that regards.
I'm quite sad to see an older system forcing me to restriction can improve my focus, this mean I'm lacking self discipline and that I've wasted too much time of my life doing useless context/task switching. I don't want to rely on some sort of limitations to be guards of my sanity, I have to work on this on my own, maybe meditation could be me getting my patience back.
I'm meeting friendly people sharing what I like, I realizing my dependencies over services or my lack of self mental discipline. The challenge is a lot harder than I expected but if it was too easy that wouldn't be a challenge. I already know I'll be happy to get back to my regular laptop but I also think I'll change some habits.
I'm using an Apple iBook G4 running the operating system development version of OpenBSD macppc. Its specs are: 1 CPU G4 1.3GHz, 512 MB of memory and an old IDE HDD 40 GB. The screen is a 4/3 ratio with a 1024x768 resolution. The touchpad has only one tap button doing left click, the touchpad doesn't support multiple fingers gestures (can't scroll, can't click). The battery is still holding a 1h40 capacity which is very surprising.
About the software, I was using the ratpoison window manager but I got issue with two GUI applications so I moved to cwm but I have other issues with cwm now. I may switch to window maker maybe or return to ratpoison which worked very well except for 2 programs, and switch to cwm when I need them... I use xterm as my terminal emulator because "it works" and it doesn't draw much memory, usually I'm using Sakura but with 32 MB of memory for each instance vs 4 MB for xterm it's important to save memory now. I usually run only one xterm with a tmux inside.
Same for the shell, I've been using fish since the beginning of 2021 but each instance of fish draws 9 MB which is quite a lot because this mean every time I split my tmux and this spawns a new shell then I have an extra 9MB used. ksh draws only 1MB per instance which is 9x less than fish, however for some operations I still switch to fish manually because it's a lot more comfortable for many operations due to its lovely completion.
My favorite browser on such old system is w3m with image support in the terminal, it's super fast and the render is very good. I use https://html.duckduckgo.com/html/ as my search engine.
The only false issue with w3m is that the key bindings are absolutely not straightforward but you only need to know a few of them to use it and they are all listed in the help.
I spend a lot of time on Mastodon to communicate with people, I usually use my web browser to access mastodon but I can't here because javascript capable web browser takes all the memory and often crash so I can only use them as a last joker. I'm using the terminal user interface tootstream but it has some limitations and my high traffic account doesn't match well with it. I'm setting up brutaldon which is a local program that gives access to mastodon through an old style website, I already wrote about it on my blog if you want more information.
Most of my files are FLAC encoded and are extremely big, although the computer can decode them right but this uses most of the CPU. As OpenBSD doesn't support mounting samba shares and that my music is on my NAS (in addition to locally on my usual computer), I will have to copy the files locally before playing them.
One solution is to use musikcube on my NAS and my laptop with the server/client setup which will make my nas transcoding the music I want to play on the laptop on the fly. Unfortunately there is no package for musikcube yet and I started compiling it on my old laptop and I suppose it will take a few hours to complete.
My favorite email client at the moment is claws-mail and fortunately it runs perfectly fine on this old computer, although the lack of right click is sometimes a problem but a clever workaround is to run "xdotool click 3" to tell X to do a right click where the cursor is, it's not ideal but I rarely need it so it's ok. The small screen is not ideal to deal with huge piles of mails but it works so far.
My IRC setup is to have a tmux with as many catgirl (irc client) instances as network I'm connected too, and this is running on a remote server so I just connect there with ssh and attach to the local tmux. No problem here.
The process is exactly the same as usual. I open a terminal to start my favorite text editor, I create the file and write in it, then I run aspell to check for typos, then I run "make" to make my blog generator creates the html/gopher/gemini versions and dispatch them on the various server where they belong to.
It's not that easy! My reliance on web services is hurting here, I found a website providing weather forecast working in w3m.
I easily focus on a task because switching to something else is painful (screen redrawing takes some times, HDD is noisy), I found a blog from a reader linking to other blogs, I enjoyed reading them all while I'm pretty sure I would usually just make a bookmark in firefox and switch to a 10-tabs opening to see what's new on some websites.
This is not an article about some tech but more me sharing feelings about my job, my passion and IT. I've met a Linux system at first in the early 2000 and I didn't really understand what this was, I've learned it the hard way by wiping Windows on the family computer (which was quite an issue) and since that time I got a passion with computers. I made a lot of mistakes that made me progress and learn more, and the more I was learning, the more I saw the amount of knowledge I was missing.
Anyway, I finally got a decent skill level if I could say, but I started early and so my skill is related to all of that early Linux ecosystem. Tools are evolving, Linux is morphing into something different a bit more every year, practices are evolving with the "Cloud". I feel lost.
I've met many people along my ride in open source and I think we can distinguish two schools (of course I know it's not that black and white): the people (like me) who enjoy the traditional ecosystem and the other group that is from the Cloud era. It is quite easy to bash the opposite group and I feel sad when I assist at such dispute.
I can't tell which group is right and which is wrong, there is certainly good and bad in both. While I like to understand and control how my system work, the other group will just care about the produced service and not the underlying layers. Nowadays, you want your service uptime to have as much nine as you can afford (99.999999) at the cost of having complex setup with automatic respawning services on failure, automatic routing within VMs and stuff like that. This is not necessarily something that I enjoy, I think a good service should have a good foundation and restarting the whole system upon failure seems wrong, although I can't deny it's effective for the availability.
I know how a package manager work but the other group will certainly prefer to have a tool that will hide all of the package manager complexity to get the job done. Tell ansible to pop a new virtual machine on Amazon using Terraform with a full nginx-php-mysql stack installed is the new way to manage servers. It seems a sane option because it gets the job done, but still, I can't find myself in there, where is the fun? I can't get the fun out of this. You can install the system and the services without ever see the installer of the OS you are deploying, this is amazing and insane at the same time.
I feel lost in this new era, I used to manage dozens of system (most bare-metal, without virtualization), I knew each of them that I bought and installed myself, I knew which process should be running and their usual CPU/memory usage, I got some acquaintance with all my systems. I was not only the system administrator, I was the IT gardener. I was working all the time to get the most out of our servers, optimizing network transfers, memory usage, backups scripts. Nowadays you just pop a larger VM if you need more resources and backups are just snapshots of the whole virtual disk, their lives are ephemeral and anonymous.
I would like to understand better that other group, get more confident with their tools and logic but at the same time I feel some aversion toward doing so because I feel I'm renouncing to what I like, what I want, what made me who I am now. I suppose the group I belong too will slowly fade away to give room to the new era, I want to be prepared to join that new era but at the same time I don't want to abandon the people of my own group by accelerating the process.
I'm a bit lost in this crossfire. Should a resistance organize against this? I don't know, I wouldn't see the point. The way we do computing is very young, we are looking for a way. Humanity has been making building for thousands and years and yet we still improve the way we build houses, bridges and roads, I guess that the IT industry is following the same process but as usual with computers, at an insane rate that humans can barely follow.
Please share with me by email or mastodon or even IRC if you feel something similar or if you got past that issue, I would be really interested to speak about this topic with other people.
I got many many readers giving me their thoughts about this article and I'm really thankful for this.
Now I think it's important to realize that when you want to deploy systems at scale, you need to automate all your infrastructure and then you lose that feeling with your servers. However, it's still possible to have fun because we need tooling, proper tooling that works and bring a huge benefit. We are still very young in regards to automation and lot of improvements can be done.
We will still need all those gardeners enjoying their small area of computer because all the cloud services rely on their work to create duplicated system in quantity that you can rely on. They are making the first most important bricks required to build the "Cloud", without them you wouldn't have a working Alpine/CentOS/FreeBSD/etc... to deploy automatically.
Both can coexist, both should know better each other because they will have to live together to continue the fantastic computer journey, however the first group will certainly be in a small number compared to the other.
So, not everything is lost! The Cloud industry can be avoided by self-hosting at home or in associative datacenter/colocations but it's still possible to enjoy some parts of the great shift without giving up all we believe in. A certain balance can be found, I'm quite sure of it.
OpenBSD package manager pkg_add is known to be quite slow and using much bandwidth, I'm trying to figure out easy ways to improve it and I may nailed something today by replacing ftp(1) http client by curl.
I used on an OpenBSD -current amd64 the following command "pkg_add -u -v | head -n 70" which will check for updates of the 70 first packages and then stop. The packages tested are always the same so the test is reproducible.
The traditional "ftp" will be tested, but also "curl" and "curl -N".
The bandwidth usage has been accounted using "pfctl -s labels" by a match rule matching the mirror IP and reset after each test.
Here is a quick intro to what happens in the code when you run pkg_add -u on http://
pkg_add downloads the package list on the mirror (which could be considered to be an index.html file) which weights ~2.5 MB, if you add two packages separately the index will be downloaded twice.
pkg_add will run /usr/bin/ftp on the first package to upgrade to read its first bytes and pipe this to gunzip (done from perl from pkg_add) and piped to signify to check the package signature. The signature is the list of dependencies and their version which is used by pkg_add to know if the package requires update and the whole package signify signature is stored in the gzip header if the whole package is downloaded (there are 2 signatures: signify and the packages dependencies, don't be mislead!).
if everything is fine, package is downloaded and the old one is replaced.
if there is no need to update, package is skipped.
new package = new connection with ftp(1) and pipes to setup
Using FETCH_CMD variable it's possible to tell pkg_add to use another command than /usr/bin/ftp as long as it understand "-o -" parameter and also "-S session" for https:// connections. Because curl doesn't support the "-S session=..." parameter, I used a shell wrapper that discard this parameter.
I measured the whole execution time and the total bytes downloaded for each combination. I didn't show the whole results but I did the tests multiple times and the standard deviation is near to 0, meaning a test done multiple time was giving the same result at each run.
operation time to run data transferred
--------- ----------- ----------------
ftp http:// 39.01 26
curl -N http:// 28.74 12
curl http:// 31.76 14
ftp https:// 76.55 26
curl -N https:// 55.62 15
curl https:// 54.51 15
Using http:// is way faster than https://, the risk is about privacy because in case of man in the middle the download packaged will be known, but the signify signature will prevent any malicious package modification to be installed. Using 'FETCH_CMD="/usr/local/bin/curl -L -s -q -N"' gave the best results.
However I can't explain yet the very different behaviors between ftp and curl or between http and https.
7. Extra: set a download speed limit to pkg_add operations §
By using curl as FETCH_CMD you can use the "--limit-rate 900k" parameter to limit the transfer speed to the given rate.
Here are the *rules* of the challenge, there are no prize to win but I'm convinced we will have feelings to share along the week and that it will change the way we interact with computers.
1 CPU maximum, whatever the model. This mean only 1 CPU|Core|Thread. Some bios allow to disable multi core.
512 MB of memory (if you have more it's not a big deal, if you want to reduce your ram create a tmpfs and put a big file in it)
using USB dongles is allowed (storage, wifi, Bluetooth whatever)
only for your personal computer, during work time use your usual stuff
relying on services hosted remotely is allowed (VNC, file sharing, whatever help you)
using a smartphone to replace your computer may work, please share if you move habits to your smartphone during the challenge
if you absolutely need your regular computer for something really important please use it. The goal is to have fun but not make your week a nightmare.
If you don't have an old computer, don't worry! You can still use your regularly computer and create a virtual machine with low specs, you would still be more comfortable with a good screen, disk access and a not too old CPU but you can participate.
Because I want this event to be a nice moment to share with others, you can contact me so I can add your blog (including gopher/gemini space) to the future list below.
You can also join #oldcomputerchallenge on libera.chat IRC server.
I use an old iBook G4 laptop (the one I already use "offline"), it has a single PowerPC G4 1.3 GHz CPU and 512 MB of ram and a slow 40GB HDD. The wifi is broken so I have to use a Wifi dongle but I will certainly rely on ethernet. The screen has a 1024x768 resolution but the colors are pretty bad.
In regards to software it runs OpenBSD 6.9 with /home/ encrypted which makes performance worse. I use ratpoison as the window manager because it saves screen space and requires little memory and CPU to run and is entirely keyboard driven, that laptop has only a left click touchpad button :).
I love that laptop and initially I wanted to see how far I could use for my daily driver!
Today I will introduce you to the program etckeeper, a simple tool that track changes in your /etc/ directory into a versioning control system (git, mercurial, darcs, bazaar...).
Your system may certainly package it, you will then have to run "etckeeper init" in /etc/ the first time. A cron or systemd timer should be set by your package manager to automatically run etckeeper every day.
In some cases, etckeeper can integrate with package manager to automatically run after a package installation.
While it can easily be replicated using "git init" in /etc/ and then using "git commit" when you make changes, etckeeper does it automatically as a safety net because it's easy to forget to commit when we make changes. It also has integration with other system tools and can use hooks like sending an email when a change is found.
It's really a convenience tool but given it's very light and can be useful I think it's a must for most sysadmins.
This is a simple cheatsheet to manage my Gentoo systems, a linux distribution source based, meaning everything installed on the computer must be compiled locally.
I use the following command to update my system, it will downloaded latest portage version and then rebuild @world (the whole set of packages manually installed).
#!/bin/sh
emerge-webrsync 2>&1 | grep "The current local"
if [ $? -eq 0 ]
then
exit
fi
emerge -auDv --with-bdeps=y --changed-use --newuse @world
As you may rebuild the same program many times (especially on a new install), I highly recommend using ccache to reuse previous builded objects and will reduce build duration by 80% when you change an USE.
It's quite easy, install ccache package, add 'FEATURES="ccache"' in your make.conf and do "install -d -o root -g portage -p 775" /var/cache/ccache and it should be working (you should see files in the ccache directory).
4. Use emlop to view / calculate build time from past builds §
Emlop can tell you how much time will be needed or remains on a build based on previous builds information. I find it quite fun to see how long an upgrade will take.
There is another tool named "genlop" that is older, but emlop feels better.
You can use "equery" from the package gentoolkit like this "equery l -p '*package name*" globbing with * is mandatory if you are not looking for a perfect match.
6. Upgrade parts of the system using packages sets §
There are special packages sets like @security or @profile that can be used instead of @world that will restrict the packages to only a group, on a server you may only want to update @security for... security but not for newer versions.
7. Disable network when emerging for extra security §
When building programs using emerge, you can disable the network access for the building process, this is considered a good thing because if the building process requires extra files downloaded or a git repository cloned during building phase, this mean your build is not reliable over time. This is also important for security because a rogue build script could upload data. This behavior is default on OpenBSD system.
To enable this, just add "network-sandbox" in the FEATURE variable in your make.conf file.
I had a bulky kernel at first but I decided to trim it down to reduce build time, it took me a long fail and retry process in order to have everything right that still work, here is a short explanation about my process.
keep an old kernel that work
install and configure genkernel with MRPROPER=no and CLEAN=no in /etc/genkernel.conf because we don't want to rebuild everything when we make changes
lspci -k will tell you which hardware requires which kernel module
visit /usr/src/linux and run make menuconfig, basically, you can remove a lot of things in "Device drivers" category that doesn't look like standard hardware on personal computers
in Ethernet, Wireless LAN, Graphical drivers, you can trim everything that doesn't look like your hardware
run genkernel all and then grub-mkconfig -o /boot/grub/grub.cfg if not done by genkernel and reboot, if something is missed, try enabling drivers you removed previously
do it slowly, not much drivers at a time, it's easier to recover an issue when you don't remove many modules from many categories
using genkernel all without cleaning, a new kernel can be out in a minute which make the process a lot faster
You can do this without genkernel but if you are like me, using LVM over LUKS and that you need an initrd file, genkernel will just ease the process and generate the initird that you need.
If you use Gentoo you may want to have control over most of your packages, but some packages can be really long to compile without much benefit, or you may simply be fine using a binary package. Some packages have the suffix -bin to their name, meaning they won't require compilation.
There are a few well known packages such as firefox-bin, libreoffice-bin, rust-bin and even gentoo-kernel-bin! You can get a generic kernel pre-compiled :)
It is possible to create a binary package of every program you compile on Gentoo, this can be used for distributing packages on similar systems or simply make a backup of your packages. In some cases, the redistribution may not work if you are on a system with a different CPU generation or different hardware, this is pretty normal because you often define the variables to optimize as much as possible the code for your CPU and the binaries produced won't work on another CPU.
The guide from Gentoo will explain all you need to know about the binary packages and how to redistribute them, but the simplest config you need to start generating packages from emerge compilation is setting FEATURES="buildpkg" in your make.conf
This is a chunk of my make.conf file that I find really useful. It accepts all licenses, make portage run with nice 15 to not disturb much a running system, make it compile with 12 threads, run up to 8 parallel package creation except if the load reach 10.
And it always create binary packages, so if you play with USE flags and revert, you will already have a binary package and this will avoid recompiling.
Nobody asked for it but I wanted to share the list of the system I used in my life (on a computer) and a few words about them. This is obviously not very accurate but I'm happy to write it somewhere.
You may wonder why I did some choices in the past, I was young and with little experience in many of these experiments, a nice looking distribution was very appealing to me.
One has to know (or remember) that 10 years ago, Linux distributions were very different from one to another and it became more and more standardized over time. At the point that I don't consider distro hoping (the fact to switch from a distribution to another regularly) something interesting because most distributions are derivative from a main one and most will all have a systemd and same defaults.
Disclaimer: my opinions about each systems are personal and driven by feeling and memories, it may be totally inaccurate (outdated or damaged memories) or even wrong (misunderstanding, bad luck). If I had issues with a system this doesn't mean it is BAD and that you shouldn't use it, I recommend to make your opinion about them.
I wanted to use it on my workstation but the documentation for full disk encryption and the documentation in general was outdated and not accurate so I gave up.
However the extreme minimalism is interesting and without full disk encryption it worked fine. It was surprising to see how packages were split in such small parts, I understand why it's used to build containers.
I really want to like it, maybe in a few years it will be mature enough.
Role: workstation (at least 1 year accumulated) and servers
Opinion: I don't like it
Date of use: from 2006 to now
It's not really possible to do Linux without having to deal with Debian some day. It's quite working when installed but I always had painful time with upgrades. As for using it as a workstation, it was at a time of gnome 2 and software were already often obsolete so I was using testing.
The system worked quite well, I had hardware compatibility issues at that time but it worked well for my laptop. HAMMER was stable when I used it on my server and I really enjoyed working with this file system, the server was my NAS and Mumble server at that time and it never failed me. I really think this make a good alternative to ZFS.
I was trying to be a good student at that time and it seemed Edubuntu was interesting, I didn't understand it was just an Ubuntu with a few packages pre-installed. It was installed on my very first laptop (a very crappy one but eh I loved it.).
I have an old multimedia laptop (the case is falling apart) that runs Elementary OS, mainly for their own desktop environment Pantheon that I really like. The distribution itself is solid and well done, it never failed me even after major upgrades. I could do everything using the GUI. I would recommend like it to a Linux beginner or someone enjoying GUI tools.
I never been into Arch but I got my first contact with EndeavourOS, a distribution based on Arch Linux that proposes an installer with many options to install Arch Linux, and also a few helper tools to manage your system. This is clearly and Arch Linux and they don't hide it, they just facilitate the use and administration of the system. I'm totally capable of installing Arch but I have to admit if I can save a lot of time to install it in a full disk encryption setup using a GUI I'm all for it. As an Arch Linux noob, the little "welcome" GUI provided by EndeavourOS was very useful to learn how to use the packages manager and a few other things. I'd totally recommend it over Arch Linux because it doesn't denature Arch while still providing useful additions.
I started with Fedora Core 6 in 2006, at that time it was amazing, they had many new software and up to date, the alternative was Debian or Mandrake (with Ubuntu not being very popular yet), I used it a long time. I used it again later but I stumbled on many quality issues and I don't have good memories about it.
This is the first BSD I tried, I heard a lot about it so I downloaded the 3 or 5 CDs of the release with my 16 kB/s DSL line, burned CDs and installed it on my computer, the installer was proposing to install packages at that time but it was doing it in a crazy way, you had to switch CD a lot between the sets because sometimes the package was on CD 2 then CD 3 and CD 1 and CD 3 and CD2.... For some reasons, I destroyed my system a few times by mixing ports and packages which ended in dooming the system. I learned a lot from my destroy and retry method.
For my first job (I occupied for 10 years) I switched all the Debian servers to FreeBSD servers and started playing with Jails to provide security for web server. FreeBSD never let me down on servers. The most pain I have with FreeBSD is freebsd-update updating RCS tags so I had to merge sometimes a hundred of files manually... At the point I preferred reinstalling my servers (with salt stack) than upgrading.
On my workstation it always worked well. I regret packages quality can be inconsistent sometimes but I'm also part of the problem because I don't think I ever reported such issues.
My first encounter with Gentoo was at my early Linux discovery. I remember following the instructions and compiling X for like A DAY to get a weird result, the resolution was totally wrong and it was in grey scale so I gave up.
I tried it later in 2017 and I successfully installed it with full disk encryption and used it as my pro laptop, I don't remember I broke it once. The only issue was to wait the compilation time when I needed a program not installed.
I'm back on Gentoo regularly for one laptop that requires many tweaks to work correctly and I also use it as my main Linux at home.
It was my first encounter with a 100% free system, I remember it wasn't able to play MP3 files :) It was an Ubuntu derivative and the community was friendly. I see the project is abandoned now.
I like Guix a lot, it has very good ideas and the consistent use of Scheme language to define the packages and write the tools is something I enjoy a lot. However I found the system doesn't feel very great for a desktop usage with GUI, it appears quite raw and required me many workaround to work correctly.
Note that Guix is a distribution but also the package manager that can be installed on any linux distribution in addition to the original package manager, in that case we refer to it as Foreign Guix.
This was one of my first distribution and it came with a graphical installer! I remember packages had to be installed with the command "urpmi" but that's all. I think I didn't have access to the internet using my USB modem so I was limited to packages from the CDs I burned.
I used NetBSD at first on a laptop (in 2009) but it was not very stable and programs were core dumping a lot, I found the software where not really up to date in pkgsrc too. However, I used it for years as my first email server and I never had a single issue.
I didn't try it seriously for a workstation recently but from what I've heard it became a good choice for a daily driver.
I use NixOS daily in my professional workstation since 2020, it never failed me even when I'm on the development channel. I already wrote about it, it's an amazing piece of work but is radically different from other Linux distributions or Unix-like systems.
I'm using it on my NAS and it's absolutely flawless since I installed it. But I am not sure how easy or hard it would be to run a full featured mail server on it (my best example for a complex setup).
I don't remember much about this distribution but I remember the awesome community and the creator of the distro which is a very helpful and committed person. This is a distribution made from scratch that is working very well and is still alive and dynamic, kudos to the team.
I already wrote a few times why I like OpenBSD so I will make it short, it just works and it works fine. However the hardware compatibility can be limited, but when hardware is supported everything just work out of the box without any tweak.
I've been using it daily for years now and it started when my NetBSD mail server had to be replaced by a newer machine at online so I chose to try OpenBSD. I'm part of the team since 2018 and apart from occasional ports changes my big contribution was to setup the infrastructure to build binary packages for ports changes in the stable branch.
I was a huge fan of OpenSolaris but Oracle killed it. OpenIndiana is the resurrection of the open source Solaris but is now a bit abandoned from contributors and the community isn't as dynamic as previously. Hardware support is lagging however the system performs very well and all Solaris features are still there if you know what to do with it.
I really hope for this project to get back on track again and being as dynamic as it used to be!
I loved OpenSolaris, it was such an amazing system, every new release had a ton of improvements (packages updates, features, hardware support) and I really thought it would compete Linux at this rate. It was possible to get free CD over snail mail and they looked amazing.
It was my main workstation on my big computer (I built it in 2007 and it had 2 xeon E5420 CPU and 32 GB of memory with 6x 500GB of SATA drives!!!), it was totally amazing to play with virtualization on it. The desktop was super fast and using Wine I was able to play Windows video games.
I don't have strong memories about OpenSuse, I think it worked well on my workstation at first but after some time I had some madness with the package manager that was doing weird things like removing half the packages to reinstall them... I never wanted to give another try after this few months experiment.
I remember having played and contributed a bit to packages on IRC, all I remember is the kind community and that it was super fast to install. It's a distribution from scratch and it still alive and updated, bravo!
PC-BSD (and more recently TrueOS) was the idea to provide FreeBSD to everyone. Each release was either good or bad, it was possible to use FreeBSD packages but also "pbi" packages that looked like Mac OS installers (a huge file that you had to double click on it to install). I definitely liked it because it was my first real success with FreeBSD but sometimes the tools proposed were half backed or badly documented. The project is dead now.
I use this distribution on my gaming computer and I have to admit it can easily replace Windows! :) Upgrades are painless and everything works out of the box (including the Nvidia driver).
This distribution is really focused into providing tools for using radio hardware, I bought a simple and cheap RTL-SDR usb device and I've been able to use it with pre-installed software. Really a plug and play experience. It works as a live CD so you don't even need to install it to benefit from its power.
It is very hard for me to explain how much and deep I love Slackware Linux. I just love it. In the date you can read I started with it in 2002, it's my very first encounter with Linux. A friend bought a Linux Magazine with Slackware CDs and explanations about the installation, it worked and many programs were available to play with! (I also erased Windows on the family computer because I had no idea what I was doing).
Since that time, I used Slackware multiples times and I think it's the system that survived the longest time every time it got installed, every new Slackware release was a day to celebrate for me.
I can't explain why I like it so much, I guess it's because you deeply know how your system work over time. Packages didn't manage dependencies at that time and it was a real pain to get new programs, it improved a lot now.
I remember the first time I heard that Solaris was a system I could install on my machine, I started to install it after downloading 2 parts of the ISO (which had to be joined using cat), I started to install it on my laptop and went to school with the laptop on battery continuing installing (it was very long) and ending the installation process in class (I was in a computer science university so it was fine :P ).
I discovered a whole new world with it, I even used it on a netbook to write some Java SCTP university project. It was the very introduction to ZFS, brand new FS with many features.
I didn't try much Solus because I'm quite busy nowadays, but it's a good distro as an alternative to major distributions, it's totally independent from other main projects and they even have their own package manager. My small experiment was good and it felt quality, it's a rolling release model but the packages are curated to check quality before being pushed to mass users.
I used Ubuntu on laptop a lot, and I recommended many people to use Ubuntu if they wanted to try Linux. Whatever we say, they helped to get Linux known and bring Linux to masses. Some choices like non-free integration are definitely not great though. I started with Dapper Drake (Ubuntu 6.06 !) on an old Pentium 1 server I had under my dresser in my student room.
I used it daily a few times but mainly at the time the default window manager was Unity. For some reasons, I loved Unity, it's really a pity the project is now abandoned and lost, it worked very well for me and looked nice.
I don't want to use it anymore as it became very complex internally, like trying to understand how domain names are resolved is quite complicated...
Opinion: interesting distribution, not enough time to try
Date of use: 2018
Void is an interesting distribution, I use it a little on a netbook with their musl libc edition and I've run into many issues at usage but also at install time. The glibc version was working a lot better but I can't remember why it didn't catch me more than this.
I wish I could have a lot of time to try it more seriously. I recommend everyone giving it a try.
My first encounter with a computer was with Windows 3.11 on a 486dx computer, I think I was 6. Since then I always had a Windows computer, at first because I didn't know there were alternatives and then because I always had it as a hard requirement for a hardware, a software or video games. Now, my gaming computer is running Windows and is dedicated to games only, I do not trust this system enough to do anything else. I'm slowly trying to move away from it and efforts are giving results, more and more games works fine on Linux.
I don't remember much, it was like Slackware but without the giant DVD install that requires 15GB of space for installation, it used Xfce by default and looked nice.
As a human being I have to communicate with other people and now we have many ways to speak to each other, so many that it's hard to speak to other people. This is a simple list of communication protocol and why you would use them. This is an opinionated text.
We rely on protocols to speak to each other, the natural way would be language with spoken words using vocal chords, we could imagine other way like emitting sound in Morse. With computers we need to define how to send a message from A to B and there are many many possibilities for such a simple task.
1. The protocol could be open source, meaning anyone can create a client or a server for this protocol.
2. The protocol can be centralized, federated or peer to peer. In a centralized situation, there is only one service provider and people must be on the same server to communicate. In a federated or peer-to-peer architecture, people can join the communication network with their own infrastructure, without relying on a service provider (federated and peer to peer are different in implementation but their end result is very close)
3. The protocol can provide many features in addition to contact someone.
The simplest communication protocol and an old one. It's open source and you can easily host your own server. It works very well and doesn't require a lot of resources (bandwidth, CPU, memory) to run, although it is quite limited in features.
you need to stay connected to know what happen
you can't stay connected if you don't keep a session opened 24/7
multi device (computer / phone for instance) is not possible without an extra setup (bouncer or tmux session)
I like to use it to communicate with many people on some topic, I find they are a good equivalent of forums. IRC has a strong culture and limitations but I love it.
Behind this acronym stands a long lived protocol that supports many features and has proven to work, unfortunately the XMPP clients never really shined by their user interface. Recently the protocol is seeing a good adoption rate, clients are getting better, servers are easy to deploy and doesn't draw much resources (i/o, CPU, memory).
XMPP uses a federation model, anyone can host their server and communicate with people from other servers. You can share files, create rooms, do private messages. Audio and video is supported based on the client. It's also able to bridge to IRC or some other protocol using the correct software. Multiples options for end-to-end encryption are available but the most recent named OMEMO is definitely the best choice.
The free/open source Android client « Conversations » is really good, on a computer you can use Gajim or Dino with a nice graphical interface, and finally profanity or poezio for a console client.
Matrix is a recent protocol in the list although it saw an incredible adoption rate and since the recent Freenode drama many projects switched to their own Matrix room. It's fully open source in client or servers and is federated so anyone can be independent with their own server.
As it's young, Matrix has only one client that proposes all the features which is Element, a very resource hungry web program (web page or run "natively using Electron, a program to turn website in desktop application) and a python server named Synapse that requires a lot of CPU to work correctly.
In regards to features, Matrix proposes end to end encryption, rooms, direct chat, encryption done well, file sharing, audio/video etc...
While it's a good alternative to XMPP, I prefer XMPP because of the poor choice of clients and servers in Matrix at the moment. Hopefully it may get better in the future.
This way is well known, most people have an email address and it may have been your first touch with the Internet. Email works well, it's federated and anyone can host an email server although it's not an easy task.
Mails are not instant but with performant servers it can only takes a few seconds for an email to be sent and delivered. They can support end to end encryption using GPG which is not always easy to use. You have a huge choice for email clients and most of them allow incredible settings choice.
I really like emails, it's a very practical way to communicate ideas or thoughts to someone.
I found a nice program named Delta Chat that is built on top of emails to communicate "instantly" with your friends who also use Delta Chat, messages are automatically encrypted.
The client user interface looks like an instant messaging program but will uses emails to transport the messages. While the program is open source and Free, it requires electron for desktop and I didn't find a way to participate to an encrypted thread using an email client (even using the according GPG key). I really found that software practical because your recipients doesn't need to create a new account, it will reuse an existing email address. You can also use it without encryption to write to someone who will reply using their own mail client but you use delta chat.
Open source client but proprietary server, I don't recommend anyone to use such a system that lock you to their server. You would have to rely on a company and you empower them by using their service.
Open source client / server but the main server where everybody is doesn't allow federation. So far, hosting your own server doesn't seem a possible and viable solution. I don't recommend using it because you rely on a company offering a service.
I daily use IRC, Emails and XMPP to communicate with friends, family, crew from open source projects or meet new people sharing my interests. My main requirement for private messages is end to end encryption and being independent so I absolutely require federated protocol.
Today I made a small change to my blog, I added some more HTML metadata for the Open Graph protocol.
Basically, when you share an url in most social networks or instant messaging, when some Open Graph headers are present the software will display you the website name, the page title, a logo and some other information. Without that, only the link will be displayed.
In this text I will explain what is the I2P network and how to provide a service over I2P on OpenBSD and how to use to connect to an I2P service from NixOS.
This acronym stands for Invisible Internet Project and is a network over the network (Internet). It is quite an old project from 2003 and is considered stable and reliable. The idea of I2P is to build a network of relays (people running an i2p daemon) to make tunnels from a client to a server, but a single TCP session (or UDP) between a client and a server could use many tunnels of n hops across relays. Basically, when you start your I2P service, the program will get some information about the relays available and prepare many tunnels in advance that will be used to reach a destination when you connect.
Some benefits from I2P network:
your network is reliable because it doesn't take care of operator peering
your network is secure because packets are encrypted, and you can even use usual encryption to reach your remote services (TLS, SSH)
provides privacy because nobody can tell where you are connecting to
can prevent against habits tracking (if you also relay data to participate to i2p, bandwidth allocated is used at 100% all the time, and any traffic you do over I2P can't be discriminated from standard relay!)
can only allow declared I2P nodes to access a server if you don't want anyone to connect to a port you expose
It is possible to host a website on I2P (by exposing your web server port), it is called an eepsite and can be accessed using the SOCKs proxy provided by your I2P daemon. I never played with them though but this is a thing and you may be interested into looking more in depth.
Obviously, many people would question why not using Tor which seems similar. While I2P can seem very close to Tor hidden services, the implementation is really different. Tor is designed to reach the outside while I2P is meant to build a reliable and anonymous network. When started, Tor creates a path of relays named a Circuit that will remain static for an approximate duration of 12 hours, everything you do over Tor will pass through this circuit (usually 3 relays), on the other hand I2P creates many tunnels all the time with a very low lifespan. Small difference, I2P can relay UDP protocol while Tor only supports TCP.
Tor is very widespread and using a tor hidden service for hosting a private website (if you don't have a public IP or a domain name for example) would be better to reach an audience, I2P is not very well known and that's partially why I'm writing this. It is a fantastic piece of software and only require more users.
Relays in I2P doesn't have any weight and can be seen as a huge P2P network while Tor network is built using scores (consensus) of relaying servers depending of their throughput and availability. Fastest and most reliable relays will be elected as "Guard server" which are entry points to the Tor network.
I've been running a test over 10 hours to compare bandwidth usage of I2P and Tor to keep a tunnel / hidden service available (they have not been used). Please note that relaying/transit were desactivated so it's only the uploaded data in order to keep the service working.
I2P sent 55.47 MB of data in 114 430 packets. Total / 10 hours = 1.58 kB/s average.
Tor sent 6.98 MB of data in 14 759 packets. Total / 10 hours = 0.20 kB/s average.
Tor was a lot more bandwidth efficient than I2P for the same task: keeping the network access (tor or i2p) alive.
- a computer running an I2P daemon configured with tunnels servers (to expose a TCP/UDP port from this machine, not necessarily from localhost though)
- a computer running an I2P daemon configured with tunnel client (with information that match the server tunnel)
- computers running I2P and allowing relay, they will receive data from other I2P daemons and pass the encrypted packets. They are the core of the network.
In this text we will use an OpenBSD system to share its localhost ssh access over I2P and a NixOS client to reach the OpenBSD ssh port.
The setup is quite simple, we will use i2pd and not the i2p java program.
pkg_add i2pd
# read /usr/local/share/doc/pkg-readmes/i2pd for open files limits
cat <<EOF > /etc/i2pd/tunnels.conf
[SSH]
type = server
port = 22
host = 127.0.0.1
keys = ssh.dat
EOF
rcctl enable i2pd
rcctl start i2pd
You can edit the file /etc/i2pd/i2pd.conf to uncomment the line "notransit = true" if you don't want to relay. I would encourage people to contribute to the network by relaying packets but this would require some explanations about a nice tuning to limit the bandwidth correctly. If you disable transit, you won't participate into the network but I2P won't use any CPU and virtually no data if your tunnel is in use.
Visit http://localhost:7070/ for the admin interface and check the menu "I2P Tunnels", you should see a line "SSH => " with a long address ending by .i2p with :22 added to it. This is the address of your tunnel on I2P, we will need it (without the :22) to configure the client.
As usual, on NixOS we will only configure the /etc/nixos/configuration.nix file to declare the service and its configuration.
We will name the tunnel "ssh-solene" and use the destination seen on the administration interface on the OpenBSD server and expose that port to 127.0.0.1:2222 on our NixOS box.
Now you can use "nixos-rebuild switch" as root to apply changes.
Note that the equivalent NixOS configuration for any other OS would look like that for any I2P setup in the file "tunnel.conf" (on OpenBSD it would be in /etc/i2pd/tunnels.conf).
[ssh-solene]
type = client
address = 127.0.0.1 # optional, default is 127.0.0.1
port = 2222
destination = gajcbkoosoztqklad7kosh226tlt5wr2srr2tm4zbcadulxw2o5a.b32.i2p
From the NixOS client you should be able to run "ssh -p 2222 localhost" and get access to the OpenBSD ssh server.
Both systems have a http://localhost:7070/ interface because it's a default setting that is not bad (except if you have multiple people who can access the box).
I2P is a nice way to share services on a reliable and privacy friendly network, it may not be fast but shouldn't drop you when you need it. Because it can easily bypass NAT or dynamic IP it's perfectly fine for a remote system you need to access when you can use NAT or VPN.
Add the agate-service definition in your /etc/config.scm file, we will store the Gemini content in /srv/gemini/content and store the certificate and its private key in the upper directory.
If you have something like %desktop-services or %base-services, you need to wrap the services list a list using "list" function and add the %something-services to that list using the function "append" like this.
A while ago I published about Tor and Tor hidden services. As a quick reminder, hidden services are TCP ports exposed into the Tor network using a long .onion address and that doesn't go through an exit node (it never leaves the Tor network).
If you want to browse .onion websites, you should use Tor, but you may not want to use Tor for everything, so here are two solutions to use Tor for specific domains. Note that I use Tor but this method works for any Socks proxy (including ssh dynamic tunneling with ssh -D).
I assume you have tor running and listening on port 127.0.0.1:9050 ready to accept connections.
The easiest way is to use a web browser extension (I personally use Firefox) that will allow defining rules based on URL to choose a proxy (or no proxy). I found FoxyProxy to do the job, but there are certainly other extensions that propose the same features.
- add a proxy of type SOCKS5 on ip 127.0.0.1 and port 9050 (adapt if you have a non standard setup), enable "Send DNS through SOCKS5 proxy" and give it a name like "Tor"
- click on Save and edit patterns
- Replace "*" by "*.onion" and save
In Firefox, click on the extension icon and enable "Proxies by pattern and order" and visit a .onion URL, you should see the extension icon to display the proxy name. Done!
Privoxy is a fantastic tool that I forgot over the time, it's an HTTP proxy with built-in filtering to protect users privacy. Marcin Cieślak shared his setup using privoxy to dispatch between Tor or no proxy depending on the url.
The setup is quite easy, install privoxy and edit its main configuration file, on OpenBSD it's /etc/privoxy/config, and add the following line at the end of the file:
forward-socks4a .onion 127.0.0.1:9050 .
Enable the service and start/reload/restart it.
Configure your web browser to use the HTTP proxy 127.0.0.1:8080 for every protocol (on Firefox you need to check a box to also use the proxy for HTTPS and FTP) and you are done.
We have seen two ways to use a proxy depending on the location, this can be quite useful for Tor but also for some other use cases. I may write about privoxy in the future but it has many options and this will take time to dig that topic.
For those who used Guix or Nixos you may know that running a binary downloaded from the internet will fail, this is because most expected paths are different than the usual Linux distributions.
I wrote a simple utility to help fixing that, I called it "guix-linux-run", inspired by the "steam-run" command from NixOS (although it has no relation to Steam).
Clone the git repository and make the command linux-run executable, install packages gcc-objc++:lib and gtk+ (more may be required later).
Call "~/guix-linux-run/linux-run ./some_binary" and enjoy.
If you get an error message like "libfoobar" is not available, try to install it with the package manager and try again, this is simply because the binary is trying to use a library that is not available in your library path.
In the project I wrote a simple compatibility list from a few experiments, unfortunately it doesn't run everything and I still have to understand why, but it permitted me to play a few games from itch.io so it's a start.
In this how-to I will explain how to configure two Guix system to share packages from one to another. The idea is that most of the time packages are downloaded from ci.guix.gnu.org but sometimes you can compile local packages too, in both case you will certainly prefer computers from your network to get the same packages from a computer that already had them to save some bandwidth. This is quite easy to achieve in Guix.
We need at least two Guix systems, I'll name the one with the package "server" and the system that will install packages the "client".
Run "guix archive --generate-key" as root to create a public key and then reconfigure the system. Your system is now publishing packages on port 8080 and advertising it with mDNS (involving avahi).
Your port 8080 should be reachable now with a link to a public key.
In the previous example, we are using advertising on the server and discovery on the client, this may not be desired and won't work from a different network.
You can manually register a remote substitute server instead of using discovery by using "substitute-urls" like this:
I'm doing my best to avoid wasting bandwidth and resources in general, I really like this feature because this doesn't require much configuration or infrastructure and work in a sort of peer-to-peer.
Other projects like Debian prefer using a proxy that keep in cache the packages downloaded and act as a repository provider itself to proxyfi the service.
In case of doubts of the validity of the substitutions provided by an url, the challenge feature can be used to check if reproducible builds done locally match the packages provided by a source.
I added a new module for GearBSD, it allows to define the exact list of packages you want on the system and GearBSD will take care of removing extra packages and installing missing packages. This is a huge step for me to allow managing the system from code.
Note that this is an improvement over feeding pkg_add with a package list because this method doesn't remove extra packages.
Then, run "rex -h localhost show" to see what changes will be done like which packages will be removed and which packages will be installed.
Run "rex -h localhost configure" to apply the changes for real. I use "rex -h localhost" using a local ssh connection to root but you could run rex as root with doas with the same effect.
Installing missing packages was easy but removing extra packages was harder because you could delete packages that are still required as dependencies.
Basically, the module looks at the packages you manually installed (the one you directly installed with the pkg_add command), if they are not part of your list of packages you want to have installed, they are marked as automatically installed and then "pkg_delete -a" will remove them if they are not required by any other package.
This is a project I started yesterday but I've long think about it. I really want to be able to manage my OpenBSD system with a single configuration file. I currently wrote two modules that are independently configured, the issue is that it doesn't allow altering modules from one to another.
For example, if I create a module to install gnome3 and configure it correctly, this will require gnome3 and gnome3-packages but if you don't have them in your packages list, it will get deleted. GearBSD needs a single configuration file with all the information required by all packages, this will permit something like this:
I love NixOS and Guix for their easy system configuration and easy jumping from one machine to another by using your configuration file. To some extent, I want to make it possible to do so on OpenBSD with a collection of parametrized Rex modules, allowing to configure your system piece by piece from templates that you feed with variables.
Let me introduce you to GearBSD, my project to do so.
You need to clone https://tildegit.org/solene/gearbsd using git and you also need to install Rex with pkg_add p5-Rex.
Use cd to enter into a directory like openbsd/pf (the only one module at this time), edit the Rexfile to change the variables as you want and run "doas rex configure" to apply.
The PF module has a few variables, in TCPports and UDPports you can list ports or ports ranges that will be allowed, if no ports are in the list then the "pass" rules for that protocol won't be there.
If you want to enable nat on em0 for your wg0 interface, set "nat" to 1, "nat_from_interface" to "wg0" and "nat_to_interface" to "em0" and the code will take care of everything, even enabling the sysctl for port forwarding.
You need to install Rex on the management system, this can be done using cpan or your package manager, on OpenBSD you can use "pkg_add p5-Rex" to install it. You will get an executable script named "rex".
To make things easier, we will use ssh from the management machine (your own computer) and a remote server, using your ssh key to access the root account (escalation with sudo is possible but will complicate things).
Create a text file named "Rexfile" in a directory, this will contain all the instructions and tasks available.
We will write in it that we want the features up to the syntax version 1.4 (latest at this time, doesn't change often), the default user to connect to remote host will be root and our servers group has only one address.
use Rex -feature => ['1.4'];
user "root";
group servers => "myremoteserver.com";
Now, let's say we want to configure this munin cron by providing it a /etc/munin/munin.conf file that we have locally. This can be done by adding the following code:
file "/etc/munin/munin.conf",
source => "local_munin.conf",
owner => "root",
group => "wheel",
mode => 644,
on_change => sub {
say "munin.conf has been modified";
};
This will install the local file "local_munin.conf" into "/etc/munin/munin.conf" on the remote host, owned by root:wheel with a chmod 644.
Now you can try "rex -g servers install_munin_cron" to deploy.
A task can call multiples tasks for bigger deployments. In this one, we have a "synapse_deploy" task that will run synapse_install() and then synapse_configure() and synapse_service() and finally prepare_pf() to ensure the rules are correct.
As synapse will generate a working config file, there are no reason to push one from the local system.
desc "Deploy synapse";
task "synapse_deploy", sub {
synapse_install();
synapse_configure();
synapse_service();
prepare_pf();
};
desc "Install synapse";
task "synapse_install", sub {
pkg "synapse", ensure => "present";
run "Init synapse",
command => 'su -s /bin/sh _synapse -c "/usr/local/bin/python3 -m synapse.app.homeserver -c /var/synapse/
cwd => "/tmp/",
only_if => is_file("/var/synapse/homeserver.yaml");
};
desc "Configure synapse";
task "synapse_configure", sub {
file "/etc/nginx/sites-enabled/synapse.conf",
source => "nginx_synapse.conf",
owner => "root",
group => "wheel",
mode => "444",
on_change => sub {
service nginx => "reload";
};
};
desc "Service for synapse";
task "synapse_service", sub {
service synapse => "ensure", "started";
};
Rex offers many feature because the configuration is real Perl code, you can make loops, conditions and extend Rex by writing local modules.
Instead of pushing configuration file from an hard coded local one, I could write a template of the configuration file and then use Rex to generate the configuration file on the fly by giving it the needed variables.
Rex has many functions to directly alter text files like "append-if_no_such_line" to add a line if it doesn't exist or replace/add/update a line matching a regex (can be handy to uncomment some lines).
Rex is a fantastic tool if you want to programmaticaly configure a system, it can even be used for your local machine to allow reproducible configuration or for keeping track of all the changes in one place.
I really like it because it's simple to work with, it's Perl code doing real things, it's easy to hack on it (I contributed to some changes and the process was easy) and it only requires a working ssh toward a server (and Perl on the remote host). While Salt stack also works "agent less", it's painfully slow compared to Rex.
While this is pretty similar to the previous example, we will only match any file ending by ".gmi" to assign it a type markdown (I know it's not but the syntax is quite similar).
hook global BufCreate .*\.gmi %{
set buffer filetype markdown
}
Today I will explain how to easily setup your own OpenBSD dpb infra. dpb is a tool to manage port building and can use chroot to use a sane environment for building packages.
This is particularly useful when you want to test packages or build your own, it can parallelize package compilation in two way: multiples packages at once and multiples processes for one package.
You need a ports tree and a partition that you accept to mount with wxallowed,nosuid,dev options. I use /home/ for that. To simplify the setup, we will create a chroot in /home/build/ and put our ports tree in /home/build/usr/ports (then your /usr/ports can be a symlink).
Create a text file that will be used as a configuration file for proot
This will tell proot to create a chroot in /home/build and preconfigure some variables for /etc/mk.conf, use all sets listed in "sets" and clean everything when run (this is what actions=unpopulate is doing). Running proot is as easy as "proot -c proot_config".
Then, you should be able to run "dpb -B /home/build/ some/port" and it will work.
I wrote a script to clean locks from dpb, locks from ports system and pobj directories but also taking care of adding the mount options.
Options -p and -j will tell dpb how many cores can be used for parallel compilation, note that dpb is smart and if you tell it 3 ports in parallel and 3 threads in parallel, it won't use 3x3, it will compile three ports at a time and once it's stuck with only one port, it will add cores to its build to make it faster.
#!/bin/sh
CHROOT=/home/build/
CORES=3
rm -fr ${CHROOT}/usr/ports/logs/amd64/locks/*
rm -fr ${CHROOT}/tmp/locks/*
rm -fr ${CHROOT}/tmp/pobj/*
mount -o dev -u /home
mount -o nosuid -u /home
mount -o wxallowed -u /home
/usr/ports/infrastructure/bin/dpb -B $CHROOT -c -p $CORES -j $CORES $*
Then I use "doas ./my_dpb.sh sysutils/p5-Rex lang/guile" to run the build process.
It's important to use -c in dpb command line which will clear compilation logs of the packages but retains the log size, this will be used to estimate further builds progress by comparing current log size with previous logs sizes.
You can harvest your packages from /home/build/data/packages/ , I even use a symlink from /usr/ports/packages/ to the dpb packages directory because sometimes I use make in ports and sometimes I use dpb, this allow recompiling packages in both areas. I do the same for distfiles.
dpb can spread the compilation load over remote hosts (or even manage compilation for a different architecture), it's not complicated to setup but it's out of scope for the current guide. This requires setting up ssh keys and NFS shares, the difficulty is to think with the correct paths depending on chroot/not chroot and local / nfs.
I extremely recommend reading dpb man pages, it supports many options such as providing it a list of pkgpaths (package address such as editor/vim or www/nginx) or building ports in random order.
Here is a simply command to generate a list of pkgpaths of outdated packages on your system compared to the ports tree, the -q parameter is to make it a lot quicker but less accurate for shared libraries.
I use dpb when I want to update my packages from sources because the binary packages are not yet available or if I want to build a new package in a clean environment to check for missing dependencies, however I use a simple "make" when I work on a port.
Guix is a full open source Linux distribution approved by the FSF, meaning it's fully free. However, for many people this will mean the drivers requiring firmwares won't work and their usual software won't be present (like Firefox isn't considered free because of trademark issue).
A group of people is keeping a parallel repository for Guix to add some not-100% free stuff like kernel with firmware loading capability or packages such as Firefox, this can be added to any Guix installation quite easily.
Most of the code and instructions you will find here come from the nonguix README, you need to add the new channel to download the packages or the definitions to build them if they are not available as binary packages (called substitutions) yet.
Create a new file /etc/guix/channels.scm with this content:
And then run "guix pull" to get the new repository, you have to restart "guix-daemon" using the command "herd restart guix-daemon" to make it accounted.
If you use this repository you certainly want to have the kernel provided that allow loading firmwares and the firmwares, so edit your /etc/config.scm
(use-modules (nongnu packages linux)
(nongnu system linux-initrd))
(operating-system ;; you should already have this line
(kernel linux)
(initrd microcode-initrd)
(firmware (list linux-firmware))
#...
Then you use "guix system reconfigure /etc/config.scm" to rebuild the system with the new kernel, you will certainly have to rebuild the kernel but it's not that long. Once it's done, reboot and enjoy.
You should also have packages available now. You can enable the channel for your user only by modifying ~/.config/guix/channels.scm instead of the system wide /etc/channels.scm file. Note that you may have to build the packages you want because the repository doesn't build all the derivations but only a few packages (like firefox, keepassxc and a few others).
Note that Guix provide flatpak in its official repository, this is a workaround for many packages like "desktop app" for instant messaging or even Firefox, but it doesn't integrates well with the system.
The nonguix repository is a nice illustration that it's possible to contribute to a project without forking it entirely when you don't fully agree with the ideas of the project. It integrates well with Guix while being totally separated from it, as a side project.
If you have any issues related to this repository, you should seek help from the nonguix project and not Guix because they are not affiliated.
Today I had to setup a Wireguard tunnel on my Guix computer (my email server is only reachable from Wireguard) and I struggled a bit to understand from the official documentation how to put the pieces together.
In Guix (the operating system, and not the foreign Guix on an existing distribution) you certainly have a /etc/config.scm file that defines your system. You will have to add the Wireguard configuration in it after generating a private/public keys for your Wireguard.
In order to generate Wireguard keys, install the package Wireguard with "guix install wireguard".
# umask 077 # this is so to make files only readable by root
# install -d -o root -g root -m 700 /etc/wireguard
# wg genkey > /etc/wireguard/private.key
# wg pubkey < /etc/wireguard/private.key > /etc/wireguard/public
Edit your /etc/config.scm file, in your "(services)" definition, you will define your VPN service. In this example, my Wireguard server is hosted at 192.168.10.120 on port 4433, my system has the IP address 192.168.5.1, I also defines my public key but my private key is automatically picked up from /etc/wireguard/private.key
If you have the default "(services %desktop-services)" you need to use "(append " to merge %desktop-services and new services all defined in a "(list ... )" definition.
The "allowed-ips" field is important, Guix will automatically make routes to these networks through the Wireguard interface, if you want to route everything then use "0.0.0.0/0" (you will require a NAT on the other side) and Guix will make the required work to pass all your traffic through the VPN.
At the top of the config.scm file, you must add "vpn" in the services modules, like this:
# I added vpn to the list
(use-service-modules vpn desktop networking ssh xorg)
Once you made the changes, you can use "guix system reconfigure" to make the changes, if you do multiples reconfigure it seems Wireguard doesn't reload correctly, you may have to use "herd restart wireguard-wg0" to properly get the new settings (seems a bug?).
As usual, setting Wireguard is easy but the functional way make it a bit different. It took me some time to figure out where I had to define the Wireguard service in the configuration file.
Backups are important, lot of our life is now related to digital data and it's important to take care of them because computers are unreliable, can be stolen and mistakes happen. I really like two programs which are restic and borg, they have nearly the same features but it's hard to decide between both, this is an attempt to understand the differences for my use case.
Restic is a backup software written in Go with a "push" workflow, it supports data deduplication within a repository and multiple systems using the same repository and also encryption.
Restic can backup to a remote sftp server but also many network services storage like S3/Minio and even more when using with the program rclone (which can turn any supported backend into a compatible restic backend). Restic seems compatible with Windows (I didn't try).
Borg is a backup software written in Python with a "push" workflow, it supports encryption, data deduplication within a repository and compression. You can backup to a remote server using ssh but the remote server requires borg to be installed.
It's a very good and reliable backup software. It has a companion app named "borgmatic" to automate the backup process and snapshots managements (daily/hourly/monthly ... and integrity checking).
*BSD specific note: borg can honor the "nodump" flag in the filesystem to skip saving those files.
I've been making a backup of my /home/ partition (minus some directories that has been excluded in both cases) using borg and restic. I always performed the restic backup and then the borg backup, measuring bandwidth for each and execution time for each.
There are five steps: init for the first backup of lot of data, little changes twice, which is basically opening firefox, browsing a few pages, closing it, refreshing my emails in claws-mail (this changes a lot of small files) and use the computer for an hour. There is a massive change as fourth step, I found a few game installers that I unzipped, producing lot of small files instead of one big file and finally, 24h of normal use between the fourth and last step which is a good representation of a daily backup.
Borg was a lot slower than restic but in my experiment the remote ssh server is a dual core atom system, borg is using a process on the other end to manage the data, so maybe that CPU was slowing the backup process. Nevertheless, in my real use case, borg is effectively slower.
Most of the time, borg was more bandwidth effective than restic: it saved 15% of bandwidth for the first backup and 18% after some big changes, but in some cases it used a bit more bandwidth. I have no explanation for this, I guess it depends how file chunks are calculated, if a big database file is changing then one may be able to save only the difference and not the whole file. Borg is also compressing the data (using lz4 by default), this may explain the bandwidth saving that doesn't work for binary data.
The local cache (typically in /root/.cache/) was a lot bigger for restic than for borg, and was increasing slightly at each new backup while borg cache never changed much.
Finally, the whole repo size holding all the snapshots has a different size for restic and borg, respectively 65 GB and 56 GB, which makes a 14% difference between each which may due to the compression done by borg.
I tested Restic and Borg because they are both good software using the "push" workflow (local computer sends the data) making full snapshots of every backup, but there are many other backup solution available.
- duplicity: fully scriptable, works over many remote protocols but requires a full snapshot and then incremental snapshots to work, when you need to make a new full snapshot it will take a lot of space which is not always convenient. Supports GPG encrypted backup stored over FTP, this is useful for some dedicated server offering 100GB of free FTP.
- burp: not very well known, the setup uses TLS certificates for encryption, requires a burp server and a burp client
- rsnapshot: based on rsync, automate the rotation of backups, use hard links to avoid data duplication for files that didn't change between two backups, it pulls data from servers from a central backup system.
- backuppc: a perl app that will pull data from servers to its repository, not really easy to use
- bacula: enterprise grade solution that I never got to work because it's really complicated but can support many things, even saving on tapes
In this benchmark, borg is clearly slower but was the most storage and bandwidth efficient. On the other hand, restic is easier to deploy (static binary) and supports a simple sftp server while borg requires borg installed on both sides.
A biggest difference between restic and borg, is that restic supports multiples systems backup in the same repository, allowing a massive data deduplication gain across machines, while a borg repository is for single system (it could work with multiples systems but they should not backup at the same time and they would have to rebuild the local cache every time which is slow).
I'll stick with borg because the backup time isn't a real issue given it's not dramatically slower than restic and that I really enjoy using borgmatic to automatically manage the backups.
For doing backups to a remote server over the Internet, the bandwidth efficiency would be my main concern of all the differences, borg seems a clear winner here.
Today I will share my simple wireguard setup using NixOS as a wireguard server. The official documentation is actually very good but it didn't really fit for my use case. I have a server with multiples services but some of them need to be only reachable through wireguard, but I don't want to open all ports to wireguard either.
As a quick introduction to Wireguard, it's an UDP based VPN protocol with the specificity that it's stateless, meaning it doesn't huge any bandwidth when not in use and doesn't rely on your IP either. If you switch from an IP to another to connect to the other wireguard peer, it will be seamless in regards to wireguard.
The setup is actually easy if you use the program "wireguard" to generate the keys. You can use "nix-shell -p wireguard" to run the following commands:
umask 077 # this is so to make files only readable by root
wg genkey > /root/wg-private
wg pubkey < /root/wg-private > /root/wg-public
Congratulations, you generated a wireguard private key in /root/wg-private and a wireguard public key in /root/wg-public, as usual, you can share the public key with other peers but the private key must be kept secret on this machine.
Now, edit your /etc/nixos/configuration.nix file, we will create a network 192.168.100.0/24 in which the wireguard server will be 192.168.100.1 and a laptop peer will be 192.168.100.2, the wireguard UDP port chosen is 5553.
Now, you will also want to enable your firewall and make the UDP port 5553 opened on your ethernet device (eth0 here). On the wireguard tunnel, we will only allow TCP port 993.
Specifically defining the firewall rules for eth0 are not useful if you want to allow the same ports on wireguard (+ some other ports specifics to wg0) or if you want to set the wg0 interface entirely trusted (no firewall applied).
I obviously stripped down my real world use case but if for some reasons you want a wireguard tunnel stricter than what's available on the public network interfaces rules, this is how you do.
If for some reasons you want to turn you display in black and white mode and you can't control this on your display (typically a laptop display won't allow you to change this), there are solutions.
The best way I found is to use a compositor, fortunately I'm already using "picom" as a compositor along with fvwm2 because I found the windows are getting drawn faster when I switch between desktop with the compositor on. You will want to run the compositor in your ~/.xsession file before running your window manager.
The idea is to run picom with a shader that will turn the color into a gray scale, restart picom with no parameter if you want to get colors back.
picom -b --backend glx --glx-fshader-win "uniform sampler2D tex; uniform float opacity; void main() { vec4 c = texture2D(tex, gl_TexCoord[0].xy); float y = dot(c.rgb, vec3(0.2126, 0.7152, 0.0722)); gl_FragColor = opacity*vec4(y, y, y, c.a); }"
It was surprisingly complicated to find how to do that. I stumbled on "toggle-monitor-grayscale" project on github which is a long script to automate this depending on your graphic card, I only took the part I needed for picom.
I have no idea why someone would like to turn the screen in black and white, but I've been curious to see how it would look like and if it would be nicer for the eyes, it's an interesting experience I have to admit but I prefer to keep my colors.
I decided to have a blog when I started to gather personal notes when playing with FreeBSD, while I wanted my notes to be easy to read and understand I also chose to publish them online so I could read them even at work.
The earlier articles were more about how to do X Y, they were reminders for myself that I was sharing with the world, I never intended to have readers at that time. I enjoyed writing and sharing, I had a few friends who were happy to subscribe to the RSS feed and they were proof-reading after my publications.
Over time, I wanted to make it a place to speak about unusual topic like StumpWM, Common LISP, Guix and weird Unix tricks. It made me very happy because I got feedback from more people over time so I kept doing this.
At some point, I got a lot more involved in the OpenBSD community and I think most of my audience is related to OpenBSD now. I want to share what you can do with OpenBSD, how it would be different than with another system, steps-by-steps guides. I hope it helped some people to jump to OpenBSD and they enjoy it as well now. At the same time, I try to be as honest as possible when I publish about something, this blog is making absolutely no money, there are no ads, I would have absolutely nothing to gain not being honest in my articles. I value precision and accuracy, I try to link to official documentation most of the time instead of doing a copy/paste that will become obsolete over time.
Speaking of obsolescence, I usually re-read all my texts (and it takes a long time) once a year, to check if everything seems still correct. I could see packages that not longer exist, configuration syntax that may have changed or just a software version that is really old, this takes a lot of time because I value all my publications and not only the most recent one.
I write because I have fun writing and I'm happy to make my readers happy. I often get some emails from people I don't know giving me their thoughts about an article, I'm always surprised but very happy when this happen and I always reply to those persons.
I have no schedule when I write, sometimes I plan texts but I can't get them right so I delete them. Sometimes months can pass between two publications, I do not really care, I'm not targeting any publication rate, that would be against the fun.
This may sound odd, but I wanted to write this text mainly to encourage other people to write and publish their own blog. Why not you? On the technical side, there are many free hosting available in the opensource community and you have plenty of awesome static website generators available nowadays.
If you want to start the adventure, just write and publish. Propose a way to contact you, I think it's important for readers to be able to reach you, they are very nice (at least I never had any issue): they could report mistakes or give you links to things you may enjoy on the same topic as your publication.
Don't think of money, styling, hit rate, visit numbers, it doesn't matter. The true gems on the Internet are those old fashions websites of early 2000 with many ugly jpg, wrong colors but with insane content about unusual and highly specific topics. I have in mind the example of a website about a French movie, the author had found every spot in France where the movie has been filmed, he has contacted every cast in the movie even the most insignificant ones to ask about stories and gathered many pictures and stories about the making of the film. None of this would ever happen in a web driven by money and ranking and visitors.
I am a true adept of the "KISS" philosophy, in which KISS stands for Keep It Simple Stupid, meaning make your software easy to understand and not try to make it smart. It works most of the time but after you reach your goal with your software, you may be tempted to add features over it, or make it faster, or make it smarter, it usually doesn't work.
In the opensource world, we have many bricks of software that we can put together to build better tools, but at some point, you may use too many of them and the service is unbearable in regards to maintenance / operating, the current trend is to automate this by providing those huge stacks of software through docker. It may be good enough for users, it does certainly the job and it works, why should we worry?
When you use a complicated software, ALWAYS make sure you have a way out: either replace product A with product B or make sure the code is easy to fix. If you plan to invest yourself into deploying a complex program that will store data (like Nextcloud or Paperless-ng), the first question you should have is: how can I move away from it?
Why would you move away from something you are deploying right now because it's good? Software can be unmaintained after some time and you certainly don't want to run a network based obsolete program, due to dependency hell it may not work in the future because it relies on some component that is not available anymore (think python2 here), you may have bugs after a long use that nobody want to fix and prevent you to use the software correctly (scalability issue due to data growth).
There are tons of reasons that something can fail, so it's always important to think about replacements.
- are the data stored in a way you can extract? data could be saved as a plain file on the file system but could also be stored in some complicated repositories format (ipfs)
- if data are encrypted, can you decrypt it? If it's GPG based, you can always work with it, but if it's custom made chunk encryption like Seafile does, it's a lot harder without the real program.
- if the software is packaged for your system, it may not be forever, you may have to package it yourself in a few years if you want to keep it up to date
- if you rely on external API, it may be not able indefinitely. Web browser extensions are a good example, those programs have tightened what extensions could do over time and many tricks had to be used to migrate from API to API. When you rely on a extension, it's a real issue when the extension can't work anymore.
There are many situations in which you may prefer to build your own service with your own code than using a software ready on the shelf. There are always pros and cons, you gain control and reliability over features and ease of use. Not everyone is able to write such scripts and you may fail and have to deal with the consequences when you do so, this is something that must be kept in mind.
- backups: you could use rsync instead of a complex backup system
- "cloud" file storage: rsync/sftp are still a viable option to upload a file "to the cloud" if you have a server, a simple https server would be enough to share the file, the checksum of the file could be used as an unique and very long file name.
- automation: a shell script executed over ssh could replace ansible or salt-stack to some extent
There are many use case in which the administrator may prefer a home-made solution, but in a company context, you may have to rely on that very person instead of relying on a complex software, which moves the problem to another level.
There are many reasons a software could fail, be abandoned, not work anymore, you should always assess such situations if you don't want to build a fragile service. Easiest ideas have less features but are a lot more reliable and resistant to time than complex implementations. The more code you involve, the more issues you will have.
We are free to use what we want, in open source we are even free to make changes to the code we use, this is fantastic. Choice always come with pros and cons and it's always better to think before hand than facing unwise consequences.
Now that git-annex is available as a package on OpenBSD I can use it again. I've been relying on it a few years ago but it was really complicated for me to compile it and I gave up. Since I really missed it, I'm now back to it and I think it's time to share about this wonderful piece of software.
git-annex is meant to help you manage your data like you would manage books in a library, you have a database telling you where the books are and you can find them on the shelves, or at least you can know who borrowed the book. We are working with digital files that can be copied here so the analogy doesn't fully work, but you could want to put your data in an external hard drive but not everything, and you may want to have some data on multiples devices for safety reasons, git-annex automates this.
It works very well for files that are not changing much, I call them "static files", they are music, videos, pictures, documents. You don't really want to use git-annex with files you edit everyday, it doesn't work well because the process can be a bit tedious.
git-annex may not be easy to understand at first, I suggest you try locally to grasp its purpose.
Let's create a cheat sheet first. Most git-annex commands have a dedicated man page, but can also provide a simpler help by using "git annex help somecommand".
When you want to register a file in git annex, you need to use "git annex add" to add it and then "git commit" to make it permanent. The files are not stored in the git repository, it will only contains metadata.
git annex add Something
git commit -m "I added something"
Example:
$ echo "hello there" > hello
$ ls -l hello
-rw-r--r-- 1 solene wheel 12 May 12 18:38 hello
$ git annex add hello
add hello
ok
(recording state in git...)
$ ls -l hello
lrwxr-xr-x 1 solene wheel 180 May 12 18:38 hello -> .git/annex/objects/qj/g5/SHA256E-s12--aadc1955c030f723e9d89ed9d486b4eef5b0d1c6945be0dd6b7b340d42928ec9/SHA256E-s12--aadc1955c030f723e9d89ed9d486b4eef5b0d1c6945be0dd6b7b340d42928ec9
$ git status hello
On branch master
Changes to be committed:
(use "git restore --staged <file>..." to unstage)
new file: hello
If you want to make changes to a file, you first need to "unlock" it in git-annex, which mean the symbolic link is replaced by the file itself and is no longer in read-only. Then, after your changes, you need to add it again to git-annex and commit your changes.
git annex unlock file
vi file
git annex add file
git commit -m "I changed something" file
If you want to store data (for duplication) on a remote server using ssh you can use a remote of type "rsync" and encrypt the data in many fashions (GPG with hybrid is the best). This will allow to store data on remote untrusted devices.
2.5. Manage data from multiple computers (with ssh) §
**This is a way to have a central git repository for many computers, this is not the best way to store data on remote servers**.
If you want to use a remote server through ssh, there are two ways: mounting the remote file system using sshfs or use a plain ssh. If you use sshfs, then it falls as a standard local file system like an external usb drive, but if you go through ssh, it's different.
You need to have a key authentication based for the remote ssh and you also need git-annex on the remote server. It's important to have a bare git repo.
cd /home/data/
git init --bare
git annex init "remote-server"
You can use the "git annex list" command to list where your files are physically stored.
In the following example you can see which files are on my computer and which are available on my remote server called "network", "web" and "bittorrent" are special remotes.
here
|network
||web
|||bittorrent
||||
X___ Documentation/Nim/Dominik Picheta - Nim in Action-Manning Publications (2017).pdf
X___ Documentation/ada/Ada-Distilled-24-January-2011-Ada-2005-Version.pdf
X___ Documentation/ada/courseada1.pdf
X___ Documentation/ada/courseada2.pdf
X___ Documentation/ada/courseada3.pdf
X___ Documentation/scheme/artanis.pdf
X___ Documentation/scheme/guix.pdf
X___ Documentation/scheme/manual_guix.pdf
X___ Documentation/skribilo/skribilo.pdf
X___ Documentation/uck2ep1.pdf
X___ Documentation/uck2ep2.pdf
X___ Documentation/usingckermit3e.pdf
XX__ Musique/Daft Punk/01 - Albums/1997 - Homework/01 - Daftendirekt.flac
XX__ Musique/Daft Punk/01 - Albums/1997 - Homework/02 - Wdpk 83.7 fm.flac
XX__ Musique/Daft Punk/01 - Albums/1997 - Homework/03 - Revolution 909.flac
XX__ Musique/Daft Punk/01 - Albums/1997 - Homework/04 - Da Funk.flac
XX__ Musique/Daft Punk/01 - Albums/1997 - Homework/05 - Phoenix.flac
_X__ Musique/Alan Walker/Alan Walker - Different World/01 - Alan Walker - Intro.flac
_X__ Musique/Alan Walker/Alan Walker - Different World/02 - Alan Walker, Sorana - Lost Control.flac
_X__ Musique/Alan Walker/Alan Walker - Different World/03 - Alan Walker, Julie Bergan - I Don_t Wanna Go.flac
If you want to list the files for which you have the content available locally, you can use the "list" command from git-annex but only restrict to the group "here" representing your local repository.
If you want to move files from a repository to another (removing the content from origin) you can use "git annex move" which will copy to destination and remove from origin.
If you don't want to have the file locally because you don't have disk space or you simply don't want it, you can use the "drop" command. Note that "drop" is safe because git-annex won't allow you to drop files that have only one copy (except if you use --force of course).
git annex drop Music/Queen
Real life example: I have a very huge music library but my laptop SSD is too small, I get get some music I want and drop the files I don't want to listen for a while.
3.7. Use mincopies to enforce multi repository data duplication §
The numcopies and mincopies variables can be used to tell git-annex you want exactly or at least "n" copies of the files, so it will be able to protect you from accidental deletions and also help uploading files to other repositories to match the requirements.
3.7.2. Only upload files not matching the num copies §
If you have multiples repositories and some files doesn't match the copies requirements, you can use the following commands to only push the files missing copies.
git annex copy --auto -t remote-server
Real life example: I want my salaries PDF to be really safe, I can ask to have 2 copies of those and then run a sync to the remote server which will proceed to upload them if there is only one copy of the file yet.
There is the git-annex fsck command which will check the integrity of every file in the local repository and reports you if they are sane (or not), but it will also tell you which file doesn't meet the mincopies requirements.
If for some reasons you want to give up git-annex, you can easily get all your files back like a normal file system by using "git annex unlock ." on the top directory of your repository, every local files will be replaced by their physical copy instead of the symlink. Reversibility is very important when you deal with your data because it means you are not stuck forever with a tool in case it's broken or if you want to switch to another process.
I have a ~/DATA/ directory in which I have sub directories {documents,documentation,pictures,videos,music,images}, documents are papers or legal papers, documentation are mostly PDF. Pictures are family pictures and images are wallpapers or stupid images I want to keep.
I've set a mincopies to 2 for documents and pictures and my music is not on my computer but on a remote, I get the music files I want to listen when I'm on the local network with the computer having the files, I drop them locally when I'm bored.
git-annex separates content from indexation, it can be used in many ways but it implies an archivist philosophy: redundancy, safety, immutability (sort of). It is not meant for backup, you can backup your directory managed by git-annex, it will save the data you have locally, you will have to make backup of your other data as well.
I love that tool, it's a very nice piece of software. It's unique, I didn't find any other program to achieve this.
Passwords are a mess, we need many of them every day but they are not practical. I do highly recommend to use an unique random password for every password needed. I switched to "keepassxc" to manage my passwords, there are many password managers on the market.
When I need to register a password, I use the longest possible allowed and I keep in my password database.
If I got hacked with my password database, all my passwords are leaked, but if I didn't use it and had only one password, good chance it would be registered somewhere and then the hacker would have access to everything too. The best situation would be to have a really effective memory but I don't want to rely on it.
I still recommend to have a few passwords in your memory, like the one for your backups, your user session and the one to unlock the password database.
When possible, use multi factor authentication. I like the TOTP (Timed One Time Password) method because it works without any third party service and can be stored securely in a backup.
It's important to define a level of trust in the devices you use. I do not trust my Windows gaming computer, I would not let it have access to my password database. I do not trust my phone device enough for that job too.
If my phone requires a password, I generate one and keep it in my password database and I will create a QR code to scan with the phone instead of copying that very long password. The phone will have the password locally but not the entire database but yet it remains quite usable.
When you think about security, you need to think what kind of security you want, sometimes this will also imply thinking about privacy.
Let's think about my home file server, it's a small device which only one disk and doesn't have access to the internet. It could be hacked from a remote person, this is possible but very unlikely. On the other hand, a thief could come into my house a steal a few things, like this server and its data. It makes a lot of sense to use disk encryption for devices that could be stolen (let make it short, I mean all devices).
On the other hand, if I had to manage a mail server with IMAP / SMTP services on it, I would harden it a lot from external attacks and I would have to make some extra security policies for it.
Most of the time, security and usability doesn't play together, if you increase security that will be at the expense of usability and vice-versa. I'll go back to my IMAP server, I could enable and enforce connecting over TLS for my users, that would prevent their connections to be eavesdropped. I could also enforce a VPN (that I manage myself, not a commercial VPN that can see all my traffic..) to connect to the IMAP server, that would prevent anyone without a VPN to connect to the server. I could also restrict that VPN connection from a list of public IP. I could require the VPN access from an allowed IP to be unlocked by an SSH connection requiring TOTP + password + public key to succeed.
At this point, I'm pretty sure my users will give up and put an automatic redirection of their emails to an other mail server which will be usable to them, I'd be defeated by my users because of too much security.
When you come to encrypt everything or lock everything on the network, it could be complicated to avoid data loss or being locked out from the service.
If you have important passwords, you could use Shamir's Secret Sharing (I wrote about it a while back) to split a password in multiples pieces that you would convert as QR code and give a copy to a few person you know, to help you recover the data if you forget about the password once.
It's important to make backups, but it's even more important to encrypt them and have them out in a different area of your storage. My practice here is to daily backup all my computer data (which is quite huge) but also backup only my most important data to remote servers. I can afford losing my music files but I'd prefer to be able to recover my GPG and SSH keys in case of huge disaster at home.
If a hacker got control of your user, it may be over for you. It's important to only run programs you trust and no network related services.
If you need to run something you are unsure, use a virtual machine or at least a dedicated user that won't have access to your user's data. My $HOMEDIR has a chmod 700 so only root and me can access it. If I need to run a service, I will use a dedicated user to it. It's not always convenient but it's effective.
Good software with a good design are important for the security, but they don't do all the job when it comes to security. Users must be aware of risks and act accordingly.
We will create a qcow2 disk, this format allows not using all the reserved space upon creation, size will grow as the virtual disk will be filled with data.
We need to create a bridge in which I will add my computer network interface "em0" to it. Virtual machines will be attached to this bridge and will be seen from the network.
echo "add em0" > /etc/hostname.bridge0
sh /etc/netstart bridge0
When you are ready to start the VM, type "vmctl start -c nixos", you will get automatically attached to the serial console, be sure to read the whole chapter because you will have a time frame of approximately 10 seconds before it boots automatically (if you don't type anything).
If you see the grub display with letters displayed more than once, this is perfectly fine. We have to tell the kernel to enable the console output and the desired speed.
On the first grub choice, press "tab" and append this text to the command line: "console=ttyS0,115200" (without the quotes). Press Enter to validate and boot, you should see the boot sequence.
For me it took a long time on starting sshd, keep waiting, that will continue after less than a few minutes.
The installation process can be summarized with theses instructions:
sudo -i
parted /dev/vda -- mklabel msdos
parted /dev/vda -- mkpart primary 1MiB -1GiB # use every space for root except 1 GB for swap
parted /dev/vda -- mkpart primary linux-swap -1GiB 100%
mkfs.xfs -L nixos /dev/vda1
mkswap -L swap /dev/vda2
mount /dev/disk/by-label/nixos /mnt
swapon /dev/vda2
nixos-generate-config --root /mnt
nano /mnt/etc/nixos/configuration.nix
nixos-install
shutdown now
Here is my configuration.nix file on my VM guest, it's the most basic I could want and I stripped all the comments from the base example generated before install.
{ config, pkgs, ... }:
{
imports =
[ # Include the results of the hardware scan.
./hardware-configuration.nix
];
boot.loader.grub.enable = true;
boot.loader.grub.version = 2;
boot.loader.grub.extraConfig = ''
serial --unit=0 --speed=115200 --word=8 --parity=no --stop=1
terminal_input --append serial
terminal_output --append serial
'';
networking.hostName = "my-little-vm";
networking.useDHCP = false;
# COMMENT THIS LINE IF YOU DON'T WANT DHCP
# networking.interfaces.enp0s2.useDHCP = true;
# BEGIN ADDITION
# all of these variables were added or uncommented
boot.loader.grub.device = "/dev/vda";
# required for serial console to work!
boot.kernelParams = [
"console=ttyS0,115200n8"
];
systemd.services."serial-getty@ttyS0" = {
enable = true;
wantedBy = [ "getty.target" ]; # to start at boot
serviceConfig.Restart = "always"; # restart when session is closed
};
# use what you want
time.timeZone = "Europe/Paris";
# BEGIN NETWORK
# define network here
networking.interfaces.enp0s2.ipv4.addresses = [ {
address = "192.168.1.151";
prefixLength = 24;
} ];
networking.defaultGateway = "192.168.1.254";
networking.nameservers = [ "192.168.1.254" ];
# END NETWORK
# enable SSH and allow X11 Forwarding to work
services.openssh.enable = true;
services.openssh.forwardX11 = true;
# Declare a user that can use sudo
users.users.solene = {
isNormalUser = true;
extraGroups = [ "wheel" ];
};
# declare the list of packages you want installed globally
environment.systemPackages = with pkgs; [
wget vim
];
# firewall configuration, only allow inbound TCP 22
networking.firewall.allowedTCPPorts = [ 22 ];
networking.firewall.enable = true;
# END ADDITION
# DONT TOUCH THIS EVER EVEN WHEN UPGRADING
system.stateVersion = "20.09"; # Did you read the comment?
}
Edit /etc/vm.conf to comment the cdrom line and reload vmd service. If you want the virtual machine to automatically start with vmd, you can remove the "disable" keyword.
Once your virtual machine is started again with "vmctl start nixos", you should be able to connect to ssh to it. If you forgot to add users, you will have to access the VM console with "vmctl console", log as root, modify the configuration file, type "nixos-rebuild switch" to apply changes, and then "passwd user" to define the user password. You can set a public key when declaring a user if you prefer (I recommend).
There are three ways to install packages on NixOS: globally, per-user or for a single run.
- globally: edit /etc/nixos/configuration.nix and add your packages names to the variable "environment.systemPackages" and then rebuild the system
- per-user: type "nix-env -i nixos.firefox" to install Firefox for that user
- for single run: type "nix-shell -p firefox" to create a shell with Firefox available in it
Note that the single run doesn't mean the package will disappear, it's most likely... not "hooked" into your PATH so you can't use it. This is mostly useful when you make development and you need specific libraries to build a project and you don't always want them available for your user.
While I never used a Linux system as a guest in OpenBSD it may be useful to run Linux specific software occasionally. With X forwarding, you can run Linux GUI programs that you couldn't run on OpenBSD, even if it's not really smooth it may be enough for some situations.
I chose NixOS because it's a Linux distribution I like and it's quite easy to use in the regards it has only one configuration file to manage the whole system.
As root, run "pkg_add gnome gnome-extras" which will install the meta-package gnome listing all the required dependencies to have a full working Gnome installation and the -extras package containing all gnome related programs.
You should see this output after "pkg_add" has finished installing the packages, it's important to read the "pkg-readme" files which are specific instructions to packages.
New and changed readme(s):
/usr/local/share/doc/pkg-readmes/gnome
/usr/local/share/doc/pkg-readmes/upower
The most important file is the pkg-readme about Gnome that contains clear instructions about the configuration required to run Gnome. That file has a "Too long didn't read" section at the end for people in a hurry which contain instructions to copy/paste.
There is an "app" named Tweaks that allow further customization than Gnome3 is allowing, like virtual desktop being horizontal, add menus on the top panel or change various behavior of Gnome.
In this article I will introduce you to various opensource file synchronization programs and their according workflows. I may not know them all, obviously.
I can't give a full explanation of each of them, but I will tell you enough so you can know if it could be of any interest to you.
rsync is the leader for simple file replication, it can take care that the destination will exactly match the source data. It's available mostly everywhere and using ssh as a transport it's also secure.
rsync is really the reference for a one-way synchronization.
lsyncd is meant to be used in an environment for near to realtime synchronization. It will check for changes in the monitored directories and will replicate the changes on a remote system (using rsync by default).
unison is like rsync but can synchronize in both way, meaning you can keep two directories synchronized without having to think in which order you need to transfer. Obviously, in case of conflict you will have to resolve and pick which file you want to keep. This is a well established software that is very reliable.
rclone is like rsync but will support many backend instead of relying on ssh to connect to a remote source. It's mostly used to transfer files from or to Cloud services by making a glue between core rclone and the service API.
I covered rclone in a previous article if you want more information.
syncthing is a fantastic tool to keep directories synchronized between computers/phones. It's a service you run, you define what directories you want to export, and on other syncthing instances you can add those exports and it will be kept synchronized together without tuning. It uses a public tracker to find peers so you don't have to mess with NAT or redirections, and if you want full privacy you can use direct IPs. Data are encrypted during transfers.
It has the advantages of working in full automatic mode and can exchange in both ways in a same directory, with multiples instance on a same share, it can also keep previous copies of deleted / replaced files and support many other features.
SparkleShare isn't well known but still does the job very efficiently. It offers automatic synchronization of a directory with other peers based on a git directory, basically, if you add a file or make a change, it's committed and pushed to the remote repositories. If someone make a change, you will receive it too.
While it works very well, it's mostly suited for non binary data because of the git backend. You can't really delete old data so the sparkleshare share will grow over time.
Nextcloud has a file synchronization capability, it's mostly used to upload your data to a remote server and be able to access it from remote, but also share a file or a directory in read only or read/write to other people. It's really a huge toolbox that requires a 24/7 server but provide many features for sharing files. A not so well known feature is the ability to share a directory between Nextcloud instances.
Nextcloud has its core in PHP for the www access but also phone or desktop applications.
Seafile is a centralized server to store data, like netxtcloud. It's more focused on file storage than nextcloud, but will provide solid features and also companions apps for phones and desktop.
I kept the best for the end. Git-annex is a special beast that would have deserved a full article for it but I never found how to approach it.
git-annex is a command line tool to manage a library of data and will delegate actual transfer to the according protocol.
WHAT DOES IT MEAN? Let's try an analogy.
You are in a house, you have many things in your house: movies, music, books, papers. If you want to keep track of where is stored something, you need an inventory, in which you will label where you stored this paper, this DVD, this book etc... This is what git-annex is doing.
git-annex will allow you to entirely manage data and spread it on different location (with redundancy possible) and let you access natively (or at least tell you where to get it). A real life example would be to use an external hard drive to store big files like music or movies but use a remote server to backup important documents. But you may want your documents to also be on the external hard drive, or even two hard drives, you can tell git-annex to manage that.
git-annex can give you the current state of your library without having the files locally, it will replace the whole hierarchy with symlinks to the real files if they are on your computer, meaning you can get the files when you need them or simply work on that index to remove files and then tell git-annex to proceed to deletion if possible (or when it can, like when you get internet access or you connect that external hard drive).
The draw back is that all the tracked files are symbolic links to a potentially non existing file and that you need a specific workflow of unlocking file in order to make changes, and then store it again.
I've been using it for years for data that doesn't change much (administrative documents, music, pictures) but it's certainly not suitable for tracking logs or often modified files.
The name contains "git" but git-annex only use gits to store the whole metadata, the data themselves are not in git.
There are different strategies to synchronize files between computers, they can be one way, both way, allow other people to use them, manage at huge scale, realtime etc...
From my experience, we all manage our files in very different ways so I'm glad we have that many ways to synchronize them.
PS: don't forget to backup, it's not because you replicate your data that you don't need backup, sometimes it's easy to destroy all the data at once with a simple mistake.
This is a guide to OpenBSD beginners, I hope this will turn to be an useful resource helping people to get acquainted to this operating system I love. I will use a lot of links because I prefer to refer to official documentation.
If you are new on OpenBSD, welcome aboard, this guide is for you. If you are not new, well, you may learn a few things.
So, you installed OpenBSD, you chose to enable X (the graphical interface at boot) and now you face a terminal on a gray background. Things are getting interesting here.
When you install the system (or upgrade) you will receive an email on root user, you can read it using the "mail" command, it will be an email from Theo De Raadt (founder of OpenBSD) greeting you.
You will notice this email contain hints and has basically the same purpose of my current article you are reading. One important man page to read is afterboot(8).
If you don't know what a man page is, it's really time to learn because you will need it. When someone say a "man page" it implies "a manual page". Documentation in OpenBSD is done in manual pages related to various software, concepts or C functions.
To read a man page, in a terminal type "man afterboot" and use arrows or page up/down to navigate within the man page. You can read "man man" page to read about man itself.
Previously I wrote "afterboot(8)" but the real man page name is "afterboot", the "(8)" is meant to specify the man page section. Some words can be used in various contexts, that's where man pages sections come into the place. For instance, there are sysctl(2) documenting the system call "sysctl()" while sysctl(8) will give you information about the sysctl command to change kernel settings. You can specify which section you want to read by typing the number before the page name, like in "man 2 sysctl" or "man 8 sysctl".
Man pages are constructed in the same order: NAME, SYNOPSIS, DESCRIPTION..... SEE ALSO..., the section "SEE ALSO" is an important one, it gives you man page references of other pages you may want to read. For example, afterboot(8) will give you hints about doas(1), pkg_add(1), hier(7) and many other pages.
When you want to install a desktop environment, there will often be a "meta package" which will pull every packages required for the environment to work.
OpenBSD provides a few desktop environments like:
- Gnome 3 => pkg_add gnome
- Xfce => pkg_add xfce
- MATE => pkg_add mate
When you install a package using "pkg_add", you may find a message at the end of the pkg_add output telling you there is a file in /usr/local/share/doc/pkg-readmes/ to read, those files are specifics to packages and contains instructions that should be read before using a package.
The instructions could be about performance, potential limits issues, configuration snippets, how to init the service etc... They are very important to read, and for desktop environment, they will tell you everything you know to get it started.
When you log-in from the xenodm screen (the one where you have a Puffer fish and OpenBSD logo asking login/password), the program xenodm will read your ~/.xsession file, this is where you prepare your desktop and the execute commands. Usually, the first blocking command (that keeps running on foreground) is your window manager, you can put commands before to customize your system or run programs in background.
# disable bell
xset b off
# auto blank after 10 minutes
xset s 600 600
# run xclock and xload
xclock -geometry 75x75-70-0 -padding 1 &
xload -nolabel -update 5 -geometry 75x75-145-0 &
# load my ~/.profile file to define ENV
. ~/.profile
# display notifications
dunst &
# load changes in X settings
xrdb -merge ~/.Xresources
# turn the screen reddish to reduce blue color
sct 5600
# synchronize copy buffers
autocutsel &
# kdeconnect to control android phone
kdeconnect-indicator &
# reduce sound to not destroy my ears
sndioctl -f snd/1 output.level=0.3
# compositor for faster windows drawing
picom &
# something for my mouse setup (I can't remember)
xset mouse 1 1
xinput set-prop 8 273 1.1
# run my window manager
fvwm2
This is a very recurrent question, how to get your shell aliases to be working once you have logged in? In bash, sh and ksh (and maybe other shells), every time you spawn a new interactive shell (in which you can enter commands), the environment variable ENV will be read and if it has a value matching a file path, it will be loaded.
The design to your beloved shell environment set is the following:
- ~/.xsession will source ~/.profile when starting X, inheriting the content to everything run from X
- ~/.profile will export ENV like in "export ENV=~/.myshellfile"
If you run a regular computer (amd64 arch) you will want to run the service "apmd" in automatic mode, it will keep your CPU at lowest frequency and increase the frequency when you have some load, allowing to reduce heat, power usage and noise.
Here are commands to run as root:
rcctl enable apmd
rcctl set apmd flags -A
rcctl start apmd
To make things simple, the "-release" version is the whole sets of files to install OpenBSD of that release when it's out. Further updates for that release are called -stable branch, if you run "pkg_add -u" to update your packages and "syspatch" to update your base system you will automatically follow -stable (which is fine!). Release is a single point in time of the state of OpenBSD.
9.5. I want my favorite program to run on OpenBSD §
If it's not opensource and not using a language like Java or C# that use a Language Virtual Machine allowing abstraction layer to work, it won't work (and most program are not like that).
If it's opensource, it may be possible if all its dependencies are available on OpenBSD.
The virtualization system of OpenBSD can run OpenBSD or some linux distributions but without a graphical interface and with only 1 CPU. This mean you will have to configure a serial console to proceed to the installation and then use ssh or the serial console to use your system.
There is qemu in ports but it's not accelerated and won't suit most of people needs because it's terribly terribly slow.
I disable the IPFS service because it's nearly not used and draw too much CPU on my server. It was a nice experiment, thank you very much for the support and suggestions.
OpenBSD 6.9 has been released and I decided to extend my IPFS experiment to latest release. This mean you can fetch packages and base sets for 6.9 amd64 now over IPFS.
If you don't know what IPFS is, I recommend you to read my previous articles about IPFS.
Note that it also works for -current / amd64, the server automatically checks for new updates of 6.9 and -current every 8 hours.
The benefits is to play with IPFS to understand how it works with a real world use case. Instead of using mirrors to distributes packages, my server is providing the packages and everyone downloading it can also participate into providing data to other IPFS client, this can be seen as a dynamic Bittorrent CDN (Content Delivery Network), instead of making a torrent per file, it's automatic. You certainly wouldn't download each packages as separate torrents files, nor you would download all the packages in a single torrent.
This could reduce the need for mirrors and potentially make faster packages access to people who are far from a mirrors if many people close to that person use IPFS and downloaded the data. This is a great technology that can only be beneficial once it reach a critical mass of adopters.
Now, pkg_add will automatically download the packages from IPFS, if more people use it, it will be faster and more resilient than if only my server is distributing the packages.
Have fun and enjoy 6.9 !
If you are worried about security, packages distributed are the same than the one on the mirrors, pkg_add automatically checks the signature in the files against the signify keys available in /etc/signify/ so if pkg_add works, the packages are legitimates.
Short instructions how to install sheetstruder, I will send some documentation upstream. You need git and python and later you will need openscad and a spreadsheet tool.
Open a spreadsheet tool that is able to export in format xlsx, type a number to create a solid object of this width (1 = 1 pixel, 2 = 3 pixels because it's mirrored) and put a background color in your cell. Save your file as xlsx.
Run "python3 ./sheetstruder.py yourfile.xlsx > file.scad" and open the file in OpenSCAD, enjoy!
Today I will introduce you to the utility "pup" providing CSS selectors filtering for HTML documents. It is a perfect companion to curl to properly fetch only a specific data from an HTML page.
On OpenBSD you can install it with pkg_add pup and check its documentation at /usr/local/share/doc/pup/README.md
The page https://www.openbsd.org/faq/current.html contains specific instructions that are required for people using OpenBSD -current and you may want to be notified for changes. Using pup it's easy to make a script to compare your last data to see what has been appended.
There are many possibilities with pup and I won't list them all. I highly recommend reading the README.md file from the project because it's its documentation and explains the syntax for filtering.
In this article I will explain a few important parameters for the reference IPFS node server go-ipfs in order to manage the bandwidth correctly for your usage.
There are many tweaks possible in the configuration file, but there are pros and cons for each one so I can't tell you what values you want. I will rather explain what you can change and in which situation you would want it.
By default, go-ipfs will keep a number of connections to peers between 600 and 900 and new connections will last at least 20 seconds. This may totally overwhelm your router to have to manage that quantity of TCP sessions.
The HighWater will define the maximum sessions you want to exist, so this may be the most important setting here. On the other hand, the LowWater will define the number of connections you want to keep all the time, so it will drain bandwidth if you keep it high.
I would say if you care about your bandwidth usage, keep the LowWater low like 50 and have the HighWater quite high and a short GracePeriod, this will allow go-ipfs to be quiet when unused but responsive (able to connect to many peers to find a content) when you need it.
IPFS use a distributed hash table to find peers (it's the common way to proceed in P2P networks), but your node can act as a client and only fetch the DHT from other peer or be active and distribute it to other peer.
If you have a low power server (CPU) and that you are limited in your bandwidth, you should use the value "dhtclient" to no distribute the DHT. You can configure this in the configuration file or use --routing=dhtclient in the command line.
This may be the most important choice you have to make for your IPFS node. With the Reprovider.Strategy setting you can choose to be part of the IPFS network and upload data you have locally, only upload data you pinned or upload nothing.
If you want to actively contribute to the network and you have enough bandwidth, keep the default "all" value, so every data available in your data store will be served to clients over IPFS.
If you self host data on your IPFS node but you don't have much bandwidth, I would recommend setting this value to "pinned" so only the data pinned in your IPFS store will be available. Remember that pinned data will never be removed from the store by the garbage collector and files you add to IPFS from the command line or web GUI are automatically pinned, the pinned data are usually data we care about and that we want to keep and/or distribute.
Finally, you can set it to empty and your IPFS node will never upload any data to anyone which could be consider as unfair in a peer to peer network but under some quota limited or high latency connection it would make sense to not upload anything.
While you can choose what kind of data you want your node to relay as a part of the IPFS network, you can choose how often your node will publish the content of the data hold in its data store.
The default is 12 hours, meaning every 12 hours your node will publish the list of everything available for upload to the other peers. If you care about bandwidth and your content doesn't change often, you can increase this value, on the other hand if you may want to publish more often if your data store is rapidly changing.
If you don't want to publish your content, you can set it to "0", then you would still be able to publish it manually using the IPFS command line.
If you want to provide your data over a public gateway, you may not want everyone to use this gateway to download IPFS content because of legal concerns, resource limits or you simply don't want that.
You can set Gateway.NoFetch to make your gateway to only distribute files available in the node data store. Meaning it will act as an http·s server for your own data but the gateway can't be used to get any other data. It's a convenient way to publish content over IPFS and make it available from a gateway you trust while keeping control over the data relayed.
There are many settings here for various use case. I'm running an IPFS node on a dedicated server but also another one at home and they have a very different configuration.
My home connection is limited to 900 kb/s which make IPFS very unfriendly to my ISP router and bandwidth usage.
Unfortunately, go-ipfs doesn't provide an easy way to set download and upload limit, that would be very useful.
IPFS is a distributed storage network protocol that comes with a public network. Anyone can run a peer and access content from IPFS and then relay the content while it's in your cache.
Gateways are websites used to allow accessing content of IPFS through http, there are several public gateways allowing to get data from IPFS without being a peer.
Every publish content has an unique CID to identify it, we usually add a /ipfs/ to it like in /ipfs/QmRVD1V8eYQuNQdfRzmMVMA6cy1WqJfzHu3uM7CZasD7j1. The CID is unique and if someone add the same file from another peer, they will get the same hash as you.
If you add a whole directory in IPFS, the top directory hash will depend on the hash of its content, this mean if you want to share a directory like a blog, you will need to publish the CID every time you change the content, as it's not practical at all, there is an alternative for making the process more dynamic.
A peer can publish data in a long name called an IPNS. The IPNS string will never change (it's tied to a private key) but you can associate a CID to it and update the value when you want and then tell other peers the value changed (it's called publishing). The IPNS notation used is looking like /ipns/k51qzi5uqu5dmebzq75vx3z23lsixir3cxi26ckl409ylblbjigjb1oluj3f2z.ipns, you can access an IPNS content with public gateways with a different notation.
- IPNS gateway use example: https://k51qzi5uqu5dmebzq75vx3z23lsixir3cxi26ckl409ylblbjigjb1oluj3f2z.ipns.dweb.link/
- IPFS gateway use example: https://ipfs.io/ipfs/QmRVD1V8eYQuNQdfRzmMVMA6cy1WqJfzHu3uM7CZasD7j1/
The IPFS link will ALWAYS return the same content because it's a defined hash to a specific resource. The IPNS link can be updated to have a newer CID over time, allowing people to bookmark the location and browse it for updates later.
You will find two kind of gateways url, one like "https://$domain/" and other like "https://$something_very_long.ipfs.$domain/", for the first one you need to append your /ipfs/something or /ipns/something requests like in the previous examples. For the latter, in web browser it only works with ipns because web browsers think the CID is a domain and will change the case of the letters and it's not long valid. When using an ipns like this, be careful to change the .ipfs. by .ipns. in the url to tell the gateway what kind of request you are doing.
First, be aware that there is no real bandwidth control mechanism and that IPFS is known to create too many connections that small routers can't handle. On OpenBSD it's possible to mitigate this behavior using queuing. It's possible to use a "lowpower" profile that will be less demanding on network and resources but be aware this will degrade IPFS performance. I found that after a few hours of bootstrapping and reaching many peers, the bandwidth usage becomes less significant but it's may be an issue for DSL connections like mine.
When you create your own node, you can use its own gateway or the command line client. When you request a data that doesn't belong to your node, it will be downloaded from known peers able to distribute the blocks and then you will keep it in cache until your cache reach the defined limited and the garbage collector comes to make some room. This mean when you get a content, you will start distributing it, but nobody will use your node for content you never fetched first.
When you have data, you can "pin" it so it will never be removed from cache, and if you pin a directory CID, the content will be downloaded so you have a whole mirror of it. When you add data to your node, it's automatically pinned by default.
The default ports are 4001 (the one you need to expose over the internet and potentially forwarding if you are behind a NAT), the Web GUI is available at http://localhost:5001/ and the gateway is available at http://localhost:8080/
You can change the profile to lowpower with "env IPFS_PATH=/var/go-ipfs/ ipfs config profile apply lowpower", you can also list profiles with the ipfs command.
I recommend using queues in PF to limit the bandwidth usage, for my DSL connection I've set a maximum of 450K and it doesn't disrupt my network anymore. I explained how to proceed with queuing and bandwidth limitations in a previous article.
Installing IPFS is easy on NixOS thanks to its declarative way. The system has a local IPv4 of 192.168.1.150 and a public IP of 136.214.64.44 (fake IP here). it is started with a 50GB maximum for cache. The gateway will be available on the local network on http://192.168.1.150:8080/.
Let's say your gateway is http://localhost:8080/ for making simpler incoming examples. If you want to request the data /ipfs/QmRVD1V8eYQuNQdfRzmMVMA6cy1WqJfzHu3uM7CZasD7j1 , you just have to add this to your gateway, like this: http://localhost:8080/ipfs/QmRVD1V8eYQuNQdfRzmMVMA6cy1WqJfzHu3uM7CZasD7j1 and you will get access to your file.
When using ipns, it's quite the same, for /ipns/blog.perso.pw/ you can request http://localhost:8080/ipns/blog.perso.pw/ and then you can browse my blog.
To make all of this really useful, I started an experiment: distributing OpenBSD amd64 -current and 6.9 both with sets and packages over IPFS. Basically, I have a server making a rsync of both sets once a day, will add them to the local IPFS node, get the CID of the top directory and then publish the CID under an IPNS. Note that I have to create an index.html file in the packages sets because IPFS doesn't handle directory listing very well.
The following examples will have to be changed if you don't use a local gateway, replace localhost:8080 by your favorite IPFS gateway.
While it may be slow to update at first, if you have many systems, running a local gateway used by all your computers will allow to have a cache of downloaded packages, making the whole process faster.
I made a "versions.txt" file in the top directory of the repository, it contains the date and CID of every publication, this can be used to fetch a package from an older set if it's still available on the network (because I don't plan to keep all sets, I have a limited disk).
You can simply use the url http://localhost:8080/ipns/k51qzi5uqu5dmebzq75vx3z23lsixir3cxi26ckl409ylblbjigjb1oluj3f2z/pub/OpenBSD/ in the file /etc/installurl to globally use IPFS for pkg_add or sysupgrade without specifying the url every time.
It's possible to use a DNS entry to associate an IPFS resource to a domain name by using dnslink. The entry would look like:
_dnslink.blog IN TXT "dnslink=/ipfs/somehashhere"
Using an /ipfs/ syntax will be faster to resolve for IPFS nodes but you will need to update your DNS every time you update your content over IPFS.
To avoid manipulating your DNS every so often (you could use an API to automate this by the way), you can use an /ipns/ record.
_dnslink.blog IN TXT "dnslink=/ipns/something"
This way, I made my blog available under the hostname blog.perso.pw but it has no A or CNAME so it work only in an IPFS context (like a web browser with IPFS companion extension). Using a public gateway, the url becomes https://ipfs.io/ipns/blog.perso.pw/ and it will download the last CID associated to blog.perso.pw.
IPFS is a wonderful piece of technology but in practice it's quite slow for DSL users and may not work well if you don't need a local cache. I do really love it though so I will continue running the OpenBSD experiment.
Please write me if you have any feedback or that you use my OpenBSD IPFS repository. I would be interested to know about people's experiences.
Today I will share about the console oriented audio player "musikcube" because I really like it. It has many features while being easy to use for a console player. The feature that really sold it to me is the library management and the rating feature allowing me to rate my files and filter by score. The library is nice to browse, it's easy to filter by pattern and the whole UI is easy to use.
Unfortunately it doesn't come with a man page, so you can check the key binding by typing "?" in it or look at the key bindings menu in the main menu.
Musikcube is a console client, meaning you start it in a terminal. You can easily switch between menus with Tab, Shift+Tab, Enter and keyboard arrows but you should also check the key bindings for full controls. Note that the mouse is supported!
Once you told musikcube where to look files, you will have access to your library, using numbers from 1 to 6 you can choose how you want the library filtered but 6 will ask which criteria to use, using "directory" will display the file hierarchy which is sometimes nicer to use for badly tagged music files.
You can access to the whole tracks list using "t" and then filter by pattern or sort the list using "Ctrl + s".
When run as musikcube, a daemon mode is started to accept incoming connections on TCP ports 7905 and 7906 for remote API control and transcoding/streaming. This behavior can be disabled in the main menu under the "server setup" choice.
Running it with the binary musikubed binary, there will be no UI started, only a background daemon listening on ports.
Musikcube has a companion app for Android named musikdroid but it only available for download as a file on the github project.
The app has multiples features, it can control the musikcube server for music playing on the remote system, but you can also use it to stream music to your Android device. The song on the musikcube server and android devices can be separated. Even better, songs played on the android devices will be automatically stored for offline (you can tune the cache) and even transcode files to have smaller files for the device.
Today I will share with you a simple way I found to transmit text from my computer to my phone. I often have to do it, to type a password, enter an url, copy/paste a message or whatever reasons.
The best way to get a text from computer to a smartphone (that I am aware of) is scanning a QR code using the camera. By using the command qrencode (I already wrote about this one), xclip and feh (a picture viewer), it is possible to generate QR code on the fly on the screen.
Is it as simple as running the following command, from a menu or a key binding:
Using this command, xclip will gives the clipboard to qrencode which will create a PNG file on stdout and then feh will display it on a 600 by 600 window, no temporary file involved here.
Once the picture is displayed on the screen, you can use a scanner program on your phone to gather the content, I found "QR & Barcode Scanner" to be really light, fast and usable with its history, available on F-Droid.
When it comes to sharing data between my phone and my computer, I love "primitive ftpd" which is a SFTP/FTP server for Android, it works out of the box and allow secure transfers over Wifi (use SFTP please!).
For simple transfers, I use "Share to Computer" that will share a file or a group of files as a zip on a temporary http server, it is then easy to connect to it to save the file.
For sending SMS through my phone but from my computer, I use the program KDE Connect (it has to be installed on phone and computer), I wanted to write about it for a long time but it's not easy to explain how to get it to work and uneasy to explain its usage. But it allows me to receive phone notifications on my computer and also send SMS. I have simple aliases in my shell like "mom-sms hello are you ?" to ease my use of SMS. When possible, don't use SMS, it's not secure. The program does a lot more than sending SMS, like using the smartphone as a remote touchpad as one example.
Hi, today's article will be a bit different than what you are used to. I am currently writing about my experience as an open source author and "project manager". I recently created a project that, while being extremely small, have seen some people getting involved at various level. I didn't know what it was to be in this position.
Having to deal with multiple people contributing to a project I started for myself on one architecture with a limited set of features is surprisingly hard. I don't say it's boring and that no one should ever do it, but I think I wasn't really prepare to handle this.
I made my best to integrate people wishes while keeping the helm of the project in the right direction, but I had to ask myself many questions.
Should I care about what other people need? I could say no to everything proposed if I see no benefit for my use case. I chose to accept some changes that I didn't use because they made sense in some context. But I have to be really careful to accept everything if I want to keep the program sane.
Should I care about other platforms I don't use? Someone proposed me to add some code to support Linux targets, which I don't use, meaning more code I can't test. For the sake of compatibility and avoiding extra work to packagers, I made a very simple solution to fix that, but if someone wanted to port my program to Windows or a platform that would require many many changes, I don't know how I would react.
Too much changing code situation. My program changed A LOT since my initials commits, and now a git blame mostly show no lines from me, this doesn't mean I didn't review changes made by contributors, but I am not as comfortable now that I was initially with my own code. That doesn't mean the new code is wrong, but it doesn't hold my logic in it. I think it's the biggest deal in this situation, I, as the project manager, must say what can go in, what can't and when. It's fine to receive contributions but they shouldn't add complexity or weird algorithms.
I am not an expert programmer, I don't often write code, and when I do, it's for my own benefit. Opening our work to other implies making it accessible to outsiders, accepting changes and explaining choices.
Many times I reviewed submitted code and replied it wasn't fine, and while it compiles and apply correctly, it's not the right way to do, please rework this in some way to make it better or discard it, but it won't get into the repository. It's not always easy, people can submit code I don't understand sometimes, I still have to review it thoroughly because I can't accept everything sent.
In some way, once people get involved into my projects, they get denatured because they receive thoughts from other, their ideas, their logic, their needs. It's wonderful and scary at the same time. When I publish code, I never expect it to be useful for someone and even less that I could receive new features by emails from strangers.
Be prepared for this is important when you start a project and that you make it open source. I could refuse everything but then I would cut myself from a potential community around my own code, that would be a shame.
This part is not related to my projects (or at least not in this situation) but this is a debate I often think about when reading dramas in open source: is an open source author responsible toward the users?
One way to reply this is that if you publish your content online and accept contributions, this mean you care about users (which then contribute back), but where to draw the limit of what is acceptable? If someone writes an awesome program for themselves and gather a community around it, and then choose to make breaking changes or remove important features, what then? The users are free to fork, the author is free to to whatever they want.
There are no clear responsibility binding contributors and end users, I hope most of the time, contributors think about the end users, but with different philosophies in play sometimes we can end in dilemma between the two groups.
I am very happy to publish open source code and to have contributors, coordinate people, goals and features is not something I expected :)
Please, be cautious with this writing, I only had to face this situation with a couple of contributors, I can't imagine how complicated it can become at a bigger scale!
I will present you the program ssss (for Shamir's Secret Sharing Scheme), a cryptography program to split a secret into n parts, requiring at least t parts to be recovered (with t <= n).
I used to run a community but there was no person in charge apart me, which made me a single point of failure. I decided to make the encrypted backup available to a few kind of trustable community members, and I gave each a secret. There were four members and I made the backup password available only if the four members agreed to share their secrets to get the password. For privacy reasons, I didn't want any of these people to be able to lurk into the backup, at least, if someone had happened to me, they could agree to recover the database only if the four persons agreed on it.
ssss-split is easy to use, you can only share text with it. So you can use a very long passphrase to encrypt files and share this passphrase into many secrets that you share.
You can install it on OpenBSD using pkg_add ssss.
In the following examples, I will create a simple passphrase and then use the generated secrets to get the original passphrase back.
$ ssss-split -t 3 -n 3
Generating shares using a (3,3) scheme with dynamic security level.
Enter the secret, at most 128 ASCII characters: [Note=>hidden input where I typed "this is a very very long password] Using a 264 bit security level.
1-cfef7c2fcd283133612834324db968ef47e52997d23f9d6eae0ecd8f8d0e898b65
2-e414b5b4de34c0ee2fbb14621201bf16e4a2df70a4b5a16a823888040d332d47a8
3-0d4d2cebcc67851ed93da3c80c58fce745c34d1fb2d1341da29b39a94b98e0f353
When you want to recover a secret, you will have to run ssss-combine and tell it how many secrets you have, they can be provided in any order.
$ ssss-combine -t 3
Enter 3 shares separated by newlines:
Share [1/3]: 2-e414b5b4de34c0ee2fbb14621201bf16e4a2df70a4b5a16a823888040d332d47a8
Share [2/3]: 3-0d4d2cebcc67851ed93da3c80c58fce745c34d1fb2d1341da29b39a94b98e0f353
Share [3/3]: 1-cfef7c2fcd283133612834324db968ef47e52997d23f9d6eae0ecd8f8d0e898b65
Resulting secret: this is a very very long password
If you want to easily store a secret or share it to a non-IT person (or in a vault), you can create a QR code and then print the picture. QR code has redundancy so if the paper is damaged you can still recover it, it's quite big on a paper so if it fades of you may not lose data and it also checks integrity.
ssss is a wonderful program to share a secret among a few people or put a few secrets here and there for a recovery situation. The program can receive the passphrase on its standard input allowing it to be scripted.
Interesting fact, if you run ssss-combine multiple times on the same text, you always get different secrets, so if you give a secret, no brute force can be used to find which input produced the secret.
Split will create new files from a single files, but smaller. The original file can be get back using the command cat on all the small files (in the correct order) to recreate the original file.
There are several use cases for this:
- store a single file (like a backup) on multiple medias (floppies, 700MB CD, DVDs etc..)
- parallelize a file process, for example: split a huge log file into small parts to run analysis on each part
- distribute a file across a few people (I have no idea about the use but I like the idea)
Its usage is very simple, run split on a file or feed its standard input, it will create 1000 lines long files by default. -b could be used to tell a size in kB or MB for the new files or use -l to change the default 1000 lines. Split can also create a new file each time a line match a regex given with -p.
Here is a simple example splitting a file into 1300kB parts and then reassemble the file from the parts, using sha256 to compare checksum of the original and reconstructed files.
solene@kongroo ~/V/pmenu> split -b 1300k pmenu.mp4
solene@kongroo ~/V/pmenu> ls
pmenu.mp4 xab xad xaf xah xaj xal xan
xaa xac xae xag xai xak xam
solene@kongroo ~/V/pmenu> cat x* > concat.mp4
solene@kongroo ~/V/pmenu> sha256 pmenu.mp4 concat.mp4
SHA256 (pmenu.mp4) = e284da1bf8e98226dc78836dd71e7dfe4c3eb9c4172861bafcb1e2afb8281637
SHA256 (concat.mp4) = e284da1bf8e98226dc78836dd71e7dfe4c3eb9c4172861bafcb1e2afb8281637
solene@kongroo ~/V/pmenu> ls -l x*
-rw-r--r-- 1 solene wheel 1331200 Mar 21 16:50 xaa
-rw-r--r-- 1 solene wheel 1331200 Mar 21 16:50 xab
-rw-r--r-- 1 solene wheel 1331200 Mar 21 16:50 xac
-rw-r--r-- 1 solene wheel 1331200 Mar 21 16:50 xad
-rw-r--r-- 1 solene wheel 1331200 Mar 21 16:50 xae
-rw-r--r-- 1 solene wheel 1331200 Mar 21 16:50 xaf
-rw-r--r-- 1 solene wheel 1331200 Mar 21 16:50 xag
-rw-r--r-- 1 solene wheel 1331200 Mar 21 16:50 xah
-rw-r--r-- 1 solene wheel 1331200 Mar 21 16:50 xai
-rw-r--r-- 1 solene wheel 1331200 Mar 21 16:50 xaj
-rw-r--r-- 1 solene wheel 1331200 Mar 21 16:50 xak
-rw-r--r-- 1 solene wheel 1331200 Mar 21 16:50 xal
-rw-r--r-- 1 solene wheel 1331200 Mar 21 16:50 xam
-rw-r--r-- 1 solene wheel 810887 Mar 21 16:50 xan
Today I will introduce you to Diffoscope, a command line software to compare two directories. I find it very useful when looking for changes between two extracted tarballs, I use it to compare changes between two version of a program to see what changed.
It is really easy to use, as parameter give the two directories you want to compare, diffoscope will then show the uid, gid, permissions, modification/creation/access time changes between the two directories.
The output on a simple example looks like the following:
This Port of the week will introduce you to a Pie-menu for X11, available on OpenBSD since 6.9 (not released yet). A pie menu is a circle with items spread in the circle, allowing to open other circle with other items in it. I find it very effective for me because I am more comfortable with information spatially organized (my memory is based on spatialization). I think pmenu was designed for a tablet input device using a pen to trigger pmenu.
This part is a bit tricky because the configuration is not obvious. Pmenu takes its configuration on the standard input and then must be piped to a shell.
The configuration supports levels, like "Apps" or "Games" in this example, that will allow a second level of shortcuts. A text could be used like in Volume, but you can also use images like in other categories. Every blank appearing in the configuration are tabs.
The pmenu itself can be customized by using X attributes, you can learn more about this on the official project page.
Today I will explain how to setup very easily the anti-spam SpamAssassin and make it work with the OpenSMTPD mail server (OpenBSD default mail server). I will suppose you are already familiar with mail servers.
We will need two packages to install: opensmtpd-filter-spamassassin and p5-Mail-SpamAssassin. The first one is a "filter" for OpenSMTPD, it's a special meaning in smtpd context, it will run spamassassin on incoming emails and the latter is the spamassassin daemon itself.
As explained in the pkg-readme file from the filter package /usr/local/share/doc/pkg-readmes/opensmtpd-filter-spamassassin , a few changes must be done to the smtpd.conf file. Mostly a new line to define the filter and add "filter "spamassassin"" to lines starting by "listen".
It should really work out of the box, but you can train SpamAssassin what are good mails (called "ham") and what are spam by running the command "sa-learn --ham" or "sa-learn --spam" on directories containing that kind of mail, this will make spamassassin more efficient at filtering by content. Be careful, this command should be run as the same user as the daemon used by SpamAssassin.
In /var/log/maillog, spamassassin will give information about scoring, up to 5.0 (default), a mail is rejected. For legitimate mails, headers are added by spamassassin.
SpamAssassin is quite slow but can be speeded up by using redis (a key/value database in memory) for storing tokens that help analyzing content of emails. With redis, you would not have to care anymore about which user is running sa-learn.
You can install and run redis by using "pkg_add redis" and "rcctl enable redis" and "rcctl start redis", make sure that your port TCP/6379 is blocked from outside. You can add authentication to your redis server &if you feel it's necessary. I only have one user on my email server and it's me.
You then have to add some content to /etc/mail/spamassassin/local.cf , you may want to adapt to your redis configuration if you changed something.
On many Linux systems, there is a special program run by the shell (configured by default) that will tell you which package provide a command you tried to run but is not available in $PATH. Let's do the same for OpenBSD!
We will need to install the package pkglocate to find binaries.
# pkg_add pkglocate
We will also need a file /usr/local/bin/command-not-found executable with this content:
#!/bin/sh
CMD="$1"
RESULT=$(pkglocate */bin/${CMD} */sbin/${CMD} | cut -d ':' -f 1)
if [ -n "$RESULT" ]
then
echo "The following package(s) contain program ${CMD}"
for result in $RESULT
do
echo " - $result"
done
else
echo "pkglocate didn't find a package providing program ${CMD}"
fi
Now, we need to configure the shell to run this command when it detects an error corresponding to an unknown command. This is possible with bash, zsh or fish at least.
Now that you configured your shell correctly, if you run a command in your shell that isn't available in your PATH, you may have either a success with a list of packages giving the command or that the command can't be found in any package (unlucky).
This is a successful output that found the program we were trying to run.
$ pup
The following package(s) contain program pup
- pup-0.4.0p0
This is a result showing that no package found a program named "steam".
$ steam
pkglocate didn't find a package providing program steam
This article features the 12 best games (in my opinion) in term of quality and fun available in OpenBSD packages. The list only contains open source games that you can install out of the box. This means that game engines requiring proprietary (or paid) game assets are not part of this list.
Tome4 is a rogue-like game with many classes, many races, lot of areas to explore. There are fun pieces of lore to find and read if it's your thing, you have to play it many times to unlock everything. Note that while the game is open source, there are paid extensions requiring an online account on the official website, this is not mandatory to play or finish the game.
This famous game is a free reimplementation of the Transport Tycoon game. Build roads, rails, make huge trains networks with signals, transports materials from extraction to industries and then deliver goods to cities to make them grow. There is a huge community and many mods, and the game can be played in multiplayer. Also available on Android.
Wesnoth is a turn based strategy game based on hexagons. There are many races with their own units. The game features a full set of campaign for playing solo but also include multiplayer. Also available on Android.
This game is about space exploration, you are captain of a ship and you can get missions, enhance your ship, trade goods over the galaxy or fight enemies. There is a learning curve to enjoy it because it's quite hard to understand at first.
Open Red Alert, the 100% free reimplementation of the engine AND assets of Red Alert, Command and Conquer and Dune. You can play all these games from OpenRA, including multiplayer. Note that there are no campaign, you can play skirmish alone with bots or in multiplayer. Campaigns (and cinematics) could be played using the original games files (from OpenRA launcher), as the games have been published as freeware a few years ago, one can find them for free and legally.
# pkg_add openra
$ openra
wait for instructions to download the assets of the game you want to play
Cataclysm DDA is a game in which you awake in a zombie apocalypse and you have to survive. The game is extremely complete and allow many actions/combinations like driving vehicles, disassemble electronics to build your own devices and many things I didn't try yet. The game is turn based and 2D from top, I highly recommend reading the manual and how-to because the game is hard. You can also create your character when you start a game, which will totally change the game experience because of your characters attributes and knowledge.
Taisei is a bullet hell game in the Touhou universe. Very well done, extremely fun, multiple characters to play with an alternative mechanic of each character.
There is a game engine named Solarus dedicated to write Zelda like games, and Zelda RotH is a game based on this. Nothing special to say, it's a 2D Zelda game, very well done with a new adventure.
This game is about making industries from shapes and colors in order to deliver what you are asked to produce in the most efficient manner, this game is addictive and easy to understand thanks to the tutorial when you start the game.
This is a fast paced arena FPS game with beautiful graphics, many weapons with two modes of fire and many games modes. Reminds me a lot Unreal Tournament 2003.
This game is a rogue like (every run is different than last one) in which you move from hexagone to hexagone to get points, each biome has its own characteristics, like a sand biome in which you have to gather spice and you must escape sand worms :-) . The game is easy to play, turn by turn and has unusual graphics because of the non-euclidian nature of its world. I recommend reading the game manual because the first time I played it I really disliked it by missing most of the game mechanics... Also available on Android!
Here is a list of games I didn't include but at also worth being played: 0ad, Xmoto, Freedoom, The Dark Mod, Freedink, crack-attack, witchblast, flare, vegastrike and many others.
This article features the very useful program "checkrestart" which is OpenBSD specific. The purpose of checkrestart is to display which programs and their according PID for which the binaries doesn't exist anymore.
Why would their binary be absent? The obvious case is that the program was removed, but what it is really good at, is when you upgrade a package with running binaries, the old binary is deleted and the new binary installed. In that case, you will have to stop all the running binaries and restart them. Hence the name "checkrestart".
If you run OpenBSD -stable, you will want to use checkrestart after running pkg_add -u. After a package update, most often related to daemons, you will have to restart the related services.
On my server, in my daily script updating packages and running syspatch, I use it to automatically restart some services.
I would like to introduce you to a very nice game I discovered a few months ago, its name is Shapez.io and is a "factory" game, a genre popularized by the famous game Factorio. In this game you will have to extract shapes and colors and rework the shapez, mix colors and mix the whole thing together to produce wanted pieces.
The gameplay is very cool, the early game is an introduction to the game mechanics, you can extract shapes, cut them rotate pieces, merge conveys belts into one, paint shapes etc... and logic circuits!
In those games, you will have to learn how to make efficient factories and mostly "tile-able" installations. A tile-able setup means that if you copy a setup and paste it next to it, it will be bigger and functional, meaning you can extend it to infinity (except that the input conveyors will starve at some point).
It can be quite addictive to improve your setups over and over. This game is non violent and doesn't require any reflex but you need to think. You can't loose, it's between a puzzle and a management game.
On OpenBSD since version 6.9 (not released yet when I publish this) you can install the package shapezio and find a launcher in your desktop environment Game menu.
I also compiled a web version that you can play in your web browser (I discourage using Firefox due to performance..) without installing it, it's legal because the game is open source :)
In this tutorial I will explain how to use Nginx as a TCP or UDP relay as an alternative to Haproxy or Relayd. This mean nginx will be able to accept requests on a port (TCP/UDP) and relay it to another backend without knowing about the content. It also permits to negociates a TLS session with the client and relay to a non-TLS backend. In this example I will explain how to configure Nginx to accept TLS requests to transmit it to my Gemini server Vger, Gemini protocol has TLS as a requirement.
I will explain how to install and configure Nginx and how to parse logs to obtain useful information. I will use an OpenBSD system for the examples.
It is important to understand that in this context Nginx is not doing anything related to HTTP.
On OpenBSD we need the package nginx-stream, if you are unsure about which package is required on your system, search which package provide the file ngx_stream_module.so . To enable Nginx at boot, you can use rcctl enable nginx.
In the previous configuration file, the backend defines the destination, multiples servers could be defined, with weights and timeouts, there is only one in this example.
The server block will tell on which port Nginx should listen and if it has to handle TLS (which is named ssl because of history), usual TLS configuration can be used here, then for a request, we have to tell to which backend Nginx have to relay the connections.
The configuration file defines a custom log format that is useful for TLS connections, it includes remote host, backend destination, connection status, bytes transffered and duration.
Sometimes in the logs there are clients that obtains a status 500, meaning the TLS connection haven't been established correctly. It may be some scanner that doesn't try a TLS connection, if you want to get statistics about those and see if it would be worth to block them if they do too many attempt, it is easy to use awk to get the list.
I was using relayd before trying Nginx with stream module, while relayd worked fine it doesn't provide any of the logs Nginx offer. I am really happy with this use of Nginx because it is a very versatile program that shown to be more than a http server over time. For a minimal setup I would still recommend lighter daemon such as relayd.
In this Port of the Week I will introduce you to the IRC client catgirl. While there are already many IRC clients available (and good ones), there was a niche that wasn't filled yet, between minimalism (ii, irCII) and full featured clients (irssi, weechat) in the terminal world. Here comes catgirl, a simple IRC client coming with enough features to be comfortable to use for heavy IRC users.
Catgirl has the following features: tab completion, split scrolling, URL detection, nick coloring, ignores filter. On the other hand, it doesn't support non-TLS networks, CCTP, multi networks or dynamic configuration. If you want to use catgirl with multiples networks, you have to run it once per network.
Catgirl will be available as a package in OpenBSD starting with version 6.9.
OpenBSD security bonus: catgirl features a very good use of unveil to reduce file system access to the minimum required (configuration+logs+certs), reducing the severity of an exploit. It also has a restricted mode when using the -R parameter that reduce features like notifications or url handling and tight the pledge list (allowing systems calls).
A simple configuration file to connect to the irc.tilde.chat server would look like the following file that must be stored under ~/.config/catgirl/tilde
nick = solene_nickname
real = Solene
host = irc.tilde.chat
join = #foobar-channel
You can then run catgirl and use the configuration file but passing the config file name as parameter.
Catgirl only display one window at a time, it is not possible to split the display, but if you scroll up you will see the last displayed lines and the text stream while keeping the upper part displaying the history, it is a neat way to browse the history without cutting yourself from what's going on in the channel.
Channels can be browsed from keyboard using Ctrl+N or Ctrl+P like in Irssi or by typing /window NUMBER, with number being the buffer number. Alt+NUMBER could also be used to switch directly to buffer NUMBER.
Searches in buffer could be used by typing a word in your input and using Ctrl+R to search backward or Ctrl+S for searching forward (given you are in the history of course).
Finally, my most favorite feature which is missing in minimal clients is Alt+A, jumping to next buffers I have to read (also yes, catgirl keep a line with information about how many messages in channels since last time you didn't read them). Even better, when you press alt+A while there is nothing to read, you jump back to the channel you manually selected last, this allow to quickly read what you missed and return to the channel you spend all your time on.
I really love this IRC client, it replaced Irssi that I used for years really easily because most of the key bindings are the same, but I am also very happy to use a client that is a lot safer (on OpenBSD). It can be used with tmux for persistence but also connect to multiple servers and make it manageable.
This article is about giving a short description of EVERY service available as part of an OpenBSD default installation (= no package installed).
From all this list, the following list is started by default: cron, dhcpleased, pflogd, sndiod, openssh, ntpd, slaacd, resolvd, sshd, spamlogd, syslogd and smtpd. Network related daemons smtpd (localhost only), openssh and ntpd (as a client) are running.
This daemon is used to automatically mount a remote NFS server when someone wants to access it, it can provide a replacement in case the file system is not reachable. More information using "info amd".
This is the daemon responsible for frequency scaling. It is important to run it on workstation and especially on laptop, it can also trigger automatic suspend or hibernate in case of low battery.
This is a BGP daemon that is used by network routers to exchanges about routes with others routers. This is mainly what makes the Internet work, every hosting company announces their IP ranges and how to reach them, in returns they also receive the paths to connect to all others addresses.
This daemon is used for diskless setups on a network, it provides information about the client such as which NFS mount point to use for swap or root devices.
This is a daemon that will read from each user cron tabs and the system crontabs to run scheduled commands. User cron tabs are modified using crontab command.
This daemon is a multicast routing daemon, in case you need multicast spanning to deploy it outside of your local LAN. This is mostly replaced by PIM nowadays.
This is a FTP server providing many features. While FTP is getting abandoned and obsolete (certainly because it doesn't really play well with NAT) it could be used to provide read/write anonymous access on a directory (and many other things).
This is a FTP proxy daemon that one is supposed to run on a NAT system, this will automatically add PF rules to connect an incoming request to the server behind the NAT. This is part of the FTP madness.
hotplugd is an amazing daemon that will trigger actions when devices are connected or disconnected. This could be scripted to automatically run a backup if some conditions are met like an usb disk inserted matching a known name or mounting a drive.
httpd is a HTTP(s) daemon which supports a few features like fastcgi support, rewrite and SNI. While it doesn't have all the features a web server like nginx has, it is able to host some PHP programs such as nextcloud, roundcube mail or mediawiki.
Identd is a daemon for the Identification Protocol which returns the login name of a user who initiatied a connection, this can be used on IRC to authenticate which user started an IRC connection.
This is a daemon monitoring the state of network interfaces and which can take actions upon changes. This can be used to trigger changes in case of an interface losing connectivity. I used it to trigger a route change to a 4G device in case a ping over uplink interface was failing.
This daemon is often forgotten but is very useful. Inetd can listen on TCP or UDP port and will run a command upon connection on the related port, incoming data will be passed as standard input of the program and program standard output will be returned to the client. This is an easy way to turn a program into a network program, it is not widely used because it doesn't scale well as the whole process of running a new program upon every connection can push a system to its limit.
This daemon is an iSCSI initator which will connect to an iSCSI target (let's call it a network block device) and expose it locally as a /dev/vcsi device. OpenBSD doesn't provide a target iSCSI daemon in its base system but there is one in ports.
This daemon is used by remote NFS client to give them information about what the system is currently offering. The command showmount can be used to see what mountd is currently exposing.
This daemon is used to establish connection using PPP but also to create tunnels with L2TP, PPTP and PPPoE. PPP is used by some modems to connect to the Internet.
This daemon is an authoritative DNS nameserver, which mean it is holding all information about a domain name and about the subdomains. It receive queries from recursive servers such as unbound / unwind etc... If you own a domain name and you want to manage it from your system, this is what you want.
This daemon is a NTP service that keep the system clock at the correct time, it can use ntp servers or sensors (like GPS) as time source but also support using remote servers to challenge the time sources. It can acts a daemon to provide time to other NTP client.
This daemon is receiving packets from PF matching rules with a "log" keyword and will store the data into a logfile that can be reused with tcpdump later. Every packet in the logfile contains information about which rule triggered it so it is very practical for analysis.
This daemon is used to accept incoming connections and distribute them to backend. It supports many protocols and can act transparently, its purpose is to have a front end that will dispatch connections to a list of backend but also verify backend status. It has many uses and can also be used in addition to httpd to add HTTP headers to a request, or apply conditions on HTTP request headers to choose a backend.
This daemon is used to expose a CGI program as a fastcgi service, allowing httpd HTTP server to run CGI. This is an equivalent of inetd but for fastcgi.
This daemon acts as a fake server that will delay or block or pass emails depending on some rules. This can be used to add IP to a block list if they try to send an email to a specific address (like a honeypot), pass emails from servers within an accept list or delay connections for unknown servers (grey list) to make them and reconnect a few times before passing the email to the SMTP server. This is a quite effective way to prevent spam but it becomes less relevant as sender use whole ranges of IP to send emails, meaning that if you want to receive an email from a big email server, you will block server X.Y.Z.1 but then X.Y.Z.2 will retry and so on, so none will pass the grey list.
This is the well known ssh server. Allow secure connections to a shell from remote client. It has many features that would gain from being more well known, such as restrict commands per public key in the ~/.ssh/authorized_keys files or SFTP only chrooted accesses.
This is the logging server that receives messages from local programs and store them in the according logfile. It can be configured to pipe some messages to command, program like sshlockout uses this method to learn about IP that must be blocked, but can also listen on the network to aggregates logs from other machines. The program newsyslog is used to rotate files (move a file, compress it and allow a new file to be created and remove too old archives). Script can use the command logger to send text to syslog.
This daemon is a recursive DNS server, this is the kind of server listed in /etc/resolv.conf whose responsibility is to translate a fully qualified domain name into the IP address behind, asking one server at a time, for example, to ask www.dataswamp.org server, it is required to ask the .org authoritative server where is the authoritative server for dataswamp (within .org top domain), then dataswamp.org DNS server will be asked what is the address of www.dataswamp.org. It can also keep queries in cache and validates the queries and replies, it is a good idea to have such a server on a LAN with many client to share the queries cache.
This daemon is a local recursive DNS server that will make its best to give valid replies, it is designed for nomad users that may encounter hostile environments like captive portals or dhcp offered DNS server preventing DNSSEC to work etc.. Unwind polls a few DNS sources (recursive from root servers, provided by dns, stub or DNS over TLS server from configuration file) regularly and choose the fastest. It will also act as a local cache and can't listen on the network to be used by other clients. It also supports a list of blocked domains as input.
This is the daemon that allow to run virtual machines using vmm. As of OpenBSD 6.9 it is capable of running OpenBSD and Linux guests without graphical interface and only one core.
In this text I will explain what makes OpenBSD secure by default when you install it. Do not take this for a security analysis, but more like a guide to help you understand what is done by OpenBSD to have a secure environment. The purpose of this text is not to compare OpenBSD to other OSes but to say what you can honestly expect from OpenBSD.
There are no security without a threat model, I always consider the following cases: computer stolen at home by a thief, remote attacks trying to exploit running services, exploit of user network clients.
Here is a list of features that I consider important for an operating system security. While not every item from the following list are strictly security features, they help having a strict system that prevent software to misbehave and lead to unknown lands.
In my opinion security is not only about preventing remote attackers to penetrate the system, but also to prevent programs or users to make the system unusable.
Pledge and unveil are often referred together although they can be used independently. Pledge is a system call to restrict the permissions of a program at some point in its source code, permissions can't be get back once pledge has been called. Unveil is a system call that will hide all the file system to the process except the paths that are unveiled, it is possible to choose what permissions is allowed for the paths.
Both a very effective and powerful surgical security tools but they require some modification within the source code of a software, but adding them requires a deep understanding on what the software is doing. It is not always possible to forbid some system calls to a software that requires to do almost anything, software designed with privilege separation are better candidate for a proper pledge addition because each part has its own job.
Some software in packages have received pledge or/and unveil support, like Chromium or Firefox for the most well known.
Most of the base system services used within OpenBSD runs using a privilege separation pattern. Each part of a daemon is restricted to the minimum required. A monolithic daemon would have to read/write files, accept network connections, send messages to the log, in case of security breach this allows a huge attack surface. By separating a daemon in multiple parts, this allow a more fine grained control of each workers, and using pledge and unveil system calls, it's possible to set limits and highly reduce damage in case a worker is hacked.
The daemon server is started by default to keep the clock synchronized with time servers. A reference TLS server is used to challenge the time servers. Keeping a computer with its clock synchronized is very important. This is not really a security feature but you can't be serious if you use a computer on a network without its time synchronized.
If you use the X, it drops privileges to _x11 user, it runs as unpriviliged user instead of root, so in case of security issue this prevent an attacker of accessing through a X11 bug more than what it should.
Default resources limits prevent a program to use too much memory, too many open files or too many processes. While this can prevent some huge programs to run with the default settings, this also helps finding file descriptor leaks, prevent a fork bomb or a simple daemon to steal all the memory leading to a crash.
Most programs on OpenBSD aren't allowed to map memory with Write AND Execution bit at the same time (W^X means Write XOR Exec), this can prevents an interpreter to have its memory modified and executed. Some packages aren't compliant to this and must be linked with a specific library to bypass this restriction AND must be run from a partition with the "wxallowed" option.
When your system requires a random number (and it does very often), OpenBSD only provides one API to get a random number and they are really random and can't be exhausted. A good random number generator (RNG) is important for many cryptography requirements.
OpenBSD comes with a full documentation in its man pages. One should be able to fully configure their system using only the man pages. Man pages comes with CAVEATS or BUGS sections sometimes, it's important to take care about those sections. It is better to read the documentation and understand what has to be done in order to configure a system instead of following an outdated and anonymous text available on the Internet.
OpenBSD has many safeties in regards to memory allocation and will prevent use after free or unsafe memory usage very aggressively, this is often a source of crash for some software from packages because OpenBSD is very strict when you want to use the memory. This helps finding memory misuses and will kill software misbehaving.
When you install the system, a root account is created and its password is asked, then you create a user that will be member of "wheel" group, allowing it to switch user to root with root's password. doas (OpenBSD base system equivalent of sudo) isn't configured by default. With the default installation, the root password is required to do any root action. I think a dedicated root account that can be logged in without use of doas/sudo is better than a misconfigured doas/sudo allowing every thing only if you know the user password.
The only services that could be enabled at installation time listening on the network are OpenSSH (asked at install time with default = yes), dhclient (if you choose dhcp) and slaacd (if you use ipv6 in automatic configuration).
Due to a heavy number of security breaches due to SMT (like hyperthreading), the default installation disables the logical cores to prevent any data leak.
With the default installation, both microphone and webcam won't actually record anything except blank video/sound until you set a sysctl for this.
2.15.1. Maintainability, release often, update often §
The OpenBSD team publish a new release a new version every six months and only last two releases receives security updates. This allows to upgrade often but without pain, the upgrade process are small steps twice a year that help keep the whole system up to date. This avoids the fear of a huge upgrade and never doing it and I consider it a huge security bonus. Most OpenBSD around are running latest versions.
Installer, archives and packages are signed using signify public/private keys. OpenBSD installations comes with the release and release n+1 keys to check the packages authenticity. A key is used only six months and new keys are received in each new release allowing to build a chain of trust. Signify keys are very small and are published on many medias to double check when you need to bootstrap this chain of trust.
Most daemons that are available offering a chroot feature will have it enabled by default. In some circumstances like for Nginx web server, the software is patched by the OpenBSD team to enable chroot which is not an official feature.
Most packages that provide a server also create a new dedicated user for this exact service, allowing more privilege separation in case of security issue in one service.
When you install a service, it doesn't get enabled by default. You will have to configure the system to enable it at boot. There is a single /etc/rc.conf.local file that can be used to see what is enabled at boot, this can be manipulated using rcctl command. Forcing the user to enable services makes the system administrator fully aware of what is running on the system, which is good point for security.
Most of the previous "security features" should be considered good practices and not features. Many good practices such as the following could be easily implemented into most systems: Limiting users resources, reducing daemon privileges, memory usage strictness, providing a good documentation, start the least required services and provide the user a clean default installation.
There are also many other features that have been added and which I don't fully understand, and that I prefer letting the reader take notice.
Firejail is a program that can prepare sandboxes to run other programs. This is an efficient way to keep a software isolated from the rest of the system without need of changing its source code, it works for network, graphical or daemons programs.
You may want to sandbox programs you run in order to protect your system for any issue that could happen within the program (security breach, code mistake, unknown errors), like Steam once had a "rm -fr /" issue, using a sandbox that would have partially saved a part of the user directory. Web browsers are major tools nowadays and yet they have access to the whole system and have many security issues discovered and exploited in the wild, running it in a sandbox can reduce the data a hacker could exfiltrate from the computer. Of course, sandboxing comes with an usability tradeoff because if you only allow access to the ~/Downloads/ directory, you need to put files in this directory if you want to upload them, and you can only download files into this directory and then move them later where you really want to keep your files.
On most Linux systems you will find a Firejail package that you can install. If your distribution doesn't provide a Firejail package, it seems the installing from sources process is quite easy, and as the project is written in C with limited dependencies it may be easy to get the build process done.
There are no service to enable and no kernel parameters to add. Apparmor or SELinux features in kernel can be used to integrates into Firejail profiles if you want to.
Firejail has a neat feature to allow starting software by their name without calling Firejail explicitly, if you create a symbolic link in your $PATH using a program name but targeting Firejail, when you call that name Firejail will automatically now what you want to start. The following example will run firefox when you call the symbolic link.
There is a Firejail --list command that will tell you about all sandboxes running and what are their parameters. As a first column the identifier is available for more Firejail features.
Firejail also has a neat feature that allows to limit the bandwidth available only for one sandbox environment. Reusing previous list output, I will reduce firefox bandwidth, the number are in kB/s.
$ firejail --bandwidth=6108 set wlan0 1000 40
You can find more information about this feature in the "TRAFFIC SHAPING" section of the Firejail man page.
Firejail is a neat way to start software into sandboxes without requiring any particular setup. It may be more limited and maybe less reliable than OpenBSD programs who received unveil() features but it's a nice trade off between safety and required work within source code (literally none). It is a very interesting project that proves to work easily on any Linux system, with a simple C source code with little dependencies. I am not really familiar with Linux kernel and its features but Firejail seems to use seccomp-bpf and namespace, I guess they are complicated to use but powerful and Firejail comes here as a wrapper to automate all of this.
Firejail has been proven to be USABLE and RELIABLE for me while my attempts at sandboxing Firefox with AppArmor were tedious and not optimal. I really recommend it.
I will explain how to limit bandwidth on OpenBSD using its firewall PF (Packet Filter) queuing capability. It is a very powerful feature but it may be hard to understand at first. What is very important to understand is that it's technically not possible to limit the bandwidth of the whole system, because once data is getting on your network interface, it's already there and got by your router, what is possible is to limit the upload rate to cap the download rate.
My home internet access allows me to download at 1600 kB/s and upload at 95 kB/s. An easy way to limit bandwidth is to calculate a percent of your upload, that should apply that ratio to your download speed as well (this may not be very precise and may require tweaks).
PF syntax requires bandwidth to be defined as kilo-bits (kb) and not kilo-bytes (kB), multiplying by 8 allow to switch from kB to kb.
Edit the file /etc/pf.conf as root and add the following before any pass/match/drop rules, in the example my main interface is em0.
# we define a main queue (requirement)
queue main on em0 bandwidth 1G
# set a queue for everything
queue normal parent main bandwidth 200K max 200K default
And reload with pfctl -f /etc/pf.conf as root. You can monitor the queue working with systat queue
QUEUE BW/FL SCH PKTS BYTES DROP_P DROP_B QLEN
main on em0 1000M fifo 0 0 0 0 0
normal 1000M fifo 535424 36032467 0 0 60
This is only a global queuing rule that will apply to everything on the system. This can be greatly extended for specific need. For example, I use the program "oasis" which is a daemon for a peer to peer social network, sometimes it has upload burst because someone is syncing against my computer, I use the following rule to limit the upload bandwidth of this user.
# within the queue rules
queue oasis parent main bandwidth 150K max 150K
# in your match rules
match on egress proto tcp from any to any user oasis set queue oasis
Instead of a user, the rule could match a "to" address, I used to have such rules when I wanted to limit my upload bandwidth for uploading videos through peertube web interface.
In these times of remote work / home office, you may have a limited bandwidth shared with other people/device. All software doesn't provide a way to limit bandwidth usage (package manager, Youtube videos player etc...).
Fortunately, Linux has a very nice program very easy to use to limit your bandwidth in one command. This program is « Wondershaper » and is using the Linux QoS framework that is usually manipulated with "tc", but it makes it VERY easy to set limits.
On most distributions, wondershaper will be available as a package with its own name. I found a few distributions that didn't provide it (NixOS at least), and some are providing various wondershaper versions.
To know if you have the newer version, a "wondershaper --help" may provide information about "-d" and "-u" flags, the older version doesn't have this.
Wondershaper requires the download and upload bandwidths to be set in kb/s (kilo bits per second, not kilo bytes). I personally only know my bandwidth in kB/s which is a 1/8 of its kb/s equivalent. My home connection is 1600 kB/s max in download and 95 kB/s max in upload, I can use wondershaper to limit to 1000 / 50 so it won't affect much my other devices on my network.
# my network device is enp3s0
# new wondershaper
sudo wondershaper -a enp3s0 -d $(( 1000 * 8 )) -u $(( 50 * 8 ))
# old wondershaper
sudo wondershaper enp3s0 $(( 1000 * 8 )) $(( 50 * 8 ))
I use a multiplication to convert from kB/s to kb/s and still keep the command understandable to me. Once a limit is set, wondershaper can be used to clear the limit to get full bandwidth available again.
# new wondershaper
sudo wondershaper -c -a enp3s0
# old wondershaper
sudo wondershaper clear enp3s0
There are so many programs that doesn't allow to limit download/upload speeds, wondershaper effectiveness and ease of use are a blessing.
Every operating system has its own way to construct some SYN packets, this is called Fingerprinting because it permits to identify which OS sent which packet. This must be clear it's not a perfect filter and may be easily get bypassed if you want to.
Because if some packets required to identify the operating system, only TCP connections can be filtered by OS. The OS list and SYN values can be found in the file /etc/pf.os.
The keyword "os $value" must be used within the "from $address" keyword. I use it to restrict the ssh connection to my server only to OpenBSD systems (in addition to key authentication).
# only allow OpenBSD hosts to connect
pass in on egress inet proto tcp from any os OpenBSD to (egress) port 22
# allow connections from $home IP whatever the OS is
pass in on egress inet proto tcp from $home to (egress) port 22
This can be a very good way to stop unwanted traffic spamming logs but should be used with cautiousness because you may incidentally block legitimate traffic.
This quick article will explain how to install pkgsrc packages on an OpenBSD installation. This is something regulary asked on #openbsd freenode irc channel. I am not convinced by the relevant use of pkgsrc under OpenBSD but why not :)
I will cover an unprivileged installation that doesn't require root. I will use packages from 2020Q4 release, I may not update regularly this text so you will have to adapt to your current year.
$ cd ~/
$ ftp https://cdn.NetBSD.org/pub/pkgsrc/pkgsrc-2020Q4/pkgsrc.tar.gz
$ tar -xzf pkgsrc.tar.gz
$ cd pkgsrc/bootstrap
$ ./bootstrap --unprivileged
From now you must add the path ~/pkg/bin to your $PATH environment variable. The pkgsrc tree is in ~/pkgsrc/ and all the relevant files for it to work are in ~/pkg/.
You can install programs by searching directories of software you want in ~/pkgsrc/ and run "bmake install", for example in ~/pkgsrc/chat/irssi/ to install irssi irc client.
I'm not sure X11 software compiles well, I got issues compiling dbus as a dependency of x11/xterm and I got compilation errors, maybe clashing with Xenocara from base system... I don't really want to investigate more about this though.
In this article I will explain how to add a bit more security to your OpenBSD system by adding a requirement for user logging into the system, locally or by ssh. I will explain how to setup 2 factor authentication (2FA) using TOTP on OpenBSD
When do you want or need this? It adds a burden in term of usability, in addition to your password you will require a device that will be pre-configured to generate the one time passwords, if you don't have it you won't be able to login (that's the whole point). Let's say you activated 2FA for ssh connection on an important server, if you get your private ssh key stolen (and without password, bouh!), the hacker will not be able to connect to the SSH server without having access to your TOTP generator.
A package is required in order to provide the various programs required. The package comes with a README file available at /usr/local/share/doc/pkg-readmes/login_oath with many explanations about how to use it. I will take lot of information from there for the local login setup.
# pkg_add login_oath
You will have to add a new login class, depending on what of the kind of authentication you want. You can either provide password OR TOTP, or set password AND TOTP (in the form of TOTP_CODE/password as the password to type). From the README file, add what you want to use:
# totp OR password
totp:\
:auth=-totp,passwd:\
:tc=default:
# totp AND password
totppw:\
:auth=-totp-and-pwd:\
:tc=default:
If you have a /etc/login.conf.db file, you have to run cap_mkdb on /etc/login.conf to update the file, most people don't need this, it only helps a bit in regards to performance when you have many many rules in /etc/login.conf.
Local login means logging on a TTY or in your X session or anything requiring your system password. You can then modify the users you want to use TOTP by adding them to the according login class with this command.
# usermod -L totp some_user
In the user directory, you have to generate a key and give it the correct permissions.
The .totp-key contains the secret that will be used by the TOTP generator, but most generator will only accept it in encoded as base32. You can use the following python3 command to convert the secret into base32.
It is possible to require your users to use TOTP or a public key + TOTP. When your refer to "password" in ssh, this will be the same password as for login, so it can be the plain password for regular user, the TOTP code for users in totp class, and TOTP/password for users in totppw.
This allow fine grained tuning for login options. The password requirement in SSH can be enabled per user or globally by modifying the file /etc/ssh/sshd_config.
# enable for everyone
AuthenticationMethods publickey,password
# for one user
Match User solene
AuthenticationMethods publickey,password
Let's say you enabled totppw class for your user and you use "publickey,password" in the AuthenticationMethods in ssh. You will require your ssh private key AND your password AND your TOTP generator.
Without doing any TOTP, by using this setting in SSH, you can require users to use their key and their system password in order to login, TOTP will only add more strength to the requirements to connect, but also more complexity for people who may not be comfortable with such security levels.
In this text we have seen how to enable 2FA for your local login and for login over ssh. Be careful to not lock you out of your system by losing the 2FA generator.
Hello, in this article I would like to share my thoughts about the NixOS Linux distribution. I've been using it daily for more than six months as my main workstation at work and on some computer at home too. I also made modest contributions to the git repository.
NixOS is a Linux distribution built around Nix tool. I'll try to explain quickly what Nix is but if you want more accurate explanations I recommend visiting the project website. Nix is the package manager of the system, Nix could be used on any Linux distribution on top of the distribution package manager. NixOS is built from top to bottom from Nix.
This makes NixOS a system entirely different than what one can expect from a regular Linux/Unix system (with the exception of Guix sharing the same idea with a different implementation). NixOS system configuration is stateless, most of the system is in read-only and most of paths you know doesn't exist. The directory /bin/sh only contains "sh" which is a symlink.
The whole system configuration: fstab, packages, users, services, crontab, firewall... is configured from a global configuration file that defines the state of the system.
An example of my configuration file to enable graphical interface with Mate as a desktop and a french keyboard layout.
There are a lot of pros. The system is really easy to setup, installing a system (for a reinstall or replicate an installation) is very easy, you only need to get the configuration.nix file from the other/previous system. Everything is very fast to setup, it's often only a few lines to add to the configuration.
Every time the system is rebuilt from the configuration file, a new grub entry is made so at boot you can choose on which environment you want to boot. This make upgrades or tries very easy to rollback and safe.
Documentation! The NixOS documentation is very nice and is part of the code. There is a special man page "configuration.nix" in the system that contains all variables you can define, what values to expect, what is the default and what it's doing. You can literally search for "steam", "mediawiki" or "luks" to get information to configure your system.
Builds are reproducible, I don't consider it a huge advantage but it's nice to have it. This allow to challenge a package mirror by building packages locally and verifying they provide the exact same package on the mirror.
It has a lot of packages. I think the NixOS team is pretty happy to share their statistics because, if I got it right, Nixpkgs is the biggest and up to date repository alive.
When you download a pre compiled Linux program that isn't statically built, it's a huge pain to make it work on NixOS. The binary will expect some paths to exist at usual places but they won't exist on NixOS. There are some tricks to get them work but it's not always easy. If the program you want isn't in the packages, it may not be easy to use it. Flatpak can help to get some programs if they are not in the packages though.
It takes disk space, some libraries can exist at the same time with small compilation differences. A program can exist with different version at the same time because of previous builds still available for boot in grub, if you forget to clean them it takes a lot of memory.
The whole system (especially for graphical environments) may not feel as polished as more mainstream distributions putting a lot of efforts into branding and customization. NixOS will only install everything and you will have a quite raw environment that you will have to configure. It's not a real cons but in comparison to other desktop oriented distributions, NixOS may not look as good out of the box.
NixOS is an awesome piece of software. It works very well and I never had any reliability issue with it. Some services like xrdp are usually quite complex to setup but it worked out of the box here for me.
I really classify it into its own category, in comparison to Linux/BSD distributions and Windows, there is the NixOS / Guix category with those stateless systems for which the configuration is their code.
I claim about security in Vger as its main feature, I even wrote Vger to have a secure gemini server that I can trust. Why so? It's written in C and I'm a beginner developer in this language, this looks like a scam.
I chose to follow the best practice I'm aware of from the very first line. My goal is to be sure Vger can't be used to exfiltrate data from the host on which it runs or to allow it to run arbirary command. While I may have missed corner case in which it could crash, I think a crash is the worse that can happen with Vger.
Vger doesn't have to manage connections or TLS, this was a lot of code already removed by this design choice. There are better tools which are exactly made for this purpose, so it's time to reuse other people good work.
Vger is run by inetd daemon, allowing to choose the user running vger. Using a dedicated user is always a good idea to prevent any harm in case of issue, but it's really not sufficient to protect vger to behave badly.
Another kind of security benefit is that vger runtime isn't looping like a daemon awaiting new connections. Vger accept a request, read a file if exist and gives its result and terminates. This is less error prone because no variable can be reused or tricked after a loop that could leave the code in an inconsistent or vulnerable state.
A critical vger feature is the ability to chroot into a directory, meaning the directory is now seen as the root of the file system (/var/gemini would be seen as /) and prevent vger to escape it. In addition to the chroot feature, the feature allow vger to drop to an unprivileged user.
/*
* use chroot() if a user is specified requires root user to be
* running the program to run chroot() and then drop privileges
*/
if (strlen(user) > 0) {
/* is root? */
if (getuid() != 0) {
syslog(LOG_DAEMON, "chroot requires program to be run as root");
errx(1, "chroot requires root user");
}
/* search user uid from name */
if ((pw = getpwnam(user)) == NULL) {
syslog(LOG_DAEMON, "the user %s can't be found on the system", user);
err(1, "finding user");
}
/* chroot worked? */
if (chroot(path) != 0) {
syslog(LOG_DAEMON, "the chroot_dir %s can't be used for chroot", path);
err(1, "chroot");
}
chrooted = 1;
if (chdir("/") == -1) {
syslog(LOG_DAEMON, "failed to chdir(\"/\")");
err(1, "chdir");
}
/* drop privileges */
if (setgroups(1, &pw->pw_gid) ||
setresgid(pw->pw_gid, pw->pw_gid, pw->pw_gid) ||
setresuid(pw->pw_uid, pw->pw_uid, pw->pw_uid)) {
syslog(LOG_DAEMON, "dropping privileges to user %s (uid=%i) failed",
user, pw->pw_uid);
err(1, "Can't drop privileges");
}
}
In addition to all the previous security practices, OpenBSD is offering a few functions to help restricting a lot what Vger can do.
The first function is pledge, allowing to restrict the system calls that can happen within the code itself. The current syscalls allowed in vger are related to the categories "rpath" and "stdio", basically standard input/output and reading files/directories only. This mean after pledge() is called, if any syscall not in those two categories is used, vger will be killed and a pledge error will be reported in the logs.
The second function is unveil, which will basically restrict access to the filesystem to anything but what you list, with the permission. Currently, vger only allows file access in read-only mode in the base directory used to serve files.
Here is an extract of the code relative to the OpenBSD specific code. With unveil available everywhere chroot wouldn't be required.
#ifdef __OpenBSD__
/*
* prevent access to files other than the one in path
*/
if (chrooted) {
eunveil("/", "r");
} else {
eunveil(path, "r");
}
/*
* prevent system calls other parsing queryfor fread file and
* write to stdio
*/
if (pledge("stdio rpath", NULL) == -1) {
syslog(LOG_DAEMON, "pledge call failed");
err(1, "pledge");
}
#endif
I made my best to use the least code possible before reducing Vger capabilities. Only the code managing the parameters is done before activating chroot and/or unveil/pledge.
int
main(int argc, char **argv)
{
char request [GEMINI_REQUEST_MAX] = {'\0'};
char hostname [GEMINI_REQUEST_MAX] = {'\0'};
char uri [PATH_MAX] = {'\0'};
char user [_SC_LOGIN_NAME_MAX] = "";
int virtualhost = 0;
int option = 0;
char *pos = NULL;
while ((option = getopt(argc, argv, ":d:l:m:u:vi")) != -1) {
switch (option) {
case 'd':
estrlcpy(chroot_dir, optarg, sizeof(chroot_dir));
break;
case 'l':
estrlcpy(lang, "lang=", sizeof(lang));
estrlcat(lang, optarg, sizeof(lang));
break;
case 'm':
estrlcpy(default_mime, optarg, sizeof(default_mime));
break;
case 'u':
estrlcpy(user, optarg, sizeof(user));
break;
case 'v':
virtualhost = 1;
break;
case 'i':
doautoidx = 1;
break;
}
}
/*
* do chroot if a user is supplied run pledge/unveil if OpenBSD
*/
drop_privileges(user, chroot_dir);
Unix is made of small component that can work together as small bricks to build something more complex. Vger is based on this idea by delegating the listening daemon handling incoming requests to another software (let's say relayd or haproxy). And then, what's left from the gemini specs once you delegate TLS is to take account of a request and return some content, which is well suited for a program accepting a request on its standard input and giving the result on standard ouput. Inetd is a key here to make such a program compatible with a daemon like relayd or haproxy. When a connection is made into the TLS listening daemon, a local port will trigger inetd that will run the command, passing the network content to the binary into its stdin.
CGI support was added in order to allow Vger to make dynamic content instead of serving only static files. It has a fine grained control, you can allow only one file to be executable as a CGI or a whole directory of files. When serving a CGI, vger forks, a pipe is opened between the two processes and a process is using execlp to run the cgi and transmit its output to vger.
From the beginning, I wrote a set of tests to be sure that once a kind of request or a use case work I can easily check I won't break it. This isn't about security but about reliability. When I push a new version on the git repository, I am absolutely confident it will work for the users. It was also an invaluable help for writing Vger.
As vger is a simple binary that accept data in stdin and output data on stdout, it is simple to write tests like this. The following example will run vger with a request, as the content is local and within the git repository, the output is predictable and known.
From here, it's possible to build an automatic test by checking the checksum of the output to the checksum of the known correct output. Of course, when you make a new use case, this requires manually generating the checksum to use it as a comparison later.
OUT=$(printf "gemini://host.name/autoidx/\r\n" | ../vger -d var/gemini/ -i | md5)
if ! [ $OUT = "770a987b8f5cf7169e6bc3c6563e1570" ]
then
echo "error"
exit 1
fi
At this time, vger as 19 use case in its test suite.
By using the program entr and a Makefile to manage the build process, it was very easy to trigger the testing process while working on the source code, allowing me to check the test suite only by saving my current changes. Anytime a .c file is modified, entr will trigger a make test command that will be displayed in a dedicated terminal.
By using best practices, reducing the amount of code and using only system libraries, I am quite confident about Vger good security. The only real issue could be to have too many connections leading to a quite high load due to inetd spawning new processes and doing a denial of services. This could be avoided by throttling simultaneous connection in the TLS daemon.
If you want to contribute, please do, and if you find a security issue please contact me, I'll be glad to examine the issue.
Lately I wanted to change the way I use my free time. I define my free time as: not working, not sleeping, not eating. So, I estimate it to six hours a day in work day and fourteen hours in non worked day.
With the year 2020 being quite unusual, I was staying at home most of the time without seeing the time passing. At the end of the year, I started to mix the duration of weeks and months which disturbed me a lot.
For a a few weeks now, I started to change the way I spend my free time. I thought it was be nice to have a few separate activies in the same day to help me realizing how time is passing by.
Here is the way I chose to distribute my free time. It's not a strict approach, I measure nothing. But I try to keep a simple ratio of 3/6, 2/6 and 1/6.
Yes, obviously this has to be done on free time... And it's always better to do it a bit everyday than accumulating it until you are forced to proceed.
I only started for a few weeks now but I really enjoy doing it. As I said previously, it's not something I stricly apply, but more a general way to spend my time and not stick for six hours writing code in a row from after work to going to sleep. I really feel my life is better balanced now and I feel some accomplishments for the few activies done every day.
Some asked asked me if I was planning in advance how I spend my time.
The answer is no. I don't plan anything but when I tend to lose focus on what I'm doing (and this happen often), I think about this time repartition method and then I think it may be time to jump on another activity and I pick something in another category. Now I think about it, that was very often that I was doing something because I was bored and lacking idea of activities to occupy myself, with this current list I no longer have this issue.
I don't often give my own opinion on this blog but I really feel it is important here.
The matter is about ecology, fair money distribution and civilization. I feel I need to share a bit about my lifestyle, in hope it will have a positive impact on some of my readers. I really think one person can make a change. I changed myself, only by spending a few moments with a member of my family a few years ago. That person never tried to convince me of anything, they only lived by their own standard without never offending me, it was simple things, nothing that would make that person a paria in our society. But I got curious about the reasons and I figurated it myself way later, now I understand why.
My philisophy is simple. In a life in modern civilization where everything is going fast, everyone cares about opinions other have about them and ultra communication, step back.
Here are the various statement I am following, this is something I self defined, it's not absolute rules.
Be yourself and be prepare to assume who you are. If you don't have the latest gadget you are not "has been", if you don't live in a giant house, you didn't fail your career, if you don't have a top notch shiny car nobody should ever care.
Reuse what you have. It's not because a cloth has a little scratch that you can't reuse it. It's not because an electronic device is old that you should replace it.
Opensource is a great way to revive old computers
Reduce your food waste to 0 and eat less meat because to feed animals we eat this requires a huge food production, more than what we finally eat in the meat
Travel less, there are a lot to see around where I live than at the other side of the planet. Certainly not go on vacation far away from home only to enjoy a beach under the sun. This also mean no car if it can be avoided, and if I use a car, why not carpooling?
Avoid gadgets (electronic devices that bring nothing useful) at all cost. Buy good gears (kitchen tools, workshop tools, furnitures etc...) that can be repaired. If possible buy second hand. For non-essential gears, second hand is mandatory.
In winter, heat at 19°C maximum with warm clothes while at home.
In summer, no A/C but use of extern isolation and vines along the home to help cooling down. And fans + water while wearing lights clothes to keep cool.
While some people are looking for more and more, I do seek for less. There are not enough for everyone on the planet, so it's important to make sacrifices.
Of course, it is how I am and I don't expect anyone to apply this, that would be insane :)
Il n'y a aucune télémétrie dans OpenBSD, je n'ai pas à m'inquiéter pour le respect de ma vie privée. Pour rappel, la télémétrie est un mécanisme qui consiste à remonter des informations de l'utilisateur afin d'analyser l'utilisation du produit.
De plus, le défaut du système a été de désactiver entièrement le micro, à moins d'une intervention avec le compte root, le microphone enregistre du silence (ce qui permet de ne pas le bloquer quant à des droits d'utilisation). A venir dans 6.9, la caméra suit le même chemin et sera désactivée par défaut. Il s'agit pour moi d'un signal fort quant à la nécessité de protéger l'utilisateur.
Avec l'ajout des fonctionnalités de sécurité (pledge et surtout unveil) dans les sources de Firefox et Chromium, je suis plus sereine quant à leur utilisation au quotidien. À l'heure actuelle, l'utilisation d'un navigateur web est quasiment incontournable, mais ils sont à la fois devenus extrêmement complexes et mal maîtrisés. L'exécution de code côté client via Javascript qui a de plus en plus de possibilité, de performances et de nécessités, ajouter un peu de sécurité dans l'équation était nécessaire. Bien que ces ajouts soient parfois un peu dérangeants à l'utilisation, je suis vraiment heureuse de pouvoir en bénéficier.
Avec ces sécurités ajoutés (par défaut), les navigateurs cités précédemment ne peuvent pas parcourir les répertoires en dehors de ce qui leur est nécessaire à leur bon fonctionnement plus les dossiers ~/Téléchargements/ et /tmp/. Ainsi, des emplacements comme ~/Documents ou ~/.gnupg sont totalement inaccessibles ce qui limite grandement les risques d'exfiltration de données par le navigateur.
On pourrait refaire grossièrement la même fonctionnalité sous Linux en utilisant AppArmor mais l'intégration est extrêmement compliquée (là où c'est par défaut sur OpenBSD) et un peu moins efficace, il est plus facile d'agir au bon moment depuis le code plutôt qu'en encapsulant le programme entier d'un groupe de règles.
Avec PF, il est très simple de vérifier le fichier de configuration pour comprendre les règles en place sur le serveur ou un ordinateur de bureau. La centralisation des règles dans un fichier et le système de macros permet d'écrire des règles simples et lisibles.
J'utilise énormément la fonctionnalité de gestion de bande passante pour limiter le débit de certaines applications qui n'offrent pas ce réglage. C'est très important pour moi n'étant pas la seule utilisatrice du réseau et ayant une connexion assez lente.
Sous Linux, il est possible d'utiliser les programmes trickle ou wondershaper pour mettre en place des limitations de bande passante, par contre, iptables est un cauchemar à utiliser en tant que firewall!
A part à l'utilisation sur du matériel peu répandu, OpenBSD est très stable et fiable. Je peux facilement atteindre deux semaines d'uptime sur mon pc de bureau avec plusieurs mises en veille par jour. Mes serveurs OpenBSD tournent 24/24 sans problème depuis des années.
Je dépasse rarement deux semaines puisque je dois mettre à jour le système de temps en temps pour continuer les développements sur OpenBSD :)
Garder à jour un système OpenBSD est très simple. Je lance les commandes syspatch et pkg_add -u tous les jours pour garder mes serveurs à jour. Une mise à jour tous les six mois est nécessaire pour monter en version mais à part quelques instructions spécifiques qui peuvent parfois arriver, une mise à jour ressemble à ça :
# sysupgrade
[..attendre un peu..]
# pkg_add -u
# reboot
Installer OpenBSD avec un chiffrement complet du disque est très facile (il faudra que j'écrive un billet sur l'importance de chiffrer ses disques et téléphones).
La documentation officielle expliquant l'installation d'un routeur avec NAT est parfaitement expliquée pas à pas, c'est une référence dès qu'il s'agit d'installer un routeur.
Tous les binaires du système de base (ça ne compte pas les packages) ont une documentation, ainsi que leurs fichiers de configuration.
Le site internet, la FAQ officielle et les pages de man sont les seules ressources nécessaires pour s'en sortir. Elles représentent un gros morceau, il n'est pas toujours facile de s'y retrouve mais tout y est.
Si je devais me débrouiller pendant un moment sans internet, je préférerais largement être sur un système OpenBSD. La documentation des pages de man suffit en général à s'en sortir.
Imaginez mettre en place un routeur qui fait du trafic shaping sous OpenBSD ou Linux sans l'aide de documents extérieurs au système. Personnellement je choisis OpenBSD à 100% pour ça :)
J'adore vraiment la façon dont OpenBSD gère les contributions. Je récupère les sources sur mon système et je procède aux modifications, je génère un fichier de diff (différence entre avant/après) et je l'envoie sur la liste de diffusion. Tout ça peut être fait en console avec des outils que je connais déjà (git/cvs) et des emails.
Parfois, les nouveaux contributeurs peuvent penser que les personnes qui répondent ne sont vraiment pas sympa. **Ce n'est pas vrai**. Si vous envoyez un diff et que vous recevez une critique, cela signifie déjà qu'on vous accorde du temps pour vous expliquer ce qui peut être amélioré. Je peux comprendre que cela puisse paraître rude pour certaines personnes, mais ce n'est pas ça du tout.
Cette année, j'ai fait quelques modestes contributions aux projets OpenIndiana et NixOS, c'était l'occasion de découvrir comment ces projets gèrent les contributions. Les deux utilisent github et la manière de faire est très intéressante, mais la comprendre demande beaucoup de travail car c'est relativement compliqué.
La méthode de contribution nécessite un compte sur Github, de faire un fork du projet, cloner le fork en local, créer une branche, faire les modifications en local, envoyer le fork sur son compte github et utiliser l'interface web de github pour faire un "pull request". Ça c'est la version courte. Sur NixOS, ma première tentative de faire un pull request s'est terminée par une demande contenant six mois de commits en plus de mon petit changement. Avec une bonne documentation et de l'entrainement c'est tout à fait surmontable. Cette méthode de travail présente certains avantages comme le suivi des contributeurs, l'intégration continue ou la facilité de critique de code, mais c'est rebutoire au possible pour les nouveaux.
Mon opinion est sûrement biaisée ici (bien plus que pour les éléments précédents) mais je pense sincèrement que les packages d'OpenBSD sont de très bonne qualité. La plupart d'entre eux fonctionnent "out of the box" avec des paramètres par défaut corrects.
Les packages qui nécessitent des instructions particulières sont fournis avec un fichier "readme" expliquant ce qui est nécessaire, par exemple créer certains répertoires avec des droits particuliers ou comment mettre à jour depuis une version précédente.
Même si par manque de contributeurs et de temps (en plus de certains programmes utilisant beaucoup de linuxismes pour être faciles à porter), la plupart des programmes libres majeurs sont disponibles et fonctionnent très bien.
Je profite de l'occasion de ce billet pour critiquer une tendance au sein du monde Open Source.
les programmes distribués avec flatpak / docker / snap fonctionnent très bien sur Linux mais sont hostiles envers les autres systèmes. Ils utilisent souvent des fonctionnalités spécifiques à Linux et les méthodes de compilation sont tournées vers Linux. Cela complique grandement le portage de ces applications vers d'autres systèmes.
les programmes avec nodeJS: ils nécessitent parfois des centaines voir des milliers des libs et certaines sont mêmes un peu bancales. C'est vraiment compliqué de faire fonctionner ces programmes sur OpenBSD. Certaines libs vont même jusqu'à embarquer du code rust ou à télécharger un binaire statique sur un serveur distant sans solution de compilation si nécessaire ou sans regardant si ce binaire est disponible dans $PATH. On y trouve des aberrations incroyables.
les programmes nécessitant git pour compiler: le système de compilation dans les ports d'OpenBSD fait de son mieux pour faire au plus propre. L'utilisateur dédié à la création des packages n'a pas du tout accès à internet (bloqué par le pare-feu avec une règle par défaut) et ne pourra pas exécuter de commande git pour récupérer du code. Il n'y a aucune raison pour que la compilation d'un programme nécessite de télécharger du code au milieu de l'étape de compilation!
Évidemment je comprends que ces trois points ci-dessus existent car cela facilite la vie des développeurs, mais si vous écrivez un programme et que vous le publiez, ce serait très sympa de penser aux systèmes non-linux. N'hésite pas à demander sur les réseaux sociaux si quelqu'un veut tester votre code sur un autre système que Linux. On adore les développeurs "BSD friendly" qui acceptent nos patches pour améliorer le support OpenBSD.
Il y a certaines choses où j'aimerais voir OpenBSD s'améliorer. Cette liste est personnelle et reflète pas l'opinion des membres du projet OpenBSD.
Meilleur support ARM
Débit du Wifi
Meilleures performances (mais ça s'améliore un peu à chaque version)
Améliorations de FFS (lors de crashs j'ai parfois des fichiers dans lost+found)
Un pkg_add -u plus rapide
Support du décodage vidéo matériel
Meilleur support de FUSE avec une possibilité de monter des systèmes CIFS/samba
Plus de contributeurs
Je suis consciente de tout le travail nécessaire ici, et ce n'est certainement pas moi qui vais y faire quelque chose. J'aimerais que cela s'améliore sans toutefois me plaindre de la situation actuelle :)
Malheureusement, tout le monde sait qu'OpenBSD évolue par un travail acharné et pas en envoyant une liste de souhaits aux développeurs :)
Quand on pense à ce qu'arrive à faire une petite équipe (environ 150 développeurs impliqués sur les dernières versions) en comparaison d'autres systèmes majeurs, je pense qu'on est assez efficace!
On me pose souvent la question sur la façon dont je publie mon blog, comment j'écris mes textes et comment ils sont publiés sur trois médias différents. Cet article est l'occasion pour moi de répondre à ces questions.
Pour mes publications j'utilise le générateur de site statique "cl-yag" que j'ai développé. Son principal travail est de générer les fichiers d'index d'accueil et de chaque tags pour chacun des médias de diffusion, HTML pour http, gophermap pour gopher et gemtext pour gemini. Après la génération des indexs, pour chaque article publié en HTML, un convertisseur va être appelé pour transformer le fichier d'origine en HTML afin de permettre sa consultation avec un navigateur internet. Pour gemini et gopher, l'article source est simplement copié avec quelques méta-données ajoutées en haut du fichier comme le titre, la date, l'auteur et les mots-clés.
Publier sur ces trois format en même temps avec un seul fichier source est un défi qui requiert malheureusement de faire des sacrifices sur le rendu si on ne veut pas écrire trois versions du même texte. Pour gopher, j'ai choisi de distribuer les textes tel quel, en tant que fichier texte, le contenu peut être du markdown, org-mode, mandoc ou autre mais gopher ne permet pas de le déterminer. Pour gémini, les textes sont distribués comme .gmi qui correspondent au type gemtext même si les anciennes publications sont du markdown pour le contenu. Pour le http, c'est simplement du HTML obtenu via une commande en fonction du type de données en entrée.
J'ai récemment décidé d'utiliser le format gemtext par défaut plutôt que le markdown pour écrire mes articles. Il a certes moins de possibilités que le markdown, mais le rendu ne contient aucune ambiguïté, tandis que le rendu d'un markdown peut varier selon l'implémentation et le type de markdown (tableaux, pas tableaux ? Syntaxe pour les images ? etc...)
Lors de l'exécution du générateur de site, tous les indexs sont régénérées, pour les fichiers publiés, la date de modification de celui-ci est comparée au fichier source, si la source est plus récente alors le fichier publié est généré à nouveau car il y a eu un changement. Cela permet de gagner énormément de temps puisque mon site atteint bientôt les 200 articles et copier 200 fichiers pour gopher, 200 pour gemini et lancer 200 programmes de conversion pour le HTML rendrait la génération extrêmement longue.
Après la génération de tous les fichiers, la commande rsync est utilisée pour mettre à jour les dossiers de sortie pour chaque protocole vers le serveur correspondant. J'utilise un serveur pour le http, deux serveurs pour gopher (le principal n'était pas spécialement stable à l'époque), un serveur pour gemini.
J'ai ajouté un système d'annonce sur Mastodon en appelant le programme local "toot" configuré sur un compte dédié. Ces changements n'ont pas été déployé dans cl-yag car il s'agit de changements très spécifiques pour mon utilisation personnelle. Ce genre de modification me fait penser qu'un générateur de site statique peut être un outil très personnel que l'on configure vraiment pour un besoin hyper spécifique et qu'il peut être difficile pour quelqu'un d'autre de s'en servir. J'avais décidé de le publier à l'époque, je ne sais pas si quelqu'un l'utilise activement, mais au moins le code est là pour les plus téméraires qui voudraient y jeter un oeil.
Mon générateur de blog peut supporter le mélange de différents types de fichiers sources pour être convertis en HTML. Cela me permet d'utiliser le type de formatage que je veux sans avoir à tout refaire.
Voici quelques commandes utilisées pour convertir les fichiers d'entrées (les articles bruts tels que je les écrits) en HTML. On constate que la conversion org-mode vers HTML n'est pas la plus simple. Le fichier de configuration de cl-yag est du code LISP chargé lors de l'exécution, je peux y mettre des commentaires mais aussi du code si je le souhaite, cela se révèle pratique parfois.
Quand je déclare un nouvel article dans le fichier de configuration qui détient les méta-données de toutes les publications, j'ai la possibilité de choisir le convertisseur HTML à utiliser si ce n'est pas celui par défaut.
;; utilisation du convertisseur par défaut
(post :title "Minimalistic markdown subset to html converter using awk"
:id "minimal-markdown" :tag "unix awk" :date "20190826")
;; utilisation du convertisseur mmd, un script awk très simple que j'ai fait pour convertir quelques fonctionnalités de markdown en html
(post :title "Life with an offline laptop"
:id "offline-laptop" :tag "openbsd life disconnected" :date "20190823" :converter :mmd)
Quelques statistiques concernant la syntaxe de mes différentes publications, via http vous ne voyez que le HTML, mais en gopher ou gemini vous verrez la source telle quelle.
I often have questions about how I write my articles, which format I use and how I publish on various medias. This article is the opportunity to highlight all the process.
So, I use my own static generator cl-yag which supports generating indexes for whole article lists but also for every tags in html, gophermap format and gemini gemtext. After the generation of indexes, for html every article will be converted into html by running a "converter" command. For gopher and gemini the original text is picked up, some metadata are added at the top of the file and that's all.
Publishing for all the three formats is complicated and sacrifices must be made if I want to avoid extra work (like writing a version for each). For gopher, I chose to distribute them as simple text file but it can be markdown, org-mode, mandoc or other formats, you can't know. For gemini, it will distribute gemtext format and for http it will be html.
Recently, I decided to switch to gemtext format instead of markdown as the main format for writing new texts, it has a bit less features than markdown, but markdown has some many implementations than the result can differ greatly from one renderer to another.
When I run the generator, all the indexes are regenerated, and destination file modification time are compared to the original file modification time, if the destination file (the gopher/html/gemini file that is published) is newer than the original file, no need to rewrite it, this saves a lot of time. After generation, the Makefile running the program will then run rsync to various servers to publish the new directories. One server has gopher and html, another server only gemini and another server has only gopher as a backup.
I added a Mastodon announcement calling a local script to publish links to new publications on Mastodon, this wasn't merged into cl-yag git repository because it's too custom code depending on local programs. I think a blog generator is as personal as the blog itself, I decided to publish its code at first but I am not sure it makes much sense because nobody may have the same mindset as mine to appropriate this tool, but at least it's available if someone wants to use it.
My blog software can support mixing input format so I am not tied to a specific format for all its life.
Here are the various commands used to convert a file from its original format to html. One can see that converting from org-mode to html in command line isn't an easy task. As my blog software is written in Common LISP, the configuration file is also a valid common lisp file, so I can write some code in it if required.
When I define a new article to generate from a main file holding the metadata, I can specify the converter if it's not the default one configured.
;; using default converter
(post :title "Minimalistic markdown subset to html converter using awk"
:id "minimal-markdown" :tag "unix awk" :date "20190826")
;; using mmd converter, a simple markdown to html converter written in awk
(post :title "Life with an offline laptop"
:id "offline-laptop" :tag "openbsd life disconnected" :date "20190823" :converter :mmd)
Some statistics about the various format used in my blog.
Lagrange is the finest browser I ever used and it's still brand new. I imported it into OpenBSD and so it will be available starting from OpenBSD 6.9 releases.
Lagrange is fantastic in the way it helps the user with the content browsed.
Links already visited display the last visited date
Subscription on page without RSS is possible for pages respecting a specific format (most of gemini space does)
Easy management of client certificates, used for authentication
In-page image loading, video watching and sound playing
Gopher support
Table of content displayed generated from headings
Keyboard navigation
Very light (dependencies, memory footprint, cpu usage)
Smooth scrolling
Dark and light modes
Much more
If you are interested into Gemini, I highly recommend this piece of software as a browser.
In case you would like to host your own Gemini content without requiring infrastructure, some community servers are offering hosting through secure sftp transfers.
The protocol supports status code including redirections, Vger had no way to know if a user wanted to redirect a page to another. The redirection litteraly means "You asked for this content but it is now at that place, load it from there".
To keep it with vger Unix way, a redirection is done using a symbolic link:
The following command would redirect requests from gemini://perso.pw/blog/index.gmi to gemini://perso.pw/capsule/index.gmi:
Unfortunately, this doesn't support globbing, in other words it is not possible to redirect everything from /blog/ to /capsule/ without creating a symlink for all previous resources to their new locations.
Cryptpad is a web office suite featuring easy real time collaboration on documents. Cryptpad is written in JavaScript and the daemon acts as a web server.
Another web front-end software will be required to allow TLS connections and secure the network access to the Cryptpad instance. This can be relayd, haproxy, nginx or lighttpd. I'll cover the setup using httpd, and relayd. Note that Cryptpad developers will provide support only to Nginx users.
"httpUnsafeOrigin" should be set to the public address on which cryptpad will be available. This will certainly be a HTTPS link with an hostname. I will use https://cryptpad.kongroo.eu
"httpSafeOrigin" should be set to a public address which is different than the previous one. Cryptpad requires two different addresses to work. I will use https://api.cryptpad.kongroo.eu
"adminEmail" must be set to a valid email used by the admin (certainly you)
Register yourself on your Cryptpad instance then visit the *Settings* page of your profile: copy your public signing key.
Edit Cryptpad file config.js and search for the pattern "adminKeys", uncomment it by removing the "/* */" around and delete the example key and paste your key as follow:
In this section I will explain how to configure generate your TLS certificate with acme-client and how to configure httpd and relayd to publish cryptpad. I consider it besides the current article because if you have nginx and already a setup to generate certificates, you don't need it. If you start from scratch, it's the easiest way to get the job done.
We will use httpd in a very simple way. It will only listen on port 80 for all domain to allow acme-client to work and also to automatically redirect http requests to https.
Edit /etc/acme-client.conf and change the last domain block, replace example.com and secure.example.com with your domains, like cryptpad.kongroo.eu and api.cryptpad.kongroo.eu as alternative name.
For convenience, you will want to replace the path for the full chain certificate to have hostname.crt instead of hostname.fullchain.pem to match relayd expectations.
This looks like this paragraph on my setup:
domain kongroo.eu {
alternative names { api.cryptpad.kongroo.eu cryptpad.kongroo.eu }
domain key "/etc/ssl/private/kongroo.eu.key"
domain full chain certificate "/etc/ssl/kongroo.eu.crt"
sign with buypass
}
Note that with the default acme-client.conf file, you can use *letsencrypt* or *buypass* as a certification authority.
You should be able to create your certificates now.
# acme-client kongroo.eu
Done!
You will want the certificate to be renewed automatically and relayd to restart upon certificate change. As stated by acme-client.conf man page, add this to your root crontab using crontab -e:
Make a selection and type |, you are then asked for a shell command, you have to use sed.
Sed can be used, but you can also select the lines and split the selection to make a new cursor before each word and replace the content by typing it, using the s command.
For my blog I format paragraphs so lines are not longer than 80 characters. This can be done by selecting lines and run fmt using a pipe command. You can use other software if fmt doesn't please you.
Short introduction about Gemini: it's a very recent protocol that is being simplistic and limited. Keys features are: pages are written in markdown like, mandatory TLS, no header, UTF-8 encoding only.
I wrote Vger to discover the protocol and the Gemini space. I had a lot of fun with it, it was the opportunity for me to rediscover the C language with a better approach. The sources include a full test suite. This test suite was unvaluable for the development process.
Vger was really built with security in mind from the first lines of code, now it offers the following features:
chroot and privilege dropping, and on OpenBSD it uses unveil/pledge all the time
virtualhost support
language selection
MIME detection
handcrafted man page, OpenBSD quality!
The name Vger is a reference to the 1979 first Star Trek movie.
Inetd will run vger` with the _gemini user. You need to take care that /var/gemini/ is readable by this user.
inetd is a wonderful daemon listening on ports and running commands upon connections. This mean when someone connects on the port 11965, inetd will run vger as _gemini and pass the network data to its standard input, vger will send the result to the standard output captured by inetd that will transmit it back to the TCP client.
Tell relayd to forward connections in relayd.conf
log connection
relay "gemini" {
listen on 163.172.223.238 port 1965 tls
forward to 127.0.0.1 port 11965
}
Make links to the certificates and key files according to relayd.conf documentation. You can use acme / certbot / dehydrate or any "Let's Encrypt" client to get certificates. You can also generate your own certificates but it's beyond the scope of this article.
From here, what's left is populating /var/gemini/ with the files you want to publish, the index.md file is special because it will be the default file if no file are requests.
In this article I will explain how to install a lsp plugin for kakoune to add language specific features such as autocompletion, syntax error reporting, easier navigation to definitions and more.
The principle is to use "Language Server Protocol" (LSP) to communicate between the editor and a daemon specific to a programming language. This can be also done with emacs, vim and neovim using the according plugins.
I recommend using a dedicated build user when building programs from sources, without a real audit you can't know what happens exactly in the build process. Mistakes could be done and do nasty things with your data.
There are a few steps. kak-lsp has its own configuration file but the default one is good enough and kakoune must be configured to run the kak-lsp program when needed.
Take care about the second command if you built from another user, you have to fix the path.
To support python programs you need to install python-language-server which is available in pip. There are no package for it on OpenBSD. If you install the program with pip, take care to have the binary in your $PATH (either by extending $PATH to ~/.local/bin/ or by copying the binary in /usr/local/bin/ or whatever suits you).
The pip command would be the following (your pip binary name may change):
To support C programs, clangd binary is required. On OpenBSD it is provided by the clang-tools-extra package. If clangd is in your $PATH then you should have working support.
I didn't look deep for now, the autocompletion automatically but may be slow in some situation.
Default keybindings for "gr" and "gd" are made respectively for "jump to reference" and "jump to definition".
Typing "diag" in the command prompt runs "lsp-diagnostics" which will open a new buffer explaining where errors are warnings are located in your source file. This is very useful to fix errors before compiling or running the program.
The official documentation explains well how you can check what is wrong with the setup. It consists into starting kak-lsp in a terminal and kakoune separately and check kak-lsp output. This helped me a lot.
Sery is back in the fourth floor 4 of the underworld. What mysteries
are to be discovered? What enemies will be slayed so we can make
our path?
Everything is awesome
Sery is in the fourth floor, she found stairs to go deeper but she
also heard coins flipping. Maybe a merchant is around? That would
be the right opportunity to buy weapons, armor and food.
After walking to a new room south-east, she found a large room with a hobbit statue h and a potion on the floor. The potion is not identified, so using it will be very risky.
The large room was a dead end. Back to the previous room Sery was now surrounded by enemies. A gas spore e, a green mold F and a giant bug :! She also felt hungry at the time, but she had to fight. Eggs and pancakes will be for another time.
While fleeing to the ascending stairs to search a merchant on this floor while escaping enemies, a gecko was blocking the way. Sery had to fight with her fists and fortunately the gecko didn’t oppose much resistance. But a few steps later, a goblin was also in the path. Sery’s dog location is unknown, it was certainly fighting in the previous room. Sery decided to drink a potion to recover from her 2 HP left and go back to the room, in hope the dog can help her.
It worked! The dog was just behind and charged the goblin would die instantly. The dog was starving and ate the goblin freshly killed, Sery was hungry too but preferred eating some pancake that wasn’t fresh, it had better taste than the remaining goblin meat tin can she had in her purse.
On the first steps in the room, she found a graffiti on the ground:
Atta?king a? ec| vhere the?c is rone i? usually a ?a?al mistakc!
The message didn’t make any sense. The room had a goblin statue and some gold on the ground, it’s all Sery had to know. The room was calm and nothing happened when crossing it. Sery seemed to be blessed!
-----
|....##
|@..| ###
----- #
Nearby she found a very small room with no other way than the entrance. This looked very suspicious and she decided to spend some time looking around for a clue about a secret door. She was right! A few minutes after she started to search, she found a hidden door! The door was not locked, which was surprising. Who knows what was waiting on the other side?
After walking a bit in a small and dark corridor, a new room was here, with an empty box along a wall and a grave in a corner in the opposite side of the room.
The large box was locked! Without lock pick she wasn’t able to open it. After all she went through in the dungeon, anger gave her some strength to break the box padlock after a few kicks in it.
The box contained the following objects:
a pyramidal amulet
a food ration
a black gem
two green gems
She still had some room on her bag, it wasn’t too heavy for now so she decided to take everything from the box.
Kicking the box consumed energy and she decided to restart a little, and eat something. The food ration from the box looked very tasty but it may be poisoned or toxic so she avoid it and ate goblin meat in tin can. It wasn’t good, but did the job.
She looked at the grave, it was old and only had engraved words on it which appeared to be
Yes Dear, just a few more minutes…
A corridor in the room was leading to a dead end. There was nothing. Even after searching for a long time, Sery didn’t find any way there so she decided to go back and descend to the next floor.
On a way back, she had to fight monsters: a newt, a sewer rat, a gas spore! After the fights, hunger was back again! It was time for a good meal: goblin meat and food ration. It did hit the spot and Sery felt a lot better.
Fifth floor
In the fifth floor, a potion ! was lying on the ground. There was some light, it wasn’t completely dark, without a lamp or a torch this would be a real problem.
In a corridor leading to a room in the south, she had to kill a coyote in the way. The room had a teleportation trap and an apple %, food!
Going east, she walked through a long corridor until a dead end. After searching for some time she found a way to get a body through a hole and get to the other side. A boulder was in the tunnel but she have been able to push it, fortunately the bolder was rolling fine.
The dog got triggered by the gnome presence and ran to fight the gnome. The gnome was definitely hostile. Sery ended quickly in hand-to-hand combat with the gnome.
The camera’s flash! She thought it should work, after all the camera still had forty seven pictures to take, or enemies to blind.
It worked, the poor creature got blinded, the dog was biting its back. After a few hits, the gnome died, leaving a bow on the ground.
Continuing her way, Sery found the room with the descending stairs. There were a homunculus i and a sewer rat r waiting. She knew the rat was an easy target but the other enemy was unknown. It didn’t appeared friendly and she doubted to be able to kill it without risking her life.
The homunculus was fast! It found Sery back from where they met. Sery was in troubles. The homunculus seemed hard to escape and while fleeing in a corridor, a dwarf zombie Z blocked the way.
She tried to fight it but she lost 9 HP in 2 hits, the beast was very powerful. It was time to drink the random potions she got over the journey. They were unidentified but there was no choice, except praying maybe.
Praying! Sery wasn’t a believer but praying was the best she could do. Her pray was deep and pure, she only wanted to have some hope for her future and her quest.
The Lady heard her pray, Sery got surrounded by a shimmering light. The dwarf zombie attacked Sery but got pulled back by some energy field. Sery felt a lot better, her health was fully recovered and also increased.
The room had only way to the south. Finding a merchant was becoming urgent. Her food supplies were depleting. She had a lot of money but that is not helpful in the middle of the underground among the monsters.
In the south room there was a lichen F, but it seemed peaceful, or guarding the stairs to descend to seventh floor, who knows? The room had no other entrance than the one by which Sery came, but after examining the walls, she found a door.
Nothing unusual in this floor. Continuing her progresses through the tunnels, she ended in a dark room, she wasn’t able to see further than a meter away.
One more step and she came face to face with a homunculus. Fortunately the dog was just behind and not fighting any other aggressive animals. The dog killed it fast. But then another homunculus came, which also got killed by the dog.
In the end, those homunculus are pretty weak.
Room after room, with only emptiness as a friend, Sery walked for a long time. And then he appeared! The merchant !
In this article I will explain how to download and run the FuguITA OpenBSD live-cd, which is not an official OpenBSD project (it is not endorsed by the OpenBSD project), but is available since a long time and is carefully updated at every release and errata published.
The file is gzipped, run gunzip on the img file FuguIta-6.8-amd64-202010251.img.gz (name may change over time because they get updated to include new erratas).
Then, copy the file to your usb memory stick. This can be dangerous if you don't write the file to the correct disk!
To avoid mistakes, I plug in the memory stick when I need it, then I check the last lines of the output of dmesg command which looks like:
Note that I use /dev/rsd1c for the sd1 device. I've added a r to use the raw mode (in opposition of buffered mode) so it gets faster, and the c stands for the whole disk (there is a historical explanation).
Boot on your usb memory stick. You will be prompted for a kernel, you can wait or type enter, the default is to use the multiprocessor kernel and there are no reason to use something else.
If will see a prompt "scanning partitions: sd0i sd1a sd1d sd1i" and be asked which is the FuguIta operating device, proposing a default that should be the correct one.
FROM HERE, YOUR KEYBOARD IS IN QWERTY.
Just type enter.
The second question will be the memory disk allowed size (using TMPFS), just press enter for "automatic".
Then, a boot mode will be showed: the best is the mode 0 for a livecd experience.
Keyboard type will be asked, just type the layout you want. Then answer to questions:
root password
hostname (you can just press enter)
IP to use (v4, v6, both [default])
When prompted for your network interfaces, WIFI may not work because the livecd doesn't have any firmware.
Finally, you will be prompted for C for console or X for xenodm. THERE ARE NO USER except root, so if you start X you can only use root as a user, which I STRONGLY discourage.
You can login console as root, use the two commands "useradd -m username" and "passwd username" to give a password to that user, and then start xenodm.
The livecd can restore data from a local hard drive, this is explained in the start guide of the FuguITA project.
Having FuguITA around is very handy. You can use it to check your hardware compatibility with OpenBSD without installing it. Packages can be installed so it's perfect to check how OpenBSD performs for you and if you really want to install it on your computer.
You can also use it as an usb live system to transport OpenBSD anywhere (the system must be compatible) by using the persistent mode, encryption being a feature! This may be very useful for people traveling on lot and who don't necesserarly want to travel with an OpenBSD laptop.
As I said in the introduction, the team is doing a very good job at producing FuguITA releases shortly after the OpenBSD release, and they continuously update every release with new erratas.
In this article I will share my opinion about things I like in OpenBSD, this may including a short rant about recent open source practices not helping non-linux support.
There is no telemetry on OpenBSD. It's good for privacy, there is nothing to turn off to disable reporting information because there is no need to.
The default system settings will prevent microphone to record sound and the webcam can't be accessed without user consent because the device is root's by default.
While the security features added (pledge and mainly unveil) to the market dominating web browsers can be cumbersome sometimes, this is really a game changer compared to using them on others operating systems.
With those security features enabled (by default) the web browsers are ony able to retrieve files in a few user defined directories like ~/Downloads or /tmp/ by default and some others directories required for the browsers to work.
This means your ~/.ssh or ~/Documents and everything else can't be read by an exploit in a web browser or a malicious extension.
It's possible to replicate this on Linux using AppArmor, but it's absolutely not out of the box and requires a lot of tweaks from the user to get an usable Firefox. I did try, it worked but it requires a very good understanding of the Firefox needs and AppArmor profile syntax to get it to work.
With this firewall, I can quickly check the rules of my desktop or server and understand what they are doing.
I also use a lot the bandwidth management feature to throttle the bandwidth some programs can use which doesn't provide any rate limiting. This is very important to me.
Linux users could use the software such as trickle or wondershaper for this.
Apart from the use of some funky hardware, OpenBSD has proven me being very stable and reliable. I can easily reach two weeks of uptime on my desktop with a few suspend/resume every day. My servers are running 24/7 without incident for years.
I rarely go further than two weeks on my workstation because I use the development version -current and I need to upgrade once in a while.
Keeping my OpenBSD up-to-date is very easy. I run syspatch and pkg_add -u twice a day to keep the system up to date. A release every six months requires a bit of work.
Basically, upgrading every six months looks like this, except some specific instructions explained in the upgrade guide (database server major upgrade for example):
Setting up an OpenBSD system with full disk encryption is easy.
Documentation to create a router with NAT is explained step by step.
Every binary or configuration file have their own up-to-date man page.
The FAQ, the website and the man pages should contain everything one needs. This represents a lot of information, it may not be easy to find what you need, but it's there.
If I had to be without internet for some times, I would prefer an OpenBSD system. The embedded documentation (man pages) should help me to achieve what I want.
Consider configuring a router with traffic shaping on OpenBSD and another one with Linux without Internet access. I'd 100% prefer read the PF man page.
This has been a hot topic recently. I very enjoy the way OpenBSD manage the contributions. I download the sources on my system, anywhere I want, modify it, generate a diff and I send it on the mailing list. All of this can be done from a console with tools I already use (git/cvs) and email.
There could be an entry barrier for new contributors: you may feel people replying are not kind with you. **This is not true.** If you sent a diff and received critics (reviews) of your code, this means some people spent time to teach you how to improve your work. I do understand some people may feel it rude, but it's not.
This year I modestly contributed to the projects OpenIndiana and NixOS this was the opportunity to compare how contributions are handled. Both those projects use github. The work flow is interesting but understanding it and mastering it is extremely complicated.
One has to make a github account, fork the project, create a branch, make the changes for your contribution, commit locally, push on the fork, use the github interface to do a merge request. This is only the short story. On NixOS, my first attempt ended in a pull request involving 6 months of old commits. With good documentation and training, this could be overcome, and I think this method has some advantages like easy continuous integration of the commits and easy review of code, but it's a real entry barrier for new people.
My opinion may be biased on this (even more than for the previous items), but I really think OpenBSD packages quality is very high. Most packages should work out of the box with sane defaults.
Packages requiring specific instructions have a README file installed with them explaining how to setup the service or the quirks that could happen.
Even if we lack some packages due to lack of contributors and time (in addition to some packages relying too much on Linux to be easy to port), major packages are up to date and working very well.
I will take the opportunity of this article to publish a complaint toward the general trend in the Open Source.
programs distributed only using flatpak / docker / snap are really Linux friendly but this is hostile to non Linux systems. They often make use of linux-only features and the builds systems are made for the linux distribution methods.
nodeJS programs: they are made out of hundreds or even thousands of libraries often working fragile even on Linux. This is a real pain to get them working on OpenBSD. Some node libraries embed rust programs, some will download a static binary and use it with no fallback solution or will even try to compile source code instead of using that library/binary from the system when installed.
programs using git to build: our build process makes its best to be clean, the dedicated build user **HAS NO NETWORK ACCESS* and won't run those git commands. There are no reasons a build system has to run git to download sources in the middle of the build.
I do understand that the three items above exist because it is easy for developers. But if you write software and publish it, that would be very kind of you to think how it works on non-linux systems. Don't hesitate to ask on social medias if someone is willing to build your software on a different platform than yours if you want to improve support. We do love BSD friendly developers who won't reject OpenBSD specifics patches.
Since my previous article about a continous integration service to track OpenBSD ports contribution I made a simple proof of concept that allowed me to track what works and what doesn't work.
A first step for the CI service would be to create a database of diffs sent to ports. This would allow people to track what has been sent and not yet committed and what the state of the contribution is (build/don't built, apply/don't apply). I would proceed following this logic:
a mail arrive and is sent to the pipeline
it's possible to find a pkgpath out of the file
the diff applies
distfiles can be fetched
portcheck is happy
Step 1 is easy, it could be mail dumped into a directory that get scanned every X minutes.
Step 2 is already done in my POC using a shell script. It's quite hard and required tuning. Submitted diffs are done with diff(1), cvs diff or git diff. The important part is to retrieve the pkgpath like "lang/php/7.4". This allow testing the port exists.
Step 3 is important, I found three cases so far when applying a diff:
it works, we can then register in the database it can be used to build
it doesn't work, human investigation required
the diff is already applied and patch think you want to reverse it. It's already committed!
Being able to check if a diff is applied is really useful. When building the contributions database, a daily check of patches that are known to apply can be done. If a reverse patch is detected, this mean it's committed and the entry could be delete from the database. This would be rather useful to keep the database clean automatically over time.
Step 4 is an inexpensive extra check to be sure the distfiles can be downloaded over the internet.
Step 5 is also an inexpensive check, running portinfo can reports easy to fix mistakes.
All the steps only require a ports tree. Only the step 4 could be tricked by someone malicious, using a patch to make the system download very huge files or files with some legal concerns, but that message would also appear on the mailing list so the risk is quite limited.
To go further in the automation, building the port is required but it must be done in a clean virtual machine. We could then report into the database if the diff has been producing a package correctly, if not, provide the compilation log.
Automatically creating an OpenBSD-current virtual machine was tricky but I've been able to sort this out using vmm, rsync and upobsd.
The script download the last sets using rsync, that directory is served from a mail server. I use upobsd to create an automatic installation with bsd.rd including my autoinstall file. Then it gets tricky :)
vmm must be started with its storage disk AND the bsd.rd, as it's an auto install, it will reboot after the install finishes and then will install again and again.
I found that using the parameters "-B disk" would make the vm to shutdown after installation for some reasons. I can then wait for the vm to stop and then start it without bsd.rd.
I'm currently able to deposite email as files in a directory and run a script that will extract the pkgpath, try to apply the patch, download distfiles, run portcheck and run the build on the host using PORTS_PRIVSEP. If the ports compiled fine, the email file is deleted and a proper diff is made from the port and moved into a staging directory where I'll review the diffs known to work.
This script would stop on blocking error and write a short text report for each port. I intended to sent this as a reply to the mailing at first, but maintaining a parallel website for people working on ports seems a better idea.
Let’s play NetHack and write a story along the way. I find nethack to be a wonderful game despite its quite simple graphics. In this game, you can do more actions than in any modern games. I can dip a towel in a fountain to make it wet, and wear it on my head. Maybe it would protect me from heat? Who knows.
As this leaves a lot of place for the imagination, every serious nethack game I play, I create a story in my head and try to imagine the various situations, so maybe I could write them down?
Welcome to the underworld Gehennom, you will read the story of Sery the human female neutral tourist and her dog. She has to find the Amulet of Yendor and come back to the surface, for some reasons.
@ is Sery and d is her dog.
Arrival - first floor
{ is a fountain, # a sink, - an open door and + a closed door.
In her inventory, she has 875 gold, tourists are rich! 24 darts to throw at enemies, 2 fortunes cookies, some various food (goblin meat in tin can, eggs, carrot, apple, pancakes…), 4 scrolls of magic mapping, 2 healing potions, and expensive camera and an uncursed credit card.
She went to the closed door but it resisted, after kicked it three times, the door opened! After walking around in tunnel, she only found empty rooms, leading to others tunnels.
# are corridors (when they are not sinks in a room).
At the end of a corridor, Sery was stuck but after searching around for some secrets passage, she found a hidden passage to the first room. Back to square one.
While walking toward the box, her dog suddenly disappeared, falling in a trap door! Sery shorten her exploration of the first level after opening the box to look after her dog.
The large box was locked, without weapon or tools to unlock it, Sery kicked the large box a dozen time so it opened. What a disappointment when she was it was empty!
Sery jumped into the trap to descend to the level below, her dog wasn’t in the room though. There were five gold to loot and stairs to descend to the third level. She needed to find her dog before continuing exploration to third level.
In the adjacent corridor, the dog was found sound and safe!
After continuing the exploration, a room was found with enemies!
F lichen, o goblin and a : newt! That was a lot of enemies for a simple tourist. She wanted to pull them into a corridor and let her dog take care of the enemies. This was a good spartiate strategy after all!
Unfortunately, when a lichen is in contact with you, you can’t escape. It took a while for Sery to kill the lichen and retreat in the corridor, she receive a few hits from the lichen and the goblin (HP 6/10). She heard some noises while staying in the corridor, after coming back in the room, the dog finished to kill the newt and the goblin seemed to ran away.
The dog was then attacking the goblin and killed it rather quickly. This was really fortunate that Sery was in company of her dog.
After walking a bit to continue the exploration, Sery stumbled on a sewer rat, she got hit rather hard and didn’t had much HP left! While retreating to the last room, looking for the dog who stayed back eating the goblin corp, the dog came back to her bringing a iron skull cap certainly found on the dead goblin. In one bit, the dog killed the rat.
After some rest to recover a few HP, Sery went back to the exploration. The exploration was quiet and easy, rooms with unlocked doors, she found the stairs to go upstairs. Nothing of interested was to be found, so it was time to go to the third level. A newt and a lichen were encountered in the corridors but opposed little resistance to the dog.
As usual, the dog took care of the enemies. A new room was found, multiples windows, some opening in previous rooms wasn’t explored yet too. There were lot of exploration to be done in this area.
Thinking about her inventory, she panicked and used her camera. The flash blinded the giant rat and he ran away! Unfortunately, another giant rat came from the left corridor. She tried to use her camera again but it didn’t work as expected as the giant was still standing in the corridor. The blinding effect didn’t seem very effective because a few seconds later, the first giant rat was back again!
----
....
..
r
r@#####
# #
##
She had no choice but run away, maybe at least fight then but one at a time in a corridor. She want backward, suffered from a giant rat bite and found her dog on the way, who came to the rescue. While she let her dog fighting, a third rat came from behind, this one, she really had to fight, no escape was possible with the dog fighting two rats in the corridor on the other side.
Camera flash, it worked! Time to throw darts, one dart was enough to kill the rat but she missed it a few times. The rat never missed a bite, Sery was in poor health at this moment.
The dog killed the two rats and she was safe, for now.
While walking around to find her way, she got surprised by a giant zombie Z who hit her hard. She had only 1 health point left. Death was close. What she could do? Try the camera flash, drink a potion, escape until her dog run and try to bite the zombie?
She decided to try the health potion and then, support enough hits from the zombie to blind it while the dog behind it was killing the undead living. It was a good idea, at the moment she dunked the healing potion, the zombie hit her, losing one health point, she would be dead if she didn’t drink that potion, then the dog killed the monster and our duo leveled up!
It was time to finish exploring and get deeper in the underworld. A = ring was on the ground in the last room. It was silver ring.
It would be foolish to wear the ring without identifying it first, it could be a cursed ring you can’t remove that makes you blind or provoke some unwanted effects.
Fourth floor
Arriving at the fourth floor, Sery found a green gem. Feeling this floor would be quite complicated, she decided to read one of her mapping scroll.
After the whole map got reveal in her mind, she got face to face with a dwarf h wielding a dagger. He really didn’t seem friendly but he didn’t attack her yet.
The whole area was very dark, without a torch or a light source, exploring this level would be very tedious.
After exploring the room, looking for interesting loots on the ground, the dwarf attacked her. This was a very dolorous stabbing. Sery retreated back to the upper stairs, she wanted to reach the level below through the other stairs on this level. In the room, she found her dog which stayed behind, fighting a gecko and a giant rat.
She started to feel hungry, hopefully she went to the underworld with a lot of food. She decided to eat a fortune cookie. When cracking it, she found a paper saying: They say that you should never introduce a rope golem to a succubus. This didn’t make much sense to her though.
While walking toward the other stairs, Sery found a graffiti on the ground: ??urist? we?r shirts loud enougn to wake t?e ?e?d.. As for the fortune cookie, this didn’t make much sense.
On her way, she fought various enemies: red mold, newt, rats, found a banana. Descending the stairs, she was surprised to see they didn’t lead to the forth floor with the dwarves, it was a parallel fourth floor. Could it be possible?? There were a newt and money in the room, it wasn’t dark.
-- -----
.....@..
|....d.|
|...:.$|
--------
She was angry.
The dog jumped on the newt and killed it. The duo got experience to reach level four. The dog, being a little dog, did grow up into a dog.
After a short rest to eat and recover health, Sery went back in corridors to find a way and continue her quest.
In the room she found stairs to go in the level below, would it be a good idea to descend now or should she explore the area first? She had lot of money, finding a merchant to buy armors and weapons would be a good idea.
To be continued
It’s all for today! Please tell me if you enjoyed it!
This article is about making your own mail server using Slackware
linux distribution, sendmail and cyrus-imap. This choice is because I
really love Slackware and I also enjoy non-mainstream stacks. While
everyone would recommend postfix/dovecot, I prefer using
sendmail/cyrus-imap. Please not this article contain ironical
statements, I will try to write them with some emphasis.
While some people use fossil fuel cars, some people use Slackware.
If you are used to clean, reproducible and automated deployments, the
present how-to is the totally opposite. This is the /Slackware/ way.
Slackware
Slackware is one of the oldest (maybe the oldest with debian) linux
distribution out there and it’s still usable. The last release (14.2)
is 4 years old but there are still security updates. I choose to use
the development branch slackware-current for this article.
I discovered an alternative to Windows in the early 2000' with a
friend showing me a « Linux » magazine, featuring Slackware
installation CDs and the instructions to install. It was my very first
contact with Linux and open source ever. I used Slackware multiple
times over time, and it was always a great system for me on my main
laptop.
The Slackware specifics could be said as: “not changing much” and
“quite limited”. Slackware never change much between releases, from
2010 to 2020, it’s pretty much the same system when you use it. I say
it’s rather limited, package wise, the default Slackware installation
requires like 15 GB on your disk because it bundles KDE and all the
kde apps, a bunch of editors (emacs,vim,vs,elvis), lot of
compilers/interpreter (gcc, llvm, ada, scheme, python, ruby
etc..). While it provides a LOT of things out of the box, you really
get all Slackware can offer. If something isn’t in the packages, you
need to install it yourself.
Full Disk Encryption or nothing
I recommend to EVERYONE the practice of having a full disk encryption
(phone, laptop, workstation, servers). If your system get stolen, you
will only lose hardware when you use full disk encryption.
Without encryption, the thief can access all your data forever.
Slackware provides a file README_CRYPT.txt explaining how to install
on an encrypted partition. Don’t forget to tell the bootloader LILO
about the initrd, and keep in mind the initrd must be recreated after
kernel upgrade
Use ntpd
It’s important to have a correct time on your server.
In /etc/ssh/sshd_config there are two changes to do:
Turn UsePam yes into UsePam no and add PasswordAuthentication.
Changes can be applied by restarting ssh with /etc/rc.d/rc.sshd
restart.
Before enabling this, don’t forget to deploy your public key to an
user who is able to become to root.
Get a SSL certificate
We need a SSL certificate for the infrastructure, so we will install
certbot. Unfortunately, certbot-auto
doesn’t work on Slackware because the system is unsupported. So we
will use pip and call certbot in standalone mode so we don’t need a
web server.
My domain being kongroo.eu the files are generated under
/etc/letsencrypt/live/kongroo.eu/.
Configure the DNS
Three DNS entries have to be added for a working email server.
SPF to tell the world which addresses have the right send your
emails
MX to tell the world which addresses will receive the emails and in
which order
DKIM (a public key) to allow recipients to check your emails really
comes from your servers (signed used a private key)
DMARC to tell recipient what to do with mails not respecting SPF
SPF
Simple, add an entry with v=spf1 mx if you want to allow your MX
servers to send emails. Basically, for simple setups, the same server
receive and send emails.
@ 1800 IN SPF "v=spf1 mx"
MX
My server with the address kongroo.eu will receive the emails.
@ 10800 IN MX 50 kongroo.eu.
DKIM
This part will be a bit more complicated. We have to generate a pair
of public and private keys and run a daemon that will sign outgoing
emails with the private key, so recipients can verify the emails
signature using the public key available in the DNS. We will use
opendkim, I found this
very good
article explaining how to use opendkim with sendmail.
Opendkim isn’t part of slackware base packages, fortunately it is
available in slackbuilds, you can check my
previous article explaining how to setup slackbuilds.
Get the content of default.txt, we will use it as a content for a
TXT entry in the DNS, select only the content between parenthesis
without double quotes: your DNS tool (like on Gandi) may take
everything without warning which would produce an invalid DKIM
signature. Been there, done that.
The file should looks like:
default._domainkey IN TXT ( "v=DKIM1; k=rsa; t=y; " "p=MIGfMA0GCSqGSIb3DQEBAQUAA4GNADCBiQKBgQC5iBUyQ02H5sfS54hg155eQBxtMuhcwB4b896S7o97pPGZEiteby/RtCOz9VV2TOgGckz8eOEeYHnONdlnYWGv8HqVwngPWJmiU7xbyoH489ZkG397ouEJI4mBrU9ZTjULbweT2sVXpiMFCalNraKHMVjqgZWxzqoE3ETGpMNNSwIDAQAB" )
We have to tell DMARC, this may help being accepted by big corporate
mail servers.
_dmarc.kongroo.eu. IN TXT "v=DMARC1;p=none;pct=100;rua=mailto:postmaster@kongroo.eu;"
This will tell the recipient that we don’t give specific instruction
to what to do with suspicious mails from our domain and tell
postmaster@kongroo.eu about the reports. Expect daily mail from
every mail server reached in the day to arrive on that address.
Install Sendmail
Unfortunately Slackware team dropped sendmail in favor to postfix in
the default install, this may be a good thing but I want
sendmail. Good news: sendmail is still in the extra directory.
I wanted to use citadel but it was really
complicated, so I went to sendmail.
Installation
Download the two sendmail txz packages on a mirror in the “extra”
directory:
https://mirrors.slackware.com/slackware/slackware64-current/extra/sendmail/
Run /sbin/installpkg on both packages.
Configuration
We will disable postfix.
# sh /etc/rc.d/rc.postfix stop
# chmod -x /etc/rc.d/rc.postfix
All the configuration will be done in /usr/share/sendmail/cf/cf, we
will use a default template from the package. As explained in the cf
files, we need to use a template and rebuild from this directory
containing all the macros.
This has been explained in a subsection of sendmail configuration. If
you didn’t read this step because you don’t want to setup dkim, you
missed information required for the next steps.
Install cyrus-imap
Slackware ships with dovecot in the default installation, but
cyrus-imapd is available in slackbuilds.
The bad news is that the slackbuild is outdated, so here it a simple
patch to apply in /usr/sbo/repo/network/cyrus-imapd. This patch also
fixes a compilation issue.
diff --git a/network/cyrus-imapd/cyrus-imapd.SlackBuild b/network/cyrus-imapd/cyrus-imapd.SlackBuild
index 48e2c54e55..251ca5f207 100644
--- a/network/cyrus-imapd/cyrus-imapd.SlackBuild
+++ b/network/cyrus-imapd/cyrus-imapd.SlackBuild
@@ -23,7 +23,7 @@
# ADVISED OF THE POSSIBILITY OF SUCH DAMAGE.
PRGNAM=cyrus-imapd
-VERSION=${VERSION:-2.5.11}
+VERSION=${VERSION:-2.5.16}
BUILD=${BUILD:-1}
TAG=${TAG:-_SBo}
@@ -107,6 +107,8 @@ CXXFLAGS="$SLKCFLAGS" \
$DATABASE \
--build=$ARCH-slackware-linux
+sed -i'' 's/gettid/_gettid/g' lib/cyrusdb_berkeley.c
+
make PERL_MM_OPT='INSTALLDIRS=vendor'
make install DESTDIR=$PKG
diff --git a/network/cyrus-imapd/cyrus-imapd.info b/network/cyrus-imapd/cyrus-imapd.info
index 99b2c68075..6ae26365dc 100644
--- a/network/cyrus-imapd/cyrus-imapd.info
+++ b/network/cyrus-imapd/cyrus-imapd.info
@@ -1,8 +1,8 @@
PRGNAM="cyrus-imapd"
VERSION="2.5.11"
HOMEPAGE="https://www.cyrusimap.org/"
-DOWNLOAD="ftp://ftp.cyrusimap.org/cyrus-imapd/cyrus-imapd-2.5.11.tar.gz"
-MD5SUM="674083444c36a786d9431b6612969224"
+DOWNLOAD="https://github.com/cyrusimap/cyrus-imapd/releases/download/cyrus-imapd-2.5.16/cyrus-imapd-2.5.16.tar.gz"
+MD5SUM="d5667e91d8e094ef24560a148e39c462"
DOWNLOAD_x86_64=""
MD5SUM_x86_64=""
REQUIRES=""
You can apply it by carefully copying the content in a file and use
the command patch.
We can now proceed with cyrus-imapd compilation and installation.
# env DATABASE=sqlite sboinstall cyrus-imapd
As explained in the README file shown during installation, we need to
do a few instructions.
There is another file /etc/cyrusd.conf used but we don’t need to
make changes in it.
We will have to copy the certificates into a separate place and allow
cyrus user to read them. This will have to be done every time the
certificate are renewed. Let’s add the certbot command so we can use
this script as a cron.
#!/bin/sh
DOMAIN=kongroo.eu
LIVEDIR=/etc/letsencrypt/live/$DOMAIN/
DESTDIR=/etc/letsencrypt/cyrus/
certbot certonly --standalone -d $DOMAIN -m usernam@example
mkdir -p $DESTDIR
install -o cyrus -g cyrus -m 400 $LIVEDIR/fullchain.pem $DESTDIR
install -o cyrus -g cyrus -m 400 $LIVEDIR/privkey.pem $DESTDIR
/etc/rc.d/rc.sendmail restart
/etc/rc.d/rc.cyrus-imapd restart
Add a crontab entry to run this script once a day, using crontab -e
to change root crontab.
MAILTO=""
PATH=/usr/local/sbin:/usr/sbin:/sbin:/usr/local/bin:/usr/bin:/bin
0 5 * * * sh /root/renew_certs.sh
Starting the mail server
We prepared the mail server to be working on reboot, but the services
aren’t started yet.
Voila! The user should be able to connect using IMAP and receive
emails.
Check your email setup
You can use the web service Mail
tester by sending an email. You could
copy/paste a real email to avoid having a bad mark due to spam
recognition (which happens if you send a mail with a few words). The
bad spam core isn’t relevant anyway as long as it’s due to the content
of your email.
Conclusion
I had real fun writing this article, digging hard in Slackware and
playing with unusual programs like sendmail and cyrus-imapd. I hope
you will enjoy too as much as I enjoyed writing it!
If you find mistakes or bad configuration settings, please contact me
so, I will be happy to discuss about the change and fix this how-to.
Nota Bene: Slackbuilds aren’t mean to be used on the current version,
but really on the last release. There is a github repository carrying
the -current changes on a github repository
https://github.com/Ponce/slackbuilds/.
In today article I will explain how to use
Slackbuilds repository on a
Slackware current system.
You can read the Documentation of
slackbuilds for more information.
We will first install sbotools package which make the use of
slackbuilds a lot easier: like a proper ports tree. As it’s preferable
to let the tools create the repository, we will install them without
downloading the whole slackbuild repository.
Download the slackbuild
from this page,
extract it and cd into the new directory.
$ tar xzvf sbotools.tar.gz
$ cd sbotools
$ . ./sbotools.info
$ wget $DOWNLOAD
$ md5sum $(basename $DOWNLOAD)
$ echo $MD5SUM
The two md5 string should match.
Now, run the build as root
$ sudo sh sbotools.SlackBuild
[lot of text]
Slackware package /tmp/sbotools-2.7-noarch-1_SBo.tgz created.
The slackbuilds tree is now installed under /usr/sbo/repo. This
could be configured before using sboconfig -s /home/solene which
would create a /home/solene/repo.
Searching a port
One can use the command sbofind to look for a port:
We will install the previously searched port: nethack
# sboinstall nethack
Nethack is a single-player dungeon exploration game. The emphasis is
on discovering the detail of the dungeon. Each game presents a
different landscape - the random number generator provides an
essentially unlimited number of variations of the dungeon and its
denizens to be discovered by the player in one of a number of
characters: you can pick your race, your role, and your gender.
User accounts that play this need to be members of the "games" group.
Proceed with nethack? [y] y
nethack added to install queue.
Install queue: nethack
Are you sure you wish to continue? [y] y
[... compilation ... ]
+==============================================================================
| Installing new package /tmp/nethack-3.6.6-x86_64-1_SBo.tgz
+==============================================================================
Verifying package nethack-3.6.6-x86_64-1_SBo.tgz.
Installing package nethack-3.6.6-x86_64-1_SBo.tgz:
PACKAGE DESCRIPTION:
# nethack (roguelike game)
#
# Nethack is a single-player dungeon exploration game. The emphasis is
# on discovering the detail of the dungeon. Each game presents a
# different landscape - the random number generator provides an
# essentially unlimited number of variations of the dungeon and its
# denizens to be discovered by the player in one of a number of
# characters: you can pick your race, your role, and your gender.
#
# http://nethack.org
#
Package nethack-3.6.6-x86_64-1_SBo.tgz installed.
Cleaning for nethack-3.6.6...
Done, nethack is installed! sboinstall manages dependencies and if
required will ask you for every required other slackbuilds to install
to add to the queue before starting compiling.
Example: getting flatpak
Flatpak is a software distribution system
for linux distributions, mainly to provide desktop software that could
be complicated to package like Libreoffice, GIMP, Microsoft Teams
etc… Using Slackware, this can be a good source of software.
To use flatpak and the official flathub repository, we need to
install flatpak first. It’s now as easy as:
# sboinstall flatpak
And answer yes to questions (you will be asked to agree for every
dependency required, there are a few of them), if you don’t want to
answer, you can use -r flag to automatically accept.
We need to add the official repository flathub using the
following command:
You will be prompted about all the dependencies required in order to
get VLC installed, those dependencies are some system parts that will
be shared across all the flatpak software in order to efficiently use
disk space. For VLC, some kde components will be required and also
Xorg GL/VAAPI/openh264 environments, flatpak manage all this and you
don’t have to worry about this.
The file /usr/sbo/repo/desktop/flatpak/README explains quirks of
flatpak on Slackware, like pulseaudio instructions or the polkit
policy on slackware not allowing your user to use the global flatpak
install command.
I found the following ~/.xinitrc to enable dbus and pulseaudio for
me, so flatpak programs work.
Having a totally disconnected system isn’t really practical for a few
reasons. Sometimes, I really need to connect the offline laptop to the
network. I do produce some content on the computer, so I need to do
backups. The easiest way for me to have reliable backup is to host
them on a remote server holding the data, this requires network
connection for the time of the backup. Of course, backups could be
done on external disks or usb memory sticks (I don’t need to backup
much), but I never liked this backup solution; don’t get me wrong, I
don’t say it’s ineffective, but it doesn’t suit my needs.
Besides the backup, I may need to sync files like my music files. I
may have bought new music that I want to get on the offline laptop, so
network access is required.
I also require internet access to install new packages or upgrade the
system, this isn’t a regular need but I occasionnaly require a new
program I forgot to install. This could be solved by downloaded the
whole packages repository but this would require too many disk space
for packages I would never use. This would also waste a lot of network
transfer.
Finally, when I work on my blog, I need to publish the files, I use
rsync to sync the destination directory from my local computer and
this requires access to the Internet through ssh.
A nice place at the right time
The moments I enjoy using this computer the most is by taking the
laptop on a table with nothing around me. I can then focus about what
I am doing. I find comfortable setups being source of distraction, so
a stool and a table are very nice in my opinion.
In addition to have a clean place to use it, I like to dedicate some
time for the use of this computer. I can write texts or some code in a
given time frame.
On a computer with 24/7 power and internet access I always feel
everything is at reach, then I tend to slack with it.
Having a rather limited battery life changes the way I experience the
computer use. It has a finite time, I have N minutes until the
computer has to be charged or shutdown. This produces for me the same
effect than when starting watching a movie, sometimes I pick up a
movie that fits the time I can spend on it.
Knowing I have some time until the computer stops, I know I must keep
focused because time is passing.
Simple article for posterity or future-me. I will share here my tweaks
to make the IBook G4 laptop (apple keyboard) suitable for OpenBSD ,
this should work for Linux too as long as you run X.
Command should be alt+gr
I really need the alt+gr key which is not there on the keyboard, I
solved this by using this line in my ~/.xsession.
xmodmap -e "keycode 115 = ISO_Level3_Shift"
i3 and mod4
As the touchpad is incredibely bad by nowadays standards (and it only
has 1 button and no scrolling feature!), I am using a window manager
that could be entirely keyboard driven, while I’m not familiar with
tiling window manager, i3 was easy to understand and light
enough. Long time readers may remember I am familiar with stumpwm but
it’s not really a dynamic tiling window manager, I can only tolerate
i3 using the tabs mode.
But an issue arise, there are no “super” key on the keyboard, and
using “alt” would collide with way too many programs. One solution is
to use “caps lock” as a “super” key.
I added this in my ~/.xsession file:
xmodmap ~/.Xmodmap
with ~/.Xmodmap having the following instructions:
Today post is about
Brutaldon, a
Mastodon/Pleroma interface in old fashion HTML like in the web 1.0
era. I will explain how it works and how to install it. Tested and
approved on an 16 years old powerpc laptop, using Mastodon with w3m
or dillo web browsers!
Introduction
Brutaldon is a mastodon client running as a web server. This mean you
have to connect to a running brutaldon server, you can use a public
one like Brutaldon.online and then you
will have two ways to connect to your account:
using oauth which will redirect through a dedicated API page of
your mastodon instance and will give back a token once you logged
in properly, this is totally safe of use, but requires javascript
to be enabled to works due to the login page on the instance
there is “old login” method in which you have to provide your
instance address, your account login and password. This is not
really safe because the brutaldon instance will known about your
credentials, but you can use any web browser with that. There are
not much security issues if you use a local brutaldon instance
How to install it
The installation is quite easy, I wish this could be as easy more
often. You need a python3 interpreter and pipenv. If you don’t have
pipenv, you need pip to install pipenv. On OpenBSD this would
translates as:
$ pip3.8 install --user pipenv
Note that on some system, pip3.8 could be pip3, or pip. Due to the
coexistence of python2 and python3 for some time until we can get ride
of python2, most python related commands have a suffix to tell which
python version it uses.
If you install pipenv with pip, the path will be
~/.local/bin/pipenv.
Now, very easy to proceed! Clone the code, run pipenv to get the
dependencies, create a sqlite database and run the server.
$ git clone git://github.com/jfmcbrayer/brutaldon.git
$ cd brutaldon
$ pipenv install
$ pipenv run python ./manage.py migrate
$ pipenv run python ./manage.py runserver
And voilà! Your brutaldon instance is available on
http://localhost:8000, you only need to open
it on your web browser and log-in to your instance.
As explained in the INSTALL.md file of the project, this method
isn’t suitable for a public deployment. The code is a Django webapp
and could be used with wsgi and a proper web server. This setup is
beyond the scope of this article.
In this article I will tell you about the
Scuttlebutt social network,
what makes it special and how to join it using OpenBSD. From here,
I’ll refer to Scuttlebutt as SSB.
Introduction to the protocol
You can find all the related documentation on
the official website.
I will make a simplification of the protocol to present it.
SSB is decentralized, meaning there are no central server with
clients around it (think about Twitter model) nor it has a constellation
of servers federating to each others (Fediverse: mastodon, plemora,
peertube…). SSB uses a peer to peer model, meaning nodes exchanges
data between others nodes. A device with an account is a node,
someone using SSB acts as a node.
The protocol requires people to be mutual followers to make the
private messaging system to work (messages are encrypted end-to
end).
This peer to peer paradigm has specific implications:
Internet is not required for SSB to work. You could use it with
other people in a local network. For example, you could visit a
friend’s place exchange your SSB data over their network.
Nodes owns the data: when you join, this can be very long to
download the content of nodes close to you (relatively to people
you follow) because the SSB client will download the data, and then
serves everything locally. This mean you can use SSB while being
offline, but also that in the case seen previously at your friend’s
place, you can exchange data from mutual friends. Example: if A
visits B, B receives A updates. When you visit B, you will receive
B updates but also A updates if you follow B on the network.
Data are immutables: when you publish something on the network,
it will be spread across nodes and you can’t modify those data.
This is important to think twice before publishing.
Moderation: there are no moderation as there are no autority in
control, but people can block nodes they don’t want to get data
from and this blocking will be published, so other people can easily
see who gets blocked and block it too. It seems to work, I don’t
have opinion about this.
You discover parts of the network by following people, giving
you access to the people they follow. This makes the discovery of
the network quite organic and should create some communities by
itself. Birds of feather flock together!
It’s complicated to share an account across multiples devices
because you need to share all your data between the devices, most
people use an account per device.
SSB clients
There are differents clients, the top clients I found were:
There are also lot of applications using the protocol, you can find
a list on this link.
One particularly interesting project is git-ssb, hosting a git
repository on the network.
Most of the code related to SSB is written in NodeJS.
In my opinion, Patchwork is the most user-friendly client but Oasis
is very nice too. Patchwork has more features, like being able to
publish pictures within your messages which is not currently possible
with Oasis.
Manyverse works fine but is rather limited in term of features.
The developer community working on the projects seems rather small
and would be happy to receive some help.
How to install Oasis on OpenBSD
I’ve been able to get the Oasis client to run on OpenBSD. The NodeJS
ecosystem is quite hostile to anything non linux but following the
path of qbit (who solved few libs years
ago), this piece of software works.
There is currently ONE issue that require a hack to start Oasis.
The lo0 interface must not have any IPv6 address.
You can use the following command as root to remove the IPv6
addresses.
# ifconfig lo0 -inet6
I reported this bug as I’ve not been able to fix it myself.
How to use Oasis on OpenBSD
2023–10–21 THIS IS OUTDATED: oasis seems to be unmaintained, and I can’t get it to work anymore even on Linux.
When you want to use Oasis, you have to run
$ node /path/to/oasis_sources
You can add --help to have the usage output, like --offline if
you don’t want oasis to do networking.
When you start oasis, you can then open http://localhost:3000 to
access network. Beware that this address is available to anyone
having access to your system.
You have to use an invitation from someone to connect to a node
and start following people to increase your range in this small
world.
You absolutely need to backup your ~/.ssb/ directory if you don’t
want to lose your account. There are no central server able to
help you recover your account in case of data lass.
If you want to use another client on another computer, you have
to copy this directory to the new place.
I don’t think the whole directory is required, but I have not
been able to find more precise information.
In this long blog post, I will write about the technical details
of the OpenBSD stable packages building infrastructure. I have setup
the infrastructure with the help of Theo De Raadt who provided me
the hardware in summer 2019, since then, OpenBSD users can upgrade
their packages using pkg_add -u for critical updates that has
been backported by the contributors. Many thanks to them, without
their work there would be no packages to build. Thanks to pea@ who
is my backup for operating this infrastructure in case something
happens to me.
The total lines of code used is around 110 lines of shell.
Original design
In the original design, the process was the following. It was done
separately on each machine (amd64, arm64, i386, sparc64).
Updating ports
First step is to update the ports tree using cvs up from a cron
job and capture its output. If there is a result, the process
continues into the next steps and we discard the result.
With CVS being per-directory and not using a database like git or
svn, it is not possible to “poll” for an update except by verifying
every directory if a new version of files is available. This check
is done three time a day.
Make a list of ports to compile
This step is the most complicated of the process and weights for a
third of the total lines of code.
The script uses cvs rdiff between the cvs release and stable
branches to show what changed since release, and its output is
passed through a few grep and awk scripts to only retrieve the
“pkgpaths” (the pkgpath of curl is net/curl) of the packages
that were updated since the last release.
From this raw output of cvs rdiff:
File ports/net/dhcpcd/Makefile changed from revision 1.80 to 1.80.2.1
File ports/net/dhcpcd/distinfo changed from revision 1.48 to 1.48.2.1
File ports/net/dnsdist/Makefile changed from revision 1.19 to 1.19.2.1
File ports/net/dnsdist/distinfo changed from revision 1.7 to 1.7.2.1
File ports/net/icinga/core2/Makefile changed from revision 1.104 to 1.104.2.1
File ports/net/icinga/core2/distinfo changed from revision 1.40 to 1.40.2.1
File ports/net/synapse/Makefile changed from revision 1.13 to 1.13.2.1
File ports/net/synapse/distinfo changed from revision 1.11 to 1.11.2.1
File ports/net/synapse/pkg/PLIST changed from revision 1.10 to 1.10.2.1
From here, for each pkgpath we have sorted out, the sqlports database
is queried to get the full list of pkgpaths of each packages, this
will include all packages like flavors, subpackages and multipackages.
This is important because an update in editors/vim pkgpath will
trigger this long list of packages:
Once we gathered all the pkgpaths to build and stored them in a
file, next step can start.
Preparing the environment
As the compilation is done on the real system (using PORTS_PRIVSEP
though) and not in a chroot we need to clean all packages installed
except the minimum required for the build infrastructure, which are
rsync and sqlports.
dpb(1) can’t be used because it didn’t gave good results for
building the delta of the packages between release and stable.
The various temporary directories used by the ports infrastructure
are cleaned to be sure the build starts in a clean environment.
Compiling and creating the packages
This step is really simple. The ports infrastructure is used
to build the packages list we produced at step 2.
env SUBDIRLIST=package_list BULK=yes make package
In the script there is some code to manage the logs of the previous
batch but there is nothing more.
Every new run of the process will pass over all the packages which
received a commit, but the ports infrastructure is smart enough to
avoid rebuilding ports which already have a package with the correct
version.
Transfer the package to the signing team
Once the packages are built, we need to pass only the built
packages to the person who will manually sign the packages before
publishing them and have the mirrors to sync.
From the package list, the package file lists are generated and
reused by rsync to only copy the packages generated.
The system has all the -release packages in
${PACKAGE_REPOSITORY}/${MACHINE_ARCH}/all/ (like
/usr/ports/packages/amd64/all) to avoid rebuilding all dependencies
required for building a package update, thus we can’t copy all the
packages from the directory where the packages are moved after
compilation.
Send a notification
Last step is to send an email with the output of rsync to send an
email telling which machine built which package to tell the people
signing the packages that some packages are available.
As this process is done on each machine and that they
don’t necessarily build the same packages (no firefox on sparc64)
and they don’t build at the same speed (arm64 is slower), mails
from the four machines could arrive at very different time, which
led to a small design change.
The whole process is automatic from building to delivering the
packages for signature. The signature step requires a human to be
done though, but this is the price for security and privilege
separation.
Current design
In the original design, all the servers were running their separate
cron job, updating their own cvs ports tree and doing a very long
cvs diff. The result was working but not very practical for the
people signing who were receiving mails from each machine for each
batch.
The new design only changed one thing: One machine was chosen to
run the cron job, produce the package list and then will copy that
list to the other machines which update their ports tree and run
the build. Once all machines finished to build, the initiator machine
will gather outputs and send an unique mail with a summary of each
machine. This became easier to compare the output of each architecture
and once you receive the email this means every machine finished
their job and the signing can be done.
Having the summary of all the building machines resulted in another
improvement: In the logic of the script, it is possible to send an
email telling absolutely no package has been built while the process
was triggered, which means, something went wrong. From here, I
need to check the logs to understand why the last commit didn’t
produce a package. This can be failures like a distinfo file
update forgotten in the commit.
Also, this permitted fixing one issue: As the distfiles are shared
through a common NFS mount point, if multiples machines try to fetch
a distfile at the same time, both will fail to build. Now, the
initiator machine will download all the required distfiles before
starting the build on every node.
All of the previous scripts were reused, except the one
sending the email which had to be rewritten.
New Port of the Week after 3 years! I never thought it was so long
since last blog post about slrn.
This post is about the awesome rclone program, written in Go and
available on most popular platforms (including OpenBSD!). I will
explain how to configure it from the interactive command, from file
and what you can do with rclone.
rclone can be see as a rsync on steroids which supports lot of
Cloud backend and also support creating an encrypted data repository
over any backend (local file, ftp, sftp, webdav, Dropbox, AWS S3,
etc…).
It’s not a automatic synchronization tool or a backup
software. It can copy files from A to B, synchronize two places
(can be harmful if you don’t pay attention).
Let’s see how to use it with an ssh server on which we will
create an encrypted repository to store important data.
Most of the time, run your package manager to install rclone.
It’s a single binary.
Interactive configuration
You can skip this LONG section if you want to learn what rclone
can do and how to configure it in a 10 lines files.
There is a parameter to have a question / answer interface to
configure your repository, using rclone config.
I’ll make a full walkthrough to enable an encrypted repository
because I struggled to understand the logic behind rclone when I
started using it.
Let’s start. I’ll create an encrypted destination on my local NAS
which doesn’t have full disk encryption, so anyone who access the
system won’t be able to read my data. First, this will require to
set up an sftp repository and then an encrypted repository using the
previous one as a backend.
Let’s create a new config named home_nas.
$ rclone config
2020/10/27 21:30:48 NOTICE: Config file "/home/solene/.config/rclone/rclone.conf" not found - using defaults
No remotes found - make a new one
n) New remote
s) Set configuration password
q) Quit config
n/s/q> n
name> home_nas
We want the storage type 29, “SSH/SFTP” (I removed all 50+ others
storages for readability).
Type of storage to configure.
Enter a string value. Press Enter for the default ("").
Choose a number from below, or type in your own value
[...]
29 / SSH/SFTP Connection
\ "sftp"
[...]
Storage> 29
My host is 192.168.1.200
** See help for sftp backend at: https://rclone.org/sftp/ **
SSH host to connect to
Enter a string value. Press Enter for the default ("").
Choose a number from below, or type in your own value
1 / Connect to example.com
\ "example.com"
host> 192.168.1.200
I will connect with the username solene.
SSH username, leave blank for current username, solene
Enter a string value. Press Enter for the default ("").
user> solene
Standard port 22, which is the default
SSH port, leave blank to use default (22)
Enter a string value. Press Enter for the default ("").
port>
I answer n because I want rclone to use ssh agent, this could
be the ssh password to the remote user, but I highly discourage
everyone from using password authentication on SSH!
SSH password, leave blank to use ssh-agent.
y) Yes type in my own password
g) Generate random password
n) No leave this optional password blank (default)
y/g/n> n
Leave this except if you want to provide a private key.
Raw PEM-encoded private key, If specified, will override key_file parameter.
Enter a string value. Press Enter for the default ("").
key_pem>
Leave this except if you want to provide a PEM-encoded private key.
Path to PEM-encoded private key file, leave blank or set key-use-agent to use ssh-agent.
Leading `~` will be expanded in the file name as will environment variables such as `${RCLONE_CONFIG_DIR}`.
Enter a string value. Press Enter for the default ("").
key_file>
Leave this except if you need to use a password to unlock your
private key. I use ssh agent so I don’t need it.
The passphrase to decrypt the PEM-encoded private key file.
Only PEM encrypted key files (old OpenSSH format) are supported. Encrypted keys
in the new OpenSSH format can't be used.
y) Yes type in my own password
g) Generate random password
n) No leave this optional password blank (default)
y/g/n> n
If your user agent manage multiples keys, you should enter the
correct value here, I only have one key so I leave it empty.
When set forces the usage of the ssh-agent.
When key-file is also set, the ".pub" file of the specified key-file is read and only the associated key is
requested from the ssh-agent. This allows to avoid `Too many authentication failures for *username*` errors
when the ssh-agent contains many keys.
Enter a boolean value (true or false). Press Enter for the default ("false").
key_use_agent>
This is a question about crypto, accept the default except if you
have to connect to old servers.
Enable the use of insecure ciphers and key exchange methods.
This enables the use of the following insecure ciphers and key exchange methods:
- aes128-cbc
- aes192-cbc
- aes256-cbc
- 3des-cbc
- diffie-hellman-group-exchange-sha256
- diffie-hellman-group-exchange-sha1
Those algorithms are insecure and may allow plaintext data to be recovered by an attacker.
Enter a boolean value (true or false). Press Enter for the default ("false").
Choose a number from below, or type in your own value
1 / Use default Cipher list.
\ "false"
2 / Enables the use of the aes128-cbc cipher and diffie-hellman-group-exchange-sha256, diffie-hellman-group-exchange-sha1 key exchange.
\ "true"
use_insecure_cipher>
We want to keep hashcheck feature so just skip the answer to keep
the default value.
Disable the execution of SSH commands to determine if remote file hashing is available.
Leave blank or set to false to enable hashing (recommended), set to true to disable hashing.
Enter a boolean value (true or false). Press Enter for the default ("false").
disable_hashcheck>
We are at the end of the configuration, we are proposed to change
more parameters but we don’t need to.
Edit advanced config? (y/n)
y) Yes
n) No (default)
y/n> n
Now we can see the output of the configuration file of rclone in
regards to my home_nas destination. I agree with the configuration
to continue.
Remote config
--------------------
[home_nas]
type = sftp
host = 192.168.1.200
user = solene
--------------------
y) Yes this is OK (default)
e) Edit this remote
d) Delete this remote
y/e/d> y
Here is a summary of the configuration, we have only one remote
here.
Current remotes:
Name Type
==== ====
home_nas sftp
In the menu, I will choose to add another remote. Let’s name it
home_nas_encrypted
e) Edit existing remote
n) New remote
d) Delete remote
r) Rename remote
c) Copy remote
s) Set configuration password
q) Quit config
e/n/d/r/c/s/q> n
name> home_nas_encrypted
We will choose the special storage crypt which work on an existing
backend.
Type of storage to configure.
Enter a string value. Press Enter for the default ("").
Choose a number from below, or type in your own value
10 / Encrypt/Decrypt a remote
\ "crypt"
Storage> 10
To this question, we will define we want the data stored to
home_nas_encrypted being saved in home_nas remote in the
encrypted_repo directory.
** See help for crypt backend at: https://rclone.org/crypt/ **
Remote to encrypt/decrypt.
Normally should contain a ':' and a path, eg "myremote:path/to/dir",
"myremote:bucket" or maybe "myremote:" (not recommended).
Enter a string value. Press Enter for the default ("").
remote> home_nas:encrypted_repo
Depending on the level of obfuscation your choice may vary. The
simple filename obfuscation is fine for me.
How to encrypt the filenames.
Enter a string value. Press Enter for the default ("standard").
Choose a number from below, or type in your own value
1 / Encrypt the filenames see the docs for the details.
\ "standard"
2 / Very simple filename obfuscation.
\ "obfuscate"
3 / Don't encrypt the file names. Adds a ".bin" extension only.
\ "off"
filename_encryption> 2
As for the directory names obfuscation, I recommend to enable it,
otherwise that leave the whole directory tree readable!
Option to either encrypt directory names or leave them intact.
NB If filename_encryption is "off" then this option will do nothing.
Enter a boolean value (true or false). Press Enter for the default ("true").
Choose a number from below, or type in your own value
1 / Encrypt directory names.
\ "true"
2 / Don't encrypt directory names, leave them intact.
\ "false"
directory_name_encryption> 1
Type the password that will be used to encrypt the data.
Password or pass phrase for encryption.
y) Yes type in my own password
g) Generate random password
y/g> y
Enter the password:
password:
Confirm the password:
password:
You can add a salt to the passphrase, I choose not too.
Password or pass phrase for salt. Optional but recommended.
Should be different to the previous password.
y) Yes type in my own password
g) Generate random password
n) No leave this optional password blank (default)
y/g/n>
No need to change advanced parameters.
Edit advanced config? (y/n)
y) Yes
n) No (default)
y/n> n
Here is a summary of the configuration of this remote backend.
I’m fine with it.
Remote config
--------------------
[home_nas_encrypted]
type = crypt
remote = home_nas:encrypted_repo
directory_name_encryption = true
password = *** ENCRYPTED ***
--------------------
y) Yes this is OK (default)
e) Edit this remote
d) Delete this remote
y/e/d> y
We see we have now two remote backends, one with the crypt type.
Current remotes:
Name Type
==== ====
home_nas sftp
home_nas_encrypted crypt
Quit rclone, the configuration is done.
e) Edit existing remote
n) New remote
d) Delete remote
r) Rename remote
c) Copy remote
s) Set configuration password
q) Quit config
e/n/d/r/c/s/q> q
Configuration file
The previous configuration process only produced this short
configuration file, so you may copy/paste from it and adapt to add
more backends if you want, instead of doing the tedious config
process.
Here is my file ~/.config/rclone/rclone.conf on my desktop.
[home_nas]
type = sftp
host = 192.168.1.200
user = solene
[home_nas_encrypted]
type = crypt
remote = home_nas:encrypted_repo
directory_name_encryption = true
password = GDS9B1B1LrBa3ltQrSbLf1Vq5C6VbaA1AJVlSZ8
First usage
Now we defined our configuration, we need to create the remote
directory that will be used as a backend, this is important to avoid
errors when using rclone, this is a simple step required only once.
$ rclone mkdir home_nas_encrypted:
On the remote server, I can see a /home/solene/encryted_repo
directory. It’s now ready to use!
A few commands
rclone has a LOT of commands available, I will present a few
of them.
Copying files to/from backend
Let’s say I want to copy files to the encrypted repository. There
is a copy command.
Files and directories can also be copied with the sync command,
but this must be used with care because it makes sure the destination
matches exactly the origin when you use it. It’s the equivalent of
rsync -a --delete origin/ destination/, so any extra files will
be removed! Note that you can use --dry-run to see what will
happen.
Filters
When you copy files using the various available method, instead of
using a path, you can provide a filter file or a list of paths to
transfers. This can be very efficient when you want to recover
specifics data.
rclone supports a lot of parameters, like to limit upload
bandwidth, copy multiples files at once, enable an interactive mode
in case of file deletion/overwriting.
Mount
On Linux, FreeBSD and MacOS, rclone can use a FUSE filesystem
to mount the remote repository on the filesystem, making its uses
totally transparent.
This is extremely useful, avoiding the tediousness of the get/put
paradigm of rclone.
This can even be used to make an encrypted repository on the local
filesystem! :)
Create a webdav/sftp/ftp server
rclone has the capability of act as a server and expose a
configured remote backend on various network protocol like webdav,
sftp, ftp, s3 (minio) !
If you plan to use an OpenVPN tunnel to reach your default gateway,
which would make the tun interface in the egress group, and use
tun0 in your pf.conf which is loaded before OpenVPN starts?
Here are the few tips I use to solve the problems.
Remove your current default gateway
We don’t want a default gateway on the system. You need to know
the remote address of the VPN server.
If you have a /etc/mygate file, remove it.
The /etc/hostname.if file (with if being your interface name,
like em0 for example), should look like this:
192.168.1.200
up
!route add -host A.B.C.D 192.168.1.254
First line is the IP on my lan
Second line is to make the interface up.
Third line is means you want to reach A.B.C.D via 192.168.1.254,
with the IP A.B.C.D being the remote VPN server.
Create the tun0 interface at boot
Create a /etc/hostname.tun0 file with only up as content,
that will create tun0 at boot and make it available to pf.conf
and you prevent it from loading the configuration.
You may think one could use “egress” instead of the interface name,
but this is not allowed in queuing.
Don’t let OpenVPN manage the route
Don’t use redirect-gateway def1 bypass-dhcp from the OpenVPN
configuration, this will create a route which is not default and
so the tun0 interface won’t be in the egress group, which is not
something we want.
Add those two lines in your configuration file, to execute
a script once the tunnel is established, in which we will make
the default route.
script-security 2
up /etc/openvpn/script_up.sh
In /etc/openvpn/script_up.sh you simply have to write
#!/bin/sh
/sbin/route add -net default X.Y.Z.A
If you have IPv6 connectivity, you have to add this line:
/sbin/route add -inet6 2000::/3 fe80::%tun0
(not sure it’s 100% correct for IPv6 but it works fine for me! If
it’s wrong, please tell me how to make it better).
For long time I wanted to share a list of non-violent games I enjoyed, so here it is. Obviously, this list is FAR from being complete and exhaustive. It contains games I played and that I liked. They should all run on Linux and some on OpenBSD.
Aside this list, most tycoon and puzzle games should be non-violent.
This game is like Factorio, you have to automate production lines
and increase the output of shapes/colors. Very time consuming.
The project is Open source but you need to buy the game if you
don’t want to compile yourself. Or just use my compiled version
working in a web browser.
This game is about building equipment to restore the nature into
a wasteland, improve the biodiversity and then remove all your
structures.
The game is not open source but is free of charge. The music
seems to be under an open licence.
Still, you can pay what you want for it to support the developer.
This game is a clone of Minecraft, it supports a lot of mods (which
can make the game very complex, like adding trains tracks with their
signals, the pinnacle of complexity :D). As far as I know, the game
now supports health but there are no fight involved.
This game is about a teenager character who is on vacation in a
place with no cell network, and you will have to make a hike and
meet people to go to the end. Very relaxing :)
The game isn’t open source and isn’t free, but costs around 8€ at
the moment from France.
This game is about adding trains to tracks and avoid them
to crash. I found this game to be more about reflexes than
building, simulation or tycoon. You mostly need to route
the trains in real time.
The game isn’t open source and not free but costs around 10€.
This game is a 2D platform game with interesting gameplay mechanics,
it is surprisingly full of good ideas and a very nice music :) The
characters are very cute and the whole environment looking great.
This game may not be liked by everyone, it consists at driving a
truck in Europe and pick up a cargo to deliver it someone else,
taking care of not hurting it and driving safely by respecting the
law. You can also buy garages and hire people to drive trucks for
you to make money. The game is relaxing and also pretty accurate
in the environment. I have been driving in many European countries
and this game really reflects country signs, cars, speed limits,
country side etc… Some cities received more work and you can see
monuments from the road. The game doesn’t cost much and works on
Linux although it’s not open source.
This game is hard and will require learning. The goal is to create
rockets to send astronauts in space, or even land on a planet or
an asteroid, and come back. Doing a whole trip like this requires
some knowledge about the game mechanics and physics. This game is
certainly not for everyone if you want to achieve something, I never
made better than just sending a rocket in space and let it crash
on the planet after lacking fuel or drifting in space forever…
The game works on Linux, requires an average computer and can be
obtained at a very fair price like 10€ when it’s on sales (which
happens very often). Definitely a must to play if you like space.
Puzzle games (Zachtronics games)
What’s a Zachtronics game? It’s a game edited by Zachtronics! Every
game from this studio have a common pattern. You solve puzzles with
more and more complexes systems, you can compare your result in
speed / efficiency / steps to the others player. They are a mix in
between automation and puzzles. Those games are really good. There
are more than the 3 games I list, but I didn’t enjoy them all,
check the full list
You play an alchemist who is asked to create product for a rich
family. You need to setup devices to transforms and combine
materials into the expected result.
The game isn’t open source and isn’t free. The average cost is 20€.
This game is about writing code into assembly. There are calculations
units that will add/sub values from registers and pass it to another
unit. Even more fun if you print the old fashion instructions book!
The game isn’t open source and isn’t free. The average cost is 10€.
I would like to add this game to this list. It’s a brawler (like
street of rage) in which you don’t fight people, but you only dodge
attacks to exhaust enemies or counter-attack. It’s still a bit
violent because it involves violence toward you, and throwing back
a knife would still be violent… But still, I think this is an
unique game that merits to be better known. :)
The game isn’t open source and isn’t free, expect around 15€ for
it.
Still playing with NixOS, I wanted to experience
how difficult it would be to write a NixOS configuration file to
turn a computer into a simple NAS with basics features: samba
storage, dlna server and auto suspend/resume.
What is NixOS? As a reminder for
some and introduction to the others, NixOS is a Linux distribution
built by the Nix package manager, which make it very different than
any other operating system out there, except Guix
which has a similar approach with their own package manager written
in Scheme.
NixOS uses a declarative configuration approach along with lot of
others features derived from Nix. What’s big here is you no longer
tweak anything in /etc or install packages, you can define the
working state of the system in one configuration file. This system
is a totally different beast than the others OS and require some
time to understand how it work. Good news though, everything
is documented in the man page configuration.nix, from fstab
configuration to users managements or how to enable samba!
Here is the /etc/nixos/configuration.nix file on my NAS.
It enables ssh server, samba, minidlna and vnstat. Set up a user
with my ssh public key. Ready to work.
Using rtcwake command (Linux specific), it’s possible to put
the system into standby mode and schedule an auto resume after
some time. This is triggered by a cron job at 01h00.
{ config, pkgs, ... }:
{
# include stuff related to hardware, auto generated at install
imports = [ ./hardware-configuration.nix ];
boot.loader.grub.device = "/dev/sda";
# network configuration
networking.interfaces.enp3s0.ipv4.addresses = [ {
address = "192.168.42.150";
prefixLength = 24;
} ];
networking.defaultGateway = "192.168.42.1";
networking.nameservers = [ "192.168.42.231" ];
# FR locales and layout
i18n.defaultLocale = "fr_FR.UTF-8";
console = { font = "Lat2-Terminus16"; keyMap = "fr"; };
time.timeZone = "Europe/Paris";
# Packages management
environment.systemPackages = with pkgs; [
kakoune vnstat borgbackup utillinux
];
# network disabled (I need to check the ports used first)
networking.firewall.enable = false;
# services to enable
services.openssh.enable = true;
services.vnstat.enable = true;
# auto standby
services.cron.systemCronJobs = [
"0 1 * * * root rtcwake -m mem --date +6h"
];
# samba service
services.samba.enable = true;
services.samba.enableNmbd = true;
services.samba.extraConfig = ''
workgroup = WORKGROUP
server string = Samba Server
server role = standalone server
log file = /var/log/samba/smbd.%m
max log size = 50
dns proxy = no
map to guest = Bad User
'';
services.samba.shares = {
public = {
path = "/home/public";
browseable = "yes";
"writable" = "yes";
"guest ok" = "yes";
"public" = "yes";
"force user" = "share";
};
};
# minidlna service
services.minidlna.enable = true;
services.minidlna.announceInterval = 60;
services.minidlna.friendlyName = "Rorqual";
services.minidlna.mediaDirs = ["A,/home/public/Musique/" "V,/home/public/Videos/"];
# trick to create a directory with proper ownership
# note that tmpfiles are not necesserarly temporary if you don't
# set an expire time. Trick given on irc by someone I forgot the name..
systemd.tmpfiles.rules = [ "d /home/public 0755 share users" ];
# create my user, with sudo right and my public ssh key
users.users.solene = {
isNormalUser = true;
extraGroups = [ "wheel" "sudo" ];
openssh.authorizedKeys.keys = [
"ssh-ed25519 AAAAC3NzaC1lZDI1NTE5AAAAIOIZKLFQXVM15viQXHYRjGqE4LLfvETMkjjgSz0mzMzS personal"
"ssh-ed25519 AAAAC3NzaC1lZDI1NTE5AAAAIOIZKLFQXVM15vAQXBYRjGqE6L1fvETMkjjgSz0mxMzS pro"
];
};
# create a dedicated user for the shares
# I prefer a dedicated one than "nobody"
# can't log into it
users.users.share= {
isNormalUser = false;
};
}
As a claws-mail user, I like to have calendar support in the mail
client to be able to “accept” invitations. In the default NixOS
claws-mail package, the vcalendar module isn’t installed with the
package. Still, it is possible to add support for the vcalendar
module without ugly hack.
It turns out, by default, the claws-mail package in Nixpkg has an
optional build option for the vcalendar module, we need to tell
nixpkg we want this module and claws-mail will be compiled.
As stated in the NixOS
manual,
the optionals features can’t be searched yet. So what’s possible
is to search for your package in the NixOS packages
search, click on the package
name to get to the details and click on the link named “Nix expression”
that will open a link to the package definition on GitHUB, claws-mail
nix
expression
As you can see on the claws-mail nix expression code, there are lot
of lines with optional, those are features we can enable. Here
is a sample:
In your configuration.nix file, where you define the package list
you want, you can tell you want to enable the plugin vcalendar,
this is done as in the following example:
Using NixOS on a laptop on which the keyboard isn’t detected when
I need to type the password to decrypt disk, I had to find a solution.
This problem is hardware related, not Linux or NixOS related.
I highly recommend using full disk encryption on every computer
following a thief threat model. Having your computer stolen is bad,
but if the thief has access to all your data, you will certainly
be in trouble.
This was time to find how to use an usb memory stick to unlock the
full disk encryption in case I don’t have my hands on an usb keyboard
to unlock the computer.
There are 4 steps to enable unlocking the luks volume using a device.
Create the key
Add the key on the luks volume
Write the key on the usb device
Configure NixOS
First step, creating the file. The easiest way is to the following:
This will create a 4096 bytes key. You can choose the size you want.
Second step is to register that key in the luks volume, you will
be prompted for luks password when doing so.
# cryptsetup luksAddKey /dev/sda1 /root/key.bin
Then, it’s time to write the key to your usb device, I assume it
will be /dev/sdb.
# dd if=/root/key.bin of=/dev/sdb bs=4096 count=1
And finally, you will need to configure NixOS to give the information
about the key. It’s important to give the correct size of the key.
Don’t forget to adapt "crypted" to your luks volume name.
Rebuild your system with nixos-rebuild switch and voilà!
Going further
I recommend using the fallback to password feature so if you
lose or don’t have your memory stick, you can type the password to
unlock the disk. Note that you need to not put anything looking
like a /dev/sdb because if it exists and no key are there, the
system won’t ask for password, and you will need to reboot.
It’s also possible to write the key in a partition or at a specific
offset into your memory disk. For this, look at
boot.initrd.luks.devices."volume".keyFileOffset entry.
It’s possible to play chess using email. This is possible because
there are notations like PGN (Portable Game Notation) that describe
the state of a game.
By playing on your computer and sending the PGN of the game to
your opponent, that person will be able to play their move and
send you the new PGN so you can play.
Using xboard
This is quite easy with xboard (which should be available in most
bsd/linux/unix distributions), as long as you are aware of the few
keybindings.
When you start a game, press Ctrl+E to enter edition mode, this
will prevent the AI to play, then make your move.
From there, you can press Ctrl+C to copy the state of the game.
You will have something like this in your clipboard.
When you want to play your turn, load that line and press Ctrl+V,
you should see the moves happening on the board.
Using gnuchess
gnuchess allow playing chess in command line.
When you want to start a game, you will have a prompt, type manual
to not play against the AI. I recommend using coords to display
coordinates on the axis of the board.
When you type show board you will have this display:
white KQkq
8 r n b q k b n r
7 p p p p p p p p
6 . . . . . . . .
5 . . . . . . . .
4 . . . . . . . .
3 . . . . . . . .
2 P P P P P P P P
1 R N B Q K B N R
a b c d e f g h
Then, I can type d3 I get a display
8 r n b q k b n r
7 p p p p p p p p
6 . . . . . . . .
5 . . . . . . . .
4 . . . . . . . .
3 . . . P . . . .
2 P P P . P P P P
1 R N B Q K B N R
a b c d e f g h
From the game, you can save the game using pgnsave FILE
and load a game using pgnload FILE.
You can see the list of the moves using show game.
After modest contributions to the NixOS operating system which made
me learn about the contribution process, I found enjoyable to have
an automatic report and feedback about the quality of the submitted
work. While on NixOS this requires GitHub, I think this could be
applied as well on OpenBSD and the mailing list contributing system.
I made a prototype before starting the real work and actually I’m
happy with the result.
This is what I get after feeding the script with a mail containing
a patch:
Determining package path ✓
Verifying patch isn't committed ✓
Applying the patch ✓
Fetching distfiles ✓
Distfile checksum ✓
Applying ports patches ✓
Extracting sources ✓
Building result ✓
It requires a lot of checks to find a patch in the file, because
we have have patches generated from cvs or git which have a slightly
different output. And then, we need to find from where to apply
this patch.
The idea would be to retrieve mails sent to ports@openbsd.org by
subscribing, then store metadata about that submission into a
database:
Sender
Date
Diff (raw text)
Status (already committed, doesn't apply, apply, compile)
Then, another program will pick a diff from the database, prepare a VM using a
derivated qcow2 disk from a base image so it always start fresh and
clean and ready, and do the checks within the VM.
Once it is finished, a mail could be sent as a reply to the original
mail to give the status of each step until error or last check. The
database could be reused to make a web page to track what compiles
but is not yet committed. As it’s possible to verify if a patch is
committed in the tree, this can automatically prune committed patches
over time.
I really think this can improve tracking patches sent to ports@ and
ease the contribution process.
DISCLAIMER
This would not be an official part of the project, I do it on my own
This may be cancelled
This may be a bad idea
This could be used “as a service” instead of pulling automatically
from ports, meaning people could send mails to it to receive an
automatic review. Ideally this should be done in portcheck(1) but
I’m not sure how to verify a diff apply on the ports tree without
enforcing requirements
Human work will still be required to check the content and verify
the port works correctly!
Simple Docker cheatsheet. This is a short introduction about Docker usage
and common questions I have been asking myself about Docker.
The official documentation for building docker images can be found
here
Build an image
Building an image is really easy. As a requirement, you need to be
in a directory that can contain data you will use for building the
image but most importantly, you need a Dockerfile file.
The Dockerfile file hold all the instructions to create the container.
A simple example would be this description:
FROM busybox
CMD "echo" "hello world"
This will create a docker container using busybox base image
and run echo "hello world" when you run it.
To create the container, use the following command in the same
directory in which Dockerfile is:
$ docker build -t your-image-name .
Advanced image building
If you need to compile sources to distribute a working binary,
you need to prepare the environment to have the required
dependencies to compile and then you need to compile a static
binary to ship the container without all the dependencies.
In the following example we will use a debian environment to build
the software downloaded by git.
FROM debian as work
WORKDIR /project
RUN apt-get update
RUN apt-get install -y git make gcc
RUN git clone git://bitreich.org/sacc /project
RUN apt-get install -y libncurses5-dev libncurses5
RUN make LDFLAGS="-static -lncurses -ltinfo"
FROM debian
COPY --from=work /project/sacc /usr/local/bin/sacc
CMD "sacc" "gopherproject.org"
I won’t explain every command here, but you may see that I have
split the packages installation in two commands. This was to help
debugging.
The trick here is that the docker build process has a cache feature.
Every time you use a FROM, COPY, RUN or CMD docker will
cache the current state of the build process, if you re-run the
process docker will be able to pick up the most recent state until
the change.
I wasn’t sure how to compile statically the software at first, and
having to install git make and gcc and run git clone EVERY TIME
was very time consuming and bandwidth consuming.
In case you run this build and it fails, you can re-run the build
and docker will catch up directly at the last working step.
If you change a line, docker will reuse the last state with a
FROM/COPY/RUN/CMD command before the changed line. Knowing about
this is really important for more efficient cache use.
Run an image
With the previously locally built image we can run it with the command:
$ docker run your-image-name
hello world
By default, when you use an image name to run, if you don’t have a
local image that match the name docker will check on the docker
official repository if an image exists, if so, it will be pulled
and run.
$ docker run hello-world
This is a sample official container that will display some
explanations about docker.
If you want to try a gopher client, I made a docker version of it
that you can run with the following command:
$ docker run -t -i rapennesolene/sacc
Why did you require -t and -i parameters? The former
is to tell docker you want a tty because it will manipulate
a terminal and the latter is to ask an interactive session.
Persistant data
By default, every data of the docker container get wiped out
once it stops, which may be really undesirable if you use
docker to deploy a service that has a state and require an
installation, configuration files etc…
Docker has two ways to solve it:
1) map a local directory
2) map a docker volume name
This is done with the parameter -v with the docker run command.
$ docker run -v data:/var/www/html/ nextcloud
This will map a persistent storage named “data” on the host
on the path /var/www/html in the docker instance. By using data,
docker will check if /var/lib/docker/volumes/data exists, if so
it will reuse it and if not it will create it.
This is a convenient way to name volumes and let docker manage it.
The other way is to map a local path to a container environment
path.
$ docker run -v /home/nextcloud:/var/www/html nextcloud
In this case, the directory /home/nextcloud on the host and
/var/www/html in the docker environment will be the same directory.
While everyone familiar with a shell know about the command cd
there are a few tips you should know.
Moving to your $HOME directory
$ pwd
/tmp
$ cd
$ pwd
/home/solene
Using cd without argument will change your current directory to
your $HOME.
Moving into someone $HOME directory
While this should fail most of the time because people shouldn’t allow
anyone to visit their $HOME, there are use case it can be used though.
$ cd ~user1
$ pwd
/home/user1
$ cd ~solene
$ pwd
/home/solene
Using ~user as a parameter will move to that user $HOME directory,
note that cd and cd ~youruser have the same result.
Moving to previous directory
This is a very useful command which allow going back and forth between
two directories.
$ pwd
/home/solene
$ cd /tmp
$ pwd
/tmp
$ cd -
/home/solene
$ pwd
/home/solene
When you use cd - the command will move to the previous directory
in which you were. There are two special variables in your shell:
PWD and OLDPWD, when you move somewhere, OLDPWD will hold
your current location before moving and then PWD hold the new
path. When you use cd - the two variables get exchanged, this
mean you can only jump from two paths using cd - multiple times.
Please note that when using cd - your new location is displayed.
Changing directory by modifying current PWD
thfr@ showed me a cd feature I never heard about, and it’s the
perfect place to write about it. Note that this work in ksh and zsh
but is reported to not work in bash.
One example will explain better than any text.
$ pwd
/tmp/pobj/foobar-1.2.0/work
$ cd 1.2.0 2.4.0
/tmp/pobj/foobar-2.4.0/work
This tells cd to replace first parameter pattern by the second
parameter in the current PWD and then cd into it.
$ pwd
/home/solene
$ cd solene user1
/home/user1
This could be done in a bloated way with the following command:
$ cd $(echo $PWD | sed "s/solene/user1/")
I learned it a few minutes ago but I see a lot of uses cases where
I could use it.
Moving into the current directory after removal
In some specific case, like having your shell into a directory that
existed but was deleted and removed (this happens often when you
working into compilation directories).
A simple trick is to tell cd to go to the current location.
$ cd .
or
$ cd $PWD
And cd will go into the same path and you can start hacking
again in that directory.
As you can see, base sets are also in the database used by pkglocate,
so you can easily find if a file is from a set (that you should
have) or if the file comes from a package.
Find which package installed a file
Klemmens Nanni (kn@) told me it’s possible to find which package
installed a file present in the filesystem using pkg_info command
which comes from the base system. This can be handy to know from
which package an installed file comes from, without requiring
pkglocatedb.
Sometimes I need to download files through http from a list on an “autoindex”
page and it’s always painful to find a correct command for this.
The easy solution is wget but you need to use the correct parameters
because wget has a lot of mirroring options but you only want specific ones to
achieve this goal.
This will download every tgz files available at the address given as last parameter.
The parameters given will filter to only download the tgz files, put the
files in the current working directory and most important, don’t try to escape
to the parent directory to start downloading again. The `–continue`` parameter
allow to interrupt wget and start again, downloaded file will be skipped and
partially downloaded files will be completed.
Do not reuse this command if files changed on the remote server because
continue feature only work if your local file and the remote file are the same,
this simply look at the local and remote names and will ask the remote server
to start downloading at the current byte range of your local file. If meanwhile
the remote file changed, you will have a mix of the old and new file.
Obviously ftp protocol would be better suited for this download job but ftp is
less and less available so I find wget to be a nice workaround for this.
The software developer prx, his website is available at
https://ybad.name/ (en/fr),
released a new software called prose to publish a blog by sending emails.
I really like this idea, while this doesn’t suit my needs at all,
I wanted to write about it.
The code can be downloaded from this address https://dev.ybad.name/prose/ .
I will briefly introduce how it works but the README file is well explaining,
prose must be started from the mail server, upon email receival in
/etc/mail/aliases the email will be piped into prose which will produce the
html output.
On the security side, prose doesn’t use any external command and on OpenBSD
it will use unveil and pledge features to reduce privileges of prose,
unveil will restrict the process file system accesses outside of the html
output directory.
I would also congrats prx who demonstrates again that writing good software
isn’t exclusive to IT professionnal.
While no one would expect this, there are huge efforts from a small team to
bring more games into OpenBSD. In fact, now some commercial games works
natively now, thanks to Mono or Java. There are no wine or linux emulation
layer in OpenBSD.
Here is a small list of most well known games that run on OpenBSD:
Northguard (RTS)
Darksburg (RTS)
Dead Cells (Side scroller action game)
Stardew Valley (Farming / Roguelike)
Slay The Spire (Card / Roguelike)
Axiom Verge (Side scroller, metroidvania)
Crosscode (top view twin stick shooter)
Terraria (Side scroller action game with craft)
Ion Fury (FPS)
Doom 3 (FPS)
Minecraft (Sandbox - not working using latest version)
Tales Of Maj’Eyal (Roguelike with lot of things in it - open source and free)
I would also like to feature the recently made compatible games from
Zachtronics developer, those are ingenious puzzles games requiring efficiency.
There are games involving Assembly code, pseudo code, molecules etc…
Opus Magnum
Exapunks
Molek-Syntez
Finally, there are good RPG running thanks to devoted developer spending their
free time working on game engine reimplementation:
Elder Scroll III: Morrowind (openmw engine)
Baldur’s Gate 1 and 2 (gemrb engine)
Planescape: Torment (gemrb engine)
There is a Peertube (opensource decentralized Youtube alternative) channel
where I started publishing gaming videos recorded from OpenBSD. Now there are
also videos from others people that are published. OpenBSD Gaming
channel
The full list of running games is available in the Shopping guide
webpage including information how they
run, on which store you can buy them and if they are compatible.
Big thanks to thfr@ who works hard to keep the shopping guide up to date and
who made most of this possible. Many thanks to all the other people in the
OpenBSD Gaming community :)
All these efforts are important for software conservation over time.
While the title may appear quite strange, the article is about installing a
package to have a new random wallpaper everytime you start the X session!
First, you need to install a package named openbsd-backgrounds which is quite
large with a size of 144 MB. This package made by Marc Espie contains lot of
pictures shot by some OpenBSD developers.
You can automatically set a picture as a background when xenodm start and
prompt for your username by uncommenting a few lines in the file
/etc/X11/xenodm/Xsetup_0:
Uncomment this part
if test -x /usr/local/bin/openbsd-wallpaper
then
/usr/local/bin/openbsd-wallpaper
fi
The command openbsd-wallpaper will display a different random picture on
every screen (if you have multiples screen connected) every time you run it.
This article is exceptionnaly in French because it’s about a French OpenBSD
community.
Bonjour à toutes et à tous.
Exceptionnellement je publie un billet en français sur mon blog car je tiens à
faire passer le mot concernant la communauté française obsd4a.
Vous pourrez par exemple trouver la quasi intégralité de la FAQ OpenBSD
traduite
à cette adresse
Sur l’accueil du site vous pourrez trouver des liens vers le forum, le wiki, le
blog, la mailing list et aussi les informations pour rejoindre le salon irc
(#obsd4* sur freenode)
I added a new feature to my blog today, when I post a new blog article this
will trigger my dedicated Mastodon user
https://bsd.network/@solenepercent to
publish a Toot so people can discuss the content there.
Every article now contains a link to the toot if you want to discuss about an
article.
This is not perfect but a good trade-off I think:
the website remains static and light (nothing is included, only one more
link per blog post)
people who would like to discuss about it can proceed in a known place
instead of writing reactions on reddit or other places without a chance for
me to asnwer
this is not relying on proprietary services
Of course, if you want to give me feedback, I’m still happy to reply to emails
or on IRC.
I’m using FreeBSD again on a laptop for some reasons so expect to read more
about FreeBSD here. This tutorial explain how to get a graphical desktop using
FreeBSD 12.1.
I used a Lenovo Thinkpad T480 for this tutorial.
Intel graphics hardware support
If you have a recent Intel integrated graphic card (maybe less than 3 years),
you have to install a package containing the driver:
pkg install drm-kmod
and you also have to tell the system the correct path of the module (because
another i915kms.ko file exist):
sysrc kld_list="/boot/modules/i915kms.ko"
Choose your desktop environnement
Install Xfce
pkg install xfce
Then in your user ~/.xsession file you must append:
exec ck-launch-session startxfce4
Install MATE
pkg install mate
Then in your user ~/.xsession file you must append:
exec ck-launch-session mate-session
Install KDE5
pkg install kde5
Then in your user ~/.xsession file you must append:
exec ck-launch-session startplasma-x11
Setting up the graphical interface
You have to enable a few services to have a working graphical session:
moused to get laptop mouse support
dbus for hald
hald for hardware detection
xdm for display manager where you log-in
You can install them with the command:
pkg install xorg dbus hal xdm
Then you can enable the services at boot using the following commands, order is
important:
service moused start
service dbus start
service hald start
service xdm start
Note that xdm will be in qwerty layout.
Power management
The installer should have prompted for the service powerd, if you didn’t
activate it at this time, you can still enable it.
Check if it’s running
service powerd status
Enabling
sysrc powerd_enable="yes"
Starting the service
service powerd start
Webcam support
If you have a webcam and want to use it, some configuration is required in
order to make it work.
Install the package webcamd, it will displays all the instructions written
below at the install step.
pkg install webcamd
From here, append this line to the file /boot/loader.conf to load webcam
support at boot time:
cuse_load="yes"
Add your user to the webcamd group so it will be able to use the device:
pw groupmod webcamd -m YOUR_USER
Enable webcamd at boot:
sysrc webcamd_enable="yes"
Now, you have to logout from your user for the group change to take place. And
if you want the webcamd daemon to work now and not wait next reboot:
kldload cuse
service webcamd start
service devd restart
You should have a /dev/video0 device now. You can test it easily with the
package pwcview.
External resources
I found this blog very interesting, I wish I found it before I struggle with
all the configuration as it explains how to install FreeBSD on the exact same
laptop. The author explains how to make a transparent lagg0 interface for
switching from ethernet to wifi automatically with a failover pseudo device.
Some websites (like this one) now offers two differents themes: light and dark.
Dark themes are proven to be better for the eyes and reduce battery usage on
mobiles devices because it requires less light to be displayed hence it
requires less energy to display. The gain is optimal on OLED devices but it
also works on classic LCD screens.
While on Windows and MacOS there is a global setting for the user interface in
which you choose if your system is in light or dark mode, with that setting
being used by lot of applications supporting dark/light themes, on Linux and
BSDs (and others) operating systems there is no such settings and your web
browser will keep displaying the light theme all the time.
To make it short, in the about:config special Firefox page, one can create a
new key ui.systemUsesDarkTheme with a number value of 1, the firefox
about:config page should turn dark immediately and then Firefox will try to use
dark themes when they are available.
You should note that as explained in the mozilla documentation, if you have the
key privacy.resistFingerprinting set to true the dark mode can’t be used.
It seems dark mode and privacy can’t belong together for some reasons.
Many thanks to https://tilde.zone/@andinus who
pointed me this out after I overlooked that page and searched a long time with
no result how to make Firefox display website using the dark theme.
In this article I’ll explain how to aggregate internet access bandwidth using
mlvpn software. I struggled a lot to set this up so I wanted to share a
how-to.
Pre-requisites
mlvpn is meant to be used with DSL / fiber links, not wireless or 4G links
with variable bandwidth or packet loss.
mlvpn requires to be run on a server which will be the public internet
access and on the client on which you want to aggregate the links, this is like
doing multiples VPN to the same remote server with a VPN per link, and
aggregate them.
Multi-wan roundrobin / load balancer doesn’t allow to stack bandwidth but
doesn’t require a remote server, depend on what you want to do, this may be
enough and mlvpn may not be required.
mlvpn should be OS agnostic between client / server but I only tried
between two OpenBSD hosts, your setup may differ.
Some network diagram
Here is a simple network, the client has access to 2 ISP through two ethernet
interfaces.
em0 and em1 will have to be on different rdomains (it’s a feature to separate
routing tables).
As said previously, em0 and em1 must be on different rdomains, it can easily be
done by adding rdomain 1 and rdomain 2 to the interfaces configuration.
Example in /etc/hostname.em0
rdomain 1
dhcp
mlvpn installation
On OpenBSD the installation is as easy as pkg_add mlvpn (should work starting
from 6.7 because it required patching).
mlvpn configuration
Once the network configuration is done on the client, there are 3 steps to do
to get aggregation working:
mlvpn configuration on the server
mlvpn configuration on the client
activating NAT on the client
Server configuration
On the server we will use the UDP ports 5080 et 5081.
Connections speed must be defined in bytes to allow mlvpn to correctly
balance the traffic over the links, this is really important.
The line bandwidth_upload = 1468006 is the maximum download bandwidth of the
client on the specified link in bytes. If you have a download speed of 1.4 MB/s
then you can choose a value of 1.4*1024*1024 => 1468006.
The line bandwidth_download = 102400 is the maximum upload bandwidth of the
client on the specified link in bytes. If you have an upload speed of 100 kB/s
then you can choose a value of 100*1024 => 102400.
The password line must be a very long random string, it’s a shared secret
between the client and the server.
# config you don't need to change
[general]
statuscommand = "/etc/mlvpn/mlvpn_updown.sh"
protocol = "tcp"
loglevel = 4
mode = "server"
tuntap = "tun"
interface_name = "tun0"
cleartext_data = 0
ip4 = "10.44.43.2/30"
ip4_gateway = "10.44.43.1"
# things you need to change
password = "apoziecxjvpoxkvpzeoirjdskpoezroizepzdlpojfoiezjrzanzaoinzoi"
[dsl1]
bindhost = "1.2.3.4"
bindport = 5080
bandwidth_upload = 1468006
bandwidth_download = 102400
[dsl2]
bindhost = "1.2.3.4"
bindport = 5081
bandwidth_upload = 1468006
bandwidth_download = 102400
Client configuration
The password value must match the one on the server, the values of ip4 and
ip4_gateway must be reversed compared to the server configuration (this is so
in the following example).
The bindfib lines must correspond to the according rdomain values of your
interfaces.
As with every VPN you must enable packet forwarding and create a pf rule for
the NAT.
Enable forwarding
Add this line in /etc/sysctl.conf:
net.inet.ip.forwarding=1
You can enable it now with sysctl net.inet.ip.forwarding=1 instead of waiting
for a reboot.
In pf.conf you must allow the UDP ports 5080 and 5081 on the public interface
and enable nat, this can be done with the following lines in pf.conf but you
should obviously adapt to your configuration.
# allow NAT on VPN
pass in on tun0
pass out quick on em0 from 10.44.43.0/30 to any nat-to em0
# allow mlvpn to be reachable
pass in on egress inet proto udp from any to (egress) port 5080:5081
Start mlvpn
On both server and client you can run mlvpn with rcctl:
rcctl enable mlvpn
rcctl start mlvpn
You should see a new tun0 device on both systems and being able to ping them
through tun0.
Now, on the client you have to add a default gateway through the mlvpn
tunnel with the command route add -net default 10.44.43.2 (adapt if you
use others addresses). I still didn’t find how to automatize it properly.
Your client should now use both WAN links and being visible with the remote
server public IP address.
mlvpn can be used for more links, you only need to add new sections.
mlvpn also support IPv6 but I didn’t take time to find how to make it work,
si if you are comfortable with ipv6 it may be easy to set up IPv6 with the
variables ip6 and ip6_gateway in mlvpn.conf.
OpenBSD -current is the development version of OpenBSD. Lot of people use it
for everyday tasks.
How to install OpenBSD -current?
OpenBSD -current refers to the last version built from sources obtained with
CVS, however, it’s also possible to get a pre-built system (a snapshot) usually
built and pushed on mirrors every 1 or 2 days.
You can install OpenBSD -current by getting an installation media like usual,
but on the path /pub/OpenBSD/snapshots/ on the mirror.
How do I upgrade from -release to -current?
There are two ways to do so:
Download bsd.rd file from the snapshots directory and boot it to upgrade
like for a -release to -release upgrade
Run sysupgrade -s command as root, this will basically download all sets
under /home/_sysupgrade and boot on bsd.rd with an autoinstall(8)
config.
How do I upgrade my -current snapshot to a newer snapshot?
Exactly the same process as going from -release to -current.
Can I downgrade to a -release if I switch to -current?
No.
What issues can I expect in OpenBSD -current?
There are a few issues possibles that one can expect
Out of sync packages
If a library get updated into the base system and you want to update packages,
they won’t be installable until packages are rebuilt with that new library,
this usually takes 1 up to 3 days.
This only create issues in case you want to install a package you don’t have.
The other way around, you can have an old snapshot and packages are not
installable because the libraries linked to by the packages are newer than what
is available in your system, in this case you have to upgrade snapshot.
Snapshots sets are getting updated on the mirror
If you download the sets on the mirror to update your -current version, you may
have an issue with the sha256 sum, this is because the mirror is getting
updated and the sha256 file is the first to be transferred, so sets you are
downloading are not the one the sha256 will compare.
Unexpected system breakage
Sometimes, very rarely (maybe 2 or 3 time in a year?), some snapshots are
borked and will prevent system to boot or lead to regularly crashes. In that
case, it’s important to report the issue with the sendbug utility.
You can fix this by using an older snapshot from this archives
server and prevent this to happen by
reading bugs@ mailing list before updating.
Broken package
Sometimes, a package update will break it or break some others packages, this
is often quickly fixed on popular packages but in some niche packages you may
be the only one using it on -current and the only one who can report about it.
If you find breakage on something you use, it may be a good idea to report the
problem on ports@openbsd.org mailing list if nobody did before. By doing so,
the issue will be fixed and next -release users will be able to install a
working package.
Is -current stable enough for a server or a workstation?
It’s really up to you. Developers are all using -current and are forbidden to
break it, so the system should totally be usable for everyday use.
What may be complicated on a server is keep updating it regularly and face
issues requires troubleshooting (like major database upgrade which was missing
a quirk).
For a workstation I think it’s pretty safe as long as you can deal with
packages that can’t be installed until they are in sync.
A few days ago, as someone working remotely since 3 years I published some tips
to help new remote workers to feel more confident into their new workplace: home
I’ve been told I should publish it on my blog so it’s easier to share the
information, so here it is.
dedicate some space to your work area, if you use a laptop try to dedicate a
table corner for it, so you don’t have to remove your “work station” all the
time
keep track of the time, remember to drink and stand up / walk every hour, you
can set an alarm every hour to remember or use software like
http://www.workrave.org/ or https://github.com/hovancik/stretchly which are
very useful. If you are alone at home, you may lose track of time so this is
important.
don’t forget to keep your phone at hand if you use it for communication with
colleagues. Think that they may only know your phone number, so it’s their
only way to reach you
keep some routine for lunch, you should eat correctly and take the time to do
so, avoid eating in front of the computer
don’t work too much after work hours, do like at your workplace, leave work
when you feel it’s time to and shutdown everything related to work, it’s a
common trap to want to do more and keep an eye on mails, don’t fall into it.
depending on your social skills, work field and colleagues, speak with others
(phone, text whatever), it’s important to keep social links.
after work, distance yourself from the work time by taking a short walk
outside, cooking, doing laundry, or anything that gets you away from the work
area and cuts the flow.
take at least one walk outside if possible during the day time to get fresh air.
get a desk that can be adjusted for both standing and sitting.
I hope those advices will help you going through the crisis, take care of
yourselves.
This is a little story that happened a few days ago, it explains well how I
usually get involved into ports in OpenBSD.
1 - Lurking into ports/graphics/
At first, I was looking in various ports there are in the graphics category,
searching for an image editor that would run correctly on my offline laptop.
Grafx2 is laggy when using the zoom mode and GIMP won’t run, so I just open
ports randomly to read their pkg/DESCR file.
This way, I often find gems I reuse later, sometimes I have less luck and I
only tried 20 ports which are useless to me. It happens I find issues in ports
looking randomly like this…
2 - Find the port « comix »
Then, the second or third port I look at is « comix », here is the DESCR file.
Comix is a user-friendly, customizable image viewer. It is specifically
designed to handle comic books, but also serves as a generic viewer. It
reads images in ZIP, RAR or tar archives (also gzip or bzip2 compressed)
as well as plain image files.
That looked awesome, I have lot of books as PDF I want to read but it’s not
convenient in a “normal” PDF reader, so maybe comix would help!
3 - Using comix
Once comix was compiled (a mix of python and gtk), I start it and I get errors
opening PDFs… I start it again from console, and in the output I get the
explanation that PDF files are not usable in comix.
Then I read about the CBZ or CBT files, they are archives (zip or tar)
containing pictures, definitely not what a PDF is.
4 - mcomix > comix
After a few searches on the Internet, I find that comix last release is from
2009 and it never supported PDF, so nothing wrong here, but I also found comix
had a fork named mcomix.
mcomix forked a long time ago from comix to fix issues and add support for new
features (like PDF support), while last release is from 2016, it works and
still receive commits (last is from late 2019). I’m going for using comix!
5 - Installing mcomix from ports
Best way to install a program on OpenBSD is to make a port, so it’s correctly
packaged, can be deinstalled and submit to ports@ mailing list later.
I did copy comix folder into mcomix, use a brain dead sed command to replace all
occurrence of comix by mcomix, and it mostly worked! I won’t explain little
details, but I got mcomix to work within a few minutes and I was quite happy!
Fun fact is that comix port Makefile was mentioning mcomix as a suggestion
for upgrade.
6 - Enjoying a CBR reader
With mcomix installed, I was able to read some PDF, it was a good experience
and I was pretty happy with it. I’ve spent a few hours reading, a few moments
after mcomix was installed.
7 - mcomix works but not all the time
After reading 2 longs PDFs, I got issues with the third, some pages were not
rendered and not displayed. After digging this issue a bit, I found about
mcomix internals. Reading PDF is done by rendering every page of the PDF using
mutool binary from mupdf software, this is quite CPU intensive, and for
some reason in mcomix the command execution fails while I can do the exact same
command a hundred time with no failure. Worse, the issue is not reproducible in
mcomix, sometimes some pages will fail to be rendered, sometimes not!
8 - Time to debug some python
I really want to read those PDF so I take my favorite editor and start
debugging some python, adding more debug output (mcomix has a -W parameter
to enable debug output, which is very nice), to try to understand why it
fails at getting output of a working command.
Sadly, my python foo is too low and I wasn’t able to pinpoint the issue. I just
found it fail, sometimes, but I wasn’t able to understand why.
9 - mcomix on PowerPC
While mcomix is clunky with PDF, I wanted to check if it was working on
PowerPC, it took some times to get all the dependencies installed on my old
computer but finally I got mcomix displayed on the screen… and dying on PDF
loading! Crash seems related to GTK and I don’t want to touch that, nobody will
want to patch GTK for that anyway so I’ve lost hope there.
10 - Looking for alternative
Once I knew about mcomix, I was able to search the Internet for alternatives of
it and also CBR readers. A program named zathura seems well known here and
we have it in the OpenBSD ports tree.
Weird thing is that it comes with two different PDF plugins, one named
mupdf and the other one poppler. I did try quickly on my amd64 machine
and zathura was working.
11 - Zathura on PowerPC
As Zathura was working nice on my main computer, I installed it on the PowerPC,
first with the poppler plugin, I was able to view PDF, but installing this
plugin did pull so many packages dependencies it was a bit sad. I deinstalled
the poppler PDF plugin and installed mupdf plugin.
I opened a PDF and… error. I tried again but starting zathura from the
terminal, and I got the message that PDF is not a supported format, with a lot
of lines related to mupdf.so file not being usable. The mupdf plugin work on
amd64 but is not usable on powerpc, this is a bug I need to report, I don’t
understand why this issue happens but it’s here.
12 - Back to square one
It seems that reading PDF is a mess, so why couldn’t I convert the PDF to CBT
files and then use any CBT reader out there and not having to deal with that
PDF madness!!
13 - Use big calibre for the job
I have found on the Internet that Calibre is the most used tool to convert a
PDF into CBT files (or into something else but I don’t really care here). I
installed calibre, which is not lightweight, started it and wanted to change
the default library path, the software did hang when it displayed the file
dialog. This won’t stop me, I restart calibre and keep the default path, I
click on « Add a book » and then it hang again on file dialog. I did report
this issue on ports@ mailing list, but it didn’t solve the issue and this mean
calibre is not usable.
14 - Using the command line
After all, CBT files are images in a tar file, it should be easy to reproduce
the mcomix process involving mutool to render pictures and make a tar of that.
IT WORKED.
I found two ways to proceed, one is extremely fast but may not make pages in
the correct order, the second requires CPU time.
Making CBT files - easiest process
The first way is super easy, it requires mutool (from mupdf package) and it
will extract the pictures from the PDF, given it’s not a vector PDF, not sure
what would happen on those. The issue is that in the PDF, the embedded pictures
have a name (which is a number from the few examples I found), and it’s not
necessarily in the correct order. I guess this depend how the PDF is made.
$ mutool extract The_PDF_file.pdf
$ tar cvf The_PDF_file.tar *jpg
That’s all you need to have your CBT file. In my PDF there was jpg files in it,
but it may be png in others, I’m not sure.
Making CBT files - safest process (slow)
The other way of making pictures out of the PDF is the one used in mcomix, call
mutool for rendering each page as a PNG file using width/height/DPI you
want. That’s the tricky part, you may not want to produce pictures with larger
resolution than the original pictures (and mutool won’t automatically help you
for this) because you won’t get any benefit. This is the same for the DPI. I
think this could be done automatically using a correct script checking each PDF
page resolution and using mutool to render the page with the exact same
resolution.
As a rule of thumb, it seems that rendering using the same width as your screen
is enough to produce picture of the correct size. If you use large values, it’s
not really an issue, but it will create bigger files and take more time for
rendering.
You will get PNG files for each page, correctly numbered, with a width of 1920
pixels. Note that instead of tar, you can use zip to create a zip file.
15 - Finally reading books again
After all this LONG process, I was finally able to read my PDF with any CBR
reader out there (even on phone), and once the process is done, it uses no cpu
for viewing files at the opposite of mcomix rendering all the pages when you
open a file.
I have to use zathura on PowerPC, even if I like it less due to the continuous
pages display (can’t be turned off), but mcomix definitely work great when not
dealing with PDF. I’m still unsure it’s worth committing mcomix to the ports
tree if it fails randomly on random pages with PDF.
16 - Being an open source activist is exhausting
All I wanted was to read a PDF book with a warm cup of tea at hand.
It ended into learning new things, debugging code, making ports, submitting
bugs and writing a story about all of this.
Last year I wrote a huge blog post about an offline laptop attempt.
It kinda worked but I wasn’t really happy with the setups, need and goals.
So, it is back and I use it know, and I am very happy with it.
This article explains my experience at solving my needs, I would
appreciate not receiving advice or judgments here.
State of the need
Internet is infinite, my time is not
Having access to the Internet is a gift, I can access anything or anyone. But
this comes with a few drawbacks. I can waste my time on anything, which is not
particularly helpful. There are so many content that I only scratch things,
knowing it will still be there when I need it, and jump to something else. The
amount of data is impressive, one human can’t absorb that much, we have to deal
with it.
I used to spend time of what I had, and now I just spend time on what exist. An
example of this statement is that instead of reading books I own, I’m looking
for which book I may want to read once, meanwhile no book are read.
Network socialization requires time
When I say “network socialization” this is so to avoid the easy “social
network” saying. I do speak with people on IRC (in real time most of the time),
I am helping people on reddit, I am reading and writing mail most of the time
for OpenBSD development.
Don’t get me wrong, I am happy doing this, but I always keep an eye on each,
trying to help people as soon as they ask a question, but this is really time
consuming for me. I spend a lot of time jumping from one thing to another to
keep myself updated on everything, and so I am too distracted to do anything.
In my first attempt of the offline laptop, I wanted to get my mails on it, but
it was too painful to download everything and keep mails in sync. Sending
emails would have required network too, it wouldn’t be an offline laptop
anymore.
IT as a living and as a hobby
On top of this, I am working in IT so I spend my day doing things over the
Internet and after work I spend my time on open source projects. I can not
really disconnect from the Internet for both.
How I solved this
First step was to define « What do I like to do? », and I came with this short
list:
reading
listening to music
playing video games
writing things
learning things
One could say I don’t need a computer to read books, but I have lots of ebooks
and PDF about lots of subjects. The key is to load everything you need on the
computer, because it can be tempting to connect the device to the Internet
because you need a bit of this or that.
I use a very old computer with a PowerPC CPU (1.3 GHz single core) with 512MB
of ram. I like that old computer, and slower computer forbid doing multiple
things at the same time and help me staying on focus.
Reading files
For reading, I found zathura or comix (and its fork mcomix) very
useful for reading huge PDF, the scrolling customization make those tools
useful.
Listening to music
I buy my music as FLAC files and download it, this doesn’t require any internet
access except at purchase time, so nothing special there. I use moc player
which is easy to use, have a lot of feature and supports FLAC (on powerpc).
Video games
Emulation is a nice way to play lot of games on OpenBSD, on my old computer
it’s up to game boy advance / super nes / megadrive which should allow me to do
again lots of games I own.
We also have a lot of nice games in ports, but my computer is too slow to run
them or they won’t work on powerpc.
Encyclopedia - Wikipedia
I’ve set up a local wikipedia replica like I explained in a previous article,
so anytime I need to find about something, I can ask my local wikipedia. It’s
always available. This is the best I found for a local encyclopedia, works
well.
Writing things
Since I started the offline computer experience, I started a diary. I never
felt the need to do so but I wanted to give it a try. I have to admit summing up
what I achieved in the day before going to bed is a satisfying experience and
now I continue to update it.
You can use any text editor you want, there are special software with specific
features, like rednotebook or lifeograph which supports embedded pictures or on
the fly markdown rendering. But a text file and your favorite editor also do
the job.
I also write some articles of this blog. It’s easy to do so as articles are
text files in a git repository. When I finish and I need to publish, I get
network and push changes to the connected computer which will do the publishing
job.
Technical details
I will go fast on this. My set up is an old Apple IBook G4 with a
1024x768 screen (I love this 4:3 ratio) running OpenBSD.
The system firewall pf is configured to prevent any incoming
connections, and only allow TCP on the network to port 22, because
when I need to copy files, I use ssh / sftp. The /home partition is
encrypted using the softraid crypto device, full disk encryption is
not supported on powerpc.
The experience is even more enjoyable with a warm cup of tea on hand.
I started doing biking seriously a few months ago, as I love having statistics
I needed to gather some. I found a lot of devices on the market but I prefered
using opensource tool and not relying on any vendor.
The best option to do so for me was reusing a 6 years old smartphone on which
the SIM card bus is broken, that phone lose the sim card when it is shaked a
little and requires a reboot to find it again, I am happy I found a way to
reuse it.
Tip: turn ON airplane mode on the smartphone while riding, even without a SIM
card it will try to get network and it will draw battery + emitting useless
radio waves. In case of emergency, just disable the airplane mode to get access
to your local emergency call number. GPS is a passive module and doesn’t
require any network.
This smartphone has a GPS receiver, it’s enough for recording my position as
often I want. Using the correct GPS software from F-droid store and a program
for sftp transfer, I can record data and transfer it easily to my computer.
The most common file format for recording GPS position is the GPX format, it’s
a simple XML file containing all positions with their timestamp, sometimes with
a few more information like speed at that time, but given you have all
positions, software can calculate the speed between each position.
Android GPS Software
It seems GPS software for recording GPX tracks are becoming popular, and in the
last months, lot of new software appeared, which is a good thing, I didn’t
tested all of them though but they tend to be more easy to use and
minimalistic.
OpenStreetMap app - OSMand~
You can install it from F-droid an alternate store for
Android only with opensource software, it’s a full free version (and
opensource) compared to the one you can find on Android store.
This is OpenStreetMap official software, it’s full of features and quite
heavy, you can download maps for navigation, record tracks, view tracks
statistics, contribute to OSM, get Wikipedia information for an area and
everything of this while being OFFLINE. Not only on my bike, I use it all the
time while walking or in my car.
Recorded GPX can be found in the default path
Android/data/net.osmand.plus/files/tracks/rec/
Trekarta
I found another software named Trekarta which is a lot more lighter than
OSM, but only focuses on recording your tracks. I would recommend it if you
don’t want any other feature or have a really old android compatible phone or
low disk space.
Analyzing GPX files / keep track of everything
I found Turtlesport, an opensource software in Java for which last release was
years ago but still work out of the box, given you have a java implementation
installed. You can find it at the following
link.
Turtlesport is a nice tool for viewing tracks, it’s not for only for cycling
and can be used for various sports, the process is the following:
define sports you do (bike, skateboard, hiking etc..)
define equipments you use (bike, sport shoes, skis etc..)
import GPX files and tell Turtlesport which sport and equipment it’s related to
Then, for each GPX file, you will be able to see it on a map, see elevation and
speed of that track, but you can also make statistics per sport or equipment,
like “How many km I ride with that bike over last year, per week”.
If you don’t have a GPX file, you can still add a new trip into the database by
drawing the path on a map.
In the equipments, you will see how many kilometers you used each, with an
alert feature if the equipment goes beyond a defined wearing limit. I’m not
sure about the use of this, maybe you want to know your shoes shouldn’t be used
for more than 2000 km?? Maybe it’s possible to use it for maintenance purpose,
says your bike has a wearing limit of 1000 km, when you reach it you get an
alert, do your maintenance and set the new limit to 2000km.
Viewing GPX files
From OpenBSD 6.7 you can install the package gpxsee to open multiple GPX
files, they will be shown on a map, each track with a different colour, and
nice charts displaying the elevation or speed over the travel for every tracks.
Before gpxsee I was using the GIS (Geographical Information System) tool
qgis but it is really heavy and complicated. But if you want to work on
your recorded data like doing complex statistics, it’s a powerful tool if you
know how to use it.
I like to use it in a gamification purpose: I’m trying to ride over every
road around my home, viewing all GPX files at the same time allow me to plan
the next trip where I never went.
Miscellaneous
Create an unique GPX file from all records
It is possible to merge GPX file into one giant one using gpsbabel .I was
using this before having *gpxsee but I have no idea about what you can do with
that, this create one big spaggheti track. I choose to keep the command here,
in case it’s useful for someone one day:
Of course, if you are a true cyclist racer and GPX files will not be enough for
you, you will certainly want devices such as a power meter or a cadence meter
and an on-board device to use them. I can’t help much about hardware.
However, you may want to give a try to Golden
Cheetah to import all your data from various
devices and make complex statistics from it. I tried it and I had no idea
about the purpose of 90% of the features.
Have fun
Don’t forget to have fun and do not get obscessed by numbers!
I like Common LISP and I also like awk. Dealing with text files in Common LISP
is often painful. So I wrote a small awk like common lisp macro, which helps a
lot dealing with text files.
Here is the implementation, I used the uiop package for split-string function,
it comes with sbcl. But it's possible to write your own split-string or reused
the infamous split-str function shared on the Internet.
(defmacro awk(file separator &body code)
"allow running code for each line of a text file,
giving access to NF and NR variables, and also to
fields list containing fields, and line containing $0"
`(progn
(let ((stream (open ,file :if-does-not-exist nil)))
(when stream
(loop for line = (read-line stream nil)
counting t into NR
while line do
(let* ((fields (uiop:split-string line :separator ,separator))
(NF (length fields)))
,@code))))))
It's interesting that the "do" in the loop could be replaced with a "collect",
allowing to reuse awk output as a list into another function, a quick example I
have in mind is this:
;; equivalent of awk '{ print NF }' file | sort | uniq
;; for counting how many differents fields long line we have
(uniq (sort (awk "file" " " NF)))
Now, here are a few examples of usage of this macro, I've written the original
awk command in the comments in comparison:
;; numbering lines of a text file with NR
;; awk '{ print NR": "$0 }' file.txt
;;
(awk "file.txt" " "
(format t "~a: ~a~%" NR line))
;; display NF-1 field (yes it's -2 in the example because -1 is last field in the list)
;; awk -F ';' '{ print NF-1 }' file.csv
;;
(awk "file.csv" ";"
(print (nth (- NF 2) fields)))
;; filtering lines (like grep)
;; awk '/unbound/ { print }' /var/log/messages
;;
(awk "/var/log/messages" " "
(when (search "unbound" line)
(print line)))
;; printing 4nth field
;; awk -F ';' '{ print $4 }' data.csv
;;
(awk "data.csv" ";"
(print (nth 4 fields)))
If you want to contribute to OpenBSD ports collection you will want to enable
thePORTS_PRIVSEP feature. When this variable is set, ports system will use
dedicated users for tasks.
Source tarballs will be downloaded by the user
_pfetch and all compilation and packaging
will be done by the user _pbuild.
Those users are created at system install and pf have a default rule to
prevent _pbuild user doing network access. This will prevent ports
from doing network stuff, and this is what you want.
This adds a big security to the porting process and any malicious code
run by ports being compiled will be harmless.
In order to enable this feature, a few changes must be made.
The file /etc/mk.conf must contains
PORTS_PRIVSEP=yes
SUDO=doas
Then, /etc/doas.conf must allows your user to become _pfetch and _pbuild
permit keepenv nopass solene as _pbuild
permit keepenv nopass solene as _pfetch
permit keepenv solene as root
If you don’t want to use the last line, there is an explanation in the
bsd.port.mk(5) man page.
Finally, within the ports tree, some permissions must be changed.
rsnapshot is a handy tool to manage backups using rsync and hard links on the
filesystem. rsnapshot will copy folders and files but it will skip duplication
over backups using hard links for files which has not changed.
This kinda create snapshots of your folders you want to backup, only using
rsync, it’s very efficient and easy to use, and getting files from backups is
really easy as they are stored as files under the rsnapshot backup.
Installation
Installing rsnapshot is very easy, on most systems it will be in your official
repository packages.
To install it on OpenBSD: pkg_add rsnapshot (as root)
Configuration
Now you may want to configure it, in OpenBSD you will find a template in
/etc/rsnapshot.conf that you can edit for your needs (you can make a backup
of it first if you want to start over). As it’s stated in big (as big as it can
be displayed in a terminal) letters at the top of the configuration sample
file, you will see that things must be separated by TABS and not spaces. I’ve
made the mistakes more than once, don’t forget using tabs.
I won’t explain all options, but only the most importants.
The variable snapshot_root is where you want to store the backups. Don’t put
that directory in a directory you will backup (that will end into an infinite
loop)
The variable backup is for telling rsnapshot what you want to backup from
your system to which directory inside snapshot_root
Be careful when using ending slashes to paths, it works the same as with rsync.
/home/solene/ means that into target directory, it will contains the content
of /home/solene/ while /home/solene will copy the folder solene within the
target directory, so you end up with target_directory/solene/the_files_here.
The variables retain are very important, this will define how rsnapshot keep
your data. In the example you will see alpha, beta, gamma but it could be hour,
day, week or foo and bar. It’s only a name that will be used by rsnapshot to
name your backups and also that you will use to tell rsnapshot which kind of
backup to do. Now, I must explain how rsnapshot actually work.
How it work
Let’s go for a straighforward configuration. We want a backup every hour on the
last 24h, a backup every day for the past 7 days and 3 manuals backup that we
start manually.
We will have this in our rsnapshot configuration
retain hourly 24
retain daily 7
retain manual 3
but how does rsnapshot know how to do what? The answer is that it doesn’t.
In root user crontab, you will have to add something like this:
# run rsnapshot every hour at 0 minutes
0 * * * * rsnapshot hourly
# run rsnapshot every day at 4 hours 0 minutes
0 4 * * * rsnapshot daily
and then, when you want to do a manual backup, just start rsnapshot manual
Every time you run rsnapshot for a “kind” of backup, the last version will be
named in the rsnapshoot root directory like hourly.0 and every backups will be
shifted by one. The directory getting a number higher than the number in the
retain line will be deleted.
New to crontab?
If you never used crontab, I will share two important things to know about it.
Use MAILTO=“” if you don’t want to receive every output generated from scripts
started by cron.
Use a PATH containing /usr/local/bin/ in it because in the default cron PATH it
is not present. Instead of setting PATH you can also using full binary paths
into the crontab, like /usr/local/bin/rsnapshot daily
You can edit the current user crontab with the command crontab -e.
Your crontab may then look like:
PATH=/bin:/sbin:/usr/bin:/usr/sbin:/usr/X11R6/bin:/usr/local/bin:/usr/local/sbin
MAILTO=""
# comments are allowed in crontab
# run rsnapshot every hour at 0 minutes
0 * * * * rsnapshot hourly
# run rsnapshot every day at 4 hours 0 minutes
0 4 * * * rsnapshot daily
codec copy means the output is using original format from the file. If the
audio is mp3 then the output file will be a mp3 whatever the extension you
choose.
Instead of using codec copy you can choose a different codec for the extracted
file, but copy is a good choice, it performs really fast because you don’t need
to re-encode it and is loss-less.
I use this to rework the audio with audacity.
Merge audio and video into a single file (merge)
After you reworked tracks (audio and/or video) of your file, you can combine
them into a single file.
Good news for my gamers readers. It’s not really fresh news but it has never
been written anywhere.
The commercial video game Crosscode is
written in HTML5, making it available on every system having chromium or
firefox. The limitation is that it may not support gamepad (except if you find
a way to make it work).
A demo is downloadable at this address
https://radicalfishgames.itch.io/crosscode and should work using the following
instructions.
You need to buy the game to be able to play it, it’s not free and not
opensource. Once you bought it, the process is easy:
Download the linux installer from GOG (from steam it may be too)
Extract the data
Patch a file if you want to use firefox
Serve the files through a http server
The first step is to buy the game and get the installer.
Once you get a file named like “crosscode_1_2_0_4_32613.sh”, run unzip
on it, it’s a shell script but only a self contained archive that can extract
itself using the small shell script at the top.
Change directory into data/noarch/game/assets and apply this patch, if you
don’t know how to apply a patch or don’t want to, you only need to
remove/comment the part you can see in the following patch:
--- node-webkit.html.orig Mon Dec 9 17:27:17 2019
+++ node-webkit.html Mon Dec 9 17:27:39 2019
@@ -51,12 +51,12 @@
<script type="text/javascript">
// make sure we don't let node-webkit show it's error page
// TODO for release mode, there should be an option to write to a file or something.
- window['process'].once('uncaughtException', function() {
+/* window['process'].once('uncaughtException', function() {
var win = require('nw.gui').Window.get();
if(!(win.isDevToolsOpen && win.isDevToolsOpen())) {
win.showDevTools && win.showDevTools();
}
- });
+ });*/
function doStartCrossCodePlz(){
if(window.startCrossCode){
Then you need to start a http server in the current path, an easy way to do it
is using… php! Because php contains a http server, you can start the server
with the following command:
$ php -S 127.0.0.1:8080
Now, you can play the game by opening http://localhost:8080/node-webkit.html
I really thank Thomas Frohwein aka thfr@ for finding this out!
Tested on OpenBSD and OpenIndiana, it works fine on an Intel Core 2 Duo T9400
(CPU from 2008).
If you ever wanted to host your own wikipedia replica, here is the simplest
way.
As wikipedia is REALLY huge, you don’t really want to host a php wikimedia
software and load the huge database, instead, the project made the openzim
format to compress the huge database that wikipedia became while allowing using
it for fast searches.
Sadly, on OpenBSD, we have no software reading zim files and most software
requires the library openzim to work which requires extra work to get it as a
package on OpenBSD.
Hopefully, there is a python package implementing all you need as pure python
to serve zim files over http and it’s easy to install.
This tutorial should work on all others unix like systems but packages or
binary names may change.
Downloading wikipedia
The project Kiwix is responsible for wikipedia files, they create regularly
files from various projects (including stackexchange, gutenberg, wikibooks
etc…) but for this tutorial we want wikipedia:
https://wiki.kiwix.org/wiki/Content_in_all_languages
You will find a lot of files, the language is contained into the filename. Some
filenames will also self explain if they contain everything or categories, and
if they have pictures or not.
The full French file is 31.4 GB worth.
Running the server
For the next steps, I recommend setting up a new user dedicated to this.
On OpenBSD, we will require python3 and pip:
$ doas pkg_add py3-pip--
Then we can use pip to fetch and install dependencies for the zimply software,
the flag --user is rather important as it allows any user to download and
install python libraries in its home folder instead of polluting the whole
system as root.
$ pip3.7 install --user --upgrade zimply
I wrote a small script to start the server using the zim file as a parameter, I
rarely write python so the script may not be high standard.
File server.py:
from zimply import ZIMServer
import sys
import os.path
if len(sys.argv) == 1:
print("usage: " + sys.argv[0] + " file")
exit(1)
if os.path.exists(sys.argv[1]):
ZIMServer(sys.argv[1])
else:
print("Can't find file " + sys.argv[1])
And then you can start the server using the command:
You will be able to access wikipedia on the url http://localhost:9454/
Note that this is not a “wiki” as you can’t see history and edit/create pages.
This kind of backup is used in place like Cuba or Africa areas where people
don’t have unlimited internet access, the project lead by Kiwix allow more
people to access knowledge.
For some times I wanted to share how I manage my personal laptop and
systems. I got the habit to create a lot of users for just
everything for security reasons.
Creating a new users is fast, I can connect as this user using doas
or ssh -X if I need a X app and this allows preventing some code to
steal data from my main account.
Maybe I went this way too much, I have a dedicated irssi users which
is only for running irssi, same with mutt. I also have a user with
a stupid name and I can use it for testing X apps and I can wipe
the data in its home directory (to try fresh firefox profiles in
case of ports update for example).
How to proceed?
Creating a new user is as easy as this command (as root):
This way, I can easily manage lots of services from packages which
don’t come with dedicated daemons users.
For this to be effective, it’s important to have a chmod 700 on
your main user account, so others users can’t browse your files.
Graphicals software with dedicated users
It becomes more tricky for graphical users. There are two options there:
allow another user to use your X session, it will have native performance but
in case of security issue in the software your whole X session is accessible
(recording keys, screnshots etc…)
running the software through ssh -X will restricts X access to the software
but the rendering will be a bit sluggish and not suitable for some uses.
Example of using ssh -X compared to ssh -Y:
$ ssh -X foobar@localhost scrot
X Error of failed request: BadAccess (attempt to access private resource denied)
Major opcode of failed request: 104 (X_Bell)
Serial number of failed request: 6
Current serial number in output stream: 8
$ ssh -Y foobar@localhost scrot
(nothing output but it made a screenshot of the whole X area)
Real world example
On a server I have the following new users running:
I don’t use gpg a lot but it seems the only tool out there for encrypting data
which “works” and widely used.
So this is my personal cheatsheet for everyday use of gpg.
In this post, I use the command gpg2 which is the binary to GPG version 2.
On your system, “gpg” command could be gpg2 or gpg1.
You can use gpg --versionif you want to check the real version behind gpg
binary.
In your ~/.profile file you may need the following line:
export GPG_TTY=$(tty)
Install GPG
The real name of GPG is GnuPG, so depending on your system the package can be
either gpg2, gpg, gnupg, gnugp2 etc…
On OpenBSD, you can install it with: pkg_add gnupg--%gnupg2
GPG Principle using private/public keys
YOU make a private and a public key (associated with a mail)
YOU give the public key to people
PEOPLE import your public key into they keyring
PEOPLE use your public key from the keyring
YOU will need your password everytime
I think gpg can do much more, but read the manual for that :)
Initialization
We need to create a public and a private key.
solene$ gpg2 --gen-key
gpg (GnuPG) 2.2.12; Copyright (C) 2018 Free Software Foundation, Inc.
This is free software: you are free to change and redistribute it.
There is NO WARRANTY, to the extent permitted by law.
Note: Use "gpg2 --full-generate-key" for a full featured key generation dialog.
GnuPG needs to construct a user ID to identify your key.
In this part, you should put your real name and your email address and validate
with “O” if you are okay with the input. You will get ask for a passphrase
after.
Real name: Solene
Email address: solene@domain.example
You selected this USER-ID:
"Solene <solene@domain.example>"
Change (N)ame, (E)mail, or (O)kay/(Q)uit? o
We need to generate a lot of random bytes. It is a good idea to perform
some other action (type on the keyboard, move the mouse, utilize the
disks) during the prime generation; this gives the random number
generator a better chance to gain enough entropy.
We need to generate a lot of random bytes. It is a good idea to perform
some other action (type on the keyboard, move the mouse, utilize the
disks) during the prime generation; this gives the random number
generator a better chance to gain enough entropy.
gpg: key 368E580748D5CA75 marked as ultimately trusted
gpg: revocation certificate stored as '/home/solene/.gnupg/openpgp-revocs.d/7914C6A7439EADA52643933B368E580748D5CA75.rev'
public and secret key created and signed.
pub rsa2048 2019-09-06 [SC] [expires: 2021-09-05]
7914C6A7439EADA52643933B368E580748D5CA75
uid Solene <solene@domain.example>
sub rsa2048 2019-09-06 [E] [expires: 2021-09-05]
The key will expire in 2 years, but this is okay.
This is a good thing, if you stop using the key, it will die silently at it
expiration time.
If you still use it, you will be able to extend the expiracy time and people
will be able to notice you still use that key.
Export the public key
If someone asks your GPG key, this is what they want:
gpg --edit-key FINGERPRINT_HERE
> sign
# do you want to sign? (y/n): y
> save
Delete a public key
In case someone change their public key, you will want to delete it to import a
new one, replace $FINGERPRINT by the actual fingerprint of the public key.
gpg2 --delete-keys $FINGERPRINT
Encrypt a file for someone
If you want to send file picture.jpg to remote@mail then use the command:
You can now send picture.jpg.gpg to remote@mail who will be able to read the
file with his/her private key.
You can use `–armor`` parameter to make the output plaintext, so you can put
it into a mail or a text file.
Decrypt a file
Easy!
gpg2 --decrypt image.jpg.gpg > image.jpg
Get public key fingerprint
The fingerprint is a short string made out of your public key and can be
embedded in a mail (often as a signature) or anywhere.
It allows comparing a public key you received from someone with the fingerprint
that you may find in mailing list archives, twitter, a html page etc.. if the
person spreaded it somewhere. This allow to multiple check the authenticity of
the public key you received.
it looks like:
4398 3BAD 3EDC B35C 9B8F 2442 8CD4 2DFD 57F0 A909
This is my real key fingerprint, so if I send you my public key, you can use
the fingerprint from this page to check it matches the key you received!
You can obtain your fingerprint using the following command:
If for some reason, you need to add another mail to your GPG key (like
personal/work keys) you can create a new identity with the new mail.
Type gpg2 --edit-key solene@domain.example and then in the prompt, type adduid
and answer questions.
You can now export the public key with a different identity.
List known keys
If you want to get the list of keys you imported, you can use
gpg2 -k
Testing
If you want to do some tests, I’d recommend making new users on your system,
exchanges their keys and try to encrypt a message from one user to another.
I have a few spare users on my system on which I can ssh locally for various
tests, it is always useful.
This blog post is about a nginx rtmp module for turning your nginx
server into a video streaming server.
The official website of the project is located on github at:
https://github.com/arut/nginx-rtmp-module/
I use it to stream video from my computer to my nginx server, then
viewers can use mpv rtmp://perso.pw/gaming in order to view the
video stream. But the nginx server will also relay to twitch for
more scalability (and some people prefer viewing there for some
reasons).
The module will already be installed with nginx package since OpenBSD
6.6 (not already out at this time).
There is no package for install the rtmp module before 6.6.
On others operating systems, check for something like “nginx-rtmp” or
“rtmp” in an nginx context.
Install nginx on OpenBSD:
pkg_add nginx
Then, add the following to the file /etc/nginx/nginx.conf
load_module modules/ngx_rtmp_module.so;
rtmp {
server {
listen 1935;
buflen 10s;
application gaming {
live on;
allow publish 176.32.212.34;
allow publish 175.3.194.6;
deny publish all;
allow play all;
record all;
record_path /htdocs/videos/;
record_suffix %d-%b-%y_%Hh%M.flv;
}
}
}
The previous configuration sample is a simple example allowing
172.32.212.34 and 175.3.194.6 to stream through nginx, and that will
record the videos under /htdocs/videos/ (nginx is chrooted in
/var/www).
You can add the following line in the “application” block to relay the
stream to your Twitch broadcasting server, using your API key.
push rtmp://live-ams.twitch.tv/app/YOUR_API_KEY;
I made a simple scripts generating thumbnails of the videos and
generating a html index file.
Every 10 minutes, a cron check if files have to be generated,
make thumbnails for videos (tries at 05:30 of the video and then
00:03 if it doesn’t work, to handle very small videos) and then
create the html.
The script checking for new stuff and starting html generation:
#!/bin/sh
cd /var/www/htdocs/videos
for file in $(find . -mmin +1 -name '*.flv')
do
echo $file
PIC=$(echo $file | sed 's/flv$/jpg/')
if [ ! -f "$PIC" ]
then
ffmpeg -ss 00:05:30 -i "$file" -vframes 1 -q:v 2 "$PIC"
if [ ! -f "$PIC" ]
then
ffmpeg -ss 00:00:03 -i "$file" -vframes 1 -q:v 2 "$PIC"
if [ ! -f "$PIC" ]
then
echo "problem with $file" | mail user@my-tld.com
fi
fi
fi
done
cd ~/dev/videos/ && sh html.sh
This one makes the html:
#!/bin/sh
cd /var/www/htdocs/videos
PER_ROW=3
COUNT=0
cat << EOF > index.html
<html>
<body>
<h1>Replays</h1>
<table>
EOF
for file in $(find . -mmin +3 -name '*.flv')
do
if [ $COUNT -eq 0 ]
then
echo "<tr>" >> index.html
INROW=1
fi
COUNT=$(( COUNT + 1 ))
SIZE=$(ls -lh $file | awk '{ print $5 }')
PIC=$(echo $file | sed 's/flv$/jpg/')
echo $file
echo "<td><a href=\"$file\"><img src=\"$PIC\" width=320 height=240 /><br />$file ($SIZE)</a></td>" >> index.html
if [ $COUNT -eq $PER_ROW ]
then
echo "</tr>" >> index.html
COUNT=0
INROW=0
fi
done
if [ $INROW -eq 1 ]
then
echo "</tr>" >> index.html
fi
cat << EOF >> index.html
</table>
</body>
</html>
EOF
As on my blog I use different markup languages I would like to use a simpler
markup language not requiring an extra package. To do so, I wrote an awk
script handling titles, paragraphs and code blocks the same way markdown does.
16 December 2019 UPDATE: adc sent me a patch to add ordered and unordered list.
Code below contain the addition.
It is very easy to use, like: awk -f mmd file.mmd > output.html
The script is the following:
BEGIN {
in_code=0
in_list_unordered=0
in_list_ordered=0
in_paragraph=0
}
{
# escape < > characters
gsub(/</,"\<",$0);
gsub(/>/,"\>",$0);
# close code blocks
if(! match($0,/^ /)) {
if(in_code) {
in_code=0
printf "</code></pre>\n"
}
}
# close unordered list
if(! match($0,/^- /)) {
if(in_list_unordered) {
in_list_unordered=0
printf "</ul>\n"
}
}
# close ordered list
if(! match($0,/^[0-9]+\. /)) {
if(in_list_ordered) {
in_list_ordered=0
printf "</ol>\n"
}
}
# display titles
if(match($0,/^#/)) {
if(match($0,/^(#+)/)) {
printf "<h%i>%s</h%i>\n", RLENGTH, substr($0,index($0,$2)), RLENGTH
}
# display code blocks
} else if(match($0,/^ /)) {
if(in_code==0) {
in_code=1
printf "<pre><code>"
print substr($0,5)
} else {
print substr($0,5)
}
# display unordered lists
} else if(match($0,/^- /)) {
if(in_list_unordered==0) {
in_list_unordered=1
printf "<ul>\n"
printf "<li>%s</li>\n", substr($0,3)
} else {
printf "<li>%s</li>\n", substr($0,3)
}
# display ordered lists
} else if(match($0,/^[0-9]+\. /)) {
n=index($0," ")+1
if(in_list_ordered==0) {
in_list_ordered=1
printf "<ol>\n"
printf "<li>%s</li>\n", substr($0,n)
} else {
printf "<li>%s</li>\n", substr($0,n)
}
# close p if current line is empty
} else {
if(length($0) == 0 && in_paragraph == 1 && in_code == 0) {
in_paragraph=0
printf "</p>"
} # we are still in a paragraph
if(length($0) != 0 && in_paragraph == 1) {
print
} # open a p tag if previous line is empty
if(length(previous_line)==0 && in_paragraph==0) {
in_paragraph=1
printf "<p>%s\n", $0
}
}
previous_line = $0
}
END {
if(in_code==1) {
printf "</code></pre>\n"
}
if(in_list_unordered==1) {
printf "</ul>\n"
}
if(in_list_ordered==1) {
printf "</ol>\n"
}
if(in_paragraph==1) {
printf "</p>\n"
}
}
Hello, this is a long time I want to work on a special project using an
offline device and work on it.
I started using computers before my parents had an internet access and
I was enjoying it. Would it still be the case if I was using a laptop
with no internet access?
When I think about an offline laptop, I immediately think I will miss
IRC, mails, file synchronization, Mastodon and remote ssh to my servers.
But do I really need it _all the time_?
As I started thinking about preparing an old laptop for the experiment,
differents ideas with theirs pros and cons came to my mind.
Over the years, I produced digital data and I can not deny this. I
don't need all of them but I still want some (some music, my texts,
some of my programs). How would I synchronize data from the offline
system to my main system (which has replicated backups and such).
At first I was thinking about using a serial line over the two
laptops to synchronize files, but both laptop lacks serial ports and
buying gears for that would cost too much for its purpose.
I ended thinking that using an IP network _is fine_, if I connect for a
specific purpose. This extended a bit further because I also need to
install packages, and using an usb memory stick from another computer
to get packages and allow the offline system to use it is _tedious_
and ineffective (downloading packages and correct dependencies is a
hard task on OpenBSD in the case you only want the files). I also
came across a really specific problem, my offline device is an old
Apple PowerPC laptop being big-endian and amd64 is little-endian, while
this does not seem particularly a problem, OpenBSD filesystem is
dependent of endianness, and I could not share an usb memory device
using FFS because of this, alternatives are fat, ntfs or ext2 so it is a
dead end.
Finally, using the super slow wireless network adapter from that
offline laptop allows me to connect only when I need for a few file
transfers. I am using the system firewall pf to limit access to outside.
In my pf.conf, I only have rules for DNS, NTP servers, my remote server,
OpenBSD mirror for packages and my other laptop on the lan. I only
enable wifi if I need to push an article to my blog or if I need to
pull a bit more music from my laptop.
This is not entirely _offline_ then, because I can get access to the
internet at any time, but it helps me keeping the device offline.
There is no modern web browser on powerpc, I restricted packages to
the minimum.
So far, when using this laptop, there is no other distraction than the
stuff I do myself.
At the time I write this post, I only use xterm and tmux, with moc as a
music player (the audio system of the iBook G4 is surprisingly good!),
writing this text with ed and a 72 long char prompt in order to wrap
words correctly manually (I already talked about that trick!).
As my laptop has a short battery life, roughly two hours, this also
helps having "sessions" of a reasonable duration. (Yes, I can still
plug the laptop somewhere).
I did not use this laptop a lot so far, I only started the experiment
a few days ago, I will write about this sometimes.
I plan to work on my gopher space to add new content only available
there :)
I’m happy to announce the OpenBSD project will now provide -stable binary
packages. This mean, if you run last release (syspatch applied or not),
pkg_add -u will update packages to get security fixes.
Remember to restart services that may have been updated, to be sure to run new
binaries.
I said I will rewrite ttyplot examples to
make them work on OpenBSD.
Here they are, but a small notice before:
Examples using systat will only work for 10000 seconds , or increase that
-d parameter, or wrap it in an infinite loop so it restart (but don’t loop
systat for one run at a time, it needs to start at least once for producing
results).
The systat examples won’t work before OpenBSD 6.6, which is not yet
released at the time I’m writing this, but it’ll work on a -current after 20 july 2019.
I made a change to systat so it flush output at every cycle, it was not
possible to parse its output in realtime before.
Enjoy!
Examples list
ping
Replace test.example by the host you want to ping.
If for some reasons you want to visualize your bandwidth traffic on an
interface (in or out) in a terminal with a nice graph, here is a small script
to do so, involving ttyplot, a nice software making graphics in a terminal.
The following will works on OpenBSD.
You can install ttyplot by pkg_add ttyplot as root, ttyplot package appeared
since OpenBSD 6.5.
In the following command, we will use trunk0 with INBOUND traffic as the
interface to monitor.
At the end of the article, there is a command for displaying both in and out at
the same time, and also instructions for customizing to your need.
Article update: the following command is extremely long and complicated, at
the end of the article you can find a shorter and more efficient version,
removing most of the awk code.
You can copy/paste this command in your OpenBSD system shell, this will produce
a graph of trunk0 inbound traffic.
{ while :; do netstat -i -b -n ; sleep 1 ; done } | awk 'BEGIN{old=-1} /^trunk0/ { if(!index($4,":") && old>=0) { print ($5-old)/1024 ; fflush ; old = $5 } if(old==-1) { old=$5 } }' | ttyplot -t "IN Bandwidth in KB/s" -u "KB/s" -c "#"
The script will do an infinite loop doing netstat -ibn every second and
sending that output to awk.
You can quit it with Ctrl+C.
Explanations
Netstat output contains total bytes (in or out) since system has started so awk
needs to remember last value and will display the difference between two
output, avoiding first value because it would make a huge spike (aka the total
network transfered since boot time).
If I decompose the awk script, this is a lot more readable.
Awk is very readable if you take care to format it properly as any source code!
#!/bin/sh
{ while :;
do
netstat -i -b -n
sleep 1
done
} | awk '
BEGIN {
old=-1
}
/^trunk0/ {
if(!index($4,":") && old>=0) {
print ($5-old)/1024
fflush
old = $5
}
if(old==-1) {
old = $5
}
}' | ttyplot -t "IN Bandwidth in KB/s" -u "KB/s" -c "#"
Customization
replace trunk0 by your interface name
replace both instances of $5 by $6 for OUT traffic
replace /1024 by /1048576 for MB/s values
remove /1024 for B/s values
replace 1 in sleep 1 by another value if you want to have the value every
n seconds
IN/OUT version for both data on the same graph + simpler
Thanks to leot on IRC, netstat can be used in a lot more efficient way and remove all the awk parsing!
ttyplot supports having two graphs at the same time, one being in opposite color.
If you ever wanted to make a twitch stream from your OpenBSD system, this is
now possible, thanks to OpenBSD developer thfr@ who made a wrapper named
fauxstream using ffmpeg with relevant parameters.
The setup is quite easy, it only requires a few steps and searching on Twitch
website two informations, hopefully, to ease the process, I found the links for
you.
You will need to make an account on twitch, get your api key (a long string of
characters) which should stay secret because it allow anyone having it to
stream on your account.
Preparation steps
Register / connect on twitch
Get your Stream API key at
https://www.twitch.tv/YOUR_USERNAME/dashboard/settings (from this page you
can also choose if twitch should automatically saves streams as videos for
14 days)
Once you have all the pieces, start a new shell and check the $TWITCH variable
is correctly set, it should looks like
rtmp://live-ams.twitch.tv/app/live_2738723987238_jiozjeoizaeiazheizahezah
(this is not a real api key).
Using fauxstream
fauxstream script comes with a README.md file containing some useful
informations, you can also check the usage
View usage:
$ ./fauxstream
Starting a stream
When you start a stream, take care your API key isn’t displayed on the
stream! I redirect stderr to /dev/null so all the output containing the
key is not displayed.
If you choose a smaller resolution than your screen, imagine a square of that
resolution starting at the top left corner of your screen, the content of this
square will be streamed.
I recommend bwm-ng package (I wrote a ports of the week article about it)
to view your realtime bandwidth usage, if you see the bandwidth reach a fixed
number this mean you reached your bandwidth limit and the stream is certainly
not working correctly, you should lower resolution, fps or bitrate.
I recommend doing a few tries before you want to stream, to be sure it’s ok.
Note that the flag -a may be be required in case of audio/video
desynchronization, there is no magic value so you should guess and try.
Adding webcam
I found an easy trick to add webcam on top of a video game.
The trick is to use mpv to display your webcam video on your screen and use the
flag to make it stay on top of any other window (this won’t work with cwm(1)
window manager). Then you can resize it and place it where you want. What you
see is what get streamed.
The others mpv flags are to reduce lag between the webcam video stream and the
display, mpv slowly get a delay and after 10 minutes, your webcam will be
lagging by like 10 seconds and will be totally out of sync between the action
and your face.
Don’t forget to use chown to change the ownership of your video device to your
user, by default only root has access to video devices. This is reset upon
reboot.
Viewing a stream
For less overhead, people can watch a stream using mpv software, I think this
will require youtube-dl package too.
Discord users keep telling about their so called discord server, which is
not dedicated to them at all. And Discord has a very bad quality and a lot of
voice distorsion.
Why not run your very own mumble server with high voice quality and low
latency and privacy respect? This is very easy to setup on OpenBSD!
Mumble is an open source voip client, it has a client named Mumble (available
on various operating system) and at least Android, the server part is murmur
but there is a lightweight server named umurmur. People authentication is done
through certificate generated locally and automatically accepted on a server,
and the certificate get associated with a nickname. Nobody can pick the same
nickname as another person if it’s not the same certificate.
We can start it as this, you may want to tweak the configuration file to add a
password to your server, or set an admin password, create static channels,
change ports etc….
You may want to increase the max_bandwidth value to increase audio quality,
or choose the right value to fit your bandwidth. Using umurmur on a DSL line is
fine up to 1 or 2 remote people. The daemon uses very little CPU and very
little memory. Umurmur is meant to be used on a router!
# rcctl start umurmurd
If you have a restrictive firewall (I hope so), you will have to open the ports
TCP and UDP 64738.
How to connect to it?
The client is named Mumble and is packaged under OpenBSD, we need to install it:
# pkg_add mumble
The first time you run it, you will have a configuration wizard that will take
only a couple of minutes.
Don’t forget to set the sysctl kern.audio.record to 1 to enable audio
recording, as OpenBSD did disable audio input by default a few releases ago.
You will be able to choose a push-to-talk mode or voice level to activate and
quality level.
Once the configuration wizard is done, you will have another wizard for
generating the certificate. I recommend choosing “Automatically create a
certificate”, then validate and it’s done.
You will be prompted for a server, click on “Add new”, enter the name server so
you can recognized it easily, type its hostname / IP, its port and your
nickname and click OK.
Congratulations, you are now using your own private VOIP server, for real!
I write this blog post as I spent too much time setting up nginx and
SSL on OpenBSD with acme-client, due to nginx being chrooted and not
stripping path and not doing it easily.
First, you need to set up /etc/acme-client.conf correctly. Here is
mine for the domain ports.perso.pw:
authority letsencrypt {
api url "https://acme-v02.api.letsencrypt.org/directory"
account key "/etc/acme/letsencrypt-privkey.pem"
}
domain ports.perso.pw {
domain key "/etc/ssl/private/ports.key"
domain full chain certificate "/etc/ssl/ports.fullchain.pem"
sign with letsencrypt
}
This example is for OpenBSD 6.6 (which is current when I write this)
because of Let’s encrypt API URL. If you are running 6.5 or 6.4,
replace v02 by v01 in the api url
Then, you have to configure nginx this way, the most important part in
the following configuration file is the location block handling
acme-challenge request. Remember that nginx is in chroot /var/www so
the path to acme directory is acme.
This blog post is an update (OpenBSD 6.5 at that time) of this very same
article I published in June 2018. Due to rtadvd replaced by rad, this text
was not useful anymore.
I subscribed to a VPN service from the french association Grifon (Grifon
website[FR] to get an IPv6 access to the world and play
with IPv6. I will not talk about the VPN service, it would be pointless.
I now have an IPv6 prefix of 48 bits which can theorically have 280 addresses.
I would like my computers connected through the VPN to let others computers in
my network to have IPv6 connectivity.
On OpenBSD, this is very easy to do. If you want to provide IPv6 to Windows
devices on your network, you will need one more.
In my setup, I have a tun0 device which has the IPv6 access and re0 which is my
LAN network.
First, configure IPv6 on your lan:
# ifconfig re0 inet6 autoconf
that’s all, you can add a new line “inet6 autoconf” to your file
/etc/hostname.if to get it at boot.
Now, we have to allow IPv6 to be routed through the differents
interfaces of the router.
# sysctl net.inet6.ip6.forwarding=1
This change can be made persistent across reboot by adding
net.inet6.ip6.forwarding=1 to the file /etc/sysctl.conf.
Automatic addressing
Now we have to configure the daemon rad to advertise the we are routing,
devices on the network should be able to get an IPv6 address from its
advertisement.
The minimal configuration of /etc/rad.conf is the following:
interface re0 {
prefix 2a00:5414:7311::/48
}
In this configuration file we only define the prefix available, this is
equivalent to a dhcp addresses range. Others attributes could provide DNS
servers to use for example, see rad.conf man page.
Then enable the service at boot and start it:
# rcctl enable rad
# rcctl start rad
Tweaking resolv.conf
By default OpenBSD will ask for IPv4 when resolving a hostname (see
resolv.conf(5) for more explanations). So, you will never have IPv6
traffic until you use a software which will request explicit IPv6
connection or that the hostname is only defined with a AAAA field.
The file resolv.conf.tail is appended at the end of resolv.conf
when dhclient modifies the file resolv.conf.
Microsoft Windows
If you have Windows systems on your network, they won’t get addresses
from rad. You will need to deploy dhcpv6 daemon.
The configuration file for what we want to achieve here is pretty
simple, it consists of telling what range we want to allow on DHCPv6
and a DNS server. Create the file /etc/dhcp6s.conf:
interface re0 {
address-pool pool1 3600;
};
pool pool1 {
range 2a00:5414:7311:1111::1000 to 2a00:5414:7311:1111::4000;
};
option domain-name-servers 2001:db8::35;
Note that I added “1111” into the range because it should not be on the
same network than the router. You can replace 1111 by what you want, even CAFE
or 1337 if you want to bring some fun to network engineers.
Now, you have to install and configure the service:
The openbsd package wide-dhcpv6 doesn’t provide a rc file to
start/stop the service so it must be started from a command line, a
way to do it is to type the command in /etc/rc.local which is run at
boot.
The openssl command is needed for dhcpv6 to start, as it requires a
base64 string as a secret key in the file /etc/dhcp6sctlkey.
I take the occasion of this blog post to explain how the file is generated as I
did not find easy tool for this task, so I ended up doing it myself.
I choosed to use XSLT, which is not quite common. Briefly, XSLT allows
to use some kind of XML template on a XML data file, this allow loops,
filtering etc… It requires only two parts: the template and the data.
Simple RSS template
The following file is a template for my RSS file, we can see a few tags
starting by xsl like xsl:for-each or xsl:value-of.
It’s interesting to note that the xsl-for-each can use a condition like
position < 10 in order to limit the loop to the 10 first items.
Now, we need some data to use with the template.
I’ve added a comment block so I can copy / paste it to add a new entry into the
RSS easily. As the date is in a painful format to write for a human, I added to
my Makefile starting the commands a call to a script replacing the string DATE
by the current date with the correct format.
<feed>
<news>
<title>www/mozilla-firefox</title>
<description>Firefox 67.0.1</description>
<date>Wed, 05 Jun 2019 06:00:00 GMT</date>
</news>
<!-- copy paste for a new item
<news>
<title></title>
<description></description>
<date></date>
</news>
-->
</feed>
Makefile
I love makefiles, so I share it even if this one is really short.
all:
sh replace_date.sh
xsltproc template.xml news.xml | xmllint -format - | tee rss.xml
scp rss.xml perso.pw:/home/stable/
clean:
rm rss.xml
When I want to add an entry, I copy / paste the comment block in news.xml, add
DATE, run make and it’s uploaded :)
The command xsltproc is available from the package libxslt on OpenBSD.
And then, after writing this, I realise that manually editing the result file
rss.xml is as much work as editing the news.xml file and then process it with
xslt… But I keep that blog post as this can be useful for more complicated
cases. :)
While writing a script to backup a remote database, I did not know how to
handle a ssh tunnel inside a script correctly/easily. A quick internet search
pointed out this link to me:
https://gist.github.com/scy/6781836
While I’m not a huge fan of the ControlMaster solution which consists at
starting a ssh connection with ControlMaster activated, and tell ssh to close
it, and don’t forget to put a timeout on the socket otherwise it won’t close if
you interrupt the script.
But I really enjoyed a neat solution which is valid for most of the cases:
This will create a ssh connection and make it go to background because of -f
flag, but it will close itself after the command is run, sleep 5 in this
case. As we chain it quickly to a command using the tunnel, ssh will only stops
when the tunnel is not used anymore, keeping it alive only the required time
for the pg_dump command, not more. If we interrupt the script, I’m not sure ssh
will stop immediately or only after it ran successfully the command sleep, in
both cases ssh will stop correctly. There is no need to use a long sleep value
because as I said previously, the tunnel will stay up until nothing uses it.
You should note that the ControlMaster way is the only reliable way if you need
to use the ssh tunnel for multiples commands inside the script.
I previously wrote about Kermit for fetching remote files using a kermit
script. I found that it’s possible to achieve the same with a single kermit
command, without requiring a script file.
Given I want to download files from my remote server from the path
/home/mirror/pub and that I’ve setup a kermit server on the other part
using inetd:
I can make a ssh tunnel to it to reach it locally on port 7878 to download my files.
kermit -I -j localhost:7878 -C "remote cd /home/mirror/pub","reget /recursive .",close,EXIT
Some flags can be added to make it even faster, like -v 31 -e 9042. I insist
on kermit because it’s super reliable and there are no security issues if
running behind a firewall and accessed through ssh.
Fetching files can be stopped at any time, it supports very poor connection
too, it’s really reliable. You can also skip files, because sometimes you need
some file first and you don’t want to modify your script to fetch a specific
file (this only works if you don’t have too many files to get of course because
you can skip them only one by one).
This article explains how to set up a simple samba server to have a CIFS /
Windows shared folder accessible by everyone. This is useful in some cases but
samba configuration is not straightforward when you need it for a one shot time
or this particular case.
The important covered case here is that no user are needed. The trick comes
from map to guest = Bad User configuration line in [global] section. This
option will automatically map an unknown user or no provided user to the guest
account.
Here is a simple /etc/samba/smb.conf file to share /home/samba to
everyone, except map to guest and the shared folder, it’s the stock file with
comments removed.
[global]
workgroup = WORKGROUP
server string = Samba Server
server role = standalone server
log file = /var/log/samba/smbd.%m
max log size = 50
dns proxy = no
map to guest = Bad User
[myfolder]
browseable = yes
path = /home/samba
writable = yes
guest ok = yes
public = yes
If you want to set up this on OpenBSD, it’s really easy:
# pkg_add samba
# rcctl enable smbd nmbd
# vi /etc/samba/smb.conf (you can use previous config)
# mkdir -p /home/samba
# chown nobody:nobody /home/samba
# rcctl start smbd nmbd
I switched from a homemade script using mblaze to neomutt (after being using mutt, alpine and mu4e) and it’s difficult to remember everything. So, let’s do a cheatsheet!
Mark as read: Ctrl+R
Mark to delete: d
Execute deletion: $
Tag a mail: t
Move a mail: s (for save, which is a copy + delete)
Save a mail: c (for copy)
Operation on tagged mails: ;[OP] with OP being the key for that operation, like ;d for deleting tagged emails or ;s for moving them
Operations on attachments
Save to file: s
Pipe to view as html: | and then w3m -T text/html
Pipe to view as picture: | and then feh -
Delete mails based on date
use T to enter a date range, format [before]-[after] with before/after being a DD/MM/YYYY format (YYYY is optional)
~d 24/04- to mark mails after 24/04 of this year
~d -24/04 to mark mails before 24/04 of this year
~d 24/04-25/04 to mark mails between 24/04 and 25/04 (inclusive)
;d to tell neomutt we want to delete marked mails
$ to make deletion happen
Simple config
Here is a simple config I’ve built to get Neomutt usable for me.
set realname = "Jane Doe"
set from = "jane@doe.com"
set smtp_url = "smtps://login@doe.com:465"
alias me Jane Doe <login@doe.com>
set folder = "imaps://login@doe.com:993"
set imap_user = "login"
set header_cache = /home/solene/.cache/neomutt/jane/headers
set message_cachedir = /home/solene/.cache/neomutt/jane/bodies
set imap_pass = "xx"
set smtp_pass = "xx"
set imap_idle = yes # IMAP push (supposed to work)
set mbox_type = Maildir
set ssl_starttls = yes
set ssl_force_tls = yes
set spoolfile = "+INBOX"
set record = "+Sent"
set postponed = "+Drafts"
set trash = "+Trash"
set imap_list_subscribed = yes
set imap_check_subscribed
#sidebar
set sidebar_visible
set sidebar_format = "%B%?F? [%F]?%* %?N?%N/?%S"
set mail_check_stats
bind index,pager \Cp sidebar-prev # Ctrl-Shift-p - Previous Mailbox
bind index,pager \Cn sidebar-next # Ctrl-Shift-n - Next Mailbox
bind index,pager \Ca sidebar-open # Ctrl-Shift-a - Open Highlighted Mailbox
bind index "," imap-fetch-mail # , - Get new emails
bind index,pager "N" next-unread-mailbox # Jump to next unread email
# regroup by threads
set sort=threads
# display only interesting headers
ignore *
unignore from date subject to cc
unignore organization organisation x-mailer: x-newsreader: x-mailing-list:
unignore posted-to:
I use ssh tunneling A LOT, for everything. Yesterday, I removed the
public access of my IMAP server, it’s now only available through ssh
tunneling to access the daemon listening on localhost. I have plenty
of daemons listening only on localhost that I can only reach through a
ssh tunnel. If you don’t want to bother with ssh and redirect ports you
need, you can also make a VPN (using ssh, openvpn, iked, tinc…)
between your system and your server. I tend to avoid setting up VPN for
the current use case as it requires more work and more maintenance than
running ssh server and a ssh client.
The last change, for my IMAP server, added an issue. I want my phone
to access the IMAP server but I don’t want to connect to my main
account from my phone for security reasons. So, I need a dedicated
user that will only be allowed to forward ports.
This is done very easily on OpenBSD.
The steps are:
generate ssh keys for the new user
add a user with no password
allow public key for port forwarding
Obviously, you must allow users (or only this one) to make port forwarding in
your sshd_config.
Generating ssh keys
Please generate the keys in a safe place, using
ssh-keygen
$ ssh-keygen
Generating public/private rsa key pair.
Enter file in which to save the key (/home/user/.ssh/id_rsa):
Enter passphrase (empty for no passphrase):
Enter same passphrase again:
Your identification has been saved in /home/user/.ssh/id_rsa.
Your public key has been saved in /home/user/.ssh/id_rsa.pub.
The key fingerprint is:
SHA256:SOMETHINGSOMETHINSOMETHINSOMETHINSOMETHING user@myhost
The key's randomart image is:
+---[RSA 3072]----+
| |
| ** |
| * ** . |
| * * |
| **** * |
| **** |
| |
| |
| |
+----[SHA256]-----+
This will create your public key in ~/.ssh/id_rsa.pub and the private key in
~/.ssh/id_rsa
Adding a user
On OpenBSD, we will create a user named tunnel, this is done with the
following command as root:
# useradd -m tunnel
This user has no password and can’t login on ssh.
Allow the public key to port forward only
We will use the command restriction in the authorized_keys file to
allow the previously generated key to only forward.
Edit /home/tunnel/.ssh/authorized_keys as following
This command will start autossh, restart if forwarding doesn’t work which is
likely to happens when you lose connectivity, it takes some time for the remote
server to disable the forwarding effectively. It will make a keep alive check
so the tunnel stays up and ensure it’s up (this is particularly useful on
wireless connection like 4G/LTE).
The others flags are also ssh parameters, to not start a shell, and for making
a local forwarding. Don’t forget that as a regular user, you can’t bind on
ports less than 1024, that’s why I redirect the port 993 to the local port
9993 in the example.
Making the tunnel on Android
If you want to access your personal services from your Android phone, you can
use ConnectBot ssh client. It’s really easy:
upload your private key to the phone
add it in ConnectBot from the main menu
create a new connection the user and your remote host
choose to use public key authentication and choose the registered key
uncheck “start a shell session” (this is equivalent to -N ssh flag)
from the main menu, long touch the connection and edit the forwarded ports
The following guide is a real world example of drist usage. We will
create a script to deploy munin-node on OpenBSD systems.
We need to create a script that will install munin-node package but
also configure it using the default proposal. This is done easily
using the script file.
#!/bin/sh
# checking munin not installed
pkg_info | grep munin-node
if [ $? -ne 0 ]; then
pkg_add munin-node
munin-node-configure --suggest --shell | sh
rcctl enable munin_node
fi
rcctl restart munin_node
The script contains some simple logic to prevent trying installing
munin-node each time we will run it, and also prevent re-configuring it
automatically every time. This is done by checking if pkg_info output
contains munin-node.
We also need to provide a munin-node.conf file to allow our munin
server to reach the nodes. For this how-to, I’ll dump the
configuration in the commands using cat, but of course, you can use
your favorite editor to create the file, or copy an original
munin-node.conf file and edit it to suit your needs.
Thanks to a hard work from thfr@, it is now possible to play the commercial game **Slay The Spire** on OpenBSD.
Small introduction to the game: it's a solo deck building game where you need to escalate a tower. Each floor may contain enemie(s) or a treasure or a merchant or an elite (harder enemies) or an event.
There are four characters playable, each unlocked after playing with the previous one. The game is really easy to understand, every game (or run) restart from the beginning with your character, at every new floor you may earn items and cards to build a deck for this run.
When you die, you can unlock some new items per characters and unlock cards for next runs. The goal is to reach the top of the tower. Each character is really different to play and each allow a few obvious deck builds.
The game work with an OpenBSD 6.5 minimum but this method using libgdx will work since 6.9. For this you will need:
Buy Slay The Spire on GOG or Steam
Copy files from a Slay The Spire installation (Windows or Linux) to your OpenBSD system or unzip the linux installer .sh file
Install some packages with pkg_add: openal jdk-11 lwjgl libgdx
Search for the .jar file (biggest file), then run libgdx-setup to extract data from the jar file and prepare the game.
Run the game with libgdx-run
Don't forget to eat, hydrate yourself and sleep. This game is time consuming :)
All settings and saves are stored in the game folder, so you may want to backup it if you don't want to lose your progression.
Again, thanks to thfr@ for his huge work on making games working on OpenBSD!
This article explains how to use haproxy to add a TLS layer to any TCP
protocol. This includes http or gopher. The following example explains
the minimal setup required in order to make it work, haproxy has a lot
of options and I won’t use them.
The idea is to let haproxy manage the TLS part and let your http server
(or any daemon listening on TCP) replying within the wrapped connection.
You need a simple haproxy.cfg which can looks like that:
The idea is that it waits on port 7000 and will use the file
/etc/ssl/certificat.pem as a certificate, and forward requests to the
backend on 127.0.0.1:7070. That is ALL. If you want to do https, you need
to listen on port 443 and redirect to your port 80.
The PEM file is made from the privkey concatenated with the fullchain
certificate. If you use a self signed certificate, you can make it with the
following command:
cat secret.key certificate.crt > cert.pem
One can use a folder with PEM certificates files inside instead of using a
file. This will allow haproxy to receive connections for ALL the certificates
loaded.
For more security, I recommend using the chroot feature and a dh file but it’s
out of the current topic.
In this article I will explain how to setup a gopher server supporting
TLS. Gopher TLS support is not “official” as there is currently no RFC
to define it. It has been recently chose by the community how to make
it work, while keeping compatibility with old servers / clients.
The way to do it is really simple.
Client A tries to connects to Server B, Client A tries TLS handshake,
if Server B answers correctly to the TLS handshakes, then Client A
sends the gopher request and Server B answers the gopher requests. If
Server B doesn’t understand the TLS handshakes, then it will probably
output a regular gopher page, then this is throwed and Client A
retries the connection using plaintext gopher and Server B answers the
gopher request.
This is easy to achieve because gopher protocol doesn’t require the
server to send anything to the client before the client sends its
request.
The way to add the TLS layer and the dispatching can be achieved using
sslh and relayd. You could use haproxy instead of relayd, but
the latter is in OpenBSD base system so I will use it. Thanks parazyd
for sharing about sslh for this use case.
sslh is a protocol demultiplexer, it listens on a port, and
depending on what it receives, it will try to guess the protocol used
by the client and send it to the according backend. It’s first purpose
was to make ssh available on port 443 while still having https daemon
working on that server.
This method allows to wrap any server to make it TLS compatible. The
best case would be to have TLS compatibles servers which do all the
work without requiring sslh and something to add the TLS. But it’s
currently a way to show TLS for gopher is real.
Relayd
The relayd(1) part is easy, you first need a x509 certificate for the
TLS part, I will not explain here how to get one, there are already
plenty of how-to and one can use let’s encrypt with acme-client(1) to
get one on OpenBSD.
We will write our configuration in /etc/relayd.conf
log connection
relay "gopher" {
listen on 127.0.0.1 port 7000 tls
forward to 127.0.0.1 port 7070
}
In this example, relayd listens on port 7000 and our gopher daemon
listens on port 7070. According to relayd.conf(5), relayd will look
for the certificate at the following places:
/etc/ssl/private/$LISTEN_ADDRESS:$PORT.key and
/etc/ssl/$LISTEN_ADDRESS:$PORT.crt, with the current example you
will need the files: /etc/ssl/private/127.0.0.1:7000.key and
/etc/ssl/127.0.0.1:7000.crt
relayd can be enabled and started using rcctl:
# rcctl enable relayd
# rcctl start relayd
Gopher daemon
Choose your favorite gopher daemon, I recommend geomyidae but any
other valid daemon will work, just make it listening on the correct
address and port combination.
We will use sslh_fork (but sslh_select would be valid too, they have
differents pros/cons). The --tls parameters tells where to forward a
TLS connection while --ssh will forward to the gopher daemon. This
is so because the protocol ssh is already configured within sslh and
acts exactly like a gopher daemon: the client doesn’t expect the
server to be the first sending data.
You can easily test if this works using openssl to connect by hand to the port 70
$ openssl s_client -connect 127.0.0.1:7000
You should see a lot of output, which is the TLS handshake, then you
can send a gopher request like “/” and you should get a result. Using
telnet on the same address and port should give the same result.
My gopher client clic already supports gopher TLS and is available
at git://bitreich.org/clic and only requires the ecl common lisp
interpreter to compile.
While most lines are really obvious, it is mandatory to have the line
initiatoraddr, many thanks to cwen@ for pointing this out when I was stuck on
it.
The targetname value will depend of the iSCSI target server. If you use
netbsd-iscsi-target, then you only need to care about the last part, aka
target0 and replace it by the name of your target (which is target0 for the
default one).
If you use netbsd-iscsi-target, the whole line should be identic except for the
sd4 part which can change, depending of your hardware.
If you don’t see it, you may need to reload iscsid configuration file with
iscsictl reload.
Warning: iSCSI is a bit of pain to debug, if it doesn’t work, double check the
IPs in /etc/iscsi.conf, check your PF rules on the initiator and the
target. You should be at least able to telnet into the target IP port 3260.
Once you found your new sd device, you can format it and mount it as a regular
disk device:
# newfs /dev/rsd4c
# mount /dev/sd4c /mnt
iSCSI is far mor efficient and faster than NFS but it has a total different
purpose. I’m using it on my powerpc machines to build packages on it. This
reduce their old IDE disks usage while giving better response time and
equivalent speed.
This is the first article of a series about iSCSI.
iSCSI is a protocol designed for sharing a block device across
network as if it was a local disk. This doesn’t permit using that
disk from multiples places at once though, except if you use a
specific filesystem like GFS2 or OCFS2 (Linux only). In this article,
we will learn how to create an iSCSI target, which is the “server”
part of iSCSI, the target is the system holding the disk and making
it available to others on the network.
OpenBSD does not have an target server in base, we will have to use
net/netbsd-iscsi-target for this. The setup is really simple.
First, we obviously need to install the package and we will activate the daemon
so it start automatically at boot, but don’t start it yet:
The configurations files are in /etc/iscsi/ folder, it contains files
auths and targets. The default configuration files are the same. By
looking at the source code, it seems that auths is used there but it seems
to have no use at all. We will just overwrite it everytime we modify
targets to keep them in sync.
The first line defines the file holding our disk in the second field, and the
last field defines the size of it. When iscsi-target will be started, it will
create files as required with the size defined here.
The second line defines permissions, in that case, the extent0 disk can be used
read/write by the net 10.4.0.0/16. For this example, I will only change the
netmask to suit my network, then I copy targets over auths.
If you want to restrict ports using PF, you only have to allows the TCP port
3260 from the network that will connect to the target. The according line would
looks like this:
Drist see its release 1.04 available. This adds support for the flag -p to
make the ssh connection persistent across the script using the ssh
ControlMaster feature. This fixes one use case where you modify ssh keys in two
operations: copy file + script to change permissions and this makes drist a lot
faster for fast tasks.
Drist makes a first ssh connection to get the real hostname of the remote
machine, and then will ssh for each step (copy, copy-hostname, absent,
absent-hostname, script, script-hostname), this mean in the use case where you
copy one file and reload a service, it was doing 3 connections. Now with
the persistent flag, drist will keep the first connection and reusing it,
closing the control socket at the end of the script.
I never used a command line utility to check the spelling in my texts because I
did not know how to do. After taking five minutes to learn how to do it, I feel
guilty about not having used it before as it is really simple.
First, you want to install aspell package, which may be already there pulled as
a dependency. In order to proceed on OpenBSD it’s easy:
# pkg_add aspell
I will only explain how to use it on text files. I think it is possible to have
some integration with text editors but then, it would be more relevant to check
out the editor documentation.
If I want to check the spelling in my file draft.txt it is as simple as:
$ aspell -l en_EN -c draft.txt
The parameter -l en_EN will depend of your locale, I have fr_FR.UTF-8 so aspell
uses it by default if I don’t enforce another language. With this command, aspell
will make an interactive display in the terminal
The output looks like this, with the word ful highlighted which I can not
render in my article.
It's ful of mistakkes!
I dont know how to type corectly!
1) flu 6) FL
2) foul 7) fl
3) fuel 8) UL
4) full 9) fol
5) furl 0) fur
i) Ignore I) Ignore all
r) Replace R) Replace all
a) Add l) Add Lower
b) Abort x) Exit
?
I am asked how I want to resolve the issue with ful, as I wanted to write
full, I will type 4 and aspell will replace the word ful with full.
This will automatically jump to the next error found, mistakkes in my case:
It's full of mistakkes!
I dont know how to type corectly!
1) mistakes 6) misstates
2) mistake's 7) mistimes
3) mistake 8) mistypes
4) mistaken 9) stake's
5) stakes 0) Mintaka's
i) Ignore I) Ignore all
r) Replace R) Replace all
a) Add l) Add Lower
b) Abort x) Exit
?
and it will continue until there are no errors left, then the file is saved
with the changes.
This week, I am happy to present you sct, a very small utility software to
set the color of your screen. You can install it on OpenBSD with pkg_add
sct and its usage is really simple, just run sct $temp where $temp is the
temperature you want to get on your screen.
The default temperature is 6500, if you lower this value, the screen will
change toward red, meaning your screen will appear less blue and this may be
more comfortable for some people. The temperature you want to use depend from
the screen and from your feeling, I have one screen which is correct at 5900
but another old screen which turn too much red below 6200!
You can add sct 5900 to your .xsession file to start it when you start your
X11 session.
There is an alternative to sct whose name is redshift, it is more complicated
as you need to tell it your location with latitude and longitude and, as a
daemon, it will correct continuously your screen temperature depending on the
time. This is possible because when you know your location on earth and the
time, you can compute the sunrise time and dawn time. sct is not a daemon,
you run it once and does not change the temperature until you call it again.
It is easily possible to parallelize drist (this works for everything though)
using Makefile. I use this to deploy a configuration on my servers at the same
time, this is way faster.
A simple BSD Make compatible Makefile looks like this:
This create a target for each server in my list which will call drist. Typing
make install will iterate over $SERVERS list but it is so possible to use
make -j 3 to tell make to use 3 threads. The output may be mixed though.
You can also use make tor-relay.local if you don’t want make to iterate over
all servers. This doesn’t do more than typing drist tor-relay.local in the
example, but your Makefile may do other logic before/after.
If you want to type make to deploy everything instead of make install you
can add the line all: install in the Makefile.
If you use GNU Make (gmake), the file requires a small change:
The part ${SERVERS}: must be changed to ${SERVERS}: %:, I think that gmake
will print a warning but I did not succeed with better result. If you have the
solution to remove the warning, please tell me.
If you are not comfortable with Makefiles, the .PHONY line tells make that
the targets are not valid files.
Hi, I rarely post about external links or other people work, but at FOSDEM
2019Vincent Delft had a
talk about running OpenBSD as a full featured NAS.
I do use OpenBSD on my NAS, I wanted to write an article about it since long
time but never did it. Thanks to Vincent, I can just share his work which is
very very interesting if you plan to make your own NAS.
Hi, it’s been long time I wanted to write this article. The topic is Kermit,
which is a file transfer protocol from the 80’s which solved problems of that
era (text files and binaries files, poor lines, high latency etc..).
There is a comm/kermit package on OpenBSD and I am going to show you how to use
it. The package is the program ckermit which is a client/server for kermit.
Kermit is a lot of things, there is a protocol, but it’s also the
client/server, when you type kermit, it opens a kermit shell, where you
can type commands or write kermit scripts. This allows scripts to be done using
a kermit in the shebang.
I personally use kermit over ssh to retrieve files from my remote server, this
requires kermit on both machines. My script is the following:
#!/usr/local/bin/kermit +
set host /pty ssh -t -e none -l solene perso.pw kermit
remote cd /home/ftp/
cd /home/solene/Downloads/
reget /recursive /delete .
close
exit
This connects to the remote server and starts kermit. It changes the current
directory on the remote server into /home/ftp and locally it goes into
/home/solene/Downloads, then, it start retrieving data, continuing previous
transfer if not finished (reget command), for every file finished, it’s deleted
on the remote server. Once finished, it close the ssh connection and exits.
The transfer interfaces looks like this. It shows how you are connected, which
file is currently transferring, its size, the percent done (0% in the example),
time left, speed and some others information.
C-Kermit 9.0.302 OPEN SOURCE:, 20 Aug 2011, solene.perso.local [192.168.43.56]
Current Directory: /home/downloads/openbsd
Network Host: ssh -t -e none -l solene perso.pw kermit (UNIX)
Network Type: TCP/IP
Parity: none
RTT/Timeout: 01 / 03
RECEIVING: src.tar.gz => src.tar.gz => src.tar.gz
File Type: BINARY
File Size: 183640885
Percent Done:
...10...20...30...40...50...60...70...80...90..100
Estimated Time Left: 00:43:32
Transfer Rate, CPS: 70098
Window Slots: 1 of 30
Packet Type: D
Packet Count: 214
Packet Length: 3998
Error Count: 0
Last Error:
Last Message:
X to cancel file, Z to cancel group, <CR> to resend last packet,
E to send Error packet, ^C to quit immediately, ^L to refresh screen.
What’s interesting is that you can skip a file by pressing “X”, kermit will
stop the downloading (but keep the file for later resuming) and start
downloading the next file. It can be useful sometimes when you transfer a bunch
of files, and it’s really big and you don’t want it now and don’t want to type
the command by hand, just “X” and it skips it. Z or E will exists the transfer
and close the connection.
Speed can be improved by adding the following lines before the reget command:
set reliable
set window 32
set receive packet-length 9024
This improves performance because nowadays our networks are mostly reliable and
fast. Kermit was designed at a time when serial line was used to transfer data.
It’s also reported that Kermit is in use in the ISS (International Space
Station), I can’t verify if it’s still in use there.
I never had any issue while transferring, even by getting a file by resuming it
so many times or using a poor 4G hot-spot with 20s of latency.
I did some tests and I get same performances than rsync over the Internet, it’s
a bit slower over Lan though.
I only described an use case. Scripts can be made, there are a lot of others
commands. You can type “help” in the kermit shell to get some hints for more
help, “?” will display the command list.
It can be used interactively, you can queue files by using “add” to create a
send-list, and then proceed to transfer the queue.
Another way to use it is to start the local kermit shell, then type “ssh
user@remote-server” which will ssh into a remote box. Then you can type
“kermit” and type kermit commands, this make a link between your local kermit
and the remote one. You can go back to the local kermit by typing "Ctrl+",
and go back to the remote by entering the command “C”.
This is a piece of software I found by lurking into the ports tree for
discovering new software and I felt in love with it. It’s really reliable.
It does a different job compared to rsync, I don’t think it can preserve time,
permissions etc… but it can be scripted completely, using parameters, and
it’s an awesome piece of software!
It should support HTTP, HTTPS and ftp transfers too, as a client, but I did not
get it work. On OpenBSD, the HTTPS support is disabled, it requires some work
to switch to libreSSL.
It’s been more than a month since the last article, which is unusual. I
don’t have much time these days and the ideas in the queue are not easy
topics, so I don’t publish anything.
I am now on Mastodon at solene@bsd.network, publishing things on the
Fediverse. Mostly UNIX propaganda.
This year I plan to work on reed-alert to improve its usage, maybe write
more how-to or documentation about it too. I also think about writing
non-core probes in a separate repository.
Cl-yag, the blog generator that I use for this blog should deserve some
attention too, I would like to make it possible to create static pages
not in the index/RSS, this doesn’t require much code as I already have a
proof of concept, but it requires some changes to better integrate
within.
Finally, my deployment tool drist should definitely be fixed to support
tcsh and csh on remote shells for script execution. This requires a few
easy changes. Some better documentation and how-to would be nice too.
I also revived a project named faubackup, it’s a backup software which
is now hosted on Framagit.
And I revived another project which is from me, a packages statistics
website to have some stats about installed OpenBSD packages. The code is
not great, the web UI is not great, the filters are not great but it
works. It needs improvements. I’m thinking about making a package of it
for people wishing to participate, that would install the client and add
a cron to update the package list weekly. The Web UI is at this address
Pkgstat, that name is not good but
I did not find a good name yet. The code can be downloaded
here.
In this new article I will explain how to programmaticaly
a line (with a newline) using ed.
We will use commands sent to ed in its stdin to do so. The logic is to
locate the part where to add the newline and if a character need to be
replaced.
this is a file
with a too much line in it that should be split
but not this one.
In order to do so, we will format using printf(1) the command list
using a small trick to insert the newline. The command list is the
following:
/too much line
s/that /that
,p
This search the first line matching “too much line” and then replaced
"that " by "that0, the trick is to escape using a backslash so the
substitution command can accept the newline, and at the end we print
the file (replace ,n by w to write it).
The resulting command line is:
$ printf '/too much line0/that /that\0n0 | ed file.txt
81
> with a too much line in it that should be split
> should be split
> 1 this is a file
2 with a too much line in it that
3 should be split
4 but not this one.
> ?
Hello, in this article I will present you my deployement tool drist (if you
speak Russian, I am already aware of what you think). It reached a feature
complete status today and now I can write about it.
As a system administrator, I started using salt a few years ago. And
honestly, I can not cope with it anymore. It is slow, it can get very
complicated for some tasks like correctly ordering commands and a
configuration file can become a nightmare when you start using condition in it.
History
I also tried alternatives like ansible, puppet, Rex etc… One day, when
lurking in the ports tree, I found sysutils/radmind which got a lot
interest from me even if it is really poorly documented. It is a project from
1995 if I remember correctly, but I liked the base idea. Radmind works with
files, you create a known working set of files for your system, and you can
propagate that whole set to other machines, or see differences between the
reference and the current system. Sets could be negative, meaning that the
listed files should not be present on the system, but it was also possible to
add extra sets for specific hosts. The whole thing is really really cumbersome,
this requires a lot of work, I found little documentation etc… so I did not
used it but, that lead me to write my own deployment tool using ideas from
radmind (working with files) and from Rex (using a script for doing
changes).
Concept
drist aims at being simple to understand and pluggable with standard tools.
There is no special syntax to learn, no daemon to run, no agent, and it relies
on base tools like awk, sed, ssh and rsync.
drist is cross platform as it has a few requirements but it is not well
suited for deploying on too much differents operating systems.
When executed, drist will execute six steps in a specific order, you can
use only steps you need.
Shamelessly copied from the man page, explanations after:
If folder files exists, its content is copied to server rsync(1).
If folder files-HOSTNAME exists, its content is copied to server using rsync(1).
If folder absent exists, filenames in it are deleted on server.
If folder absent-HOSTNAME exists, filenames in it are deleted on server.
If file script exists, it is copied to server and executed there.
If file script-HOSTNAME exists, it is copied to server and executed there.
In the previous list, all the existences checks are done from the current
working directory where drist is started. The text HOSTNAME is replaced by
the output of uname -n of the remote server, and files are copied starting from
the root directory.
drist does not do anything more. In a more litteral manner, it copies files to
the remote server, using a local filesystem tree (folder files). It will
delete on the remote server all files present in the local filesystem tree
(folder absent), and it will run on the remote server a script named
script.
Each of theses can be customized per-host by adding a “-HOSTNAME” suffix to the
folder or file name, because experience taught me that some hosts does require
specific configuration.
If a folder or a file does not exist, drist will skip it. So it is possible
to only copy files, or only execute a script, or delete files and execute a
script after.
Drist usage
The usage is pretty simple. drist has 3 flags which are optionals.
-n flag will show what happens (simuation mode)
-s flag tells drist to use sudo on the remote host
-e flag with a parameter will tell drist to use a specific path for the sudo
program
The remote server address (ssh format like user@host) is mandatory.
$ drist my_user@my_remote_host
drist will look at files and folders in the current directory when executed,
this allow to organize as you want using your filesystem and a revision control
system.
Simple examples
Here are two examples to illustrate its usage. The examples are easy, for
learning purpose.
Deploying ssh keys
I want to easily copy my users ssh keys to a remote server.
This module (aka a folder which contain material for drist) will install nginx
on FreeBSD and start it.
$ mkdir deploy_nginx
$ cd deploy_nginx
$ cat >script <<EOF
#!/bin/sh
test -f /usr/local/bin/nginx
if [ $? -ne 0 ]; then
pkg install -y nginx
fi
sysrc nginx_enable=yes
service nginx restart
EOF
$ drist user@remote-host
Executing file "script":
Updating FreeBSD repository catalogue...
FreeBSD repository is up to date.
All repositories are up to date.
The following 1 package(s) will be affected (of 0 checked):
New packages to be INSTALLED:
nginx: 1.14.1,2
Number of packages to be installed: 1
The process will require 1 MiB more space.
421 KiB to be downloaded.
[1/1] Fetching nginx-1.14.1,2.txz: 100% 421 KiB 430.7kB/s 00:01
Checking integrity... done (0 conflicting)
[1/1] Installing nginx-1.14.1,2...
===> Creating groups.
Using existing group 'www'.
===> Creating users
Using existing user 'www'.
[1/1] Extracting nginx-1.14.1,2: 100%
Message from nginx-1.14.1,2:
===================================================================
Recent version of the NGINX introduces dynamic modules support. In
FreeBSD ports tree this feature was enabled by default with the DSO
knob. Several vendor's and third-party modules have been converted
to dynamic modules. Unset the DSO knob builds an NGINX without
dynamic modules support.
To load a module at runtime, include the new `load_module'
directive in the main context, specifying the path to the shared
object file for the module, enclosed in quotation marks. When you
reload the configuration or restart NGINX, the module is loaded in.
It is possible to specify a path relative to the source directory,
or a full path, please see
https://www.nginx.com/blog/dynamic-modules-nginx-1-9-11/ and
http://nginx.org/en/docs/ngx_core_module.html#load_module for
details.
Default path for the NGINX dynamic modules is
/usr/local/libexec/nginx.
===================================================================
nginx_enable: -> yes
Performing sanity check on nginx configuration:
nginx: the configuration file /usr/local/etc/nginx/nginx.conf syntax is ok
nginx: configuration file /usr/local/etc/nginx/nginx.conf test is successful
nginx not running? (check /var/run/nginx.pid).
Performing sanity check on nginx configuration:
nginx: the configuration file /usr/local/etc/nginx/nginx.conf syntax is ok
nginx: configuration file /usr/local/etc/nginx/nginx.conf test is successful
Starting nginx.
More complex example
Now I will show more complexes examples, with host specific steps. I will not
display the output because the previous output were sufficient enough to give a
rough idea of what drist does.
Removing someone ssh access
We will reuse an existing module here, a user should not be able to login
anymore on its account on the servers using the ssh key.
The following module will install php and remove the opcache.ini file, and will
install php72-pdo_pgsql if it is run on server production.domain.private.
$ mkdir deploy_php && cd deploy_php
$ mkdir -p files/usr/local/etc
$ cp /some/correct/config.ini files/usr/local/etc/php.ini
$ cat > script <<EOF
#!/bin/sh
test -f /usr/local/etc/php-fpm.conf || pkg install -f php-extensions
sysrc php_fpm_enable=yes
service php-fpm restart
test -f /usr/local/etc/php/opcache.ini || rm /usr/local/etc/php/opcache.ini
EOF
$ cat > script-production.domain.private <<EOF
#!/bin/sh
test -f /usr/local/etc/php/pdo_pgsql.ini || pkg install -f php72-pdo_pgsql
service php-fpm restart
EOF
The monitoring machine
This one is unique and I would like to avoid applying its configuration against
another server (that happened to me once with salt and it was really really
bad). So I will just do all the job using the hostname specific cases.
Everything can be automated easily. I have some makefile in a lot of my drist
modules, because I just need to type “make” to run it correctly. Sometimes it
requires concatenating files before being run, sometimes I do not want to make
mistake or having to remember on which module apply on which server (if it’s
specific), so the makefile does the job for me.
One of my drist module will look at all my SSL certificates from another
module, and make a reed-alert configuration file using awk and deploying it on
the monitoring server. All I do is typing “make” and enjoy my free time.
This second fun-tip article will explain how to display trailing
spaces in a text file, using the
ed(1)
editor.
ed has a special command for showing a dollar character at the end of
each line, which mean that if the line has some spaces, the dollar
character will spaced from the last visible line character.
$ echo ",pl" | ed some-file.txt
453
This second fun-tip article will explain how to display trailing$
spaces in a text file, using the$
[ed(1)$](https://man.openbsd.org/ed)
editor.$
ed has a special command for showing a dollar character at the end of$
each line, which mean that if the line has some spaces, the dollar$
character will spaced from the last visible line character.$
$
.Bd -literal -offset indent$
echo ",pl" | ed some-file.txt$
This is the output of the article file while I am writing it. As you
can notice, there is no trailing space here.
The first number shown in the ed output is the file size, because ed
starts at the end of the file and then, wait for commands.
If I use that very same command on a small text files with trailing
spaces, the following result is expected:
49
this is full $
of trailing $
spaces ! $
It is also possible to display line numbers using the “n” command
instead of the “p” command.
This would produce this result for my current article file:
1559
1 .Dd November 29, 2018$
2 .Dt "Show trailing spaces using ed"$
3 This second fun-tip article will explain how to display trailing$
4 spaces in a text file, using the$
5 .Lk https://man.openbsd.org/ed ed(1)$
6 editor.$
7 ed has a special command for showing a dollar character at the end of$
8 each line, which mean that if the line has some spaces, the dollar$
9 character will spaced from the last visible line character.$
10 $
11 .Bd -literal -offset indent$
12 echo ",pl" | ed some-file.txt$
13 453$
14 .Dd November 29, 2018
15 .Dt "Show trailing spaces using ed"
16 This second fun-tip article will explain how to display trailing
17 spaces in a text file, using the
18 .Lk https://man.openbsd.org/ed ed(1)
19 editor.
20 ed has a special command for showing a '\ character at the end of
21 each line, which mean that if the line has some spaces, the '\
22 character will spaced from the last visible line character.
23
24 \&.Bd \-literal \-offset indent
25 \echo ",pl" | ed some-file.txt
26 .Ed$
27 $
28 This is the output of the article file while I am writing it. As you$
29 can notice, there is no trailing space here.$
30 $
31 The first number shown in the ed output is the file size, because ed$
32 starts at the end of the file and then, wait for commands.$
33 $
34 If I use that very same command on a small text files with trailing$
35 spaces, the following result is expected:$
36 $
37 .Bd -literal -offset indent$
38 49$
39 this is full
40 of trailing
41 spaces !
42 .Ed$
43 $
44 It is also possible to display line numbers using the "n" command$
45 instead of the "p" command.$
46 This would produce this result for my current article file:$
47 .Bd -literal -offset indent$
This shows my article file with each line numbered plus the position
of the last character of each line, this is awesome!
I have to admit though that including my own article as example is
blowing up my mind, especially as I am writing it using ed.
If for some reasons you need to share a file anonymously, this can be done
through Tor using the port net/onionshare. Onionshare will start a web server
displaying an unique page with a list of shared files and a Download Files
button leading to a zip file.
While waiting for a download, onionshare will display HTTP logs. By default,
onionshare will exit upon successful download of the files but this can be
changed with the flag –stay-open.
Its usage is very simple, execute onionshare with the list of files to
share, as you can see in the following example:
solene@computer ~ $ onionshare Epictetus-The_Enchiridion.txt
Onionshare 1.3 | https://onionshare.org/
Connecting to the Tor network: 100% - Done
Configuring onion service on port 17616.
Starting ephemeral Tor onion service and awaiting publication
Settings saved to /home/solene/.config/onionshare/onionshare.json
Preparing files to share.
* Running on http://127.0.0.1:17616/ (Press CTRL+C to quit)
Give this address to the person you're sending the file to:
http://3ngjewzijwb4znjf.onion/hybrid-marbled
Press Ctrl-C to stop server
Now, I need to give the address http://3ngjewzijwb4znjf.onion/hybrid-marbled
to the receiver who will need a web browser with Tor to download it.
This article is about a software named onioncat, it is available as a
package on most Unix and Linux systems. This software allows to create an IPv6
VPN over Tor, with no restrictions on network usage.
First, we need to install onioncat, on OpenBSD:
$ doas pkg_add onioncat
Run a tor hidden service, as explained in one of my previous article, and get
the hostname value. If you run multiples hidden services, pick one hostname.
Now that we have the hostname, we just need to run ocat.
# ocat g6adq2w15j1eakzr.onion
If everything works as expected, a tun interface
will be created. With a fe80:: IPv6 address assigned to it, and a fd87::
address.
Your system is now reachable, via Tor, through its IPv6 address starting with
fd87:: . It supports every IP protocol. Instead of using torsocks wrapper
and .onion hostname, you can use the IPv6 address with any software.
It has been more than four months since I wrote my article about leaving Emacs.
This article will quickly speak about my journey.
First, I successfully left Emacs. Long story short, I like Emacs and think
it’s a great piece of software, but I’m not comfortable being dependent of it
for everything I do. I chose to replace all my Emacs usage by other software
(agenda, notes taking , todo-list, IRC client, jabber client, editor etc..).
agenda is not replaced by when (port productivity/when), but I plan to
replace it by calendar(1) as it’s in base and that when doesn’t do much.
todo-list: I now use taskwarrior + a kanban board (using kanboard) for team
work
notes: I wrote a small software named “notes” which is a wrapper for editing
files and following edition using git. It’s available at
git://bitreich.org/notes
IRC: weechat (not better or worse than emacs circe)
jabber: profanity
editor: vim, ed or emacs, that depend what I do. Emacs is excellent for
writing Lisp or Scheme code, while I prefer to use vim for most of edition
task. I now use ed for small editions.
mail: I wrote some kind of a wrapper on top of mblaze. I plan to share it
someday.
I am starting a new kind of articles that I chose to name it ”fun facts“.
Theses articles will be about one-liners which can have some kind of use, or
that I find interesting from a technical point of view. While not useless,
theses commands may be used in very specific cases.
The first of its kind will explain how to programmaticaly use diff to modify
file1 to file2, using a command line, and without a patch.
First, create a file, with a small content for the example:
$ printf "first line\nsecond line\nthird line\nfourth line with text\n" > file1
$ cp file1{,.orig}
$ printf "very first line\nsecond line\n third line\nfourth line\n" > file1
$ diff -e file1 file1.orig
4c
fourth line
.
1c
very first line
.
The diff(1) output is batch of ed(1) commands,
which will transform file1 into file2. This can be embedded into a script as
in the following example. We also add w as the last command in order
to save the file after changes.
#!/bin/sh
ed file1 <<EOF
4c
fourth line
.
1c
very first line
.
w
EOF
This is a convenient way to transform a file into another file, without
pushing the entire file. This can be used in a deployment script. This
is less error prone than a sed command.
In the same way, we can use ed to alter configuration file by writing
instructions without using diff(1). The following script will change the
first line containing “Port 22” into Port 2222 in /etc/ssh/sshd_config.
#!/bin/sh
ed /etc/ssh/sshd_config <<EOF
/Port 22
c
Port 2222
.
w
EOF
The sed(1) equivalent would be:
sed -i'' 's/.*Port 22.*/Port 2222/' /etc/ssh/sshd_config
Both programs have their use, pros and cons. The most important is to use the
right tool for the right job.
sshd(8) has a very nice feature that is often
overlooked. That feature is the ability to allow a ssh user to run a specified
command and nothing else, not even a login shell.
This is really easy to use and the magic happens in the file
authorized_keys which can be used to restrict commands per public key.
For example, if you want to allow someone to run the “uptime” command on your
server, you can create a user account for that person, with no password so the
password login will be disabled, and add his/her ssh public key in
~/.ssh/authorized_keys of that new user, with the following content.
The user will not be able to log-in, and doing the command ssh remoteserver
will return the output of uptime. There is no way to escape this.
While running uptime is not really helpful, this can be used for a much more
interesting use case, like allowing remote users to use vmctl without
giving a shell account. The vmctl command requires parameters, the configuration
will be slightly different.
The variable SSH_ORIGINAL_COMMAND contains the value of what is passed as
parameter to ssh. The pty keyword also make an appearance, that will be
explained later.
If the user connects to ssh, vmctl with no parameter will be output.
If you pass parameters to ssh, it will be passed to vmctl.
$ ssh remotehost show
ID PID VCPUS MAXMEM CURMEM TTY OWNER NAME
1 - 1 1.0G - - solene test
$ ssh remotehost start test
vmctl: started vm 1 successfully, tty /dev/ttyp9
$ ssh -t remotehost console test
(I)nstall, (U)pgrade, (A)utoinstall or (S)hell?
The ssh connections become a call to vmctl and ssh parameters become vmctl
parameters.
Note that in the last example, I use “ssh -t”, this is so to force allocation
of a pseudo tty device. This is required for vmctl console to get a fully
working console. The keyword restrict does not allow pty allocation, that
is why we have to add pty after restrict, to allow it.
In this fourth Tor article, I will quickly cover how to run a Tor relay, the
Tor project already have a very nice and up-to-date Guide for setting a relay.
Those relays are what make Tor usable, with more relay, Tor gets more bandwidth
and it makes you harder to trace, because that would mean more traffic to
analyze.
A relay server can be an exit node, which will relay Tor traffic to the
outside. This implies a lot of legal issues, the Tor project foundation offers
to help you if your exit node gets you in trouble.
Remember that being an exit node is optional. Most relays are not exit
nodes. They will either relay traffic between relays, or become a guard
which is an entry point to the Tor network. The guard gets the request over
non-tor network and send it to the next relay of the user circuit.
Running a relay requires a lot of CPU (capable of some crypto) and a huge
amount of bandwidth. Running a relay requires at least a bandwidth of 10Mb/s,
this is a minimal requirement. If you have less, you can still run a bridge
with obfs4 but I won’t cover it here.
When running a relay, you will be able to set a daily/weekly/monthly traffic
limit, so your relay will stop relaying when it reach the quota. It’s quiet
useful if you don’t have unmeasured bandwidth, you can also limit the bandwidth
allowed to Tor.
To get real-time information about your relay, the software Nyx (net/nyx) is a
Tor top-like front end which show Tor CPU usage, bandwidth, connections, log in
real time.
In this article I will present you the rcs
tools and we will use it for versioning files in /etc to track changes between
editions. These tools are part of the OpenBSD base install.
Prerequisites
You need to create a RCS folder where your files are, so the files
versions will be saved in it. I will use /etc in the examples, you
can adapt to your needs.
# cd /etc
# mkdir RCS
The following examples use the command ci -u. This will be explained
later why so.
Tracking a file
We need to add a file to the RCS directory so we can track its
revisions. Each time we will proceed, we will create a new revision
of the file which contain the whole file at that point of time. This
will allow us to see changes between revisions, and the date of each
revision (and some others informations).
I really recommend to track the files you edit in your system, or even
configuration file in your user directory.
In next example, we will create the first revision of our file with
ci, and we will have to write some message about
it, like what is doing that file. Once we write the message, we need to
validate with a single dot on the line.
# cd /etc
# ci -u fstab
fstab,v <-- fstab
enter description, terminated with single '.' or end of file:
NOTE: This is NOT the log message!
>> this is the /etc/fstab file
>> .
initial revision: 1.1
done
Editing a file
The process of edition has multiples steps, using
ci and co:
checkout the file and lock it, this will make the file available
for writing and will prevent using co on it again (due to lock)
edit the file
commit the new file + checkout
When using ci to store the new revision, we need to write a small
message, try to use something clear and short. The log messages can be
seen in the file history, that should help you to know which change
has been made and why. The full process is done in the following
example.
# co -l fstab
RCS/fstab,v --> fstab
revision 1.1 (locked)
done
# echo "something wrong" >> fstab
# ci -u fstab
RCS/fstab,v <-- fstab
new revision: 1.4; previous revision: 1.3
enter log message, terminated with a single '.' or end of file:
>> I added a mistake on purpose!
>> .
revision 1.4 (unlocked)
done
View changes since last version
Using previous example, we will use rcsdiff
to check the changes since the last version.
The -u flag is so to produce an unified diff, which I find easier to
read. Lines with + shows additions, and lines with - show
deletions (there are none in the example).
Use of ci -u
The examples were using ci -u this is because, if you use ci
some_file, the file will be saved in the RCS folder but will be
missing in its place. You should use co some_file to get it back (in
read-only).
# co -l fstab
RCS/fstab,v --> fstab
revision 1.1 (locked)
done
# echo "something wrong" >> fstab
# ci -u fstab
RCS/fstab,v <-- fstab
new revision: 1.4; previous revision: 1.3
enter log message, terminated with a single '.' or end of file:
>> I added a mistake on purpose!
>> .
done
# ls fstab
ls: fstab: No such file or directory
# co fstab
RCS/fstab,v --> fstab
revision 1.5
done
# ls fstab
fstab
Using ci -u is very convenient because it prevent the user to forget
to checkout the file after commiting the changes.
Note that there is no space between the flag and the revision! This
is required.
We can see that the command did output some extra informations about
the file and “done” at the end of the file. Thoses extra
informations are sent to stderr while the actual file content is sent
to stdout. That mean if we redirect stdout to a file, we will get the
file content.
With the new OpenSMTPD syntax change which landed with OpenBSD 6.4
release, changes are needed for making opensmtpd to act as a lan relay
to a smtp server. This case wasn’t covered in my previous article
about opensmtpd, I was only writing about relaying from the local
machine, not for a network. Mike (a reader of the blog) shared that it
would be nice to have an article about it. Here it is! :)
A simple configuration would look like the following:
listen on em0
listen on lo0
table aliases db:/etc/mail/aliases.db
table secrets db:/etc/mail/secrets.db
action "local" mbox alias <aliases>
action "relay" relay host smtps://myrelay@remote-smtpd.tld auth <secrets>
match for local action "local"
match from local for any action "relay"
match from src 192.168.1.0/24 for action relay
The daemon will listen on em0 interface, and mail delivered from the
network will be relayed to remote-smtpd.tld.
For a relay using authentication, the login and passwords must be
defined in the file /etc/mail/secrets like this: myrelay
login:Pa$$W0rd
smtpd.conf(5) explains creation
of /etc/mail/secrets like this:
In this third Tor article, we will discover the web browser Tor
Browser.
The Tor Browser is an official Tor project. It is a modified
Firefox, including some defaults settings changes and some extensions.
The default changes are all related to privacy and anonymity. It has
been made to be easy to browse the Internet through Tor without
leaving behind any information which could help identify you, because
there are much more information than your public IP address which
could be used against you.
It requires tor daemon to be installed and running, as I covered in my
first Tor article.
Using it is really straightforward.
How to install tor-browser
$ pkg_add tor-browser
How to start tor-browser
$ tor-browser
It will create a ~/TorBrowser-Data folder at launch. You can remove it
as you want, it doesn’t contain anything sensitive but is required for
it to work.
If you are using opensmtpd on a device not
always connected on the internet, you may want to see what mail did not go, and
force it to be delivered NOW when you are finally connected to the
Internet.
$ doas smtpctl show queue
1de69809e7a84423|local|mta|auth|so@tld|dest@tld|dest@tld|1540362112|1540362112|0|2|pending|406|No MX found for domain
The previous command will report nothing if the queue is empty.
In the previous output, we see that there is one mail from me to
dest@tld which is pending due to “NO MX found for domain” (which is
normal as I had no internet when I sent the mail).
We need to extract the first field, which is 1de69809e7a84423 in the
current example.
In order to tell opensmtpd to deliver it now, we will use the
following command:
$ doas smtpctl schedule 1de69809e7a84423
1 envelope scheduled
$ doas smtpctl show queue
My mail was delivered, it’s not in the queue anymore.
If you wish to deliver all enveloppes in the queue, this is as simple as:
My website/gopherhole static generator cl-yag has been updated today,
and see its first release!
New feature added today is that the gopher output now supports an
index menu of tags, and a menu for each tags displaying articles
tagged by that tag. The gopher output was a bit of a second class
citizen before this, only listing articles.
New release v1.00 can be downloaded
here (sha512
sum
53839dfb52544c3ac0a3ca78d12161fee9bff628036d8e8d3f54c11e479b3a8c5effe17dd3f21cf6ae4249c61bfbc8585b1aa5b928581a6b257b268f66630819).
Code can be cloned with git: git://bitreich.org/cl-yag
In this second Tor article, I will present an interesting Tor feature
named hidden service. The principle of this hidden service is to
make available a network service from anywhere, with only
prerequisites that the computer must be powered on, tor not blocked
and it has network access.
This service will be available through an address not disclosing
anything about the server internet provider or its IP, instead, a
hostname ending by .onion will be provided by tor for
connecting. This hidden service will be only accessible through Tor.
There are a few advantages of using hidden services:
privacy, hostname doesn’t contain any hint
security, secure access to a remote service not using SSL/TLS
no need for running some kind of dynamic dns updater
The drawback is that it’s quite slow and it only work for TCP
services.
From here, we assume that Tor is installed and working.
Running an hidden service require to modify the Tor daemon
configuration file, located in /etc/tor/torrc on OpenBSD.
Add the following lines in the configuration file to enable a hidden
service for SSH:
The directory /var/tor/ssh_service will be be created. The
directory /var/tor is owned by user _tor and not readable by
other users. The hidden service directory can be named as you want,
but it should be owned by user _tor with restricted
permissions. Tor daemon will take care at creating the directory with
correct permissions once you reload it.
Now you can reload the tor daemon to make the hidden service
available.
$ doas rcctl reload tor
In the /var/tor/ssh_service directory, two files are created. What
we want is the content of the file hostname which contains the
hostname to reach our hidden service.
$ doas cat /var/tor/ssh_service/hostname
piosdnzecmbijclc.onion
Now, we can use the following command to connect to the hidden service
from anywhere.
$ torsocks ssh piosdnzecmbijclc.onion
In Tor network, this feature doesn’t use an exit node. Hidden services
can be used for various services like http, imap, ssh, gopher etc…
Using hidden service isn’t illegal nor it makes the computer to relay
tor network, as previously, just check if you can use Tor on your
network.
Note: it is possible to have a version 3 .onion address which will
prevent hostname collapsing, but this produce very long
hostnames. This can be done like in the following example:
This will produce a really long hostname like
tgoyfyp023zikceql5njds65ryzvwei5xvzyeubu2i6am5r5uzxfscad.onion
If you want to have the short and long hostnames, you need to specify
twice the hidden service, with differents folders.
Take care, if you run a ssh service on your website and using this
same ssh daemon on the hidden service, the host keys will be the same,
implying that someone could theoricaly associate both and know that
this public IP runs this hidden service, breaking anonymity.
Tor is a network service allowing to hide your traffic. People
sniffing your network will not be able to know what server you reach
and people on the remote side (like the administrator of a web
service) will not know where you are from. Tor helps keeping your
anonymity and privacy.
Long story short, tor makes use of an entry point that you reach
directly, then servers acting as relay not able to decrypt the data
relayed, and up to an exit node which will do the real request for
you, and the network response will do the opposite way.
Installing tor is easy on OpenBSD. You need to install it and start its
daemon. The daemon will listen by default on localhost on port 9050. On
other systems, it may be similar, install the tor package and enable
the daemon if not enabled by default.
# pkg_add tor
# rcctl enable tor
# rcctl start tor
Now, you can use your favorite program, look at the proxy settings and
choose “SOCKS” proxy, v5 if possible (it manage the DNS queries) and
use the default address: 127.0.0.1 with port 9050.
If you need to use tor with a program that doesn’t support setting a
SOCKS proxy, it’s still possible to use torsocks to wrap it, that
will work with most programs. It is very easy to use.
# pkg_add torsocks
$ torsocks ssh remoteserver
This will make ssh going through tor network.
Using tor won’t make you relaying anything, and is legal in most
countries. Tor is like a VPN, some countries has laws about VPN, check
for your country laws if you plan to use tor. Also, note that using
tor may be forbidden in some networks (companies, schools etc..)
because this allows to escape filtering which may be against some kind
of “Agreement usage” of the network.
I will cover later the relaying part, which can lead to legal
uncertainty.
Note: as torsocks is a bit of a hack, because it uses LD_PRELOAD to
wrap network system calls, there is a way to do it more cleanly with
ssh (or any program supporting a custom command for initialize the
connection) using netcat.
This can be simplified by adding the following lines to your ~/.ssh/config file, in order to automatically use the proxy command when you connect to a .onion hostname:
The default OpenBSD partition layout uses a pre-defined template. If
you have a disk more than 356 GB you will have unused space with the
default layout (346 GB before 6.4).
It’s possible to create a new partition to use that space if you did
not modify the default layout at installation. You only need to start
disklabel with flag -E* and type a to add a partition,
default will use all remaining space for the partition.
# disklabel -E sd0
Label editor (enter '?' for help at any prompt)
> a
partition: [m]
offset: [741349952]
size: [258863586]
FS type: [4.2BSD]
> w
> q
No label changes.
The new partition here is m. We can format it with:
# newfs /dev/rsd0m
Then, you should add it to your /etc/fstab, for that, use the same
uuid as for other partitions, it would look something like
52fdd1ce48744600
52fdd1ce48744600.e /data ffs rw,nodev,nosuid 1 2
It will be auto mounted at boot, you only need to create the folder
/data. Now you can do
Simple command line to display your installed packages listed by size
from smallest to biggest.
$ pkg_info -sa | paste - - - - | sort -n -k 5
Thanks to sthen@ for the command, I was previously using one involving
awk which was less readable. paste is often forgotten, it has very
specifics uses which can’t be mimic easily with other tools, its
purpose is to joins multiples lines into one with some specific rules.
You can easily modify the output to convert the size from bytes to
megabytes with awk:
Today I will write about my blog itself. While I started it as my own
documentation for some specific things I always forget about (like
“How to add a route through a specific interface on FreeBSD”) or to
publish my dot files, I enjoyed it and wanted to share about some
specific topics.
Then I started the “port of the week” things, but as time goes, I find
less of those software and so I don’t have anything to write
about. Then, as I run multiples servers, sometimes when I feel that
the way I did something is clean and useful, I share it here, as it is
a reminder for me I also write it to be helpful for others.
Doing things right is time consuming, but I always want to deliver a
polished write. In my opinion, doing things right includes the
following:
explain why something is needed
explain code examples
give hints about potential traps
where to look for official documentation
provide environment informations like the operating system version
used at the writing time
make the reader to think and get inspired instead of providing a
material ready to be copy / pasted brainlessly
I try to keep as much as possible close to those guidelines. I even
update from time to time my previous articles to check it still works
on the latest operating system version, so the content is still
relevant. And until it’s not updated, having the system version let
the reader think about “oh, it may have changed” (or not, but it
becomes the reader problem).
Now, I want to share about some OpenBSD specifics features, in a way
to highlight features. In OpenBSD everything is documented
correctly, but as a Human, one can’t read and understand every man
page to know what is possible. Here come the highlighting articles,
trying to show features, how to use it and where they are documented.
I hope you, reader, like what I write. I am writing here since two
years and I still like it.
Following a discussion on the OpenBSD mailing list misc, today I
will write about how to manage the priority (as in nice priority) of
your daemons or services.
Before init(8) starts rc, it sets the process priority, umask, and
resource limits according to the “daemon” login class as described in
login.conf(5). It then starts rc and attempts to execute the sequence of
commands therein.
Using /etc/login.conf we can manage some limits for services and
daemon, using their rc script name.
For example, to make jenkins at lowest priority (so it doesn’t
make troubles if it builds), using this line will set it to nice 20.
jenkins:priority=20
If you have a file /etc/login.conf.db you have to update it from
/etc/login.conf using the software cap_mkdb. This creates a
hashed database for faster information retrieval when this file is
big. By default, that file doesn’t exist and you don’t have to run
cap_mkdb. See login.conf(5) for
more informations.
In this article I will show how to configure OpenSMTPD, the default mail server
on OpenBSD, to relay mail sent locally to your smtp server. In pratice, this
allows to send mail through “localhost” by the right relay, so it makes also
possible to send mail even if your computer isn’t connected to the internet.
Once connected, opensmtpd will send the mails.
All you need to understand the configuration and write your own one is in the
man page smtpd.conf(5). This is only a
highlight on was it possible and how to achieve it.
In OpenBSD 6.4 release, the configuration of opensmtpd changed drasticaly, now
you have to defines rules and action to do when a mail match the rules, and you
have to define those actions.
In the following example, we will see two kinds of relay, the first is through
smtp over the Internet, it’s the most likely you will want to setup. And the
other one is how to relay to a remote server not allowing relaying from
outside.
/etc/mail/smtpd.conf
table aliases file:/etc/mail/aliases
table secrets file:/etc/mail/secrets
listen on lo0
action "local" mbox alias <aliases>
action "relay" relay
action "myserver" relay host smtps://myrelay@perso.pw auth <secrets>
action "openbsd" relay host localhost:2525
match mail-from "@perso.pw" for any action "myserver"
match mail-from "@openbsd.org" for any action "openbsd"
match for local action "local"
match for any action "relay"
I defined 2 actions, one from “myserver”, it has a label “myrelay” and we use
auth <secrets> to tell opensmtpd it needs authentication.
The other action is “openbsd”, it will only relay to localhost on port 2525.
To use them, I define 2 matching rules of the very same kind. If the mail that
I want to send match the @domain-name, then choose relay “myserver” or
“openbsd”.
The “openbsd” relay is only available when I create a SSH tunnel, binding the
local port 25 of the remote server to my port 2525, with flags
-L 2525:127.0.0.1:25.
For a relay using authentication, the login and passwords must be defined in
the file /etc/mail/secrets like this: myrelay login:Pa$$W0rd
smtpd.conf(5) explains creation
of /etc/mail/secrets like this:
Now, restarts your server. Then if you need to send mails, just use “mail”
command or localhost as a smtp server. Depending on your From address, a
different relay will be used.
Deliveries can be checked in /var/log/maillog log file.
Today I will cover a specific topic on OpenBSD networking. If you are using a
laptop, you may switch from ethernet to wireless network from time to time.
There is a simple way to keep the network instead of having to disconnect /
reconnect everytime.
It’s possible to aggregate your wireless and ethernet devices into one trunk
pseudo device in failover mode, which give ethernet the priority if connected.
To achieve this, it’s quite simple. If you have devices em0 and iwm0
create the following files.
As you can see in the wireless device configuration we can specify multiples
network to join, it is a new feature that will be available from 6.4 release.
You can enable the new configuration by running sh /etc/netstart as root.
This setup is explained in trunk(4)
man page and in the
OpenBSD FAQ as well.
By default Tmux uses the emacs key-bindings, to make a selection you
need to enter in copy-mode by pressing Ctrl+b and then [ with Ctrl+b
being the tmux prefix key, if you changed it then do the replacement
while reading.
If you need to quit the copy-mode, type Ctrl+C.
Make a selection
While in copy-mode, selects your start or ending position for your
selection and then press Ctrl+Space to start the selection. Now, move
your cursor to select the text and press Ctrl+w to validate.
Paste a selection
When you want to paste your selection, press Ctrl+b ] (you should not
be in copy-mode for this!).
Make a rectangular selection
If you want to make a rectangular selection, press Ctrl+space to
start and immediately, press R (capitalized R), then move your cursor
and validate with Ctrl+w.
Output the buffer to X buffer
Make a selection to put the content in tmux buffer, then type
tmux save-buffer - | xclip
You may want to look at xclip (it’s a package) man page.
Output the buffer to a file
tmux save-buffer file
Load a file into buffer
It’s possible to load the content of a file inside the buffer for
pasting it somewhere.
tmux load-buffer file
You can also load into the buffer the output of a command, using a
pipe and - as a file like in this example:
echo 'something very interesting' | tmux load-buffer -
Display the battery percentage in the status bar
If you want to display your battery percentage and update it every
40 seconds, you can add two following lines in ~/.tmux.conf:
set status-interval 40
set -g status-right "#[fg=colour155]#(apm -l)%% | #[fg=colour45]%d %b %R"
This example works on OpenBSD using apm command. You can reuse
this example to display others informations.
I never wrote a man page. I already had to read at the source of a
man page, but I was barely understand what happened there. As I like
having fun and discovering new things (people call me a Hipster since
last days days ;-) ).
I modified cl-yag (the website generator used for this website) to be
only produced by mdoc files. The output was not very cool as it has
too many html items (classes, attributes, tags etc…). The result
wasn’t that bad but it looked like concatenated man pages.
I actually enjoyed playing with mdoc format (the man page format on
OpenBSD, I don’t know if it’s used somewhere else). While it’s pretty
verbose, it allows to separate the formatting from the paragraphs. As
I’m playing with
ed
editor last days, it is easier to have an article written with small
pieces of lines rather than a big paragraph including the formatting.
Finally I succeded at writing a command line which produced an usable
html output to use it as a converter in cl-yag. Now, I’ll be able to
write my articles in the mdoc format if I want :D (which is fun). The
convert command is really ugly but it actually works, as you can see
if you read this.
cat data/%IN | mandoc -T markdown | sed -e '1,2d' -e '$d' | multimarkdown -t html -o %OUT
The trick here was to use markdown as an convert format between mdoc
to html. As markdown is very weak compared to html (in
possibilities), it will only use simple tags for formatting the html
output. The sed command is needed to delete the mandoc output with
the man page title at the top, and the operating system at the
bottom.
By having played with this, writing a man page is less obscure to me
and I have a new unusual format to use for writing my articles. Maybe
unusual for this use case, but still very powerful!
Today I will write about my current process of trying to get rid of
emacs. I use it extensively with org-mode for taking notes and making
them into a agenda/todo-list, this helped me a lot to remember tasks
to do and what people told to me. I also use it for editing of
course, any kind of text or source code. This is usually the editor I
use for writing the blog articles that you can read here. This one is
written using ed. I also read my emails in emacs with mu4e (which
last version doesn’t work anymore on powerpc due to a c++14 feature
used and no compiler available on powerpc to compile it…).
While I like Emacs, I never liked to use one big tool for everything.
My current quest is to look for a portable and efficient way to
replace differents emacs parts. I will not stop using Emacs if the
replacements are not good enough to do the job.
So, I identified my Emacs uses:
todo-list / agenda / taking notes
writing code (perl, C, php, Common LISP)
IRC
mails
writing texts
playing chess by mail
jabber client
I will try for each topic to identify alternatives and challenge them
to Emacs.
Todo-list / Agenda / Notes taking
This is the most important part of my emacs use and it is the one I
would really like to get out of Emacs. What I need is: writing
quickly a task, add a deadline to it, add explanations or a
description to it, be able to add sub-tasks for a task and be able to
display it correctly (like in order of deadline with days / hours
before deadline).
I am trying to convert my current todo-list to taskwarrior, the
learning curve is not easy but after spending one hour playing with it
while reading the man page, I have understood enough to replace
org-mode with it. I do not know if it will be as good as org-mode but
only time will let us know.
By the way, I found vit, a ncurses front-end for taskwarrior.
Writing code
Actually Emacs is a good editor. It supports syntax coloring, can
evaluates regions of code (depend of the language), the editor is
nice etc… I discovered jed which is a emacs-like editor written
in C+libslang, it’s stable and light while providing more features
than mg editor (available in OpenBSD base installation).
While I am currently playing with ed for some reasons (I will
certainly write about it), I am not sure I could use it for
writing a software from scratch.
IRC
There are lots of differents IRC clients around, I just need to pick
up one.
Mails
I really enjoy using mu4e, I can find my mails easily with it, the
query system is very powerful and interesting. I don’t know what I
could use to replace it. I have been using alpine some times ago, and
I tried mutt before mu4e and I did not like it. I have heard about
some tools to manage a maildir folder using unix commands, maybe I
should try this one. I did not any searches on this topic at the
moment.
Writing text
For writing plain text like my articles or for using $EDITOR for
differents tasks, I think that ed will do the job perfectly :-) There
is ONE feature I really like in Emacs but I think it’s really easy to
recreate with a script, the function bind on M-q to wrap a text to
the correct column numbers!
Update: meanwhile I wrote a little perl script using Text::Wrap
module available in base Perl. It wraps to 70 columns. It could be
extended to fill blanks or add a character for the first line of a
paragraph.
#!/usr/bin/env perl
use strict;use warnings;
use Text::Wrap qw(wrap $columns);
open IN, '<'.$ARGV[0];
$columns = 70;
my @file = <IN>;
print wrap("","",@file);
This script does not modify the file itself though.
Some people pointed me that Perl was too much for this task. I have
been told about Groff or Par to format my files.
Finally, I found a very BARE way to handle this. As I write my
text with ed, I added an new alias named “ruled” with spawn ed with a
prompt of 70 characters #, so I have a rule each time ed displays its
prompt!!! :D
It looks like this for the last paragraph:
###################################################################### c
been told about Groff or Par to format my files.
Finally, I found a very **BARE** way to handle this. As I write my
text with ed, I added an new alias named "ruled" with spawn ed with a
prompt of 70 characters #, so I have a rule each time ed displays its
prompt!!! :D
.
###################################################################### w
Obviously, this way to proceed only works when writing the content at
first. If I need to edit a paragraph, I will need a tool to format
correctly my document again.
Jabber client
Using jabber inside Emacs is not a very good experience. I switched
to profanity (featured some times ago on this blog).
Playing Chess
Well, I stopped playing chess by mails, I am still waiting for my
recipient to play his turn since two years now. We were exchanging
the notation of the whole play in each mail, by adding our turn each
time, I was doing the rendering in Emacs, but I do not remember
exactly why but I had problems with this (replaying the string).
Hello, it turned out that this article is obsolete. The security used in is not
safe at all so the goal of this backup system isn’t achievable, thus it should
not be used and I need another backup system.
One of the most important feature of dump for me was to keep track of the inodes
numbers. A solution is to save the list of the inodes numbers and their path in
a file before doing a backup. This can be achieved with the following command.
$ doas ncheck -f "\I \P\n" /var
If you need a backup tool, I would recommend the following:
Duplicity
It supports remote backend like ftp/sftp which is quite convenient as you don’t
need any configuration on this other side. It supports compression and
incremental backup. I think it has some GUI tools available.
Restic
It supports remote backend like cloud storage provider or sftp, it doesn’t
require any special tool on the remote side. It supports deduplication of the
files and is able to manage multiples hosts in the same repository, this
mean that if you backup multiple computers, the deduplication will work across
them. This is the only backup software I know allowing this (I do not count
backuppc which I find really unusable).
Borg
It supports remote backend like ssh only if borg is installed on the other side.
It supports compression and deduplication but it is not possible to save
multiples hosts inside the same repository without doing a lot of hacks (which I
won’t recommend).
If you ever wanted to share a terminal with someone without opening a
remote access to your computer, tmate is the right tool for this.
Once started, tmate will create a new tmux instance connected through
the tmate public server, by typing tmate show-messages you will get
url for read-only or read-write links to share with someone, by ssh or
web browser. Don’t forget to type clear to hide url after typing
show-messages, otherwise viewing people will have access to the write
url (and it’s not something you want).
If you don’t like the need of a third party, you can setup your own
server, but we won’t cover this in this article.
When you want to end the share, you just need to exit the tmux opened
by tmate.
If you want to install it on OpenBSD, just type pkg_add tmate and
you are done. I think it’s available on most unix systems.
There is no much more to say about it, it’s great, simple, work
out-of-the-box with no configuration needed.
Here is a little script to automatize in some way your crontab
deployment when you don’t want to use a configuration tool like
ansible/salt/puppet etc… This let you package a file in your project
containing the crontab content you need, and it will add/update your
crontab with that file.
The script works this way:
$ ./install_cron crontab_solene
with crontab_solene file being an actual crontab correct, which
could looks like this:
Then it will include the file into my current user crontab, the
TAG in the file is here to be able to remove it and replace it
later with the new version. The script could be easily modified to
support the tag name as parameter, if you have multiple deployments
using the same user on the same machine.
This article will explain quickly how to bind a folder to access it
from another path. It can be useful to give access to a specific
folder from a chroot without moving or duplicating the data into the
chroot.
Real world example: “I want to be able to access my 100GB folder
/home/my_data/ from my httpd web server chrooted in /var/www/”.
The trick on OpenBSD is to use NFS on localhost. It’s pretty simple.
The order is really important. You can check that the folder is
available through NFS with the following command:
$ showmount -e
Exports list on localhost:
/home/my_data 127.0.0.1
If you don’t have any line after “Exports list on localhost:”, you
should kill mountd with pkill -9 mountd and start mountd again. I
experienced it twice when starting all the daemons from the same
commands but I’m not able to reproduce it. By the way, mountd only
supports reload.
If you modify /etc/exports, you only need to reload mountd using
rcctl reload mountd.
Once you have check that everything was alright, you can mount the
exported folder on another folder with the command:
# mount localhost:/home/my_data /var/www/htdocs/my_data
You can add -ro parameter in the /etc/exports file on the export
line if you want it to be read-only where you mount it.
Note: On FreeBSD/DragonflyBSD, you can use mount_nullfs /from /to,
there is no need to setup a local NFS server. And on Linux you can use
mount --bind /from /to and some others ways that I won’t cover here.
I discovered today an OpenSSH feature which doesn’t seem to be widely
known. The feature is called multiplexing and consists of reusing
an opened ssh connection to a server when you want to open another
one. This leads to faster connection establishment and less processes
running.
To reuse an opened connection, we need to use the ControlMaster
option, which requires ControlPath to be set. We will also set
ControlPersist for convenience.
ControlMaster defines if we create, or use or nothing about
multiplexing
ControlPath defines where to store the socket to reuse an opened
connection, this should be a path only available to your user.
ControlPersist defines how much time to wait before closing a
ssh connection multiplexer after all connection using it are
closed. By default it’s “no” and once you drop all connections the
multiplexer stops.
I choosed to use the following parameters into my ~/.ssh/config file:
Host *
ControlMaster auto
ControlPath ~/.ssh/sessions/%h%p%r.sock
ControlPersist 60
This requires to have ~/.ssh/sessions/ folder restricted to my user
only. You can create it with the following command:
install -d -m 700 ~/.ssh/sessions
(you can also do mkdir ~/.ssh/sessions && chmod 700 ~/.ssh/sessions
but this requires two commands)
The ControlPath variable will creates sessions with the name
“\({hostname}\){port}${user}.sock”, so it will be unique per remote
server.
Finally, I choose to use ControlPersist to 60 seconds, so if I
logout from a remote server, I still have 60 seconds to reconnect to
it instantly.
Don’t forget that if for some reason the ssh channel handling the
multiplexing dies, all the ssh connections using it will die with it.
Benefits with ProxyJump
Another ssh feature that is very useful is ProxyJump, it’s really
useful to access ssh hosts which are not directly available from your
current place. Like servers with no public ssh server available. For
my job, I have a lot of servers not facing the internet, and I can
still connect to them using one of my public facing server which will
relay my ssh connection to the destination. Using the
ControlMaster feature, the ssh relay server doesn’t have to handle
lot of connections anymore, but only one.
In my ~/.ssh/config file:
Host *.private.lan
ProxyJump public-server.com
Those two lines allow me to connect to every servers with .private.lan
domains (which is known by my local DNS server) by typing
ssh some-machine.private.lan. This will establish a connection to
public-server.com and then connects to the next server.
In my article about mu4e I said that I would write about sending mails
with it. This will be the topic covered in this article.
There are a lot of ways to send mails with a lot of differents use
cases. I will only cover a few of them, the documentation of mu4e and
emacs are both very good, I will only give hints about some
interestings setups.
I would thank Raphael who made me curious about differents ways of
sending mails from mu4e and who pointed out some mu4e features I
wasn’t aware of.
Send mails through your local server
The easiest way is to send mails through your local mail server (which
should be OpenSMTPD by default if you are running OpenBSD). This only
requires the following line to works in your ~/.emacs file:
Basically, it would be only relayed to the recipient if your local
mail is well configured, which is not the case for most servers. This
requires a reverse DNS address correctly configured (assuming a static
IP address), a SPF record in your DNS and a DKIM signing for outgoing
mail. This is the minimum to be accepted to others SMTP
servers. Usually people send mails from their personal computer and
not from the mail server.
Configure OpenSMTPD to relay to another smtp server
We can bypass this problem by configuring our local SMTP server to
relay our mails sent locally to another SMTP server using credentials
for authentication.
This is pretty easy to set-up, by using the following
/etc/mail/smtpd.conf configuration, just replace remoteserver by
your server.
table aliases file:/etc/mail/aliases
table secrets file:/etc/mail/secrets
listen on lo0
accept for local alias <aliases> deliver to mbox
accept for any relay via secure+auth://label@remoteserver:465 auth <secrets>
You will have to create the file /etc/mail/secrets and add your
credentials for authentication on the SMTP server.
Then, all mail sent from your computer will be relayed through your
mail server. With 'sendmail-send-it, emacs will delivered the mail to
your local server which will relay it to the outgoing SMTP server.
SMTP through SSH
One setup I like and I use is to relay the mails directly to the
outgoing SMTP server, this requires no authentication except a SSH
access to the remote server.
It requires the following emacs configuration in ~/.emacs:
The configuration tells emacs to connect to the SMTP server on
localhost port 2525 to send the mails. Of course, no mail daemon runs
on this port on the local machine, it requires the following ssh
command to be able to send mails.
This will bind the port 127.0.0.1:25 from the remote server point of
view on your address 127.0.0.1:2525 from your computer point of view.
Your mail server should accept deliveries from local users of course.
SMTP authentication from emacs
It’s also possible to send mails from emacs using a regular smtp
authentication directly from emacs. It is boring to setup, it requires
putting credentials into a file named ~/.authinfo that it’s possible
to encrypt using GPG but then it requires a wrapper to load it. It
also requires to setup correctly the SMTP authentication. There are
plenty of examples for this on the Internet, I don’t want to cover it.
Queuing mails for sending it later
Mu4e supports a very nice feature which is mail queueing from smtpmail
emacs client. To enable it, it requires two easy steps:
In ~/.emacs:
(setq
smtpmail-queue-mail t
smtpmail-queue-dir "~/Mail/queue/cur")
In your shell:
$ mu mkdir ~/Mail/queue
$ touch ~/Mail/queue/.noindex
Then, mu4e will be aware of the queueing, in the home screen of mu4e,
you will be able to switch from queuing to direct sending by pressing
m and flushing the queue by pressing f.
Note: there is a bug (not sure it’s really a bug). When sending a mail
into the queue, if your mail contains special characters, you will be
asked to send it raw or to add a header containing the encoding.
Today I found a software named
Lazyread which can read and
display file an autoscroll at a chosen speed. I had to read its source
code to make it work, the documentation isn’t very helpful, it doesn’t
read ebooks (as in epub or mobi format) and doesn’t support
stdin… This software requires some C code + a shell wrapper to
works, it’s complicated for only scrolling.
So, after thinking a few minutes, the autoscroll can be reproduced
easily with a very simple awk command. Of course, it will not have the
interactive keys like lazyread to increase/decrease speed or some
others options, but the most important part is there: autoscrolling.
If you want to read a file with a rate of 1 line per 700 millisecond,
just type the following command:
$ awk '{system("sleep 0.7");print}' file
Do you want to read an html file (documentation file on the disk or
from the web), you can use lynx or w3m to convert the html file on the
fly to a readable text and pass it to awk stdin.
If you want to pause the reading, you can use the true unix way,
Ctrl+Z to send a signal which will stop the command and let it paused
in background. You can resume the reading by typing fg.
One could easily write a little script parsing parameters for setting
the speed or handling files or url with the correct command.
Notes: If for some reasons you try to use lazyread, fix the shebang
in the file lesspipe.sh and you will need to call lazyread binary with
the environment variable LESSOPEN="|./lesspipe.sh %s" (the path of
the script if needed). Without this variable, you will have a very
helpful error “file not found”.
As the new port of the week, We will discover Sent. While we could
think it is mail related, it is not. Sent is a nice software to
make presentations from a simple text file. It has been developped by
Suckless, a hacker community enjoying writing good software while
keeping a small and sane source code, they also made software like st,
dwm, slock, surf…
Sent is about simplicity. I will reuse a part of the example
file which is also the documentation of the tool.
usage:
$ sent FILE1 [FILE2 …]
▸ one slide per paragraph
▸ lines starting with # are ignored
▸ image slide: paragraph containing @FILENAME
▸ empty slide: just use a \ as a paragraph
@nyan.png
this text will not be displayed, since the @ at the start of the first line
makes this paragraph an image slide.
The previous text, saved into a file and used with sent will open
a fullscreen window containg three “slides”. Each slide will resize
the text to maximize the display usage, this mean the font size will
change on each slide.
It is really easy to use. To display next slide, you have the choice
between pressing space, right arrow, return or clicking any
button. Pressing left arrow will go back.
If you want to install it on OpenBSD: pkg_add sent, the package
comes from the port misc/sent.
Be careful, Sent does not produce any file, you will need it for the
presentation!
If you have enough memory on your system and that you can afford to
use a few hundred megabytes to store temporary files, you may want to
mount a mfs filesystem on /tmp. That will help saving your SSD drive,
and if you use an old hard drive or a memory stick, that will reduce
your disk load and improve performances. You may also want to mount a
ramdisk on others mount points like ~/.cache/ or a database for some
reason, but I will just explain how to achieve this for /tmp with is a
very common use case.
First, you may have heard about tmpfs, but it has been disabled in
OpenBSD years ago because it wasn’t stable enough and nobody fixed
it. So, OpenBSD has a special filesystem named mfs, which is a FFS
filesystem on a reserved memory space. When you mount a mfs
filesystem, the size of the partition is reserved and can’t be used
for anything else (tmpfs, as the same on Linux, doesn’t reserve the
memory).
Add the following line in /etc/fstab (following fstab(5)):
swap /tmp mfs rw,nodev,nosuid,-s=300m 0 0
The permissions of the mountpoint /tmp should be fixed before
mounting it, meaning that the /tmp folder on / partition
should be changed to 1777:
# umount /tmp
# chmod 1777 /tmp
# mount /tmp
This is required because mount_mfs inherits permissions from the
mountpoint.
If for some reason you need to access a Samba share outside of the
network, it is possible to access it through ssh and mount the share
on your local computer.
Using the ssh command as root is required because you will bind local
port 139 which is reserved for root:
# ssh -L 139:127.0.0.1:139 user@remote-server -N
Then you can mount the share as usual but using localhost instead of
remote-server.
If you ever receive a mail with an attachment named “winmail.dat” then
you may be disappointed. It is a special format used by Microsoft
Exchange, it contains the files attached to the mail and need some
specific software to extract them.
Hopefully, there is a simple and effecient utility named tnef to
extract the files.
In this post I will do a short presentation of the port
productivity/ledger, an very powerful command line accounting
software, using plain text as back-end. Writing on it is not an easy
task, I will use a real life workflow of my usage as material, even if
my use is special.
As I said before, Ledger is very powerful. It can helps you manage
your bank accounts, bills, rents, shares and others things. It uses a
double entry system which means each time you add an operation
(withdraw, paycheck, …) , this entry will also have to contain the
current state of the account after the operation. This will be checked
by ledger by recalculating every operations made since it has been
initialized with a custom amount as a start. Ledger can also tracks
categories where you spend money or statistics about your payment
method (check, credit card, bank transfer, money…).
As I am not an english native speaker and that I don’t work in banks
or related, I am not very familiar with accounting words in english,
it makes me very hard to understand all ledger keywords, but I found a
special use case for accounting things and not money which is really
practical.
My special use case is that I work from home for a company working in
a remote location. From time to time, I take the train to the to the
office, the full travel is
It means I need to buy tickets for both underground A and underground
B system, and I want to track tickets I use for going to work. I buy
the tickets 10 by 10 but sometimes I use it for my personal use or
sometimes I give a ticket to someone. So I need to keep track of my
tickets to know when I can give a bill to my work for being refunded.
Practical example: I buy 10 tickets of A, I use 2 tickets at
day 1. On day 2, I give 1 ticket to someone and I use 2 tickets in the
day for personal use. It means I still have 5 tickets in my bag but,
from my work office point of view, I should still have 8 tickets. This
is what I am tracking with ledger.
2018/02/01 * tickets stock Initialization + go to work
Tickets:inv 10 City_A
Tickets:inv 10 City_B
Tickets:inv -2 City_A
Tickets:inv -2 City_B
Tickets
2018/02/08 * Work
Tickets:inv -2 City_A
Tickets:inv -2 City_B
Tickets
2018/02/15 * Work + Datacenter access through underground
Tickets:inv -4 City_B
Tickets:inv -2 City_A
Tickets
At the point, running ledger -f tickets.dat balance Tickets shows my
tickets remaining:
4 City_A
2 City_B Tickets:inv
Will add another entry which requires me to buy tickets:
2018/02/22 * Work + Datacenter access through underground
Tickets:inv -4 City_B
Tickets:inv -2 City_A
Tickets:inv 10 City_B
Tickets
I hope that the example was clear enought and interesting. There is a
big tutorial document available on the ledger homepage, I recommend to
read it before using ledger, it contains real world examples with
accounting. Homepage link
Dnstop is an interactive console application to watch in realtime the
DNS queries going through a network interface. It currently only
supports UDP DNS requests, the man page says that TCP isn’t supported.
It has a lot of parameters and keybinding for the interactive use
To install it on OpenBSD: doas pkg_add dnstop
We will start dnstop on the wifi interface using a depth of 4 for the
domain names: as root type dnstop -l 4 iwm0 and then press ‘3’ to
display up to 3 sublevel, the -l 4 parameter means we want to know
domains with a depth of 4, it means that if a request for the domain
my.very.little.fqdn.com. happens, it will be truncated as
very.little.fqdn.com. If you press ‘2’ in the interactive display, the
earlier name will be counted in the line fqdn.com'.
If you ever had to read an ebook in a epub format, you may have find
yourself stumbling on Calibre software. Personally, I don’t enjoy
reading a book in Calibre at all. Choice is important and it seems
that Calibre is the only choice for this task.
But, as the epub format is very simple, it’s possible to easily read
it with any web browser even w3m or lynx.
With a few commands, you can easily find xhtml files that can be
opened with a web browser, an epub file is a zip containing mostly
xhtml, css and images files. The xhtml files have links to CSS and
images contained in others folders unzipped.
In the following commands, I prefer to copy the file in a new
directory because when you will unzip it, it will create folder in
your current working directory.
$ mkdir /tmp/myebook/
$ cd /tmp/myebook
$ cp ~/book.epub .
$ unzip book.epub
$ cd OPS/xhtml
$ ls *xhtml
I tried with differents epub files, in most case you should find a lot
of files named chapters-XX.xhtml with XX being 01, 02, 03 and so
forth. Just open the files in the correct order with a web browser aka
“html viewer”.
Today we will discover the software named tig whose name stands
for Text-mode Interface for Git.
To install it on OpenBSD: pkg_add tig
Tig is a light and easy to use terminal application to browse a git
repository in an interactive manner. To use it, just ‘cd’ into a git
repository on your filesystem and type tig. You will get the list of
all the commits, with the author and the date. By pressing “Enter” key
on a commit, you will get the diff. Tig also displays branching and
merging in a graphical way.
Tig has some parameters, one I like a lot if blame which is used
like this: tig blame afile. Tig will show the file content and will
display for each line to date of last commit, it’s author and the
small identifier of the commit. With this function, it gets really
easy to find who modified a line or when it was modified.
Tig has a lot of others possibilities, you can discover them in its
man pages.
I am writing this to answer questions asked too many times.
If some answers get good enough, maybe we could try to merge it in the OpenBSD
FAQ if the topic isn’t covered.
If the topic is covered, then a link to the official FAQ should be used.
If you want to participate, you can fetch the page using gopher protocol and
send me a diff:
The last two releases are called “-release” and are officially supported
(patches for security issues are provided).
-stable version is the latest release with the base system patches applied,
the -stable ports tree has some patches backported from -current, mainly to fix
security issues. Official packages for -stable are built and are picked up
automatically by pkg_add(1).
What is -current?
It’s the development version with latest packages and latest code.
You shouldn’t use it only to get latest package versions.
This article will present my software reed-alert, it checks
user-defined states and send user-defined notification. I made it
really easy to use but still configurable and extensible.
Description
reed-alert is not a monitoring tool producing graph or storing
values. It does a job sysadmins are looking for because there are no
alternative product (the alternatives comes from a very huge
infrastructure like Zabbix so it’s not comparable).
From its configuration file, reed-alert will check various states
and then, if it fails, will trigger a command to send a notification
(totally user-defined).
Fetch it
This is a open-source and free software released under MIT license,
you can install it with the following command:
# git clone git://bitreich.org/reed-alert
# cd reed-alert
# make
# doas make install
This will install a script reed-alert in /usr/local/bin/ with the
default Makefile variables. It will try to use ecl and then sbcl if
ecl is not installed.
A README file is available as documentation to describe how to use
it, but we will see here how to get started quickly.
You will find a few files there, reed-alert is a Common LISP
software and it has been chose for (I hope) good reasons that the
configuration file is plain Common LISP.
There is a configuration file looking like a real world example named
config.lisp.sample and another configuration file I use for testing
named example.lisp containing lot of cases.
Let’s start
In order to use reed-alert we only need to create a new
configuration file and then add a cron job.
Configuration
We are going to see how to configure reed-alert. You can find more
explanations or details in the README file.
Alerts
We have to configure two kind of parameters, first we need to set-up a
way to receive alerts, easiest way to do so is by sending a mail with
“mail” command. Alerts are declared with the function alert and as
parameters the alert name and the command to be executed. Some
variables are replaced with values from the probe, in the README
file you can find the list of probes, it looks like %date% or
%params%.
In Common LISP functions are called by using a parenthesis before its
name and until the parenthesis is closed, we are giving its
parameters.
Example:
(alert mail "echo 'problem on %hostname%' | mail me@example.com")
One should take care about nesting quotes here.
reed-alert will fork a shell to start the command, so pipes and
redirection works. You can be creative when writing alerts that:
use a SMS service
write a script to post on a forum
publishing a file on a server
send text to IRC with ii client
Checks
Now we have some alerts, we will configure some checks in order to
make reed-alert useful. It uses probes which are pre-defined
checks with parameters, a probe could be “has this file not been
updated since N minutes ?” or “Is the disk space usage of partition X
more than Y ?”
I chose to name the function “=>” to make a check, it isn’t a name
and reminds an item or something going forward. Both previous example
using our previous mail notifier would look like:
(=> mail file-updated :path "/program/file.generated" :limit "10")
(=> mail disk-usage :limit 90)
It’s also possible to use shell commands and check the return code
using the command probe, allowing the user to define useful
checks.
We use echo + netcat to check if a connection to a socket works. The
:desc keyword will give a nicer name in the output instead of just
“COMMAND”.
Garniture
We wrote the minimum required to configure reed-alert, now the
configuration file so your my-config.lisp file should looks like
this:
(alert mail "echo 'problem on %hostname%' | mail me@example.com")
(=> mail file-updated :path "/program/file.generated" :limit "10")
(=> mail disk-usage :limit 90)
Now, you can start it every 5 minutes from a crontab with this:
The time between each run is up to you, depending on what you monitor.
Important
By default, when a check returns a failure, reed-alert will only
trigger the notifier associated once it reach the 3rd failure. And
then, will notify again when the service is back (the variable %state%
is replaced by start or end to know if it starts or stops.)
This is to prevent reed-alert to send a notification each time it
checks, there is absolutely no need for this for most users.
The number of failures before triggering can be modified by using the
keyword “:try” as in the following example:
(=> mail disk-usage :limit 90 :try 1)
In this case, you will get notified at the first failure of it.
The number of failures of failed checks is stored in files (1 per
check) in the “states/” directory of reed-alert working directory.
cl-yag is a static website generator. It's a software used to publish
a website and/or a gopher hole from a list of articles. As the
developer of cl-yag I'm happy to announce that a new version has been
released.
New features
The new version, with its number 0.6, bring lot of new features :
supporting different markup language per article
date format configurable
gopher output format configurable
ship with the default theme "clyma", minimalist but responsive (the
one used on this website)
easier to use
full user documentation
The code is available at git://bitreich.org/cl-yag, the program
requires sbcl or ecl to work.
Per article markup language
The best feature I'm proud of is allowing to use a different language
per article. While on my blog I choosed to use markdown, it's
sometimes not adapted for more elaborated articles like the one about
LISP containing code which was written in org-mode then converted to
markdown manually to fit to cl-yag. Now, the user can declare a named
"converter" which is a command line with pattern replacement, to
produce the html file. We can imagine a lot of things with this, even
producing a gallery with find + awk command. Now, I can use markdown
by default and specify if I want to use org-mode or something else.
This is the way to declare a converter, taking org-mode as example,
which is not very simple, because of emacs not being script friendly :
The concatenate function is only used to improve the presentation, to
split the command in multiples lines and make it easier to read. It's
possible to write all the command in one line.
The patterns %IN and %OUT are replaced by the input file
name and the output file name when the command is executed.
For an easier example, the default markdown converter looks like this,
calling multimarkdown command :
It's really easy (I hope !) to add new converters you need with this
feature.
Date format configurable
One problem I had with cl-yag is that it's plain vanilla Common LISP
without libraries, so it's easier to fetch and use but it lacks some
elaborated libraries like one to parse date and format a date. Before
this release, I was writing in plain text "14 December 2017" in the
date field of a blog post. It was easy to use, but not really usable
in the RSS feed in the pubDate attribute, and if I wanted to
change the display of the date for some reason, I would have to
rewrite everything.
Now, the date is simply in the format "YYYYMMDD" like "20171231" for
the 31rd December 2017. And in the configuration variable, there is a
:date-format keyword to define the date display. This variable
is a string allowing pattern replacement of the following variables :
%DayNumber
day of the month in number, from 1 to 31
%DayName
day of the week, from Monday to Sunday, names are
written in english in the source code and can be
translated
%MonthNumber
month in number, from 1 to 12
%MonthName
month name, from January to December, names are
written in english in the source code and can be
translated
%Year
year
Currently, as the time of writing, I use the value "%DayNumber
%MonthName %Year"
A :gopher-format keyword exist in the configuration file to
configure the date format in the gopher export. It can be different
from the html one.
More Gopher configuration
There are cases where the gopher server use an unusual syntax compared
to most of the servers. I wanted to make it configurable, so the user
could easily use cl-yag without having to mess with the code. I
provide the default for geomyidae and in comments another syntax
is available. There is also a configurable value to indicates where to
store the gopher page menu, it's not always gophermap, it could be
index.gph or whatever you need.
Easier to use
A comparison of code will make it easier to understand. There was a
little change the way blog posts are declared :
From
(defparameter *articles*
(list
(list :id "third-article" :title "My third article" :tag "me" :date "20171205")
(list :id "second-article" :title "Another article" :tag "me" :date "20171204")
(list :id "first-article" :title "My first article" :tag "me" :date "20171201")
))
to
(post :id "third-article" :title "My third article" :tag "me" :date "20171205")
(post :id "second-article" :title "Another article" :tag "me" :date "20171204")
(post :id "first-article" :title "My first article" :tag "me" :date "20171201")
Each post are independtly declared and I plan to add a "page" function
to create static pages, but this is going to be for the next version !
Future work
I am very happy to hack on cl-yag, I want to continue improving it but
I should really think about each feature I want to add. I want to keep
it really simple even if it limits the features.
I want to allow the creation of static pages like "About me", "Legal"
or "websites I liked" that integrates well in the template. The user
may not want all the static pages links to go at the same place in the
template, or use the same template. I'm thinking about this.
Also, I think the gopher generation could be improved, but I still
have no idea how.
Others themes may come in the default configuration, allowing the user
to have a choice between themes. But as for now, I don't plan to bring
a theme using javascript.
I’m very noob with git and I always screw everything when someone
clone one of my repo, contributes and asks me to merge the changes.
Now I found an easy way to merge commits from another repository. Here
is a simple way to handle this. We will get changes from
project1_modified to merge it into our project1
repository. This is not the fastest way or maybe not the optimal way,
but I found it to work reliabily.
This process will makes you download the repository of the people who
contributed to the code, then you add it as a remote sources into your
project, you create a new branch where you will do the merge, if
something is wrong you will be able to manage conflicts easily. Once
you tried the code and you are fine, you need to merge this branch to
master and then, when you are done, you can delete the branch.
If later you need to get new commits from the other repo, it become
easier.
$ cd /path/to/projects
$ cd project1_modified
$ git pull
$ cd ../my_project1
$ git pull modified
$ git merge modified/master
Today is a bit special because I’m writing with a mirror keyboard
layout. I use only half my keyboard to type all characters. To make
things harder, the layout is qwerty while I use azerty usually (I’m
used to qwerty but it doesn’t help).
Here, “caps lock” is a modifier key that must be pressed to obtain
characters of the other side. As a mirror, one will find ‘p’ instead
of ‘q’ or ‘h’ instead of ‘g’ while pressing caps lock.
It’s even possible to type backspace to delete characters or to
achieve a newline. All the punctuation isn’t available throught this,
only ‘.<|¦>’",'.
While I type this I get a bit faster and it become more and more
easier. It’s definitely worth if you can’t use hands two.
This a been made possible by Randall Munroe. To enable it just
download the file Here and type
xkbcomp mirrorlayout.kbd $DISPLAY
backspace is use with tilde and return with space, using the modifier
of course.
I’ve spent approximately 15 minutes writing this, but the time spent
hasn’t been linear, it’s much more fluent now !
[Mirrorboard: A one-handed keyboard layout for the lazy by Randall Munroe]
(https://blog.xkcd.com/2007/08/14/mirrorboard-a-one-handed-keyboard-layout-for-the-lazy/)
We will refer to Common LISP as CL in the following article.
I wrote it to share what I like about CL. I’m using Perl to compare CL
features. I am using real world cases for the average programmer. If
you are a CL or perl expert, you may say that some example could be
rewritten with very specific syntax to make it smaller or faster, but
the point here is to show usual and readable examples for usual
programmers.
This article is aimed at people with programming interest, some basis
of programming knowledge are needed to understand the following. If
you know how to read C, Php, Python or Perl it should be
enough. Examples have been choosed to be easy.
I thank my friend killruana for his contribution as he wrote the
python code.
Variables
Scope: global
Common Lisp code
(defparameter *variable* "value")
Defining a variable with defparameter on top-level (= outside of a
function) will make it global. It is common to surround the name of
global variables with * character in CL code. This is only for
readability for the programmer, the use of * has no
incidence.
Perl code
my $variable = "value";
Python code
variable = "value";
Scope: local
This is where it begins interesting in CL. Declaring a local variable
with let create a new scope with parenthesis where the variable
isn’t known outside of it. This prevent doing bad things with
variables not set or already freed. let can define multiple
variables at once, or even variables depending on previously declared
variables using let*
Common Lisp code
(let ((value (http-request)))
(when value
(let* ((page-title (get-title value))
(title-size (length page-title)))
(when page-title
(let ((first-char (subseq page-title 0 1)))
(format t "First char of page title is ~a~%" first-char))))))
Perl code
{
local $value = http_request;
if($value) {
local $page_title = get_title $value;
local $title_size = get_size $page_title;
if($page_title) {
local $first_char = substr $page_title, 0, 1;
printf "First char of page title is %s\n", $first_char;
}
}
}
The scope of a local value is limited to the parent curly brakets, of
a if/while/for/foreach or plain brakets.
Python code
if True:
hello = 'World'
print(hello) # displays World
There is no way to define a local variable in python, the scope of the
variable is limited to the parent function.
Printing and format text
CL has a VERY powerful function to print and format text, it’s even
named format. It can even manage plurals of words (in english only) !
Common Lisp code
(let ((words (list "hello" "Dave" "How are you" "today ?")))
(format t "~{~a ~}~%" words))
format can loop over lists using ~{ as start and ~} as end.
Perl code
my @words = @{["hello", "Dave", "How are you", "today ?"]};
foreach my $element (@words) {
printf "%s ", $element;
}
print "\n";
Python code
# Printing and format text
# Loop version
words = ["hello", "Dave", "How are you", "today ?"]
for word in words:
print(word, end=' ')
print()
# list expansion version
words = ["hello", "Dave", "How are you", "today ?"]
print(*words)
Functions
function parameters: rest
Sometimes we need to pass to a function a not known number of
arguments. CL supports it with &rest keyword in the function
declaration, while perl supports it using the @_ sigil.
Common Lisp code
(defun my-function(parameter1 parameter2 &rest rest)
(format t "My first and second parameters are ~a and ~a.~%Others parameters are~%~{ - ~a~%~}~%"
parameter1 parameter2 rest))
(my-function "hello" "world" 1 2 3)
Perl code
sub my_function {
my $parameter1 = shift;
my $parameter2 = shift;
my @rest = @_;
printf "My first and second parameters are %s and %s.\nOthers parameters are\n",
$parameter1, $parameter2;
foreach my $element (@rest) {
printf " - %s\n", $element;
}
}
my_function "hello", "world", 0, 1, 2, 3;
Python code
def my_function(parameter1, parameter2, *rest):
print("My first and second parameters are {} and {}".format(parameter1, parameter2))
print("Others parameters are")
for parameter in rest:
print(" - {}".format(parameter))
my_function("hello", "world", 0, 1, 2, 3)
The trick in python to handle rests arguments is the wildcard
character in the function definition.
function parameters: named parameters
CL supports named parameters using a keyword to specify its
name. While it’s not at all possible on perl. Using a hash has
parameter can do the job in perl.
CL allow to choose a default value if a parameter isn’t set,
it’s harder to do it in perl, we must check if the key is already set
in the hash and give it a value in the function.
Common Lisp code
(defun my-function(&key (key1 "default") (key2 0))
(format t "Key1 is ~a and key2 (~a) has a default of 0.~%"
key1 key2))
(my-function :key1 "nice" :key2 ".Y.")
There is no way to pass named parameter to a perl function. The best
way it to pass a hash variable, check the keys needed and assign a
default value if they are undefined.
Perl code
sub my_function {
my $hash = shift;
if(! exists $hash->{key1}) {
$hash->{key1} = "default";
}
if(! exists $hash->{key2}) {
$hash->{key2} = 0;
}
printf "My key1 is %s and key2 (%s) default to 0.\n",
$hash->{key1}, $hash->{key2};
}
my_function { key1 => "nice", key2 => ".Y." };
Python code
def my_function(key1="default", key2=0):
print("My key1 is {} and key2 ({}) default to 0.".format(key1, key2))
my_function(key1="nice", key2=".Y.")
Loop
CL has only one loop operator, named loop, which could be seen as an
entire language itself. Perl has do while, while, for and foreach.
loop: for
Common Lisp code
(loop for i from 1 to 100
do
(format t "Hello ~a~%" i))
for i in range(1, 101):
print("Hello {}".format(i))
loop: foreach
Common Lisp code
(let ((elements '(a b c d e f)))
(loop for element in elements
counting element into count
do
(format t "Element number ~s : ~s~%"
count element)))
Perl code
# verbose and readable version
my @elements = @{['a', 'b', 'c', 'd', 'e', 'f']};
my $count = 0;
foreach my $element (@elements) {
$count++;
printf "Element number %i : %s\n", $count, $element;
}
# compact version
for(my $i=0; $i<$#elements+1;$i++) {
printf "Element number %i : %s\n", $i+1, $elements[$i];
}
Python code
# Loop foreach
elements = ['a', 'b', 'c', 'd', 'e', 'f']
count = 0
for element in elements:
count += 1
print("Element number {} : {}".format(count, element))
# Pythonic version
elements = ['a', 'b', 'c', 'd', 'e', 'f']
for index, element in enumerate(elements):
print("Element number {} : {}".format(index, element))
LISP only tricks
Store/restore data on disk
The simplest way to store data in LISP is to write a data structure
into a file, using print function. The code output with print
can be evaluated later with read.
This permit to skip the use of a data storage format like XML or
JSON. Common LISP can read Common LISP, this is all it needs. It can
store objets like arrays, lists or structures using plain text
format. It can’t dump hash tables directly.
Creating a new syntax with a simple macro
Sometimes we have cases where we need to repeat code and there is no
way to reduce it because it’s too much specific or because it’s due to
the language itself. Here is an example where we can use a simple
macro to reduce the written code in a succession of conditions doing
the same check.
The code is much more readable and the macro is easy to
understand. One could argue that in another language a switch/case
could work here, I choosed a simple example to illustrate the use of a
macro, but they can achieve more.
Create powerful wrappers with macros
I’m using macros when I need to repeat code that affect variables. A
lot of CL modules offers a structure like with-something, it’s a
wrapper macro that will do some logic like opening a database,
checking it’s opened, closing it at the end and executing your code
inside.
Here I will write a tiny http request wrapper, allowing me to write
http request very easily, my code being able to use variables from the
macro.
Common Lisp code
(defmacro with-http(url)
`(progn
(multiple-value-bind (content status head)
(drakma:http-request ,url :connection-timeout 3)
(when content
,@code))))
(with-http "https://dataswamp.org/"
(format t "We fetched headers ~a with status ~a. Content size is ~d bytes.~%"
status head (length content)))
In Perl, the following would be written like this
Perl code
sub get_http {
my $url = $1;
my %http = magic_http_get $url;
if($http{content}) {
return %http;
} else {
return undef;
}
}
{
local %data = get_http "https://dataswamp.org/";
if(%data) {
printf "We fetched headers %s with status %d. Content size is %d bytes.\n",
$http{headers}, $http{status}, length($http{content});
}
}
The curly brackets are important there, I want to emphase that the
local %data variable is only available inside the curly
brackets. Lisp is written in a successive of local scope and this is
something I really like.
Python code
import requests
with requests.get("https://dataswamp.org/") as fd:
print("We fetched headers %s with status %d. Content size is %s bytes." \
% (list(fd.headers.keys()), fd.status_code, len(fd.content)))
I just received a wide screen with a 2560x1080 resolution but xrandr
wasn’t allowing me to use it. The intel graphics specifications say
that I should be able to go up to 4096xsomething so it’s a software
problem.
Generate the informations you need with the gtf command:
$ gtf 2560 1080 59.9
Keep the numbers after the resolution name between quotes, so in
Modeline "2560x1080_59.90" 230.37 2560 2728 3000 3440 1080 1081 1084 1118 -HSync +Vsync
keep only 230.37 2560 2728 3000 3440 1080 1081 1084 1118 -HSync +Vsync
Now add the new resolution and make it available to your output
(mine is HDMI2):
When you fetch OpenBSD src or ports from CVS and that you want to save
bandwidth during the process there is a little trick that change
everything: compression
Just add -z9 to the parameter of your cvs command line and the
remote server will send you compressed files, saving 10 times the
bandwidth, or speeding up 10 times the transfer, or both (I’m in the
case where I have differents users on my network and I’m limiting my
incoming bandwidth so other people can have bandwidth too so it is
important to reduce the packets transffered if possible).
Today I will speak about slrn, a nntp client. I’m using it to
fetch mailing lists I’m following (without necesserarly subscribing to
them) and read it offline. I’ll speak about using nntp to read
news-groups, I’m not sure but in a more general way nntp is used to
access usenet. I’m not sure to know what usenet is, so we will
stick here by connecting to mailing-list archives offered by
gmane.org (which offers access to mailing-lists and newsgroups
through nntp).
Long story short, recently I moved and now I have a very poor DSL
connection. Plus I’m often moving by train with nearly no 4G/LTE
support during the trip. I’m going to write about getting things done
offline and about reducing bandwith usage. This is a really
interesting topic in our hyper-connected world.
So, back to slrn, I want to be able to fetch lot of news and read
it later. Every nntp client I tried were getting the articles list (in
nntp, an article = a mail, a forum = mailing list) and then it
download each article when we want to read it. Some can cache the
result when you fetch an article, so if you want to read it later it
is already fetched. While slrn doesn’t support caching at all, it
comes with the utility slrnpull which will create a local copy of
forums you want, and slrn can be configured to fetch data from
there. slrnpull need to be configured to tell it what to fetch, what
to keep etc… and a cron will start it sometimes to fetch the new
articles.
Configuration
The following configuration is made to be simple to use, it runs with
your regular user. This is for gentoo, maybe some another system would
provide a dedicated user and everything pre-configured.
Create the folder for slrnpull and change the owner:
$ sudo mkdir /var/spool/slrnpull
$ sudo chown user /var/spool/slrnpull
slrnpull configuration file must be placed in the folder it will
use. So edit /var/spool/slrnpull/slrnpull.conf as you want, my
configuration file is following.
default 200 45 0
# indicates a default value of 20 articles to be retrieved from the server and
# that such an article will expire after 14 days.
gmane.network.gopher.general
gmane.os.freebsd.questions
gmane.os.freebsd.devel.ports
gmane.os.openbsd.misc
gmane.os.openbsd.ports
gmane.os.openbsd.bugs
The client slrn needs to be configured to find the informations from slrnpull.
File ~/.slrnrc:
set hostname "your.hostname.domain"
set spool_inn_root "/var/spool/slrnpull"
set spool_root "/var/spool/slrnpull/news"
set spool_nov_root "/var/spool/slrnpull/news"
set read_active 1
set use_slrnpull 1
set post_object "slrnpull"
set server_object "spool"
Add this to your crontab to fetch news once per hour (at HH:00 minutes):
Quick cheat sheet for using slrn, there is a help using “?” but it
is not very easy to understand at first.
h : hide/display the article view
space : scroll to next page in the article, go to next at the end
enter : scroll one line
tab : scroll to the end of quotes
c : mark all as read
Tips
when a forum is empty, it is not shown by default
I found that a slrnconf software provide a GUI to configure slrn
exists, I didn’t try it.
Going further
It seems nntp clients supports a score file that can mark interesting
articles using user defined rules.
nntp protocol allow to submit articles (reply or new thread) but I
have no idea how it works. Someone told me to forget about this and
use mails to mailing-lists when it is possible.
leafnode daemon can be used instead of slrnpull in a more
generic way. It is a nntp server that one would use locally as a proxy
to nntp servers. It will mirror forums you want and serve it back
through nntp, allowing you to use any nntp client (slrnpull enforces
the use of slrn). leafnode seems old, a v2 is still in development
but seems rather inactive. Leafnode is old and complicated, I wanted
something KISS (Keep It Simple Stupid) and it is not.
Others clients you may want to try
nntp console client
gnus (in emacs)
wanderlust (in emacs too)
alpine
GUI client
pan (may be able to download, but I failed using it)
Hey ! You use stumpwm, emacs or tmux and your screen (not the GNU
screen) split in lot of parts ? There is a solution to improve
that. ZOOMING !
Each of them work with a screen divided into panes/windows (the
meaning of theses words change between the program), sometime you want
want to have the one where your work in fullscreen. An option exists
in each of them to get fullscreen temporarly on a window.
Emacs: (not native)
This is not native in emacs, you will need to install zoom-window
from your favorite repository.
Today I will present you a nice port (from Gentoo this time, not from
a FreeBSD) and this port is even linux only.
nethogs is a console program which shows the bandwidth usage of
each running application consuming network. This can be particulary
helpful to find which application is sending traffic and at which
rate.
It can be installed with emerge as simple as emerge -av
net-analyzer/nethogs.
It is very simple of use, just type nethogs in a terminal (as
root). There are some parameters and it’s a bit interactive but I
recommend reading the manual if you need some details about them.
I am currently running Gentoo on my main workstation, that makes me
discover new things so maybe I will write more regularly about gentoo
ports.
If for some reason you need to reduce the download speed of emerge
when downloading sources you can use a tweak in portage’s make.conf as
explained
in the handbook.
To keep wget and just add the bandwidth limit, add this to
/etc/portage/make.conf:
If you want to show the packages installed manually (and not installed
as dependency of another package), you have to use “pkg query” and
compare if %a (automatically installed == 1) isn’t 1. The second
string will format the output to display the package name:
Update 2020: This method may certainly not work anymore but I
don’t have a Guix installation to try.
I’m new to Guix, it’s a wonderful system but it’s such different than
any other usual linux distribution that it’s hard to achieve some
basics tasks. As Guix is 100% free/libre software, Firefox has been
removed and replaced by icecat. This is nearly the same software but
some “features” has been removed (like webRTC) for some reasons
(security, freedom). I don’t blame Guix team for that, I understand
the choice.
But my problem is that I need Firefox. I finally achieve to get it
working from the official binary downloaded from mozilla website.
You need to install some packages to get the libraries, which will
become available under your profile directory. Then, tells firefox to
load libraries from there and it will start.
In this article we will see how to fetch, read and manage your emails
from Emacs using mu4e. The process is the following: mbsync command
(while mbsync is the command name, the software name is isync)
create a mirror of an imap account into a Maildir format on your
filesystem. mu from mu4e will create a database from the Maildir
directory using xapian library (full text search database), then mu4e
(mu for emacs) is the GUI which queries xapian database to manipulates
your mails.
Mu4e handles with dynamic bookmarks, so you can have some predefined
filters instead of having classic folders. You can also do a query and
reduce the results with successives queries.
You may have heard about using notmuch with emacs to manage mails,
mu4e and notmuch doesn’t do the same job. While notmuch is a nice tool
to find messages from queries and create filters, it operates as a
read-only tool and can’t do anything with your mail. mu4e let you
write mail, move, delete, flag etc… AND still allow to make complex
queries.
I wrote this article to allow people to try mu4e quickly, you may want
to read both isync and mu4e manual to have a better configuration
suiting your needs.
Installation
On OpenBSD you need to install 2 packages:
# pkg_add mu4 isync
isync configuration
We need to configure isync to connect to the IMAP server:
Edit the file ~/.mbsyncrc, there is a trick to not have the
password in clear text in the configuration file, see isync
configuration manual for this:
A few commands are needed in order to make everything works. We need
to create the base folder as mbsync command won’t do the job for some
reason, and we need mu to index the mails the first time.
mbsync can takes a moment because it will download ALL your mails.
$ mkdir -p ~/Maildir/my_imap
$ mbsync -aC
$ mu init --maildir=~/Maildir/my_imap
$ mu index
How to use mu4e
start emacs, run M-x mu4e RET and enjoy, the documentation of mu4e
is well done. Press “U” at mu4e screen to synchronize with imap
server.
A query for mu4e looks like this:
list:misc.openbsd.org flag:unread avahi
This query will search mails having list header “misc.openbsd.org”
and which are unread and which contains “avahi” pattern.
date:20140101..20150215 urgent
This one will looks for mails within date range of 1st january 2014 to
15th february 2015 containing word “urgent”.
Additional notes
The current setup doesn’t handle sending mails, I’ll write another
article about this. This requires configuring a smtp authentification
and an identify for mu4e.
Also, you may need to tweak mbsync configuration or mu4e
configuration, some settings must be changed depending on the imap
server, this is particuliarly important for deleted mails.
You want to fold (hide) code between brackets like an if statement, a
function, a loop etc.. ? Use the HideShow minor-mode which is part of
emacs. All you need is to enable hs-minor-mode. Now you can
fold/unfold by cycling with C-c @ C-c.
Today I felt the need to change the language of my Firefox browser to
esperanto but I haven’t been able to do this, it is not
straightforward…
First, you need to install your language pack, depending if you use
the official Mozilla Firefox or Icecat, the rebranded firefox with
non-free stuff removed
Then, open about:config in firefox, we will need to change 2
keys. Firefox needs to know that we don’t want to use our user’s
locale as Firefox language and which language we want to set.
set intl.locale.matchOS to false
set general.useragent.locale to the language code you want (eo for esperanto)
For the fun, here is a few examples of the same output in differents
markup languages. The list isn’t exhaustive of course.
This is org-mode:
* This is a title level 1
+ first item
+ second item
+ third item with a [[http://dataswamp.org][link]]
** title level 2
Blah blah blah blah blah
blah blah blah *bold* here
#+BEGIN_SRC lisp
(let ((hello (init-string)))
(format t "~A~%" (+ 1 hello))
(print hello))
#+END_SRC
This is markdown :
# this is title level 1
+ first item
+ second item
+ third item with a [Link](http://dataswamp.org)
## Title level 2
Blah blah blah blah blah
blah blah blah **bold** here
(let ((hello (init-string)))
(format t "~A~%" (+ 1 hello))
(print hello))
or
```
(let ((hello (init-string)))
(format t "~A~%" (+ 1 hello))
(print hello))
```
This is HTML :
<h1>This is title level 1</h1>
<ul>
<li>first item></li>
<li>second item</li>
<li>third item with a <a href="http://dataswamp.org">link</a></li>
</ul>
<h2>Title level 2</h2>
<p>Blah blah blah blah blah
blah blah blah <strong>bold</strong> here
<code><pre>(let ((hello (init-string)))
(format t "~A~%" (+ 1 hello))
(print hello))</pre></code>
This is LaTeX :
\begin{document}
\section{This is title level 1}
\begin{itemize}
\item First item
\item Second item
\item Third item
\end{itemize}
\subsection{Title level 2}
Blah blah blah blah blah
blah blah blah \textbf{bold} here
\begin{verbatim}
(let ((hello (init-string)))
(format t "~A~%" (+ 1 hello))
(print hello))
\end{verbatim}
\end{document}
I already upgraded a few servers, with both methods. One with bsd.rd
upgrade but that requires physical access to the server and the other
method well explained in the upgrade guide which requires to untar the
files and do move some files. I recommend using bsd.rd if
possible.
I have a pfsense appliance (Netgate 2440) with a usb console port,
while it used to be a serial port, now devices seems to have a usb
one. If you plug an usb wire from an openbsd box to it, you woull see this in your dmesg
uslcom0 at uhub0 port 5 configuration 1 interface 0 "Silicon Labs CP2104 USB to UART Bridge Controller" rev 2.00/1.00 addr 7
ucom0 at uslcom0 portno 0
To connect to it from OpenBSD, use the following command:
Here is a list of software that I find useful, I will update this list
everytime I find a new tool. This is not an exhaustive list, theses
are only software I enjoy using:
Backup Tool
duplicity
borg
restore/dump
File synchronization tool
unison
rsync
lsyncd
File sharing tool / “Cloud”
boar
nextcloud / owncloud
seafile
pydio
syncthing (works as peer-to-peer without a master)
sparkleshare (uses a git repository so I would recommend storing only text files)
Editors
emacs
vim
jed
Web browsers using keyboard
qutebrowser
firefox with vimperator extension
Todo list / Personal Agenda…
org-mode (within emacs)
ledger (accounting)
Mail client
mu4e (inside emacs, requires the use of offlineimap or mbsync to fetch mails)
Network
curl
bwm-ng (to see bandwith usage in real time)
mtr (traceroute with a gui that updates every n seconds)
Files integrity
bitrot
par2cmdline
aide
Image viewer
sxiv
feh
Stuff
entr (run command when a file change)
rdesktop (RDP client to connect to Windows VM)
xclip (read/set your X clipboard from a script)
autossh (to create tunnels that stays up)
mosh (connects to your ssh server with local input and better resilience)
ncdu (watch file system usage interactively in cmdline)
mupdf (PDF viewer)
pdftk (PDF manipulation tool)
x2x (share your mouse/keyboard between multiple computers through ssh)
Today, the topic is data degradation, bit rot, birotting, damaged files
or whatever you call it. It’s when your data get corrupted over the
time, due to disk fault or some unknown reason.
What is data degradation ?
I shamelessy paste one line from wikipedia: “Data degradation is the
gradual corruption of computer data due to an accumulation of
non-critical failures in a data storage device. The phenomenon is also
known as data decay or data rot.”.
bit rot = (checksum changed) && NOT (modification time changed)
While updating a file could be mistaken as bit rot, there is a difference
update = (checksum changed) && (modification time changed)
How to check if we encounter bitrot ?
There is no way you can prevent bitrot. But there are some ways to
detect it, so you can restore a corrupted file from a backup, or
repair it with the right tool (you can’t repair a file with a hammer,
except if it’s some kind of HammerFS ! :D )
In the following I will describe software I found to check (or even
repair) bitrot. If you know others tools which are not in this list, I
would be happy to hear about it, please mail me.
In the following examples, I will use this method to generate bitrot
on a file:
We generate the checksum database, then we alter a file by adding a
“a” at the end of the file and we restore the modification and acess
time of the file. Then, we start the tool to check for data
corruption.
The first touch is only for convenience, we could get the
modification time with stat command and pass the same value to
touch after modification of the file.
bitrot
This is a python script, it’s very easy to use. I will scan a
directory and create a database with the checksum of the files and
their modification date.
Initialization usage:
% cd /home/my_data/
% bitrot
Finished. 199.41 MiB of data read. 0 errors found.
189 entries in the database, 189 new, 0 updated, 0 renamed, 0 missing.
Updating bitrot.sha512... done.
% echo $?
0
Verify usage (case OK):
% cd /home/my_data/
% bitrot
Checking bitrot.db integrity... ok.
Finished. 199.41 MiB of data read. 0 errors found.
189 entries in the database, 0 new, 0 updated, 0 renamed, 0 missing.
% echo $?
0
Exit status is 0, so our data are not damaged.
Verify usage (case Error):
% cd /home/my_data/
% bitrot
Checking bitrot.db integrity... ok.
error: SHA1 mismatch for ./sometextfile.txt: expected 17b4d7bf382057dc3344ea230a595064b579396f, got db4a8d7e27bb9ad02982c0686cab327b146ba80d. Last good hash checked on 2017-03-16 21:04:39.
Finished. 199.41 MiB of data read. 1 errors found.
189 entries in the database, 0 new, 0 updated, 0 renamed, 0 missing.
error: There were 1 errors found.
% echo $?
1
When something is wrong. As the exit status of bitrot isn’t 0 when it
fails, it’s easy to write a script running every day/week/month.
bitrot is available in OpenBSD ports in sysutils/bitrot since 6.1 release.
par2cmdline
This tool works with PAR2 archives (see below for more informations
about what PAR ) and from them, it will be able to check your data
integrity AND repair it.
While it has some pros like being able to repair data, the cons is
that it’s not very easy to use. I would use this one for checking
integrity of long term archives that won’t changes. The main drawback
comes from PAR specifications, the archives are created from a
filelist, if you have a directory with your files and you add new
files, you will need to recompute ALL the PAR archives because the
filelist changed, or create new PAR archives only for the new files,
but that will make the verify process more complicated. That doesn’t
seems suitable to create new archives for every bunchs of files added
in the directory.
PAR2 let you choose the percent of a file you will be able to repair,
by default it will create the archives to be able to repair up to 5%
of each file. That means you don’t need a whole backup for the files
(while it’s would be a bad idea) and only an approximately extra of 5%
of your data to store.
% par2 verify integrity_archive.par2
Loading "integrity_archive.par2".
Loaded 36 new packets
Loading "integrity_archive.vol000+01.par2".
Loaded 1 new packets including 1 recovery blocks
Loading "integrity_archive.vol001+02.par2".
Loaded 2 new packets including 2 recovery blocks
Loading "integrity_archive.vol003+04.par2".
Loaded 4 new packets including 4 recovery blocks
Loading "integrity_archive.vol007+08.par2".
Loaded 8 new packets including 8 recovery blocks
Loading "integrity_archive.vol015+16.par2".
Loaded 16 new packets including 16 recovery blocks
Loading "integrity_archive.vol031+32.par2".
Loaded 32 new packets including 32 recovery blocks
Loading "integrity_archive.vol063+37.par2".
Loaded 37 new packets including 37 recovery blocks
Loading "integrity_archive.par2".
No new packets found
There are 17 recoverable files and 0 other files.
The block size used was 3812 bytes.
There are a total of 2000 data blocks.
The total size of the data files is 7595275 bytes.
Verifying source files:
Target: "my_data/....." - found.
[...cut here...]
Target: "my_data/....." - found.
All files are correct, repair is not required.
% echo $?
0
Verify usage (with error):
par2 verify integrity_archive.par.par2
Loading "integrity_archive.par.par2".
Loaded 36 new packets
Loading "integrity_archive.par.vol000+01.par2".
Loaded 1 new packets including 1 recovery blocks
Loading "integrity_archive.par.vol001+02.par2".
Loaded 2 new packets including 2 recovery blocks
Loading "integrity_archive.par.vol003+04.par2".
Loaded 4 new packets including 4 recovery blocks
Loading "integrity_archive.par.vol007+08.par2".
Loaded 8 new packets including 8 recovery blocks
Loading "integrity_archive.par.vol015+16.par2".
Loaded 16 new packets including 16 recovery blocks
Loading "integrity_archive.par.vol031+32.par2".
Loaded 32 new packets including 32 recovery blocks
Loading "integrity_archive.par.vol063+37.par2".
Loaded 37 new packets including 37 recovery blocks
Loading "integrity_archive.par.par2".
No new packets found
There are 17 recoverable files and 0 other files.
The block size used was 3812 bytes.
There are a total of 2000 data blocks.
The total size of the data files is 7595275 bytes.
Verifying source files:
Target: "my_data/....." - found.
[...cut here...]
Target: "my_data/....." - found.
Target: "my_data/Ebooks/Lovecraft/Quete Onirique de Kadath l'Inconnue.epub" - damaged. Found 95 of 95 data blocks.
Scanning extra files:
Repair is required.
1 file(s) exist but are damaged.
16 file(s) are ok.
You have 2000 out of 2000 data blocks available.
You have 100 recovery blocks available.
Repair is possible.
You have an excess of 100 recovery blocks.
None of the recovery blocks will be used for the repair.
% echo $?
1
Repair usage:
% par2 repair integrity_archive.par.par2
Loading "integrity_archive.par.par2".
Loaded 36 new packets
Loading "integrity_archive.par.vol000+01.par2".
Loaded 1 new packets including 1 recovery blocks
Loading "integrity_archive.par.vol001+02.par2".
Loaded 2 new packets including 2 recovery blocks
Loading "integrity_archive.par.vol003+04.par2".
Loaded 4 new packets including 4 recovery blocks
Loading "integrity_archive.par.vol007+08.par2".
Loaded 8 new packets including 8 recovery blocks
Loading "integrity_archive.par.vol015+16.par2".
Loaded 16 new packets including 16 recovery blocks
Loading "integrity_archive.par.vol031+32.par2".
Loaded 32 new packets including 32 recovery blocks
Loading "integrity_archive.par.vol063+37.par2".
Loaded 37 new packets including 37 recovery blocks
Loading "integrity_archive.par.par2".
No new packets found
There are 17 recoverable files and 0 other files.
The block size used was 3812 bytes.
There are a total of 2000 data blocks.
The total size of the data files is 7595275 bytes.
Verifying source files:
Target: "my_data/....." - found.
[...cut here...]
Target: "my_data/....." - found.
Target: "my_data/Ebooks/Lovecraft/Quete Onirique de Kadath l'Inconnue.epub" - damaged. Found 95 of 95 data blocks.
Scanning extra files:
Repair is required.
1 file(s) exist but are damaged.
16 file(s) are ok.
You have 2000 out of 2000 data blocks available.
You have 100 recovery blocks available.
Repair is possible.
You have an excess of 100 recovery blocks.
None of the recovery blocks will be used for the repair.
Wrote 361069 bytes to disk
Verifying repaired files:
Target: "my_data/Ebooks/Lovecraft/Quete Onirique de Kadath l'Inconnue.epub" - found.
Repair complete.
% echo $?
0
par2cmdline is only one implementation doing the job, others tools
working with PAR archives exists. They should be able to all works
with the same PAR files.
par2cmdline is available in OpenBSD ports in archivers/par2cmdline.
If you find a way to add new files to existing archives, please mail
me.
mtree
One can write a little script using mtree (in base system on
OpenBSD and FreeBSD) which will create a file with the checksum of
every files in the specified directories. If mtree output is different
since last time, we can send a mail with the difference. This is a
process done in base install of OpenBSD for /etc and some others files
to warn you if it changed.
While it’s suited for directories like /etc, in my opinion, this is
not the best tool for doing integrity check.
ZFS
I would like to talk about ZFS and data integrity because this is
where ZFS is very good. If you are using ZFS, you may not need any
other software to take care about your data. When you write a file,
ZFS will also store its checksum as metadata. By default, the option
“checksum” is activated on dataset, but you may want to disable it for
better performance.
There is a command to ask ZFS to check the integrity of the
files. Warning: scrub is very I/O intensive and can takes from hours
to days or even weeks to complete depending on your CPU, disks and the
amount of data to scrub:
# zpool scrub zpool
The scrub command will recompute the checksum of every file on the ZFS
pool, if something is wrong, it will try to repair it if possible. A
repair is possible in the following cases:
If you have multiple disks like raid-Z or raid-1 (mirror), ZFS will be
look on the differents disks if the non corrupted version of the file
exists, if it finds it, it will restore it on the disk(s) where it’s
corrupted.
If you have set the ZFS option “copies” to 2 or 3 (1 = default), that
means that the file is written 2 or 3 time on the disk. Each file of
the dataset will be allocated 2 or 3 time on the disk, so take care if
you want to use it on a dataset containing heavy files ! If ZFS find
thats a version of a file is corrupted, it will check the others
copies of it and tries to restore the corrupted file is possible.
You can see the percentage of filesystem already scrubbed with
zfs status zpool
and the scrub can be stopped with
zfs scrub -s zpool
BTRFS
Like ZFS, BTRFS is able to scrub its data and report bit rot, and repair
it if data is available in another disk.
To start a scrub, run:
btrfs scrub start /
You can check progress using:
btrfs scrub status /
It’s possible to use btrfs scrub cancel / to stop a scrub, and resume
it later with btrfs scrub resume /, however btrfs tries its best to
scrub the data without affecting much the responsiveness of the system.
AIDE
Its name is an acronym for “Advanced Intrusion Detection Environment”,
it’s an complicated software which can be used to check for bitrot. I
would not recommend using it if you only need bitrot detection.
Here is a few hints if you want to use it for checking your file integrity:
/etc/aide.conf
/home/my_data/ R
# Rule definition
All=m+s+i+md5
report_summarize_changes=yes
The config file will create a database of all files in /home/my_data/
(R for recursive). “All” line list the checks we do on each file. For
bitrot checking, we want to check modification time, size, checksum
and inode of the files. The report_summarize_change displays a
list of changes if something is wrong.
This is the most basic config file you can have. Then you will have to
run aide to create the database and then run aide to create a new
database and compare the two databases. It doesn’t update its database
itself, you will have to move the old database and tell it where to
found the older database.
My use case
I have different kind of data. On a side, I have static data like
pictures, clips, music or things that won’t change over time and the
other side I have my mails, documents and folders where the content
changes regularly (creation, deletetion, modification). I am able to
afford a backup for 100% of my data with some history of the backup on
a few days, so I won’t be interested about file repairing.
I want to be warned quickly if a file get corrupted, so I can still
get the backup in my history but I don’t keep every versions of my
files for too long. I choose to go with the python tool bitrot,
it’s very easy to use and it doesn’t become a mess with my folders
getting updated often.
I would go with par2cmdline if I could not be able to backup all my
data. Having 5% or 10% of redundancy of my files should be enough to
restore it in case of corruption without taking too much space.
This is the kind of Port of the week I like. This is a software I just
discovered and fall in love to. The tool r2e which is the port
mail/rss2email on OpenBSD is a small python utility that solves a
problem: how to deal with RSS feeds?
Until last week, I was using a “web app” named selfoss which was
aggregating my RSS feeds and displaying it on a web page, I was able
to filter by read/unread/marked and also filter by source. It is a
good tool that does the job well but I wanted something that doesn’t
rely on a web browser. Here comes r2e !
This simple software will send you a mail for each new entry in your
RSS feeds. It’s really easy to configure and set-up. Just look at how
I configured mine:
Today I encountered an unknown issue to me with my Imap server
dovecot. In roundcube mail web client, my Inbox folder appeared empty
after being reading a mail. My Android mail client K9-Mail was
displaying “IOException:readStringUnti….” when trying to synchronize
this folder.
I solved it easily by connecting to my server with SSH, cd-ing into
the maildir directory and in the Inbox folder, renamed
dovecot.index.log to dovecot.index.log.bak (you can remove it
if it fix the problem).
And now, mails are back. This is the very first time I have a problem
of this kind with dovecot…
Today I just updated my tool cl-yag that
implies a slightly change on my website. Now, on the top of this blog, you can
see a link “Index of articles”. This page only display
articles titles, without any text from the article.
Cl-yag is a tool to generate static website like this one. It’s
written in Common LISP. For reminder, it’s also capable of producing
both html and gopher output now.
Let’s encrypt is a free service which provides free SSL
certificates. It is fully automated and there are a few tools to
generate your certificates with it. In the following lines, I will
just explain how to get a certificate in a few minutes. You can find
more informations on Let’s Encrypt website.
To make it simple, the tool we will use will generate some keys on the
computer, send a request to Let’s Encrypt service which will use http
challenging (there are also dns and another one kind of challenging)
to see if you really own the domain for which you want the
certificate. If the challenge process is ok, you have the certificate.
Please, if you don’t understand the following commands, don’t type
it.
While the following is right for OpenBSD, it may change slightly for
others systems. Acme-client is part of the base system, you can read
the man page acme-client(1).
Prepare your http server
For each certificate you will ask a certificate, you will be
challenged for each domain on the port 80. A file must be available in
a path under “/.well-known/acme-challenge/”.
You must have this in your httpd config file. If you use another
web server, you need to adapt.
server "mydomain.com" {
root "/empty"
listen on * port 80
location "/.well-known/acme-challenge/*" {
root { "/acme/" , request strip 2 }
}
}
The request strip 2 part is IMPORTANT. (I’ve lost 45 minutes figuring
out why root “/acme/” wasn’t working.)
Prepare the folders
As stated in acme-client man page and if you don’t need to change the
path. You can do the following commands with root privileges :
As root, in the acme-client sources folder, type the following the
generate the certificates. The verbose flag is interesting and you
will see if the challenging step work. If it doesn’t work, you should
try manually to get a file like with the same path tried from Let’s
encrypt, and try again the command when you succeed.
Now, you can use your SSL certificates for your mail server, imap
server, ftp server, http server…. There is a little drawback, if you
generate certificates for a lot of domains, they are all written in
the certificate. This implies that if someone visit one page, look at
the certificate, this person will know every domain you have under
SSL. I think that it’s possible to ask every certificate independently
but you will have to play with acme-client flags and make some kind of
scripts to automatize this.
Certificate file is located at /etc/ssl/acme/fullchain.pem and
contains the full certification chain (as its name is explicit). And
the private key is located at /etc/ssl/acme/private/privkey.pem.
If you are using emacs under Microsoft Windows and you want to edit
remote files through SSH, it’s possible to do it without using Cygwin.
Tramp can use the tool “plink” from putty tools to do ssh.
What you need is to get “plink.exe” from the following page and get it
into your $PATH, or choose the installer which will install all putty
tools.
Now, you can edit your remote files, but you will need to type your
password. I think that in order to get password-less with ssh keys,
you would need to use putty key agent.
I have been using mbox format for a few years on my personal mail
server. For those who don’t know what mbox is, it consists of only one
file per folder you have on your mail client, each file containing all
the mails of the corresponding folder. It’s extremely ineficient when
you backup the mail directory because it must copy everything each
time. Also, it reduces the system cache possibility of the server
because if you have folders with lots of mails with attachments, it
may not be cached.
Instead, I switched to maildir, which is a format where every mail is
a regular file on the file system. This takes a lot of inodes but at
least, it’s easier to backup or to deal with it for analysis.
Here how to switch from mbox to maildir with a dovecot tool.
That’s all ! In this case, my mbox folder was ~/mail/ and my INBOX
file was ~/mail/inbox. It tooks me some time to find where my
INBOX really was, at first I tried a few thing that didn’t work and
tried a perl convert tool named mb2md.pl which has been able to
extract some stuff but a lot of mails were broken. So I have been
going back getting dsync working.
If you want to migrate, the whole process looks like:
# service smtpd stop
modify dovecot/conf.d/10-mail.conf, replace the first line
mail_location = mbox:~/mail:INBOX=/var/mail/%u # BEFORE
mail_location = maildir:~/maildir # AFTER
# service dovecot restart
# dsync -u solene mirror mbox:~/mail/:INBOX=~/mail/inbox
# service smtpd start
entr is a command line tool that let you run arbitrary command on
file change. This is useful when you are doing something that requires
some processing when you modify it.
Recently, I have used it to edit a man page. At first, I had to run
mandoc each time I modified to file to check the render. This was the
first time I edited a man page so I had to modify it a lot to get what
I wanted. I remembered about entr and this is how you use it:
$ ls stagit.1 | entr mandoc /_
This simple command will run “mandoc stagit.1” each time stagit.1 is
modified. The file names must be given by stdin to entr, and then use
the characters sequence /_ to replace the names (like {} in find).
The man page of entr is very well documented if you need more
examples.
Since I upgraded to Emacs 25 it was no longer saving my last cursor
position in edited file. This is a feature I really like because I
often fire and close emacs rather than keeping it opened.
Now, unwind on OpenBSD and unbound can support DNS over TLS or DNS
over HTTPS, dnscrypt lost a bit of relevance but it’s still usable
and a good alternative.
Dnscrypt
Today I will talk about net/dnscrypt-proxy. This let you encrypt your
DNS traffic between your resolver and the remote DNS recursive
server. More and more countries and internet provider use DNS to block
some websites, and now they tend to do “man in the middle” with DNS
answers, so you can’t just use a remote DNS you find on the
internet. While a remote dnscrypt DNS server can still be affected by
such “man in the middle” hijack, there is a very little chance DNS
traffic is altered in datacenters / dedicated server hosting.
The article also deal with unbound as a dns cache because dnscrypt is
a bit slow and asking multiple time the same domain in a few minutes
is a waste of cpu/network/time for everyone. So I recommend setting up
a DNS cache on your side (which can also permit to use it on a LAN).
At the time I write this article, their is a very good explanation
about “how to install it” is named dnscrypt-proxy-1.9.5p3 in the
folder /usr/local/share/doc/pkg-readmes/. The following article is
made from this file. (Article updated at the time of OpenBSD 6.3)
While I write for OpenBSD this can be easily adapted to anthing else
Unix-like.
If you use dhcp to get an address, you can use the following line to
force having 127.0.0.1 as nameserver by modifying dhclient config
file. Beware, if you use it, when upgrading the system from bsd.rd,
you will get 127.0.0.1 as your DNS server but no service running.
/etc/dhclient.conf :
supersede domain-name-servers 127.0.0.1;
Unbound
Now, we need to modify unbound config to tell him to ask DNS at
127.0.0.1 port 40. Please adapt your config, I will just add what is
mandatory. Unbound configuration file isn’t in /etc because it’s
chrooted
/var/unbound/etc/unbound.conf:
server:
# this line is MANDATORY
do-not-query-localhost: no
forward-zone:
name: "."
forward-addr: 127.0.0.1@40
# address dnscrypt listen on
If you want to allow other to resolv through your unbound daemon,
please see parameters interface and access-control. You will need to
tell unbound to bind on external interfaces and allow requests on it.
Dnscrypt-proxy
Now we need to configure dnscrypt, pick a server in the following LIST
/usr/local/share/dnscrypt-proxy/dnscrypt-resolvers.csv, the name is
the first column.
As root type the following (or use doas/sudo), in the example we
choose dnscrypt.eu-nl as a DNS provider
# rcctl enable dnscrypt_proxy
# rcctl set dnscrypt_proxy flags -E -m1 -R dnscrypt.eu-nl -a 127.0.0.1:40
# rcctl start dnscrypt_proxy
Conclusion
You should be able to resolv address through dnscrypt now. You can use
tcpdump on your external interface to see if you see something on udp
port 53, you should not see traffic there.
If you want to use dig hostname -p 40 @127.0.0.1 to make DNS request
to dnscrypt without unbound, you will need net/isc-bind which will
provide /usr/local/bin/dig. OpenBSD base dig can’t use a port
different than 53.
Here is an how-to in order to make a git repository available for
cloning through a simple http server. This method only allow people to
fetch the repository, not to push. I wanted to set-up this to get my
code, I don’t plan to have any commit on it from other people at this
time so it’s enough.
Today I will present misc/rlwrap which is an utility tool when you
use some command-line software which doesn’t provide you a nice
readline input. By using rlwrap, you will be able to use telnet, a
language REPL or any command-line tool where you input text with an
history of what you type, ability to use emacs bindings like C-a C-e
M-Ret etc… I use it often with telnet or sbcl.
Here is a tiny code to get a connection to an SSL/TLS server. I am
writing an IRC client and an IRC bot too and it’s better to connect
through a secure channel.
If you have an android Phone, here are two things you may like:
Org-mode <=> Android
First is the MobileOrg app to synchronize your calendar/tasks
between your computer org-mode files and your phone. I am using
org-mode since a few months, I think I do pretty basics things with it
like having a todo list with a deadline for each item. Having it in my
phone calendar is a good enhancement. I can also add todo items from
my phone to show it on my computer.
The phone and your computer get synced by publishing a special format
of org files for the mobile on a remote server. Mobile Org supports
ssh, webdav, dropbox or sdcard. I’m using ssh because I own a server
and I can reliabily have my things connected together there on a
dedicated account. Emacs will then use tramp to publish/retrieve the
files.
Second useful thing I like with my android phone is being able to
write and send sms (+ some others things but I was most interested by
SMS) from my computer. A few services already exists but they work
with “cloud” logic and I don’t want my phone to be connected to one
more service. The MAXS app provides me what I need : ability to
read/write the sms of my phone from the computer without web
browser and relying on my own services. MAXS connects the phone to a
XMPP account and you set a whitelist of XMPP mails able to send
commands, that’s all. Here are a few examples of use:
To write a SMS I just need to speak to the jabber account of my phone
and write
sms send firstname lastname hello how are you ?
Be careful, there are 2 spaces after the lastname ! I think it’s like
this so MAXS can make easily the difference between the name and the
message.
I can also reply quickly to the last contacted person
reply to Yes I'm answering from my computer
To read the last n sms
sms read n
It’s still not perfect because sometimes it lose connectivity and you
can’t speak with it anymore but from the project author it’s not a
problem seen on every phone. I did not have the time yet to report
exactly the problem (I need to play with Android Debug Bridge for
that). If you want to install MAXS, you will need a few app from the
store to get it working. First, you will need MAXS main and MAXS
transport (a plugin to use XMPP) and then plugins for the differents
commands you want, so, maybe, smsread and smswrite. Check their
website for more informations.
As presenter earlier on my website, I use profanity as XMPP
client. It’s a light and easy to configure/use console client.
If you want to kill a process by its name instead of its PID number,
which is easier if you have to kill processes from the same binary,
here are the commands depending of your operating system:
FreeBSD / Linux
$ killall pid_name
OpenBSD
$ pkill pid_name
Solaris
Be careful with Solaris killall. With no argument, the command will
send a signal to every active process, which is not something you
want.
At work I have the sound of my laptop not muted because I need sound
from time to time. But browsing the internet with Firefox can sometime
trigger some undesired sound, very boring in the office. There is the
extension Mute Tab to auto-mute a new tab on Firefox so it won’t
play sound. The auto-mute must be activated in the plugin options,
it’s un-checked by default.
I will talk about security/pwgen for the current port of the
week. It’s a very light executable to generate passwords. But it’s not
just a dumb password generator, it has options to choose what kind of
password you want.
Here is a list of options with their flag, you will find a lot more in
the nice man page of pwgen:
-A : don’t use capital letters
-B : don’t use characters which could be missread (O/0, I/l/1 …)
-v : don’t use vowels
etc…
You can also use a seed to generate your “random” password (which
aren’t very random in this case), you may need it for some reason to
be able to reproduce password you lost for a ftp/http access for
example.
Example of pwgen output generating 5 password of 10 characters. Using
-1 parameter so it will only display one password per line, otherwise
it display a grid (on column and multiple lines) of passwords.
My website is now available with Gopher protocol ! I really like this
protocol. If you don’t know it, I encourage you reading this page :
Why is Gopher still relevant?.
This has been made possible by modifying the tool generating the
website pages to make it generating gopher compatible pages. This was
a bit of work but I am now proud to have it working.
I have also made a “big” change into the generator, it now rely on a
“markdown-to-html” tool which sadden me a bit. Before that, I was
using ham-mode in emacs which was converting html on the fly to
markdown so I can edit in markdown, and was exporting into html on
save. This had pros and cons. Nothing more than a lisp interpreter was
needed on the system generating the files, but I was sometimes
struggling with ham-mode because the conversion was
destructive. Multiple editing in a row of the same file was breaking
code blocks, because it wasn’t exported the same way each time until
it wasn’t a code block anymore. There are some articles that I update
sometimes to keep it up-to-date or fix an error in it, and it was
boring to fix the code everytime. Having the original markdown text
was mandatory for gopher export, and is now easier to edit with any
tool.
There is a link to my gopher site on the right of this page. You will
need a gopher client to connect to it. There is an android client
working, also Firefox can have an extension to become compatible
(gopher support was native before it have been dropped). You can find
a list of clients on
Wikipedia.
If you ever need to modify the tags of your music library (made of
MP3s) I would recommend you audio/puddletag. This tool will let
you see all your music metadata like a spreadsheet and just modify the
cells to change the artist name, title etc… You can also select
multiple cells and type one text and it will be applied on all the
selected cells. There is also a tool to extract data from the filename
with a regex. This tool is very easy and pleasant to use.
There is an option in the configuration panel that is good to be aware
of, by default, when you change the tag of a file, the modification
time isn’t changed, so if you use some kind of backup relying on the
modification time it won’t be synchronized. In the configuration
panel, you will find an option to check which will bump the
modification timestamp when you change a tag on a song.
Profanity is a command-line ncurses based XMPP (Jabber) client. It's easy to use and seem inspired from irssi for the interface. It's available on OpenBSD as a package named "profanity".
It's really easy to use and the documentation on its website is really clear. It supports all main XMPP features including OMEMO / OTR / GPG for end-to-end encryption.
When you use google search and you click on a link, you a redirected
on a google server that will take care of saving your navigation
choice from their search engine into their database.
This is bad for your privacy
This slow the process of using the search engine because you have a
redirection (that you don’t see) when you want to visit a link
There is a firefox extension that will fix the links in the results of
the search engine so when you click, you just go on the website
without saying “hello Google I clicked there”:
Google Search Link Fix
You can also use another web engine if you don’t like Google. I keep
it because I have best results when searching technical. I tried to
use Yahoo, Bing, Exalead, Qwant, Duck duck go, each one for a few days
and Google has the bests results so far.
OpenSCAD is a software for creating 3D objects like a programming
language, with the possibility to preview your creation.
I am personaly interested in 3D things, I have been playing with 3ds
Max and Blender for creating 3d objects but I never felt really
comfortable with them. I discovered pov-ray a few years ago which is
used to create rendered pictures instead of creating objects. Pov-ray
use its own “programming language” to describe the scene and make the
render. Now, I have a 3D printer and I would like to create things to
print, but I don’t like the GUI stuff of Blender and Pov-ray don’t
create objects, so… OpenSCAD ! This is the pov-ray of objects !
Here is a simple example that create an empty box (difference of 2
cubes) and a screw propeller:
The following picture is made from the code above:
openscad
There are scad-mode and scad-preview for emacs for editing OpenSCAD
files. scad-mode will check the coloration/syntax and scad-preview
will create the OpenScad render inside a Emacs pane. Personaly, I use
OpenSCAD opened in some corner of the screen with option set to
render on file change, and I edit with emacs. Of course you can use
any editor, or the embedded editor which is a Scintilla one which is
pretty usable.
Today the Port of the week is x11/arandr, it’s a very simple tool
to set-up your screen display when using multiple monitors. It’s very
handy when you want to make something complicated or don’t want to use
xrandr in command line. There is not much to say because it’s very
easy to use!
It can generates your current configuration as a script that you will find
under the ~/.screenlayout/ repertory. This is quite useful to configure your
screens from your ~/.xsession file in case a monitor is connected.
Port of the week is now presenting you x2x which stands for X to
X connection. This is a really tiny tool in one executable file that
let you move your mouse and use your keyboard on another X server than
yours. It’s like the other tool synergy but easier to use and
open-source (I think synergy isn’t open source anymore).
If you want to use the computer on your left, just use the following
command (x2x must be installed on it and ssh available)
$ ssh -CX the_host_address "x2x -west -to :0.0"
and then you can move your cursor to the left of your screen and you
will see that you can use your cursor or type with the keyboard on
your other computer ! I am using it to manage a wall of screen made of
raspberry Pi first generation. I used to connect to it with VNC but it
was very very slow.
Here is my git cheat sheet ! Because I don’t like git I never remember
how to do X or Y with it so I need to write down simple commands ! (I
am used to darcs and mercurial but with the “git trend” I need to
learn it and use it).
I switched to mu4e to manage my mails at work, and also to send
mails. But in our corporation we all have a signature that include our
logo and some hypertext links, so I couldn’t just insert my signature
and be done with that. There is a simple way to deal with this
problem, I fetched the html part of my signature (which include an
image in base64) and pasted it into my emacs config file this way.
(setq mu4e-compose-signature
"<#part type=text/html><html><body><p>Hello ! I am the html signature which can contains anything in html !</p></body></html><#/part>" )
I pasted my signature instead of the hello world text of course, but
you only have to use the part tag and you are done ! The rest of your
mails will be plain text, except this part.
I want to talk about stumpwm, a window manager written in Common
LISP. I think one must at least like emacs to like stumpwm. Stumpwm is
a tiling window manager one which you create “panes” on the screen
like windows on Emacs. A single pane takes 100% of the screen, then
you can split it into 2 panes vertically or horizontally and resize
it, and you can split again and again. There is no “automatic”
tiling. By default, if you have ONE pane, you will only have ONE
window displayed, this is a bit different that others tiling wm I had
tried. Also, virtual desktops are named groups, nothing special here,
you can create/delete groups and rename it. Finally, stumpwm is not
minimalistic.
To install it, you need to get the sources of stumpwm, install a
common lisp interpreter (sbcl, clisp, ecl etc…), install quicklisp
(which is not in packages), install the quicklisp packages cl-ppcre
and clx and then you can compile stumpwm, that will produce a huge
binary which embedded a common lisp interpreter (that’s a way to share
common lisp executables, the interpreter can create an executable from
itself and include the files you want to execute). I would like to
make a package for OpenBSD but packaging quicklisp and its packages
seems too difficult for me at the moment.
This Port of the week is a bit special because sadly, the port isn’t
available on OpenBSD. The port is mbuffer (which you can find in
misc/mbuffer).
I discovered it while looking for a way to enhance one of my network
stream scripts. I have some scripts that get a dump of a postgresql
base through SSH, copy it from stdin to a file with tee and send it
out to the local postgres, the command line looks like
I also use the same kind of command to receive a ZFS snapshot from
another server.
But there is an issue, the end server is relatively slow, postgresql
and ZFS will eat lot of data from stdin and then it will stop for
sometimes writing on the disk, when they are ready to take new data,
it’s slow to fill them. This is where mbuffer takes places. This
tool permit to add a buffer that will take data from stdin and fill
its memory (that you set on the command line), so when the slowest
part of the command is ready to take data, mbuffer will empty its
memory into the pipe, so the slowlest command isn’t waiting to get
filled before working again.
The new command looks like that for a buffer of 300 Mb
I had a problem with my 3 latests R430 Dell server which all have a
PERC H730P Mini raid controller. The installer could barely works and
slowly, and 2 servers were booting and crashing with FS corruption
while the latest just didn’t boot and the raid was cleared.
It is a problem with a driver of the raid controller. I don’t
understand exatly the problem but I found a fix.
From man page mfi(4)
A tunable is provided to adjust the mfi driver's behaviour when attaching
to a card. By default the driver will attach to all known cards with
high probe priority. If the tunable hw.mfi.mrsas_enable is set to 1,
then the driver will reduce its probe priority to allow mrsas to attach
to the card instead of mfi.
In order to install the system, you have to set
hw.mfi.mrsas_enable=1 on the install media, and set this on the
installed system before booting it.
There are two ways for that:
if you use a usb media, you can mount it and edit /boot/loader.conf
and add hw.mfi.mrsas_enable=1
at the boot screen with the logo freebsd, choose 3) Espace to boot
prompt, type set hw.mfi.mrsas_enable=1 and boot
You will have to edit /boot/loader.conf to add the line on the
installed system from the live system of the installer.
I have been struggling a long before understanding the problem. I hope
this message could save time to somebody else.
This week we will have a quick look at the tool rdesktop. Rdesktop
is a RDP client (RDP stands for Remote Desktop Protocol) which is used
to share your desktop with another machine. RDP is a Microsoft thing
and it’s most used on Windows.
I am personally using it because sometimes I need to use Microsoft
Word/Excel or Windows only software and I have a dedidated virtual
machine for this. So I use rdesktop to connect in fullscreen to
the virtual machine and I can work on Windows. The RDP protocol is
very efficient, on LAN network there is no lag. I appreciate much more
using the VM with RDP than VNC.
You can also have RDP servers within virtual machines. VirtualBox let
you have (with an additional package to add on the host) RDP server
for a VM. Maybe VmWare provides RDP servers too. I know that Xen and
KVM can give access through VNC or Spice but no RDP.
For its usage, if you want to connect to a RDP server whose IP address
is 192.168.1.100 in fullscreen with max quality, type:
$ rdesktop -f -x 0x80 192.168.1.100
The -x 0x80 bit is needed to set the quality at maximum. If the
machine needs username and password you can add -u my_user -p
my_plaintext_pass to login automatically. I have an alias in my zsh
shell, I just type “windows” and I get logged in in fullscreen to the
windows machine.
To exit fullscreen type ctrl+alt+return to switch to windowed mode
and again to go in fullscreen mode. I wasn’t able to remember the
keyboard shortcut the first times and was stuck in Windows ! ;-)
I have not found any answer about this so I share my fixed. I wanted
to use mbsync with one IMAP server and encountered the following
error.
IMAP command 'AUTHENTICATE DIGEST-MD5' returned an error: NO Authentication failed
A fix is to add the following to your ~/.mbsyncrc IMAPAccount
declaration.
AuthMechs LOGIN
Using LOGIN instead of DIGEST-MD5 is still secure if you have an
encrypted connection (IMAPS or STARTTLS). The login will be given
plaintext inside the connection.
I am using FreeBSD in virtual machines and sometimes I need to
increase the disk capacity of the storage. From your VM Host, increase
the capacity of the storage backend, then on the FreeBSD system (10.3
when writing), you should see this in the last line of dmesg.
GEOM_PART: vtbd0 was automatically resized.
Use `gpart commit vtbd0` to save changes or `gpart undo vtbd0` to revert them.
The process is a bit harder here because I have my partition swap at
the end of the storage, so if I want to increase the size of the ufs
partition, I will need to remove the swap partition, increase the data
partition and recreate the swap. This is not that hard but having the
freebsd-ufs partition at the end would have been easier.
swapoff the device : swapoff /dev/vtbd0p3
delete the swap partition : gpart delete -i 3 vtbd0
resize the freebsd-ufs partition : gpart resize -i 2 -a 4k -s 156G vtbd0
create the swap : gpart add -t freebsd-swap -a 4k vtbd0
swapon : swapon /dev/vtbd0p3
tell UFS to resize : growfs /
If freebsd-ufs was the latest in the gpart order, only steps 3 and 6
would have been necessary.
You have a git repository where you work in, and you would like to
work on a clone of it and push the data back to it ? You may encounter
issues if your git repository isn’t a bare one. I have been facing
this problem by using gitit, which works with a non-bare git
repository.
What is a bare git repository ?
Here is how to create a bare repository and what it looks like.
$ git init --bare repo
$ ls -a repo/
. HEAD config hooks objects
.. branches description info refs
You can’t work in this, but this is the kind of repository that should
be used to store/push/clone etc..
What is a non-bare git repository ?
Here is how to create a non-bare repository and what it looks like.
$ git init repo2
$ ls -a repo2
. .. .git
You may use this one for local use, but you may want to clone it
later, and work with this repository and doing push/pull. That’s how
gitit works, it has a folder “wikidata” that should be initiated as
git, and it will works locally. But if you want to clone it on your
computer, work on the documentation and then push your changes to
gitit, you may get this error when pushing :
Problem when pushing
I cloned the repository, made changes, committed and now I want to
push, but no…
Décompte des objets: 3, fait.
Écriture des objets: 100% (3/3), 232 bytes | 0 bytes/s, fait.
Total 3 (delta 0), reused 0 (delta 0)
remote: error: refusing to update checked out branch: refs/heads/master
remote: error: By default, updating the current branch in a non-bare repository
remote: error: is denied, because it will make the index and work tree inconsistent
remote: error: with what you pushed, and will require 'git reset --hard' to match
remote: error: the work tree to HEAD.
remote: error:
remote: error: You can set 'receive.denyCurrentBranch' configuration variable to
remote: error: 'ignore' or 'warn' in the remote repository to allow pushing into
remote: error: its current branch; however, this is not recommended unless you
remote: error: arranged to update its work tree to match what you pushed in some
remote: error: other way.
remote: error:
remote: error: To squelch this message and still keep the default behaviour, set
remote: error: 'receive.denyCurrentBranch' configuration variable to 'refuse'.
! [remote rejected] master -> master (branch is currently checked out)
git is unhappy, I can’t push
Solution
You can fix this “problem” by changing a config in the server
repository with this command :
This week I will talk about the command line image viewer
sxiv. While it’s a command line tool, of course it spawn a X
window to display the pictures. It’s very light and easy of use,
it’s my favorite image viewer.
Quick start: (you should read the man page for more informations)
sxiv file1 file2… : Sxiv open only files given as
parameter or filenames from stdin
p/n : previous/next
f : fullscreen
12 G : go to 12th image of the list
Return : switch to the thumbnails mode / select the image from the thumbnails mode
q : quit
a lot more in the well written man page !
For power users who have a LOT of pictures to sort: Sxiv has a nice
function that let you mark images you see and dump the list of
marked images in a file (see parameter -o).
Tip for zsh users, if you want to read every jpg files in a tree, you
can use sxiv **/*.jpg globbing as seen in the Zsh cheat sheet
I am starting a periodic posting for something I wanted to do since a
long time. Take a port in the tree and introduce it quickly. There are
tons of ports in the tree that we don’t know about. So, I will write
frequently about ports that I use frequently and that I find useful,
if you read this, maybe I will find a new tool to your collection of
“useful program”. :-)
For a first one, I would like to present net/bwm-ng. Its name
stands for “BandWitch Monitor next-generation”, it allows the user
to watch in real-time the bandwith usage of the different network
interfaces. By default, it will update the display every 0.5
second. You can change the frequency of updating by pressing keys ‘+’
and ‘-’.
Let see the bindings of the interactive mode :
‘t’ will cycle between current rate, maximum peak, sum, average
on 30 seconds.
‘n’ will cycle between data sources, on OpenBSD it defaults to
“getifaddrs” and you can also choose “sysctl” or “netstat -i”.
‘d’ will change the unit, by default it shows KB but you can
change to another units that suits better your current data.
Summary output after downloading a file
bwm-ng v0.6.1 (probing every 5.700s), press 'h' for help
input: getifaddrs type: sum
- iface Rx Tx Total
==============================================================================
lo0: 0.00 B 0.00 B 0.00 B
em0: 19.89 MB 662.82 KB 20.54 MB
pflog0: 0.00 B 0.00 B 0.00 B
------------------------------------------------------------------------------
total: 19.89 MB 662.82 KB 20.54 MB
I may add new things in the future, as they come for me, if I find new
features useful.
How to repeat a command n time
repeat 5 curl http://localhost/counter_add.php
How to expand recursively
If you want to find every file ending by .lisp in the folder and
subfolder you can use the following syntax. Using ****** inside a
pattern while do a recursive globbing.
ls **/*.lisp
Work with temp files
If you want to work on some command outputs without having to manage
temporary files, zsh can do it for you with the following syntax:
=(command that produces stdout).
In the example we will use emacs to open the list of the files in our
personal folder.
emacs =(find ~ -type f)
This syntax will produce a temp file that will be removed when emacs
exits.
My ~/.zshrc
here is my ~/.zshrc, very simple (I didn’t pasted the aliases I have),
I have a 1000 lines history that skips duplicates.
Here is a dump of my emacs config file. That may be useful for some
emacs users who begin.
If you doesn’t want to have your_filename.txt~ files with a tilde at
the end (this is a default backup file), add this
; I don't want to have backup files everywhere with filename~ name
(setq backup-inhibited t)
(setq auto-save-default nil)
To have parenthesis highlighting on match, which is very useful, you
will need this
; show match parenthesis
(show-paren-mode 1)
I really like this one. It will save the cursor position in every file
you edit. When you edit it again, you start exactly where you leaved
the last time.
; keep the position of the cursor after editing
(setq save-place-file "~/.emacs.d/saveplace")
(setq-default save-place t)
(require 'saveplace)`
If you write in utf-8 (which is very common now) you should add this.
; utf8
(prefer-coding-system 'utf-8)
Emacs modes are used depending on the extension of a file. Sometime
you need to edit files with a custom extension but you want to use a
mode for it. So, you just need to add some line like this to get your
mode automatically when you load the file.
If one day under FreeBSD (from 10 to 13 at least) you have a system
with multiple IP addresses on the same network and you need to use
a specific IP for a route, you have to use the -ifa parameter in
the route command.
In our example, we have to use the address 192.168.1.140 to access
the network 192.168.30.0 through the router 192.168.1.1, this
is as easy as the following.