About me: My name is Solène Rapenne, pronouns she/her. I like learning and
sharing knowledge. Hobbies: '(Qubes OS BSD OpenBSD Lisp cmdline gaming security QubesOS internet-stuff). I
love percent and lambda characters. Qubes OS core team member, former OpenBSD developer solene@. No AI is involved in this blog.
Contact me: solene at dataswamp dot org or
@solene@bsd.network (mastodon).
This blog post is a republication of the article I published on my employer's blog under CC BY 4.0. I'm grateful to be allowed to publish NixOS related content there, but also to be able to reuse it here!
This guide explains how to install NixOS on a computer, with a twist.
If you use the same computer in different contexts, let's say for work and for your private life, you may wish to install two different operating systems to protect your private life data from mistakes or hacks from your work. For instance a cryptolocker you got from a compromised work email won't lock out your family photos.
But then you have two different operating systems to manage, and you may consider that it's not worth the effort and simply use the same operating system for your private life and for work, at the cost of the security you desired.
I offer you a third alternative, a single NixOS managing two securely separated contexts. You choose your context at boot time, and you can configure both context from either of them.
You can safely use the same machine at work with your home directory and confidential documents, and you can get into your personal context with your private data by doing a reboot. Compared to a dual boot system, you have the benefits of a single system to manage and no duplicated package.
For this guide, you need a system either physical or virtual that is supported by NixOS, and some knowledge like using a command line. You don't necessarily need to understand all the commands. The system disk will be erased during the process.
You can find an example of NixOS configuration files to help you understand the structure of the setup on the following GitHub repository:
We will create a 512 MB space for the /boot partition that will contain the kernels, and allocate the space left for an LVM partition we can split later.
We will use LVM so we need to initialize the partition and create a Volume Group with all the free space.
pvcreate /dev/sda2
vgcreate pool /dev/sda2
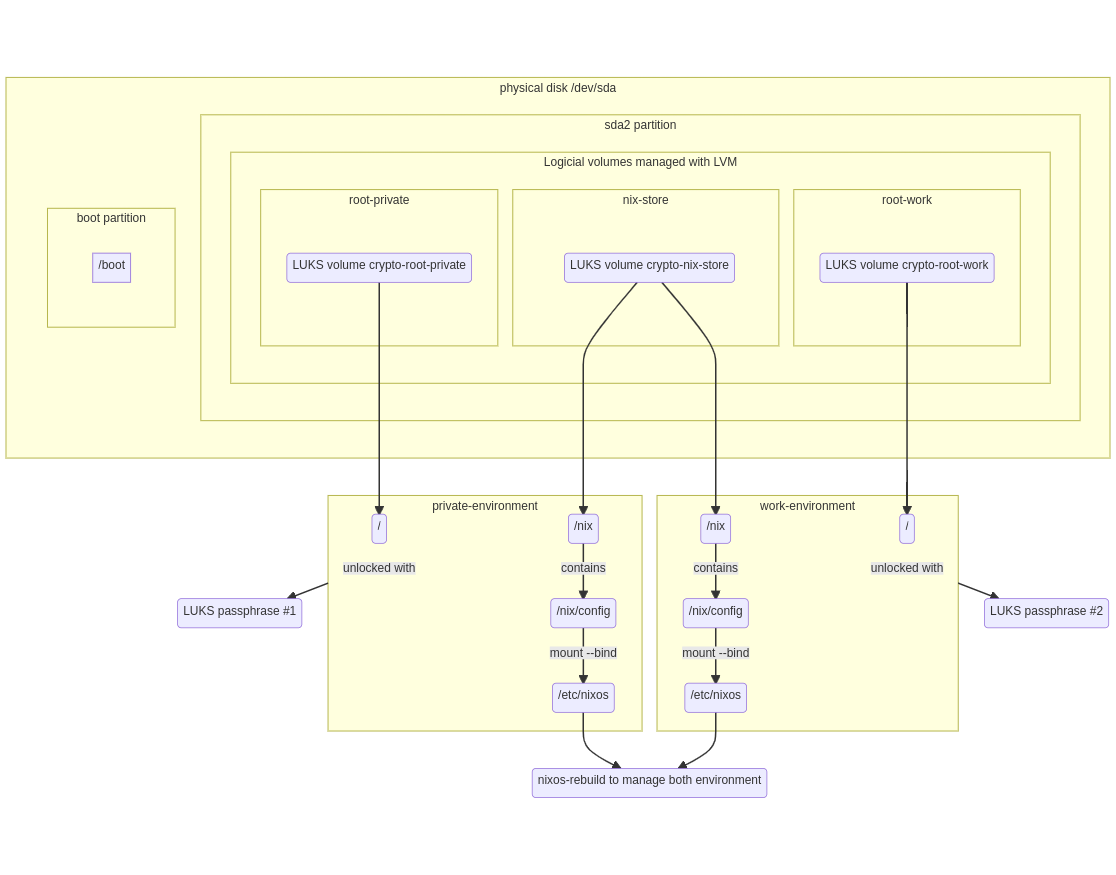
We will then create three logical volumes, one for the store and two for our environments:
lvcreate -L 15G -n root-private pool
lvcreate -L 15G -n root-work pool
lvcreate -l 100%FREE -n nix-store pool
NOTE: The sizes to assign to each volume is up to you, the nix store should have at least 30GB for a system with graphical sessions. LVM allows you to keep free space in your volume group so you can increase your volumes size later when needed.
We will enable encryption for the three volumes, but we want the nix-store partition to be unlockable with either of the keys used for the two root partitions. This way, you don't have to type two passphrases at boot.
cryptsetup luksFormat /dev/pool/root-work
cryptsetup luksFormat /dev/pool/root-private
cryptsetup luksFormat /dev/pool/nix-store # same password as work
cryptsetup luksAddKey /dev/pool/nix-store # same password as private
We unlock our partitions to be able to format and mount them. Which passphrase is used to unlock the nix-store doesn't matter.
Please note we don't encrypt the boot partition, which is the default on most encrypted Linux setup. While this could be achieved, this adds complexity that I don't want to cover in this guide.
Note: the nix-store partition isn't called crypto-nix-store because we want the nix-store partition to be unlocked after the root partition to reuse the password. The code generating the ramdisk takes the unlocked partitions' names in alphabetical order, by removing the prefix crypto the partition will always be after the root partitions.
We format each partition using ext4, a performant file-system which doesn't require maintenance. You can use other filesystems, like xfs or btrfs, if you need features specific to them.
The boot partition should be formatted using fat32 when using UEFI with mkfs.fat -F 32 /dev/sda1. It can be formatted in ext4 if you are using legacy boot (MBR).
Mount the partitions onto /mnt and its subdirectories to prepare for the installer.
mount /dev/mapper/crypto-work /mnt
mkdir -p /mnt/etc/nixos /mnt/boot /mnt/nix
mount /dev/mapper/nix-store /mnt/nix
mkdir /mnt/nix/config
mount --bind /mnt/nix/config /mnt/etc/nixos
mount /dev/sda1 /mnt/boot
We generate a configuration file:
nixos-generate-config --root /mnt
Edit /mnt/etc/nixos/hardware-configuration.nix to change the following parts:
We need two configuration files to describe our two environments, we will use hardware-configuration.nix as a template and apply changes to it.
sed '/imports =/,+3d' /mnt/etc/nixos/hardware-configuration.nix > /mnt/etc/nixos/work.nix
sed '/imports =/,+3d ; s/-work/-private/g' /mnt/etc/nixos/hardware-configuration.nix > /mnt/etc/nixos/private.nix
rm /mnt/etc/nixos/hardware-configuration.nix
Edit /mnt/etc/nixos/configuration.nix to make the imports code at the top of the file look like this:
imports =
  [
    ./work.nix
    ./private.nix
  ];
Remember we removed the file /mnt/etc/nixos/hardware-configuration.nix so it shouldn't be imported anymore.
Now we need to hook each configuration to become a different boot entry, using the NixOS feature called specialisation. We will make the environment you want to be the default in the boot entry as a non-specialised environment and non-inherited so it's not picked up by the other, and a specialisation for the other environment.
For the hardware configuration files, we need to wrap them with some code to create a specialisation, and the "non-specialisation" case that won't propagate to the other specialisations.
Starting from a file looking like this, some code must be added at the top and bottom of the files depending on if you want it to be the default context or not.
It's now the time to configure your system as you want. The file /mnt/etc/nixos/configuration.nix contains shared configuration, this is the right place to define your user, shared packages, network and services.
The files /mnt/etc/nixos/private.nix and /mnt/etc/nixos/work.nix can be used to define context specific configuration.
During the numerous installation tests I've made to validate this guide, on some hardware I noticed an issue with LVM detection, add this line to your global configuration file to be sure your disks will be detected at boot.
The partitions are mounted and you configured your system as you want it, we can run the NixOS installer.
nixos-install
Wait for the copy process to complete after which you will be prompted for the root password of the current crypto-work environment (or the one you mounted here), you also need to define the password for your user now by chrooting into your NixOS system.
# nixos-enter --root /mnt -c "passwd your_user"
New password:
Retape new password:
passwd: password updated successfully
# umount -R /mnt
From now, you have a password set for root and your user for the crypto-work environment, but no password are defined in the crypto-private environment.
We will rerun the installation process with the other environment mounted:
mount /dev/mapper/crypto-private  /mnt
mkdir -p /mnt/etc/nixos /mnt/boot /mnt/nix

mount /dev/mapper/nix-store /mnt/nix
mount --bind /mnt/nix/config /mnt/etc/nixos
mount /dev/sda1 /mnt/boot
As the NixOS configuration is already done and is shared between the two environments, just run nixos-install, wait for the root password to be prompted, apply the same chroot sequence to set a password to your user in this environment.
You can reboot, you will have a default boot entry for the default chosen environment, and the other environment boot entry, both requiring their own passphrase to be used.
Now, you can apply changes to your NixOS system using nixos-rebuild from both work and private environments.
Congratulations for going through this long installation process. You can now log in to your two contexts and use them independently, and you can configure them by applying changes to the corresponding files in /etc/nixos/.
With this setup, I chose to not cover swap space because this would allow to leak secrets between the contexts. If you need some swap, you will have to create a file on the root partition of your current context, and add the according code to the context filesystems.
If you want to use hibernation in which the system stops after dumping its memory into the swap file, your swap size must be larger than the memory available on the system.
It's possible to have a single swap for both contexts by using a random encryption at boot for the swap space, but this breaks hibernation as you can't unlock the swap to resume the system.
As you noticed, you had to run passwd in both contexts to define your user password and root's password. It is possible to define their password declaratively in the configuration file, refers to the documentation ofusers.mutableUsers and users.extraUsers.<name>.initialHashedPassword
If something is wrong when you boot the first time, you can reuse the installer to make changes to your installation: you can run again the cryptsetup luksOpen and mount commands to get access to your filesystems, then you can edit your configuration files and run